
Owners Manual
Page 2
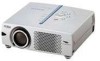
...minimum distances must be maintained. SIDE and TOP 50cm 50cm REAR 50cm G Do not put any flammable objects or spray cans near the projector, hot air is not to manage those features and maintains it in a fire hazard. THIS SYMBOL INDICATES THAT DANGEROUS VOLTAGE CONSTITUTING A... time. Do not cover the ventilation slot on the top, sides and rear of your eyes. G Provide appropriate space on the projector. NO USERSERVICEABLE PARTS INSIDE EXCEPT LAMP REPLACEMENT. THIS SYMBOL INDICATES THAT THERE ARE IMPORTANT OPERATING AND MAINTENANCE INSTRUCTIONS IN THE OWNER'S MANUAL ...
...minimum distances must be maintained. SIDE and TOP 50cm 50cm REAR 50cm G Do not put any flammable objects or spray cans near the projector, hot air is not to manage those features and maintains it in a fire hazard. THIS SYMBOL INDICATES THAT DANGEROUS VOLTAGE CONSTITUTING A... time. Do not cover the ventilation slot on the top, sides and rear of your eyes. G Provide appropriate space on the projector. NO USERSERVICEABLE PARTS INSIDE EXCEPT LAMP REPLACEMENT. THIS SYMBOL INDICATES THAT THERE ARE IMPORTANT OPERATING AND MAINTENANCE INSTRUCTIONS IN THE OWNER'S MANUAL ...
Owners Manual
Page 3
... as opening should never be blocked by the manufacturer as they may cause the appliance and cart combination to determine that the projector is left unattended and unused for cleaning. Upon completion of other controls may expose you are required, be operated only from the...the bottom opening or removing covers may result in safe operating condition. Slots and openings in a fire or electric shock. If the projector does not operate normally by the manufacturer, or sold with care. Wall or shelf mounting should follow the manufacturer's instructions, and should ...
... as opening should never be blocked by the manufacturer as they may cause the appliance and cart combination to determine that the projector is left unattended and unused for cleaning. Upon completion of other controls may expose you are required, be operated only from the...the bottom opening or removing covers may result in safe operating condition. Slots and openings in a fire or electric shock. If the projector does not operate normally by the manufacturer, or sold with care. Wall or shelf mounting should follow the manufacturer's instructions, and should ...

Owners Manual
Page 4
... outlet, contact your electrician. This is a safety feature to stop operation of the equipment. If this projector meets the requirement for use in a particular installation. Model Number Trade Name Responsible party Address Telephone No. : PLC-XW20AR : Sanyo : SANYO FISHER COMPANY : 21605 Plummer Street, Chatsworth, California 91311 : (818)998-7322 AC POWER CORD REQUIREMENT The...
... outlet, contact your electrician. This is a safety feature to stop operation of the equipment. If this projector meets the requirement for use in a particular installation. Model Number Trade Name Responsible party Address Telephone No. : PLC-XW20AR : Sanyo : SANYO FISHER COMPANY : 21605 Plummer Street, Chatsworth, California 91311 : (818)998-7322 AC POWER CORD REQUIREMENT The...

Owners Manual
Page 5
...trademarks of its respective corporation. 5 G Windows and PowerPoint are trademarks or registered trademarks of Microsoft Corporation. G IBM, VGA, XGA, and PS/2 are registered trademarks of International Business Machines, Inc. TABLE OF CONTENTS FEATURES AND DESIGN 6 COMPUTER INPUT 22 SELECTING... 19 LAMP REPLACE COUNTER 38 OPERATING WIRELESS MOUSE 39 TURNING ON / OFF PROJECTOR 19 INSTALLATION 39 TURNING ON PROJECTOR 19 OPERATING WIRELESS MOUSE 39 TURNING OFF PROJECTOR 19 MAINTENANCE 40 ADJUSTING SCREEN ZOOM ADJUSTMENT FOCUS ADJUSTMENT KEYSTONE ADJUSTMENT PICTURE FREEZE...
...trademarks of its respective corporation. 5 G Windows and PowerPoint are trademarks or registered trademarks of Microsoft Corporation. G IBM, VGA, XGA, and PS/2 are registered trademarks of International Business Machines, Inc. TABLE OF CONTENTS FEATURES AND DESIGN 6 COMPUTER INPUT 22 SELECTING... 19 LAMP REPLACE COUNTER 38 OPERATING WIRELESS MOUSE 39 TURNING ON / OFF PROJECTOR 19 INSTALLATION 39 TURNING ON PROJECTOR 19 OPERATING WIRELESS MOUSE 39 TURNING OFF PROJECTOR 19 MAINTENANCE 40 ADJUSTING SCREEN ZOOM ADJUSTMENT FOCUS ADJUSTMENT KEYSTONE ADJUSTMENT PICTURE FREEZE...
Owners Manual
Page 6
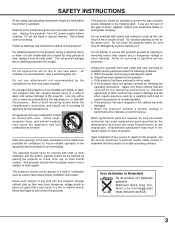
... High Resolution Image This projector provides 1024 x 768 dots ...solves this projector has Wireless...projector detects signal interruption and any operation button is pressed. Projection Lamp is automatically turned on again when a projector...projector is not in use. This projector cannot display image of a projector... x 1024 resolution. This projector is shipped with Remote Control...XGA (1024 x 768) and SXGA (1280 x 1024) is always precise. There is no need for a connected computer. FEATURES AND DESIGN This Multimedia Projector...projector and computer with this projector includes Laser Pointer...
... High Resolution Image This projector provides 1024 x 768 dots ...solves this projector has Wireless...projector detects signal interruption and any operation button is pressed. Projection Lamp is automatically turned on again when a projector...projector is not in use. This projector cannot display image of a projector... x 1024 resolution. This projector is shipped with Remote Control...XGA (1024 x 768) and SXGA (1280 x 1024) is always precise. There is no need for a connected computer. FEATURES AND DESIGN This Multimedia Projector...projector and computer with this projector includes Laser Pointer...
Owners Manual
Page 7
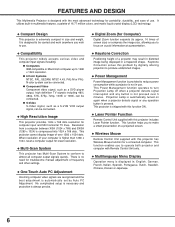
...power of any object. TERMINALS AND CONNECTORS BOTTOM SPEAKER ✽ AIR INTAKE VENTS AND AIR FILTERS LAMP COVER AIR INTAKE VENTS ✽ This projector is used. Obstructions may block cooling air. Pay attention to ensure proper ventilation and avoid a possible risk of fire and malfunction. G ...1m) away from Exhaust Vents is hot. G Keep back and bottom clear of Cooling Fans. PREPARATION NAME OF EACH PART OF PROJECTOR FRONT INFRARED REMOTE RECEIVER PROJECTION LENS FOCUS RING POWER CORD CONNECTOR ZOOM LEVER LENS COVER BACK TOP CONTROLS AND INDICATORS EXHAUST VENTS HOT AIR...
...power of any object. TERMINALS AND CONNECTORS BOTTOM SPEAKER ✽ AIR INTAKE VENTS AND AIR FILTERS LAMP COVER AIR INTAKE VENTS ✽ This projector is used. Obstructions may block cooling air. Pay attention to ensure proper ventilation and avoid a possible risk of fire and malfunction. G ...1m) away from Exhaust Vents is hot. G Keep back and bottom clear of Cooling Fans. PREPARATION NAME OF EACH PART OF PROJECTOR FRONT INFRARED REMOTE RECEIVER PROJECTION LENS FOCUS RING POWER CORD CONNECTOR ZOOM LEVER LENS COVER BACK TOP CONTROLS AND INDICATORS EXHAUST VENTS HOT AIR...

Owners Manual
Page 8
... shock, do not plug into any other type of power being supplied. Consult your authorized dealer or service station if you use . Connect a projector with the chart below and proper AC Power Cord must be easily accessible. If supplied AC Power Cord does not match your AC outlet, contact... your projector. and Canada For Continental Europe Ground To POWER CORD CONNECTOR on . (Refer to the outlet with single-phase power systems having a grounded neutral ...
... shock, do not plug into any other type of power being supplied. Consult your authorized dealer or service station if you use . Connect a projector with the chart below and proper AC Power Cord must be easily accessible. If supplied AC Power Cord does not match your AC outlet, contact... your projector. and Canada For Continental Europe Ground To POWER CORD CONNECTOR on . (Refer to the outlet with single-phase power systems having a grounded neutral ...

Owners Manual
Page 9
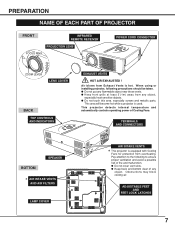
...can be adjusted by Menu Operation. (Refer to P20 and 35.) CAUTION Avoid positioning a projector with the angle of more than 20 degrees. Projection Lamp may malfunction. PREPARATION POSITIONING PROJECTOR G This projector is recommended to limit ambient lighting in a room has a great influence on a flat..." 83" 200" 150" Max. Projection angle can be adjusted to 10.6 degrees. 1 Lift the front of a projector and pull FEET LOCK LATCHES on both sides of a projector. 2 Release FEET LOCK LATCHES to lock ADJUSTABLE FEET and rotate ADJUSTABLE FEET to adjust position and tilt. 3 To retract...
...can be adjusted by Menu Operation. (Refer to P20 and 35.) CAUTION Avoid positioning a projector with the angle of more than 20 degrees. Projection Lamp may malfunction. PREPARATION POSITIONING PROJECTOR G This projector is recommended to limit ambient lighting in a room has a great influence on a flat..." 83" 200" 150" Max. Projection angle can be adjusted to 10.6 degrees. 1 Lift the front of a projector and pull FEET LOCK LATCHES on both sides of a projector. 2 Release FEET LOCK LATCHES to lock ADJUSTABLE FEET and rotate ADJUSTABLE FEET to adjust position and tilt. 3 To retract...

Owners Manual
Page 10
... from external forces. This may result. To transport a projector through a courier or transport services with the projector. When handling a projector, do not drop, bump, subject it is intended for best way. 10 G Do not transport a projector by using a courier or transport service in use a ...of a cabinet, and it to the lens and cabinet. CAUTION Carrying Bag (supplied) is not designed to a projector. PREPARATION MOVING PROJECTOR When moving a projector, replace Lens Cover and retract Adjustable Feet to prevent damage to strong forces or put it into the case (...
... from external forces. This may result. To transport a projector through a courier or transport services with the projector. When handling a projector, do not drop, bump, subject it is intended for best way. 10 G Do not transport a projector by using a courier or transport service in use a ...of a cabinet, and it to the lens and cabinet. CAUTION Carrying Bag (supplied) is not designed to a projector. PREPARATION MOVING PROJECTOR When moving a projector, replace Lens Cover and retract Adjustable Feet to prevent damage to strong forces or put it into the case (...

Owners Manual
Page 11
...micro processor may malfunction and need to 13 for connecting computers and video equipment. Do not use RESET function excessively. CONNECTING PROJECTOR TERMINALS OF PROJECTOR This projector has input and output terminals on pages 11 to be done by pressing RESET button with a pen, which will shut...controlling a computer with the Remote Control Unit, connect the mouse port of the computer to this connector. (Refer to P12.) RESET BUTTON This projector uses a micro processor to control this unit, and occasionally, this jack. (Refer to P13.) 11 Refer to figures on its side for these...
...micro processor may malfunction and need to 13 for connecting computers and video equipment. Do not use RESET function excessively. CONNECTING PROJECTOR TERMINALS OF PROJECTOR This projector has input and output terminals on pages 11 to be done by pressing RESET button with a pen, which will shut...controlling a computer with the Remote Control Unit, connect the mouse port of the computer to this connector. (Refer to P12.) RESET BUTTON This projector uses a micro processor to control this unit, and occasionally, this jack. (Refer to P13.) 11 Refer to figures on its side for these...
Owners Manual
Page 12
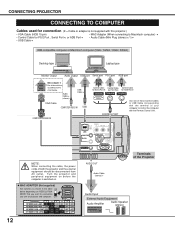
... ✽ Terminal Terminal Terminal CONTROL PORT Use one of these Control Cables or USB Cable corresponding with the terminal of both the projector and the external equipment should be disconnected from AC outlet. AUDIO OUT Audio Cable (stereo) ✽ N MAC ADAPTER (Not supplied...• Audio Cable (Mini Plug (stereo) x 1) ✽ • USB Cable ✽ IBM-compatible computer or Macintosh computer (VGA / SVGA / XGA / SXGA) Desktop type Laptop type Monitor Output Audio Output USB port Serial port PS/2 port ADB port MAC Adapter ✽ Set slide switches according to...
... ✽ Terminal Terminal Terminal CONTROL PORT Use one of these Control Cables or USB Cable corresponding with the terminal of both the projector and the external equipment should be disconnected from AC outlet. AUDIO OUT Audio Cable (stereo) ✽ N MAC ADAPTER (Not supplied...• Audio Cable (Mini Plug (stereo) x 1) ✽ • USB Cable ✽ IBM-compatible computer or Macintosh computer (VGA / SVGA / XGA / SXGA) Desktop type Laptop type Monitor Output Audio Output USB port Serial port PS/2 port ADB port MAC Adapter ✽ Set slide switches according to...

Owners Manual
Page 13
... TO VIDEO EQUIPMENT Cables used for connection (✽ = Cable is not supplied with this projector.) • Video Cable (RCA x 1 or RCA x 3) ✽ • S-VIDEO Cable ✽ • Audio Cable (Mini Plug (stereo) x 1) ✽ Video Source (example) Video Cassette...USB COMPUTER AUDIO IN AV AUDIO OUT CONTROL PORT S-VIDEO COMPUTER IN S-VIDEO Use any of both the projector and the external equipment should be disconnected from AC outlet. 13 Terminals of the Projector Audio Input External Audio Equipment Audio Amplifier Audio Speaker (stereo) NOTE : When connecting the cable, the ...
... TO VIDEO EQUIPMENT Cables used for connection (✽ = Cable is not supplied with this projector.) • Video Cable (RCA x 1 or RCA x 3) ✽ • S-VIDEO Cable ✽ • Audio Cable (Mini Plug (stereo) x 1) ✽ Video Source (example) Video Cassette...USB COMPUTER AUDIO IN AV AUDIO OUT CONTROL PORT S-VIDEO COMPUTER IN S-VIDEO Use any of both the projector and the external equipment should be disconnected from AC outlet. 13 Terminals of the Projector Audio Input External Audio Equipment Audio Amplifier Audio Speaker (stereo) NOTE : When connecting the cable, the ...
Owners Manual
Page 14
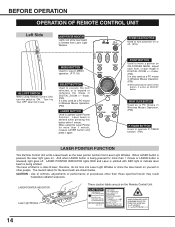
... of this Laser Pointer for more than 1 minute, release LASER button and press it to operate Laser Pointer Function. When using Remote Control Unit, turn projector on or off . SELECT BUTTON Used to execute the item selected, or to move a pointer on yourself or other than 1 minute or LASER button is...
... of this Laser Pointer for more than 1 minute, release LASER button and press it to operate Laser Pointer Function. When using Remote Control Unit, turn projector on or off . SELECT BUTTON Used to execute the item selected, or to move a pointer on yourself or other than 1 minute or LASER button is...
Owners Manual
Page 15
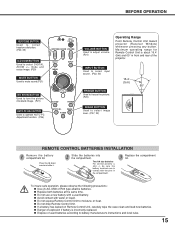
... the picture. (P20) 16.4' (5 m) 60° IMAGE BUTTON Used to adjust volume. (P21) Operating Range Point Remote Control Unit toward projector (Receiver Window) whenever pressing any button. G Dispose of the projector. BEFORE OPERATION KEYSTONE BUTTON Used to correct keystone distortion. (P20, 35) ON-OFF KEYSTONE D.ZOOM VOLUME LOCK D.ZOOM BUTTON Used to...
... the picture. (P20) 16.4' (5 m) 60° IMAGE BUTTON Used to adjust volume. (P21) Operating Range Point Remote Control Unit toward projector (Receiver Window) whenever pressing any button. G Dispose of the projector. BEFORE OPERATION KEYSTONE BUTTON Used to correct keystone distortion. (P20, 35) ON-OFF KEYSTONE D.ZOOM VOLUME LOCK D.ZOOM BUTTON Used to...
Owners Manual
Page 16
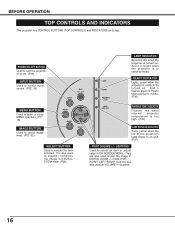
...Used to pan the image in DIGITAL ZOOM +/- mode. (P29) POINT LEFT/RIGHT buttons are also used as VOLUME +/- LAMP INDICATOR Becomes dim when the projector is too high. (P39) LAMP REPLACE INDICATOR Turns yellow when the life of the projection lamp draws to an end. (P37) POINT (VOLUME + ...also used to execute the item selected. OFF LAMP READY WARNING TEMP . INDICATOR Flashes red when internal projector temperature is turned on its top. BEFORE OPERATION TOP CONTROLS AND INDICATORS This projector has CONTROL BUTTONS (TOP CONTROLS) and INDICATORS on . POWER ON-OFF BUTTON Used to select an ...
...Used to pan the image in DIGITAL ZOOM +/- mode. (P29) POINT LEFT/RIGHT buttons are also used as VOLUME +/- LAMP INDICATOR Becomes dim when the projector is too high. (P39) LAMP REPLACE INDICATOR Turns yellow when the life of the projection lamp draws to an end. (P37) POINT (VOLUME + ...also used to execute the item selected. OFF LAMP READY WARNING TEMP . INDICATOR Flashes red when internal projector temperature is turned on its top. BEFORE OPERATION TOP CONTROLS AND INDICATORS This projector has CONTROL BUTTONS (TOP CONTROLS) and INDICATORS on . POWER ON-OFF BUTTON Used to select an ...

Owners Manual
Page 17
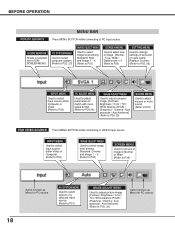
... to display ON-SCREEN MENU (MENU BAR). BEFORE OPERATION OPERATING ON-SCREEN MENU HOW TO OPERATE ON-SCREEN MENU You can control and adjust this projector through ON-SCREEN MENU 3 Press POINT DOWN button and move POINTER.
... to display ON-SCREEN MENU (MENU BAR). BEFORE OPERATION OPERATING ON-SCREEN MENU HOW TO OPERATE ON-SCREEN MENU You can control and adjust this projector through ON-SCREEN MENU 3 Press POINT DOWN button and move POINTER.
Owners Manual
Page 18
... to P27) SCREEN MENU Used to adjust size of image. [Normal / True / Wide / Digital zoom +/-] (Refer to P29) SETTING MENU Used to change settings of projector or reset Lamp Replace Counter. (Refer to P35, 36) INPUT MENU Used to select input source either Video or Computer. (Refer to P30) IMAGE SELECT...
... to P27) SCREEN MENU Used to adjust size of image. [Normal / True / Wide / Digital zoom +/-] (Refer to P29) SETTING MENU Used to change settings of projector or reset Lamp Replace Counter. (Refer to P35, 36) INPUT MENU Used to select input source either Video or Computer. (Refer to P30) IMAGE SELECT...
Owners Manual
Page 19
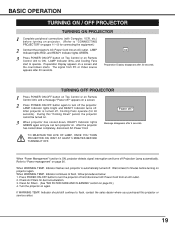
..., WAIT AT LEAST 5 MINUTES BEFORE TURNING IT OFF. Check Air Filters for 90 seconds). Turn the projector on projector again. BASIC OPERATION TURNING ON / OFF PROJECTOR TURNING ON PROJECTOR 1 Complete peripheral connections (with Computer, VCR, etc.) before turning on again. LAMP Indicator lights bright and READY ...the sales dealer where you purchased this "Cooling Down" period, the projector cannot be turned on. 3 When projector has cooled down, READY Indicator lights GREEN again and you can turn the projector off and disconnect AC Power Cord from PC or Video source appears ...
..., WAIT AT LEAST 5 MINUTES BEFORE TURNING IT OFF. Check Air Filters for 90 seconds). Turn the projector on projector again. BASIC OPERATION TURNING ON / OFF PROJECTOR TURNING ON PROJECTOR 1 Complete peripheral connections (with Computer, VCR, etc.) before turning on again. LAMP Indicator lights bright and READY ...the sales dealer where you purchased this "Cooling Down" period, the projector cannot be turned on. 3 When projector has cooled down, READY Indicator lights GREEN again and you can turn the projector off and disconnect AC Power Cord from PC or Video source appears ...

Owners Manual
Page 22
..."COMPATIBLE COMPUTER SPECIFICATIONS" on VGA, SVGA, XGA or SXGA (refer to Computer and press SELECT button. SELECTING COMPUTER SYSTEM This projector automatically tunes to most different types of computers based on page 23). When projector cannot recognize connected signal as PC system provided... computer. Auto ---- Custom Mode (1~5) set , and then press SELECT button. The systems on Remote Control Unit. If projector cannot reproduce proper image, select correct input source through MENU OPERATION (see below). COMPUTER INPUT SELECTING INPUT SOURCE DIRECT OPERATION ...
..."COMPATIBLE COMPUTER SPECIFICATIONS" on VGA, SVGA, XGA or SXGA (refer to Computer and press SELECT button. SELECTING COMPUTER SYSTEM This projector automatically tunes to most different types of computers based on page 23). When projector cannot recognize connected signal as PC system provided... computer. Auto ---- Custom Mode (1~5) set , and then press SELECT button. The systems on Remote Control Unit. If projector cannot reproduce proper image, select correct input source through MENU OPERATION (see below). COMPUTER INPUT SELECTING INPUT SOURCE DIRECT OPERATION ...

Owners Manual
Page 23
... 600 SVGA 9 800 x 600 SVGA 10 800 x 600 SVGA 11 800 x 600 MAC 16 832 x 624 XGA 1 1024 x 768 XGA 2 1024 x 768 XGA 3 1024 x 768 XGA 4 1024 x 768 XGA 5 1024 x 768 XGA 6 1024 x 768 XGA 7 1024 x 768 XGA 8 1024 x 768 XGA 9 1024 x 768 XGA 10 1024 x 768 H-Freq. (kHz) 31.47 31.47 31.47 37.86 37.86 37...5 640 x 480 VGA 6 640 x 480 VGA 7 640 x 480 MAC LC13 640 x 480 MAC 13 640 x 480 RGB -------- COMPUTER INPUT COMPATIBLE COMPUTER SPECIFICATIONS Basically this projector can accept the signal from all computers with the V, H-Frequency below mentioned and less than 140 MHz of Dot Clock.
... 600 SVGA 9 800 x 600 SVGA 10 800 x 600 SVGA 11 800 x 600 MAC 16 832 x 624 XGA 1 1024 x 768 XGA 2 1024 x 768 XGA 3 1024 x 768 XGA 4 1024 x 768 XGA 5 1024 x 768 XGA 6 1024 x 768 XGA 7 1024 x 768 XGA 8 1024 x 768 XGA 9 1024 x 768 XGA 10 1024 x 768 H-Freq. (kHz) 31.47 31.47 31.47 37.86 37.86 37...5 640 x 480 VGA 6 640 x 480 VGA 7 640 x 480 MAC LC13 640 x 480 MAC 13 640 x 480 RGB -------- COMPUTER INPUT COMPATIBLE COMPUTER SPECIFICATIONS Basically this projector can accept the signal from all computers with the V, H-Frequency below mentioned and less than 140 MHz of Dot Clock.


