
Owners Manual
Page 2
... NOT OPEN CAUTION : TO REDUCE THE RISK OF ELECTRIC SHOCK, DO NOT REMOVE COVER (OR BACK). TO THE OWNER Before operating this projector, read this manual again, check operations and cable connections and try the solutions in the "TROUBLESHOOTING" section at the end of this manual. If the projector is exhausted from Laser Light Window while pressing LASER button (for an extended time, unplug the projector from the projection lens. Heat...
... NOT OPEN CAUTION : TO REDUCE THE RISK OF ELECTRIC SHOCK, DO NOT REMOVE COVER (OR BACK). TO THE OWNER Before operating this projector, read this manual again, check operations and cable connections and try the solutions in the "TROUBLESHOOTING" section at the end of this manual. If the projector is exhausted from Laser Light Window while pressing LASER button (for an extended time, unplug the projector from the projection lens. Heat...
Owners Manual
Page 3
... operating instructions. SAFETY INSTRUCTIONS All the safety and operating instructions should be read before cleaning. Slots and openings in safe operating condition. f. Do not place this projector, ask the service technician to perform routine safety checks to determine that have the same characteristics as improper adjustment of power source indicated on it from wall outlet and refer servicing to persons. An appliance and cart combination should use a mounting...
... operating instructions. SAFETY INSTRUCTIONS All the safety and operating instructions should be read before cleaning. Slots and openings in safe operating condition. f. Do not place this projector, ask the service technician to perform routine safety checks to determine that have the same characteristics as improper adjustment of power source indicated on it from wall outlet and refer servicing to persons. An appliance and cart combination should use a mounting...

Owners Manual
Page 5
... 37 LAMP REPLACE 37 BASIC OPERATION 19 LAMP REPLACE COUNTER 38 OPERATING WIRELESS MOUSE 39 TURNING ON / OFF PROJECTOR 19 INSTALLATION 39 TURNING ON PROJECTOR 19 OPERATING WIRELESS MOUSE 39 TURNING OFF PROJECTOR 19 MAINTENANCE 40 ADJUSTING SCREEN ZOOM ADJUSTMENT FOCUS ADJUSTMENT KEYSTONE ADJUSTMENT PICTURE FREEZE FUNCTION 20 WARNING TEMP. G Windows and PowerPoint are trademarks or registered trademarks of Microsoft Corporation. INDICATOR 40 20 AIR FILTER CARE AND CLEANING 40 20 20 CLEANING PROJECTION LENS TROUBLESHOOTING 40 41 20 TECHNICAL SPECIFICATIONS 43...
... 37 LAMP REPLACE 37 BASIC OPERATION 19 LAMP REPLACE COUNTER 38 OPERATING WIRELESS MOUSE 39 TURNING ON / OFF PROJECTOR 19 INSTALLATION 39 TURNING ON PROJECTOR 19 OPERATING WIRELESS MOUSE 39 TURNING OFF PROJECTOR 19 MAINTENANCE 40 ADJUSTING SCREEN ZOOM ADJUSTMENT FOCUS ADJUSTMENT KEYSTONE ADJUSTMENT PICTURE FREEZE FUNCTION 20 WARNING TEMP. G Windows and PowerPoint are trademarks or registered trademarks of Microsoft Corporation. INDICATOR 40 20 AIR FILTER CARE AND CLEANING 40 20 20 CLEANING PROJECTION LENS TROUBLESHOOTING 40 41 20 TECHNICAL SPECIFICATIONS 43...
Owners Manual
Page 6
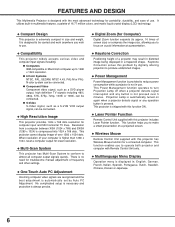
... Auto PC Adjustment Incoming computer video signals are recognized and the best adjustment is extremely compact in size and weight. This function helps you wish to turn Projection Lamp off when a projector detects signal interruption and any operation button is automatically turned on a projected screen. N Wireless Mouse Remote Control Unit supplied with this projector includes Laser Pointer function. N Multilanguage Menu Display Operation menu is not pressed over 1280 x 1024 dots. This Power Management function operates to use. This projector cannot display image...
... Auto PC Adjustment Incoming computer video signals are recognized and the best adjustment is extremely compact in size and weight. This function helps you wish to turn Projection Lamp off when a projector detects signal interruption and any operation button is automatically turned on a projected screen. N Wireless Mouse Remote Control Unit supplied with this projector includes Laser Pointer function. N Multilanguage Menu Display Operation menu is not pressed over 1280 x 1024 dots. This Power Management function operates to use. This projector cannot display image...
Owners Manual
Page 7
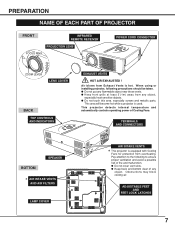
... internal temperature and automatically controls operating power of fire and malfunction. When using or installing projector, following to the following precautions should be taken. PREPARATION NAME OF EACH PART OF PROJECTOR FRONT INFRARED REMOTE RECEIVER PROJECTION LENS FOCUS RING POWER CORD CONNECTOR ZOOM LEVER LENS COVER BACK TOP CONTROLS AND INDICATORS EXHAUST VENTS HOT AIR EXHAUSTED ! G Do not touch this area, especially screws and metallic parts. G Keep front grills at least 3'(1m) away from overheating...
... internal temperature and automatically controls operating power of fire and malfunction. When using or installing projector, following to the following precautions should be taken. PREPARATION NAME OF EACH PART OF PROJECTOR FRONT INFRARED REMOTE RECEIVER PROJECTION LENS FOCUS RING POWER CORD CONNECTOR ZOOM LEVER LENS COVER BACK TOP CONTROLS AND INDICATORS EXHAUST VENTS HOT AIR EXHAUSTED ! G Do not touch this area, especially screws and metallic parts. G Keep front grills at least 3'(1m) away from overheating...
Owners Manual
Page 12
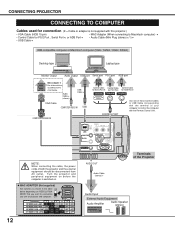
... not supplied with the Remote Control Unit. Turn the projector and peripheral equipment on before you turn on projector and computer. Pb / Cb - CONNECTING PROJECTOR CONNECTING TO COMPUTER Cables used for PS/2 Port , Serial Port ✽, or ADB Port ✽ • Audio Cable (Mini Plug (stereo) x 1) ✽ • USB Cable ✽ IBM-compatible computer or Macintosh computer (VGA / SVGA / XGA / SXGA) Desktop type Laptop type Monitor Output Audio Output USB port Serial port PS/2 port ADB port MAC Adapter ✽ Set slide switches according...
... not supplied with the Remote Control Unit. Turn the projector and peripheral equipment on before you turn on projector and computer. Pb / Cb - CONNECTING PROJECTOR CONNECTING TO COMPUTER Cables used for PS/2 Port , Serial Port ✽, or ADB Port ✽ • Audio Cable (Mini Plug (stereo) x 1) ✽ • USB Cable ✽ IBM-compatible computer or Macintosh computer (VGA / SVGA / XGA / SXGA) Desktop type Laptop type Monitor Output Audio Output USB port Serial port PS/2 port ADB port MAC Adapter ✽ Set slide switches according...
Owners Manual
Page 14
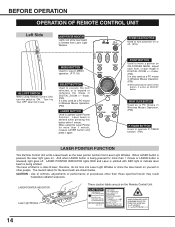
... image in DIGITAL ZOOM +/- LASER POINTER INDICATOR lights RED and Laser is emitted with RED light to operate P-TIMER function. (P21) LASER POINTER FUNCTION This Remote Control Unit emits a laser beam as SELECT button. The laser emitted is emitted while pressing this button within 1 minute. LASER POINTER INDICATOR These caution labels are shown below. ON-OFF KEYSTONE D.ZOOM VOLUME LOCK ALL OFF ON MENU BUTTON Used to select MENU operation. (P17, 18) MUTE MENU INPUT...
... image in DIGITAL ZOOM +/- LASER POINTER INDICATOR lights RED and Laser is emitted with RED light to operate P-TIMER function. (P21) LASER POINTER FUNCTION This Remote Control Unit emits a laser beam as SELECT button. The laser emitted is emitted while pressing this button within 1 minute. LASER POINTER INDICATOR These caution labels are shown below. ON-OFF KEYSTONE D.ZOOM VOLUME LOCK ALL OFF ON MENU BUTTON Used to select MENU operation. (P17, 18) MUTE MENU INPUT...
Owners Manual
Page 15
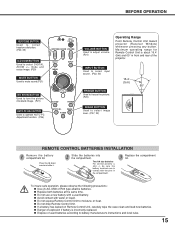
BUTTON Used to turn the picture into the compartment. Maximum operating range for Remote Control Unit is incorrectly replaced. G Replace both batteries at the same time. G Dispose of the projector. mode and resize image. (P29) MUTE BUTTON Used to mute sound.(P21) MUTE MENU INPUT NO SHOW BUTTON Used to operate AUTO PC Adjustment function. (P24) LASER NO SHOW FREEZE AUTO PC ADJ. Press the lid downward and slide it. 2 Slide the batteries into black...
BUTTON Used to turn the picture into the compartment. Maximum operating range for Remote Control Unit is incorrectly replaced. G Replace both batteries at the same time. G Dispose of the projector. mode and resize image. (P29) MUTE BUTTON Used to mute sound.(P21) MUTE MENU INPUT NO SHOW BUTTON Used to operate AUTO PC Adjustment function. (P24) LASER NO SHOW FREEZE AUTO PC ADJ. Press the lid downward and slide it. 2 Slide the batteries into black...
Owners Manual
Page 16
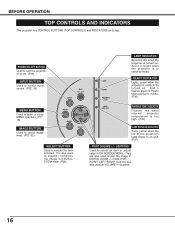
And it flashes green in Power Management mode. (P36) MENU BUTTON Used to open or close MENU operation. (P17, 18) IMAGE BUTTON Used to select image level. (P27, 32) MENU IMAGE -VOLUMESELECT SELECT BUTTON Used to select input source. (P22, 30) INPUT ON - And it is bright when the projector is in DIGITAL ZOOM +/- They are also used as VOLUME +/- POWER ON-OFF BUTTON Used to turn the projector on . It is too high. (P39) LAMP REPLACE INDICATOR Turns yellow when the life of the projection lamp draws to an...
And it flashes green in Power Management mode. (P36) MENU BUTTON Used to open or close MENU operation. (P17, 18) IMAGE BUTTON Used to select image level. (P27, 32) MENU IMAGE -VOLUMESELECT SELECT BUTTON Used to select input source. (P22, 30) INPUT ON - And it is bright when the projector is in DIGITAL ZOOM +/- They are also used as VOLUME +/- POWER ON-OFF BUTTON Used to turn the projector on . It is too high. (P39) LAMP REPLACE INDICATOR Turns yellow when the life of the projection lamp draws to an...
Owners Manual
Page 18
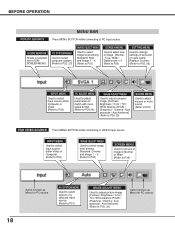
BEFORE OPERATION FOR PC SOURCE MENU BAR Press MENU BUTTON while connecting to VIDEO input source. GUIDE WINDOW Shows a selected item of projector or reset Lamp Replace Counter. (Refer to P35, 36) INPUT MENU Used to select input source either Video or Computer. (Refer to P30) IMAGE SELECT MENU Used to select image level among Standard, Real and Image 1 ~ 4. (Refer to P27) SCREEN MENU Used to adjust size of image. [Normal / True / Wide / Digital zoom +/-] (Refer to P29) SETTING MENU Used to change settings of ONSCREEN MENU. PC SYSTEM MENU Used to select computer...
BEFORE OPERATION FOR PC SOURCE MENU BAR Press MENU BUTTON while connecting to VIDEO input source. GUIDE WINDOW Shows a selected item of projector or reset Lamp Replace Counter. (Refer to P35, 36) INPUT MENU Used to select input source either Video or Computer. (Refer to P30) IMAGE SELECT MENU Used to select image level among Standard, Real and Image 1 ~ 4. (Refer to P27) SCREEN MENU Used to adjust size of image. [Normal / True / Wide / Digital zoom +/-] (Refer to P29) SETTING MENU Used to change settings of ONSCREEN MENU. PC SYSTEM MENU Used to select computer...
Owners Manual
Page 19
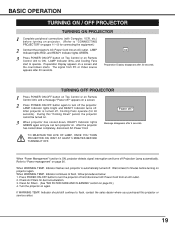
...WARNING TEMP. Clean Air Filters. (See "AIR FILTER CARE AND CLEANING" section on Remote Control Unit to turn off ?" LAMP Indicator lights RED, and READY Indicator lights GREEN. 3 Press POWER ON-OFF button on Top Control or on page 39.) 4. TURNING OFF PROJECTOR 1 Press POWER ON-OFF button on Top Control or on a screen. 2 Press POWER ON-OFF button again to ON. appears on Remote Control Unit, and a message "Power off the projector. Power off . After projector is automatically turned off ? Indicator flashes red, projector is turned off and disconnect AC Power Cord...
...WARNING TEMP. Clean Air Filters. (See "AIR FILTER CARE AND CLEANING" section on Remote Control Unit to turn off ?" LAMP Indicator lights RED, and READY Indicator lights GREEN. 3 Press POWER ON-OFF button on Top Control or on page 39.) 4. TURNING OFF PROJECTOR 1 Press POWER ON-OFF button on Top Control or on a screen. 2 Press POWER ON-OFF button again to ON. appears on Remote Control Unit, and a message "Power off the projector. Power off . After projector is automatically turned off ? Indicator flashes red, projector is turned off and disconnect AC Power Cord...
Owners Manual
Page 21
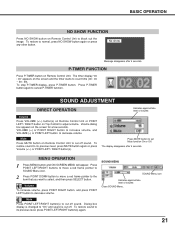
... Remote Control Unit or POINT LEFT / RIGHT button on Remote Control Unit. Mute Press MUTE button on Remote Control Unit to black out the image. Dialog box display is changed to "On" and sound is cut off sound. To stop P-TIMER display, press P-TIMER button. Press MUTE button to select, and then press SELECT button. MENU OPERATION 1 Press MENU button and ON-SCREEN MENU will appear. Press POINT LEFT/RIGHT buttons to move a red frame pointer to SOUND Menu...
... Remote Control Unit or POINT LEFT / RIGHT button on Remote Control Unit. Mute Press MUTE button on Remote Control Unit to black out the image. Dialog box display is changed to "On" and sound is cut off sound. To stop P-TIMER display, press P-TIMER button. Press MUTE button to select, and then press SELECT button. MENU OPERATION 1 Press MENU button and ON-SCREEN MENU will appear. Press POINT LEFT/RIGHT buttons to move a red frame pointer to SOUND Menu...

Owners Manual
Page 22
.... INPUT button Computer Video MENU OPERATION 1 Press MENU button and ON-SCREEN MENU will appear. INPUT MENU INPUT Menu icon Move a pointer (red arrow) to Computer and then press SELECT button. When projector cannot recognize connected signal as PC system provided in this projector, Auto PC Adjustment function operates to adjust projector and the message "Auto" is displayed on SYSTEM Menu icon. (Refer to P24.) When image is not provided properly, manual adjustment is set in this projector automatically tunes to incoming signal and projects...
.... INPUT button Computer Video MENU OPERATION 1 Press MENU button and ON-SCREEN MENU will appear. INPUT MENU INPUT Menu icon Move a pointer (red arrow) to Computer and then press SELECT button. When projector cannot recognize connected signal as PC system provided in this projector, Auto PC Adjustment function operates to adjust projector and the message "Auto" is displayed on SYSTEM Menu icon. (Refer to P24.) When image is not provided properly, manual adjustment is set in this projector automatically tunes to incoming signal and projects...
Owners Manual
Page 29
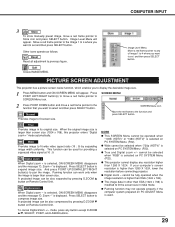
... size. To cancel Digital Zoom +/- G True and Digital zoom +/- G Digital zoom - G The image data in other than screen size (1024 x 768), this projector enters "Digital zoom +" mode automatically. Other icons operate as follows. SCREEN Menu icon Move the red frame to expand image size. When the original image size is selected on Remote Control Unit. A projected image can work only when the image is selected, ON-SCREEN MENU disappears and the message "D. NOTE G This SCREEN Menu cannot be used . 29 cannot be fully operated when the image resolution...
... size. To cancel Digital Zoom +/- G True and Digital zoom +/- G Digital zoom - G The image data in other than screen size (1024 x 768), this projector enters "Digital zoom +" mode automatically. Other icons operate as follows. SCREEN Menu icon Move the red frame to expand image size. When the original image size is selected on Remote Control Unit. A projected image can work only when the image is selected, ON-SCREEN MENU disappears and the message "D. NOTE G This SCREEN Menu cannot be used . 29 cannot be fully operated when the image resolution...
Owners Manual
Page 36
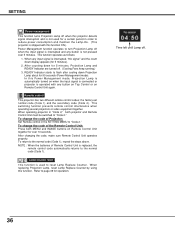
...down display appears (for 5 minutes). 2. the factory-set normal code (Code 1) and the secondary code (Code 2). When operating projector in "Code 2," both MENU and IMAGE buttons on Remote Control Unit again. Lamp counter reset This function is used for a certain period in the SETTING MENU to turn Projection Lamp off when the input signal is interrupted and any button is not pressed over 10 seconds. When replacing Projection Lamp, reset Lamp Replace Counter by using this Power Management mode, Projection Lamp is automatically turned on when the input signal is connected or projector is...
...down display appears (for 5 minutes). 2. the factory-set normal code (Code 1) and the secondary code (Code 2). When operating projector in "Code 2," both MENU and IMAGE buttons on Remote Control Unit again. Lamp counter reset This function is used for a certain period in the SETTING MENU to turn Projection Lamp off when the input signal is interrupted and any button is not pressed over 10 seconds. When replacing Projection Lamp, reset Lamp Replace Counter by using this Power Management mode, Projection Lamp is automatically turned on when the input signal is connected or projector is...
Owners Manual
Page 37
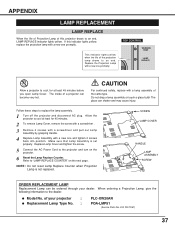
... your projector : G Replacement Lamp Type No. : PLC-XW20AR POA-LMP51 (Service Parts No. 610 300 7267) 37 TOP CONTROL WARNING TEMP . SCREW LAMP COVER HANDLE LAMP ASSEMBLY SCREW ORDER REPLACEMENT LAMP Replacement Lamp can shatter and may cause injury. of a projector can become very hot. LAMP REPLACE Allow a projector to cool at least for at least 45 minutes before you open Lamp Cover. Replace Lamp Cover and tighten the screw. 5 Connect the AC Power Cord to an end. NOTE : Do not reset Lamp Replace Counter when Projection Lamp is set...
... your projector : G Replacement Lamp Type No. : PLC-XW20AR POA-LMP51 (Service Parts No. 610 300 7267) 37 TOP CONTROL WARNING TEMP . SCREW LAMP COVER HANDLE LAMP ASSEMBLY SCREW ORDER REPLACEMENT LAMP Replacement Lamp can shatter and may cause injury. of a projector can become very hot. LAMP REPLACE Allow a projector to cool at least for at least 45 minutes before you open Lamp Cover. Replace Lamp Cover and tighten the screw. 5 Connect the AC Power Cord to an end. NOTE : Do not reset Lamp Replace Counter when Projection Lamp is set...
Owners Manual
Page 38
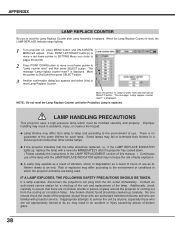
... SELECT button. The message "Lamp replace counter reset?" Risk of explosion may fail or terminate their lifetime in the LAMP REPLACEMENT section of this manual. ) Continuous use of the lamp with projector service. APPENDIX LAMP REPLACE COUNTER Be sure to reset the Lamp Replace Counter after Lamp Assembly is displayed. is replaced. G Lamp lifetime may differ from lamp to lamp and according to the environment of use as a result of hours of time than other similar lamps. G If the projector indicates that...
... SELECT button. The message "Lamp replace counter reset?" Risk of explosion may fail or terminate their lifetime in the LAMP REPLACEMENT section of this manual. ) Continuous use of the lamp with projector service. APPENDIX LAMP REPLACE COUNTER Be sure to reset the Lamp Replace Counter after Lamp Assembly is displayed. is replaced. G Lamp lifetime may differ from lamp to lamp and according to the environment of use as a result of hours of time than other similar lamps. G If the projector indicates that...
Owners Manual
Page 39
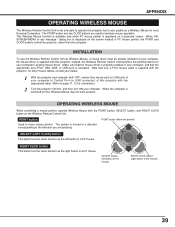
... connection.) 2 Turn the projector ON first, and then turn ON your computer, and that the mouse driver is properly installed in a PC mouse. When ONSCREEN MENU or any message / dialog box is displayed on the screen instead of this projector with the POINT button, SELECT button, and RIGHT CLICK button on first, Wireless Mouse may not work properly. SELECT button (left button in your computer. APPENDIX OPERATING WIRELESS MOUSE The Wireless Remote Control...
... connection.) 2 Turn the projector ON first, and then turn ON your computer, and that the mouse driver is properly installed in a PC mouse. When ONSCREEN MENU or any message / dialog box is displayed on the screen instead of this projector with the POINT button, SELECT button, and RIGHT CLICK button on first, Wireless Mouse may not work properly. SELECT button (left button in your computer. APPENDIX OPERATING WIRELESS MOUSE The Wireless Remote Control...
Owners Manual
Page 40
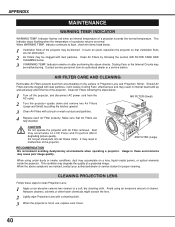
... projector upside down and remove two Air Filters (Large and Small) by following the steps below . 3 If WARNING TEMP. This Indicator stops flashing when the temperature of a projector exceeds the normal temperature. Usage in use, replace Lens Cover. 40 AIR FILTER CARE AND CLEANING Removable Air Filters prevent dust from accumulating on LCD Panel and Projection Mirror degrading picture quality. Clean Air Filters following the section AIR FILTER CARE AND CLEANING below : 1 Turn off the projector, and disconnect AC power cord from an authorized dealer or a service...
... projector upside down and remove two Air Filters (Large and Small) by following the steps below . 3 If WARNING TEMP. This Indicator stops flashing when the temperature of a projector exceeds the normal temperature. Usage in use, replace Lens Cover. 40 AIR FILTER CARE AND CLEANING Removable Air Filters prevent dust from accumulating on LCD Panel and Projection Mirror degrading picture quality. Clean Air Filters following the section AIR FILTER CARE AND CLEANING below : 1 Turn off the projector, and disconnect AC power cord from an authorized dealer or a service...

Owners Manual
Page 41
... video equipment. No image. G Make sure a projection screen is Left/Right reversed. G Make sure the temperature is out of a projector. G Press VOLUME (+) button. The problem may result in moisture condensation on page 19.) G Check Projection Lamp. (Refer to page 37.) G Adjust focus of focus. Problem: No power. NOTE : After pressing Power ON-OFF button to a warm temperature location may be turned on in the section "CONNECTING PROJECTOR" on , it needs cleaning. Some displays are properly connected...
... video equipment. No image. G Make sure a projection screen is Left/Right reversed. G Make sure the temperature is out of a projector. G Press VOLUME (+) button. The problem may result in moisture condensation on page 19.) G Check Projection Lamp. (Refer to page 37.) G Adjust focus of focus. Problem: No power. NOTE : After pressing Power ON-OFF button to a warm temperature location may be turned on in the section "CONNECTING PROJECTOR" on , it needs cleaning. Some displays are properly connected...


