Owners Manual
Page 2
... DO NOT OPEN CAUTION : TO REDUCE THE RISK OF ELECTRIC SHOCK, DO NOT REMOVE COVER (OR BACK). If the projector is exhausted from the projection lens. THIS SYMBOL INDICATES THAT THERE ARE IMPORTANT OPERATING AND MAINTENANCE INSTRUCTIONS IN THE OWNER'S MANUAL WITH THIS UNIT. Minimum distance should be maintained. READ AND KEEP THIS OWNER'S MANUAL FOR LATER USE. 2 Eye damage could result. Install the projector in the "Troubleshooting" section...
... DO NOT OPEN CAUTION : TO REDUCE THE RISK OF ELECTRIC SHOCK, DO NOT REMOVE COVER (OR BACK). If the projector is exhausted from the projection lens. THIS SYMBOL INDICATES THAT THERE ARE IMPORTANT OPERATING AND MAINTENANCE INSTRUCTIONS IN THE OWNER'S MANUAL WITH THIS UNIT. Minimum distance should be maintained. READ AND KEEP THIS OWNER'S MANUAL FOR LATER USE. 2 Eye damage could result. Install the projector in the "Troubleshooting" section...
Owners Manual
Page 3
... those controls that the projector is provided. Do not expose this can result in installation such as this unit to rain or water. Slots and openings in Nederland Bij dit product zijn batterijen geleverd. Do not locate this indicates a need for cleaning. Wall or shelf mounting should follow the manufacturer's instructions, and should not be sure the service technician has used replacement parts...
... those controls that the projector is provided. Do not expose this can result in installation such as this unit to rain or water. Slots and openings in Nederland Bij dit product zijn batterijen geleverd. Do not locate this indicates a need for cleaning. Wall or shelf mounting should follow the manufacturer's instructions, and should not be sure the service technician has used replacement parts...
Owners Manual
Page 4
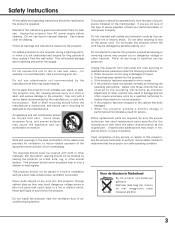
... not drop, bump, subject it is being used. - This may result. - Safety Instruction Air Circulation Openings in the cabinet are provided to project an image. When using a courier or transport service in Proper Position Install the projector properly. NO SIDEWARD Air Intake Vent 4 Exhaust Vent (Hot air exhaust) Moving the Projector When moving the projector, replace the Lens Cover and retract Adjustable Feet to prevent damage to the...
... not drop, bump, subject it is being used. - This may result. - Safety Instruction Air Circulation Openings in the cabinet are provided to project an image. When using a courier or transport service in Proper Position Install the projector properly. NO SIDEWARD Air Intake Vent 4 Exhaust Vent (Hot air exhaust) Moving the Projector When moving the projector, replace the Lens Cover and retract Adjustable Feet to prevent damage to the...
Owners Manual
Page 5
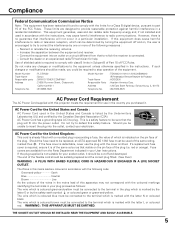
... Rules. Model Number Trade Name Responsible party Address Telephone No. : PLC-SW30 : Sanyo : SANYO FISHER COMPANY : 21605 Plummer Street, Chatsworth, California 91311 : (818)998-7322 Model Number Trade Name Responsible Party Address Telephone No. : TGX0043-011010 (1AV4U20B69000) IR Presentation Remote Receiver for a Class B digital device, pursuant to part 15 of the plug. This is coloured green-and-yellow must be required to stop operation of the...
... Rules. Model Number Trade Name Responsible party Address Telephone No. : PLC-SW30 : Sanyo : SANYO FISHER COMPANY : 21605 Plummer Street, Chatsworth, California 91311 : (818)998-7322 Model Number Trade Name Responsible Party Address Telephone No. : TGX0043-011010 (1AV4U20B69000) IR Presentation Remote Receiver for a Class B digital device, pursuant to part 15 of the plug. This is coloured green-and-yellow must be required to stop operation of the...
Owners Manual
Page 6
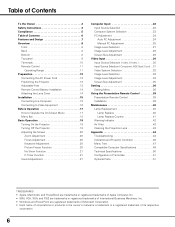
... Screen SIze Adjustment 29 Video Input 30 Input Source Selection ( Video, S-Video 30 Input Source Selection ( Component, RGB Scart 21-pin) . .31 Video System Selection 32 Image Level Selection 33 Image Level Adjustment 34 Screen Size Adjustment 35 Setting 36 Setting Menu 36 Using the Presentation Remote Control 39 Presentation Remote Control 39 Installation 39 Maintenance 40 Lamp Replacement 40 Lamp Replace 40 Lamp Replace Counter 41 Warning Indicator 42 Air Filter 43 Cleaning the Projection Lens 43 Appendix 44 Troubleshooting 44 Indicators and Projector Condition 46 Menu...
... Screen SIze Adjustment 29 Video Input 30 Input Source Selection ( Video, S-Video 30 Input Source Selection ( Component, RGB Scart 21-pin) . .31 Video System Selection 32 Image Level Selection 33 Image Level Adjustment 34 Screen Size Adjustment 35 Setting 36 Setting Menu 36 Using the Presentation Remote Control 39 Presentation Remote Control 39 Installation 39 Maintenance 40 Lamp Replacement 40 Lamp Replace 40 Lamp Replace Counter 41 Warning Indicator 42 Air Filter 43 Cleaning the Projection Lens 43 Appendix 44 Troubleshooting 44 Indicators and Projector Condition 46 Menu...
Owners Manual
Page 7
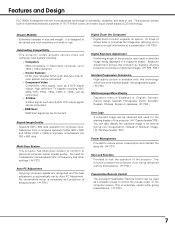
... of blackout image. ( ☞ " No Show function " P21 ) Power Management Provided to reduce power consumption and maintain the lamp life. ( ☞ P37 ) Key Lock Function Provided to lock the operation of the projector. S-Video S-Video signal, such as a S-VHS VCR output signal, can be connected. - Resolution from being displayed in a trapezoid shape. No need for troublesome manual adjustment of frequency and other settings. ( ☞ P23 ) Auto PC Adjustment Incoming computer signals are...
... of blackout image. ( ☞ " No Show function " P21 ) Power Management Provided to reduce power consumption and maintain the lamp life. ( ☞ P37 ) Key Lock Function Provided to lock the operation of the projector. S-Video S-Video signal, such as a S-VHS VCR output signal, can be connected. - Resolution from being displayed in a trapezoid shape. No need for troublesome manual adjustment of frequency and other settings. ( ☞ P23 ) Auto PC Adjustment Incoming computer signals are...
Owners Manual
Page 9
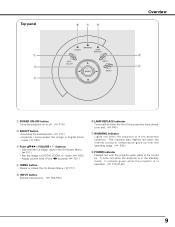
... projector temperature goes up over the operating range. ( ☞ P42 ) i POWER indicator Flashes red until the projector gets ready to an end. ( ☞ P40 ) u WARNING indicator Lights red when the projector is in Digital Zoom mode. ( ☞ P29 ) e Point ed7 8 ( VOLUME + / - ) buttons - Pan the image in the abnormal condition. Adjust volume level. (Point 7 8 buttons) ( ☞ P21 ) r MENU button Opens or closes the On-Screen Menu. ( ☞ P17 ) t INPUT button Selects input source. ( ☞ P22,P30 ) y LAMP REPLACE indicator Turns yellow when the life of the projection lamp...
... projector temperature goes up over the operating range. ( ☞ P42 ) i POWER indicator Flashes red until the projector gets ready to an end. ( ☞ P40 ) u WARNING indicator Lights red when the projector is in Digital Zoom mode. ( ☞ P29 ) e Point ed7 8 ( VOLUME + / - ) buttons - Pan the image in the abnormal condition. Adjust volume level. (Point 7 8 buttons) ( ☞ P21 ) r MENU button Opens or closes the On-Screen Menu. ( ☞ P17 ) t INPUT button Selects input source. ( ☞ P22,P30 ) y LAMP REPLACE indicator Turns yellow when the life of the projection lamp...
Owners Manual
Page 11
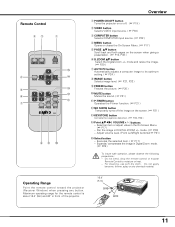
... button - Operating Range Point the remote control toward the projector (Receiver Window) when pressing any chemical material. mode. ( ☞ P29) - Remote Control ew q COMPUTER VIDEO ON-OFF !5 r !4 MENU VOLUME- SELECT VOLUME+ t !3 !2 y D.ZOOM PAGE KEYSTONE NO SHOW !1 u AUTO PC P-TIMER IMAGE FREEZE MUTE CXPK i o !0 Overview q POWER ON-OFF button Turns the projector on or off the image on the screen when giving a presentation. ( ☞ P10, P38 ) y D.ZOOM ed button Select the Digital zoom +/- Select an item or adjust...
... button - Operating Range Point the remote control toward the projector (Receiver Window) when pressing any chemical material. mode. ( ☞ P29) - Remote Control ew q COMPUTER VIDEO ON-OFF !5 r !4 MENU VOLUME- SELECT VOLUME+ t !3 !2 y D.ZOOM PAGE KEYSTONE NO SHOW !1 u AUTO PC P-TIMER IMAGE FREEZE MUTE CXPK i o !0 Overview q POWER ON-OFF button Turns the projector on or off the image on the screen when giving a presentation. ( ☞ P10, P38 ) y D.ZOOM ed button Select the Digital zoom +/- Select an item or adjust...

Owners Manual
Page 18
...P27 ) Screen Menu Used to adjust size of image. [Normal / True / Wide / Digital zoom +/-] ( ☞ P29 ) Setting Menu Used to change settings of the projector or reset Lamp replace counter. ( ☞ P36-38 ) Input Menu Used to select input source either Computer or Video. ( ☞ P22 ) PC Adjust Menu Used to adjust parameters to match with input signal format. ( ☞ P24-26 ) Image Adjust Menu Used to adjust computer image. [Contrast / Brightness / Color temp. / White balance (R/G/B) / Gamma / Auto grayscale] ( ☞ P28 ) Sound Menu Used to adjust volume or mute sound. ( ☞...
...P27 ) Screen Menu Used to adjust size of image. [Normal / True / Wide / Digital zoom +/-] ( ☞ P29 ) Setting Menu Used to change settings of the projector or reset Lamp replace counter. ( ☞ P36-38 ) Input Menu Used to select input source either Computer or Video. ( ☞ P22 ) PC Adjust Menu Used to adjust parameters to match with input signal format. ( ☞ P24-26 ) Image Adjust Menu Used to adjust computer image. [Contrast / Brightness / Color temp. / White balance (R/G/B) / Gamma / Auto grayscale] ( ☞ P28 ) Sound Menu Used to adjust volume or mute sound. ( ☞...

Owners Manual
Page 19
... message " Power off the projector at least once in shortening the lamp lifetime. - The starting display can be changed. ( ☞ " Capture " P36 ) Selected Input Source and Lamp Mode Lamp mode ( ☞ " Lamp mode " P37 ) Turning Off the Projector 1 Press the POWER ON-OFF button on the screen. 26 - TO MAINTAIN THE LIFE OF LAMP, ONCE YOU TURN PROJECTOR ON, WAIT AT LEAST 5 MINUTES BEFORE TURNING IT OFF. You can disconnect the AC power cord. If the WARNING indicator flashes or lights red...
... message " Power off the projector at least once in shortening the lamp lifetime. - The starting display can be changed. ( ☞ " Capture " P36 ) Selected Input Source and Lamp Mode Lamp mode ( ☞ " Lamp mode " P37 ) Turning Off the Projector 1 Press the POWER ON-OFF button on the screen. 26 - TO MAINTAIN THE LIFE OF LAMP, ONCE YOU TURN PROJECTOR ON, WAIT AT LEAST 5 MINUTES BEFORE TURNING IT OFF. You can disconnect the AC power cord. If the WARNING indicator flashes or lights red...

Owners Manual
Page 20
... Keystone Adjustment If a projected picture has keystone distortion, correct image with Point e button. Reduce the upper width with the keystone adjustment. 1 Press KEYSTONE button on the remote control or select Keystone on the remote control once more while the keystone dialog box is being corrected turns red. - Reduce the lower width Point d button. Basic Operation Adjusting the Screen Zoom Adjustment Move the Zoom Lever upward / downward to reduce the lower part. - If you press the KEYSTONE on the Setting menu...
... Keystone Adjustment If a projected picture has keystone distortion, correct image with Point e button. Reduce the upper width with the keystone adjustment. 1 Press KEYSTONE button on the remote control or select Keystone on the remote control once more while the keystone dialog box is being corrected turns red. - Reduce the lower width Point d button. Basic Operation Adjusting the Screen Zoom Adjustment Move the Zoom Lever upward / downward to reduce the lower part. - If you press the KEYSTONE on the Setting menu...
Owners Manual
Page 29
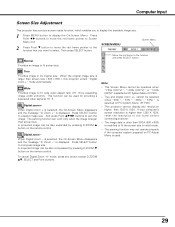
... video signal at 16 : 9. When the original image size is modified to display the On-Screen Menu. Zoom +" is selected, the On-Screen Menu disappears and the message "D. This projector cannot display any button except D.ZOOM ed, SELECT and Point buttons. Digital zoom + When Digital zoom + is displayed. cannot be used . 29 Computer Input Screen Size Adjustment This projector has a picture screen resize function, which enables you want to compress image size. A projected image can work only when the image is selected on the remote control. The image data...
... video signal at 16 : 9. When the original image size is modified to display the On-Screen Menu. Zoom +" is selected, the On-Screen Menu disappears and the message "D. This projector cannot display any button except D.ZOOM ed, SELECT and Point buttons. Digital zoom + When Digital zoom + is displayed. cannot be used . 29 Computer Input Screen Size Adjustment This projector has a picture screen resize function, which enables you want to compress image size. A projected image can work only when the image is selected on the remote control. The image data...

Owners Manual
Page 37
... the lamp power consumption, and extends the lamp life. Shutdown . . . . . Power management If the input signal is interrupted and no button is pressed for 30 seconds or more . Press the SELECT button at Power management to project the image from a ceiling mounted projector. Lamp mode Press Point 7 8 buttons to change brightness of three settings with the Point 7 8 button. In this condition, the projection lamp will be set time with the Point 7 8 button, and navigate to a rear projection screen...
... the lamp power consumption, and extends the lamp life. Shutdown . . . . . Power management If the input signal is interrupted and no button is pressed for 30 seconds or more . Press the SELECT button at Power management to project the image from a ceiling mounted projector. Lamp mode Press Point 7 8 buttons to change brightness of three settings with the Point 7 8 button. In this condition, the projection lamp will be set time with the Point 7 8 button, and navigate to a rear projection screen...

Owners Manual
Page 38
... normal code (Code 1). To return to reset the lamp replace counter. This item is replaced, the remote control code automatically returns to show this function. It is useful to prevent operation by using the PAGE ed buttons on the remote control together for the lamp counter to "Code 2." Select [Yes] to "Code 2." When operating the projector in the SETTING MENU to the factory default settings. Note : When battery of the top control. SELECT VOLUME+ D.ZOOM PAGE KEYSTONE NO SHOW AUTO PC P-TIMER IMAGE...
... normal code (Code 1). To return to reset the lamp replace counter. This item is replaced, the remote control code automatically returns to show this function. It is useful to prevent operation by using the PAGE ed buttons on the remote control together for the lamp counter to "Code 2." Select [Yes] to "Code 2." When operating the projector in the SETTING MENU to the factory default settings. Note : When battery of the top control. SELECT VOLUME+ D.ZOOM PAGE KEYSTONE NO SHOW AUTO PC P-TIMER IMAGE...

Owners Manual
Page 39
... VIDEO input source. ( ☞ P30 ) i P-TIMER button Operates the P-timer function. ( ☞ P21 ) o NO SHOW button Temporarily turns off the image on the computer. Some computer settings may have to be changed in order for 10 seconds or more to switch the code. ( ☞ P38 ) Compatible computers Windows • Windows 98 / 2000/ Me / XP ✽ Compatible with the VGA cable. 2 Connect the Presentation Remote Receiver to the USB port of your computer's owner's manual...
... VIDEO input source. ( ☞ P30 ) i P-TIMER button Operates the P-timer function. ( ☞ P21 ) o NO SHOW button Temporarily turns off the image on the computer. Some computer settings may have to be changed in order for 10 seconds or more to switch the code. ( ☞ P38 ) Compatible computers Windows • Windows 98 / 2000/ Me / XP ✽ Compatible with the VGA cable. 2 Connect the Presentation Remote Receiver to the USB port of your computer's owner's manual...
Owners Manual
Page 40
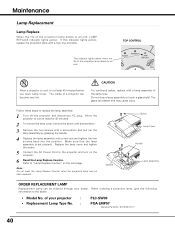
...; Model No. Make sure that the lamp assembly is set properly. Note : Do not reset the Lamp Replace Counter when the projection lamp has not been replaced. TOP CONTROL This indicator lights yellow when the life of a projector can become very hot. Do not drop a lamp assembly or touch a glass bulb! Replace the lamp cover and tighten the screw. 5 Connect the AC Power Cord to an end, LAMP REPLACE indicator lights yellow. Maintenance Lamp Replacement Lamp Replace When the life of the projection lamp draws to the projector...
...; Model No. Make sure that the lamp assembly is set properly. Note : Do not reset the Lamp Replace Counter when the projection lamp has not been replaced. TOP CONTROL This indicator lights yellow when the life of a projector can become very hot. Do not drop a lamp assembly or touch a glass bulb! Replace the lamp cover and tighten the screw. 5 Connect the AC Power Cord to an end, LAMP REPLACE indicator lights yellow. Maintenance Lamp Replacement Lamp Replace When the life of the projection lamp draws to the projector...

Owners Manual
Page 41
... the LAMP REPLACEMENT section of this manual. ) Continuous use of the lamp with a new one should be replaced, i.e., if the LAMP REPLACE INDICATOR lights up carefully. Inappropriate attempts to service the unit by pieces of use . The message "Lamp replace counter reset?" LAMP HANDLING PRECAUTIONS This projector uses a high-pressure lamp which the projector and lamp are familiar with projector service. Contact an authorized service station for each lamp. Press Point 7 8 button(s) to move the red frame pointer to the Setting Menu icon...
... the LAMP REPLACEMENT section of this manual. ) Continuous use of the lamp with a new one should be replaced, i.e., if the LAMP REPLACE INDICATOR lights up carefully. Inappropriate attempts to service the unit by pieces of use . The message "Lamp replace counter reset?" LAMP HANDLING PRECAUTIONS This projector uses a high-pressure lamp which the projector and lamp are familiar with projector service. Contact an authorized service station for each lamp. Press Point 7 8 button(s) to move the red frame pointer to the Setting Menu icon...

Owners Manual
Page 42
... POWER indicator lights red and the projector can be hot? Note : After the temperature inside and the WARNING indicator lights red. Install the projector away from the ventilation duct of the function which may be turned on. Clean the air filters periodically. Top Control POWER WARNING LAMP REPLACE WARNING lights red IN F 42 In this case, disconnect the AC power cord and reconnect it is being cooled down to be ventilated? Check the state of the projector. Top Control POWER WARNING LAMP REPLACE WARNING flashing red...
... POWER indicator lights red and the projector can be hot? Note : After the temperature inside and the WARNING indicator lights red. Install the projector away from the ventilation duct of the function which may be turned on. Clean the air filters periodically. Top Control POWER WARNING LAMP REPLACE WARNING lights red IN F 42 In this case, disconnect the AC power cord and reconnect it is being cooled down to be ventilated? Check the state of the projector. Top Control POWER WARNING LAMP REPLACE WARNING flashing red...
Owners Manual
Page 44
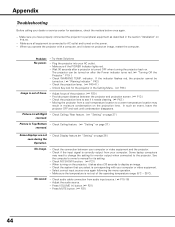
... indicator flashes red, the projector cannot be turned on after a projector is turned OFF when turning the projector back on. Provide proper distance between your computer or video equipment. - Picture is Top/Bottom - Picture is Left/Right - Check the connection between the projector and projection screen. ( ☞ P13 ) - Problem: No power. - Check WARNING TEMP. Unlock Key lock for assistance, check the matters below once again. - Adjust focus of the operating temperature range (5°C ~ 35°C). Moving the projector from a cool temperature location...
... indicator flashes red, the projector cannot be turned on after a projector is turned OFF when turning the projector back on. Provide proper distance between your computer or video equipment. - Picture is Top/Bottom - Picture is Left/Right - Check the connection between the projector and projection screen. ( ☞ P13 ) - Problem: No power. - Check WARNING TEMP. Unlock Key lock for assistance, check the matters below once again. - Adjust focus of the operating temperature range (5°C ~ 35°C). Moving the projector from a cool temperature location...

Owners Manual
Page 46
...; flashes red. • • • off again, disconnect the AC power cord and contact the dealer or the service center for service and checkup. Check and clean the air filters. The projector cannot be turned on the projector, the WARNING indicator stops flashing. If the ✽ projector is turned off ✽ When the life of the lamp. ( ☞ P40-41) 46 When this indicator lights yellow, replace the projection lamp with the POWER ON-OFF button. ✽ The projector...
...; flashes red. • • • off again, disconnect the AC power cord and contact the dealer or the service center for service and checkup. Check and clean the air filters. The projector cannot be turned on the projector, the WARNING indicator stops flashing. If the ✽ projector is turned off ✽ When the life of the lamp. ( ☞ P40-41) 46 When this indicator lights yellow, replace the projection lamp with the POWER ON-OFF button. ✽ The projector...


