
Assembly Manual
Page 1
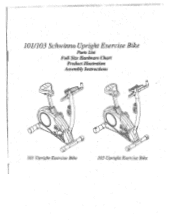
e. • • sx., A,$!•"• 4%0 .••• 101/103 Schwinn® Upright Exercise Bike Parts List Full.Size Hardware.chart Product Illustration Assembly Instructions 101 Upright Exercise Bike 103 Upright Exercise Bike
e. • • sx., A,$!•"• 4%0 .••• 101/103 Schwinn® Upright Exercise Bike Parts List Full.Size Hardware.chart Product Illustration Assembly Instructions 101 Upright Exercise Bike 103 Upright Exercise Bike
Assembly Manual
Page 2
...are adequately informed of all users of this product. It is intended for foot protection. Read all warnings posted on the Schwinn 101/103 is especially important for protection. 5. This is 275 lbs. Always wear athletic shoes for home use this equipment for ... tighten all instructions before using. WARNING: Before beginning this manual and in the accompanying literature and follow them carefully before using the Schwinn 101/103. 1. IMPORTANT PRECAUTIONS WARNING: To reduce the risk of serious injury, please read the following precautions before using the equipment. 3, ...
...are adequately informed of all users of this product. It is intended for foot protection. Read all warnings posted on the Schwinn 101/103 is especially important for protection. 5. This is 275 lbs. Always wear athletic shoes for home use this equipment for ... tighten all instructions before using. WARNING: Before beginning this manual and in the accompanying literature and follow them carefully before using the Schwinn 101/103. 1. IMPORTANT PRECAUTIONS WARNING: To reduce the risk of serious injury, please read the following precautions before using the equipment. 3, ...
Assembly Manual
Page 3
each of only a few setup steps. Included is divided into 7 easy stages; 101/103 Schwinn Upright Bike Parts List, Hardware Chart, and Assembly Instructions Assembly of the enclosed assembly hardware. Before proceeding with the assembly, please read over the easy... complete the assembly: 6mm Allen wrench (supplied) Open wrench 13mm, 14mm, 15mm (supplied) Phillips screwdriver (supplied) Also, to each of the 101/103 Upright Bike is a handy full size hardware chart and parts list of each comprised of the required assembly hardware. Simply match up the corresponding hardware to ensure...
each of only a few setup steps. Included is divided into 7 easy stages; 101/103 Schwinn Upright Bike Parts List, Hardware Chart, and Assembly Instructions Assembly of the enclosed assembly hardware. Before proceeding with the assembly, please read over the easy... complete the assembly: 6mm Allen wrench (supplied) Open wrench 13mm, 14mm, 15mm (supplied) Phillips screwdriver (supplied) Also, to each of the 101/103 Upright Bike is a handy full size hardware chart and parts list of each comprised of the required assembly hardware. Simply match up the corresponding hardware to ensure...

Assembly Manual
Page 4
Check _ _ _ ....._ _ _ _ _ Quantity I 1 1 4 1• 1 1 2 2 1 1 2 I 4 8 1 1 1 I 2 1pr 4 1 2 1 2 1 1 1 1 1 Parts List Description Reference # Computer Handlebar Assembly 2 Heart Rate Cable 3 Computer Mounting Screws 4 Computer/Handlebar Mast 5 Handle Bar Bolt M7 x P1.0 x 3Orrim 6 T-Knob 7 T-Knob Bushing 8 Handlebar Clamp Cover 9 Spring Washers 10 Washers 11 Handlebar Clamp 12 Water Bottle 13 Water Bottle Mounting Screws 14 Water Bottle Cage 15 Allen Bolt M8 x P1.25 x 16mm 1.6 Curved Washers 17 Computer Cable (upper) 18 Computer Cable (lower) 19 Main...
Check _ _ _ ....._ _ _ _ _ Quantity I 1 1 4 1• 1 1 2 2 1 1 2 I 4 8 1 1 1 I 2 1pr 4 1 2 1 2 1 1 1 1 1 Parts List Description Reference # Computer Handlebar Assembly 2 Heart Rate Cable 3 Computer Mounting Screws 4 Computer/Handlebar Mast 5 Handle Bar Bolt M7 x P1.0 x 3Orrim 6 T-Knob 7 T-Knob Bushing 8 Handlebar Clamp Cover 9 Spring Washers 10 Washers 11 Handlebar Clamp 12 Water Bottle 13 Water Bottle Mounting Screws 14 Water Bottle Cage 15 Allen Bolt M8 x P1.25 x 16mm 1.6 Curved Washers 17 Computer Cable (upper) 18 Computer Cable (lower) 19 Main...

Assembly Manual
Page 5
Hardware Chart Note: Please verify you have all correct parts and quantities before assembling unit. '\ Carriage Bolt M8"121.25*75MM (2) .__. . Aosiular Washer Enigiv(a2ror Or 01211(2) Carriage Bolt M8121.2r9OMM C2) Box Spanner (1) CO Acorn Nut for WWII (4) Anon Bolt M7711,0*3044 (1) Alien Key 8M1v1( black)30mmI*84mml (1) l'-shape knob M7*SSMM(1) Clamp of handle bar 4T (1) Bushing 012. 3011/.IM' (1) I O O O O Curved Washer . 08" 0 19"2t (4) i. Screwdriver (1) metal cover (1) 0 CD O O C-'---
Hardware Chart Note: Please verify you have all correct parts and quantities before assembling unit. '\ Carriage Bolt M8"121.25*75MM (2) .__. . Aosiular Washer Enigiv(a2ror Or 01211(2) Carriage Bolt M8121.2r9OMM C2) Box Spanner (1) CO Acorn Nut for WWII (4) Anon Bolt M7711,0*3044 (1) Alien Key 8M1v1( black)30mmI*84mml (1) l'-shape knob M7*SSMM(1) Clamp of handle bar 4T (1) Bushing 012. 3011/.IM' (1) I O O O O Curved Washer . 08" 0 19"2t (4) i. Screwdriver (1) metal cover (1) 0 CD O O C-'---

Assembly Manual
Page 6
If you are missing items, are short quantities, or have damaged components, please contact Schwinn at 1.800.864.1270 101/103 Assembly Drawing with Reference Numbers 1 2 (4- 7 8 9 4 q0) 30 clp 12 29 13 15 27 26 17 a C 23 5
If you are missing items, are short quantities, or have damaged components, please contact Schwinn at 1.800.864.1270 101/103 Assembly Drawing with Reference Numbers 1 2 (4- 7 8 9 4 q0) 30 clp 12 29 13 15 27 26 17 a C 23 5

Assembly Manual
Page 7
Replacement Parts List Reference # Description 1 Computer for 101 Computer for 103 2 Handlebar Assembly for 101 N/A 3 4 5 6 7 8 9 12 14 15 16 17 18 19 21 • 22 23 Foam Grip w/ cap Heart Rate Cable Computer Mounting Screws Computer/... Seat Slider Knob 31 Seat Slider Washer 32 Seat Slider 33 Seat Pad for 101 N/A Right Shroud N/A Left Shroud Part # 18033 18047 18020(101) 18106(103) 18011 18021 18095 18020 18015 18043 18044 18016 18014 18097 18005 18078 18101 18046 18026 18013 18002 98148(101) 18048...
Replacement Parts List Reference # Description 1 Computer for 101 Computer for 103 2 Handlebar Assembly for 101 N/A 3 4 5 6 7 8 9 12 14 15 16 17 18 19 21 • 22 23 Foam Grip w/ cap Heart Rate Cable Computer Mounting Screws Computer/... Seat Slider Knob 31 Seat Slider Washer 32 Seat Slider 33 Seat Pad for 101 N/A Right Shroud N/A Left Shroud Part # 18033 18047 18020(101) 18106(103) 18011 18021 18095 18020 18015 18043 18044 18016 18014 18097 18005 18078 18101 18046 18026 18013 18002 98148(101) 18048...

Assembly Manual
Page 8
Please take just a few moments to read over these instructions to familiarize yourself with the CURVED WASHERS (#17), and ACORN NUTS (#24) into 7 easy-to-follow stages. Each step of the assembly process has been broken down into the holes in the stabilizer and front of all the required assembly hardware and parts with the enclosed parts list and full size hardware chart. Assembly Stage #1 Attach Front and Rear Stabilizer Tubes to make assembly quick and trouble-free. Attach the FRONT STABILIZER TUBE (#21) to the MAIN UNIT (#20) by inserting the two 75rnrn LONG BOLTS (#22) with ...
Please take just a few moments to read over these instructions to familiarize yourself with the CURVED WASHERS (#17), and ACORN NUTS (#24) into 7 easy-to-follow stages. Each step of the assembly process has been broken down into the holes in the stabilizer and front of all the required assembly hardware and parts with the enclosed parts list and full size hardware chart. Assembly Stage #1 Attach Front and Rear Stabilizer Tubes to make assembly quick and trouble-free. Attach the FRONT STABILIZER TUBE (#21) to the MAIN UNIT (#20) by inserting the two 75rnrn LONG BOLTS (#22) with ...

Assembly Manual
Page 9
Attach the REAR STABILIZER TUBE (#25) to the MAIN UNIT (#20) by R and L. Attach right PEDAL (#23) to the Crank Arms on the MAIN UNIT (#20). Thread the pedal onto the crank arm and then tighten with the CURVED WASHERS (#17), and ACORN NUTS (#24) into the holes in the stabilizer and rear of the threads be careful to the left pedal is reversed from the main unit. To avoid stripping of the main unit. Attach left PEDAL (#23) to use the proper pedal. 3. Thread the pedal onto the crank ann and then tighten with an R or an L corresponding to each strap is a right pedal and a left ...
Attach the REAR STABILIZER TUBE (#25) to the MAIN UNIT (#20) by R and L. Attach right PEDAL (#23) to the Crank Arms on the MAIN UNIT (#20). Thread the pedal onto the crank arm and then tighten with the CURVED WASHERS (#17), and ACORN NUTS (#24) into the holes in the stabilizer and rear of the threads be careful to the left pedal is reversed from the main unit. To avoid stripping of the main unit. Attach left PEDAL (#23) to use the proper pedal. 3. Thread the pedal onto the crank ann and then tighten with an R or an L corresponding to each strap is a right pedal and a left ...

Assembly Manual
Page 10
... post. Assembly Stage #3 Attach Seat Post, Slider, and Pad to Main Unit 3 31 30 9 e 0 Assembly Hardware Required: (1) Seat Slider Washer (item #31) (Already attached to bike) 1.
... post. Assembly Stage #3 Attach Seat Post, Slider, and Pad to Main Unit 3 31 30 9 e 0 Assembly Hardware Required: (1) Seat Slider Washer (item #31) (Already attached to bike) 1.

Assembly Manual
Page 11
... the 8mm BOLTS (#16) and CURVED WASHERS (#t1.7) and tighten, 10 Assembly Stage #4 Attach Computer/Handlebar Mast to Main Unit 16 HANDLEBAR 17 POSTER FOR 103 18 19 Assembly Hardware Required: (4) MS Allen Bolt 16nun (item #16) (already on main unit) (4) Curved Washers (item #1.7) (Already on main unit...
... the 8mm BOLTS (#16) and CURVED WASHERS (#t1.7) and tighten, 10 Assembly Stage #4 Attach Computer/Handlebar Mast to Main Unit 16 HANDLEBAR 17 POSTER FOR 103 18 19 Assembly Hardware Required: (4) MS Allen Bolt 16nun (item #16) (already on main unit) (4) Curved Washers (item #1.7) (Already on main unit...
Assembly Manual
Page 12
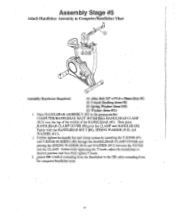
WARIER (#11), • 2. Further tighten the handle bar and clamp system by inserting the T-KNOB (#7) and T-KNOB BUSHING (#8) through the HANDLEBAR. FBARS. CLAMP COVER and placing the SPRING WASHER (#10) and WASHER (#11) between the COVER and the CLAMP. Before fully tightening the T-knob, adjust the handlebars to desired position and then fully tighten T-knob, 3. ,Attach HR CABLE extending from the Handlebar to Computer/Handlebar Mast 7 2 8 6 9 10 ll 2 Assembly Hardware Required: (1) Allen Bolt M7 x P1.0 x 30mm(item #6) (1) T-knob Bushing (item #8) (2) Spring Washer (...
WARIER (#11), • 2. Further tighten the handle bar and clamp system by inserting the T-KNOB (#7) and T-KNOB BUSHING (#8) through the HANDLEBAR. FBARS. CLAMP COVER and placing the SPRING WASHER (#10) and WASHER (#11) between the COVER and the CLAMP. Before fully tightening the T-knob, adjust the handlebars to desired position and then fully tighten T-knob, 3. ,Attach HR CABLE extending from the Handlebar to Computer/Handlebar Mast 7 2 8 6 9 10 ll 2 Assembly Hardware Required: (1) Allen Bolt M7 x P1.0 x 30mm(item #6) (1) T-knob Bushing (item #8) (2) Spring Washer (...

Assembly Manual
Page 13
Assembly Stage #6 Attach Computer Console to Computer/Handlebar Mast re COMPUTER FOR 103 Assembly Hardware Needed: (4) Computer Screws (item #4) (Already attached to the bottom of the COMPUTER (#1). 2. Place the COMPUTER on top of the computer console. 3. Attach UPPER COMPUTER CABLE (#18) exiting top of COMPUTER/HANDLEBAR MAST (#5) to computer) 1. The • reading rack should wrap around the bottom of the COMPUTER/HANDLEBAR MAST. Attach the COMPUTER to the CONIPUTER/HANDLEBAR MAST with the 4 COMPUTER MOUNTING SCREWS (#4). 12
Assembly Stage #6 Attach Computer Console to Computer/Handlebar Mast re COMPUTER FOR 103 Assembly Hardware Needed: (4) Computer Screws (item #4) (Already attached to the bottom of the COMPUTER (#1). 2. Place the COMPUTER on top of the computer console. 3. Attach UPPER COMPUTER CABLE (#18) exiting top of COMPUTER/HANDLEBAR MAST (#5) to computer) 1. The • reading rack should wrap around the bottom of the COMPUTER/HANDLEBAR MAST. Attach the COMPUTER to the CONIPUTER/HANDLEBAR MAST with the 4 COMPUTER MOUNTING SCREWS (#4). 12

Assembly Manual
Page 14
... WATER BOTTLE (#13) into the power input located at the rear of the MAIN UNIT (#20) just above the REAR STABILIZER TUBE (#25), That's it! Schwinn Customer Service 1.800.864.1270 13 Insert the power plug into the wall and the other end into WATER BOTTLE CAGE. • , 3. You're finished...
... WATER BOTTLE (#13) into the power input located at the rear of the MAIN UNIT (#20) just above the REAR STABILIZER TUBE (#25), That's it! Schwinn Customer Service 1.800.864.1270 13 Insert the power plug into the wall and the other end into WATER BOTTLE CAGE. • , 3. You're finished...
Assembly Manual
Page 15
... the rear stabilizer. If heart rate still fails to start , function, or is blank... (SOLUTION): 1, Ensure the unit is plugged into a 110v outlet. 2. Troubleshooting the Schwinn 101, 103 Upright Exercise Bike TIP; PROBLEM: Bike will not start please call 1.800.864.1270 for assistance.
... the rear stabilizer. If heart rate still fails to start , function, or is blank... (SOLUTION): 1, Ensure the unit is plugged into a 110v outlet. 2. Troubleshooting the Schwinn 101, 103 Upright Exercise Bike TIP; PROBLEM: Bike will not start please call 1.800.864.1270 for assistance.
Owner's Manual
Page 2
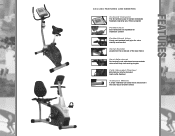
103/203 FEATURES AND BENEFITS On-board Computer The fast and easy way to obtain immediate feedback regarding your fitness program Padded Seat Extra-wide and ... the underside of the base frame Seat Adjustment Fast and easy seat adjustment accommodates riders of all body sizes and leg lengths Fully Shrouded Flywheel Bike features a fully-shrouded high inertia flywheel Transport Wheels A single individual can easily move and position the...
103/203 FEATURES AND BENEFITS On-board Computer The fast and easy way to obtain immediate feedback regarding your fitness program Padded Seat Extra-wide and ... the underside of the base frame Seat Adjustment Fast and easy seat adjustment accommodates riders of all body sizes and leg lengths Fully Shrouded Flywheel Bike features a fully-shrouded high inertia flywheel Transport Wheels A single individual can easily move and position the...

Owner's Manual
Page 3
... fitness 20 Suggested readings 20 Schwinn Fitness Inc. Limited Warranty 21 FITNESS SAFEGUARDS Before starting any exercise program, consult with your particular age and condition. He or she can pedal your exercise and fitness activities. The 103/203 bike should enable you need to ... exercise frequency, intensity (target heart rate zone) and time appropriate for making the Schwinn bike a part of Surgeon's General Report on -board digital computer enables you to use the 103/203 bike 6 How to accurately monitor your physician before getting started . Thank you are general...
... fitness 20 Suggested readings 20 Schwinn Fitness Inc. Limited Warranty 21 FITNESS SAFEGUARDS Before starting any exercise program, consult with your particular age and condition. He or she can pedal your exercise and fitness activities. The 103/203 bike should enable you need to ... exercise frequency, intensity (target heart rate zone) and time appropriate for making the Schwinn bike a part of Surgeon's General Report on -board digital computer enables you to use the 103/203 bike 6 How to accurately monitor your physician before getting started . Thank you are general...
Owner's Manual
Page 4
...problems. • Do not place fingers or any of these safeguards may result in use the bike. Repeat for adults, not children. • Never turn the knob to ensure maximum pedal efficiency. Adjust the 103 seat by hand. Release the seat knob, engaging the locking pin. The knob will need to...to move at a complete STOP. • Warn bystanders to move the seat down on the 103 or forward on the top of the exercise equipment. • Keep children and pets away from the 103/203 bike while machine is bent too much, you feel secure and comfortable. Place one of the pedal...
...problems. • Do not place fingers or any of these safeguards may result in use the bike. Repeat for adults, not children. • Never turn the knob to ensure maximum pedal efficiency. Adjust the 103 seat by hand. Release the seat knob, engaging the locking pin. The knob will need to...to move at a complete STOP. • Warn bystanders to move the seat down on the 103 or forward on the top of the exercise equipment. • Keep children and pets away from the 103/203 bike while machine is bent too much, you feel secure and comfortable. Place one of the pedal...
Owner's Manual
Page 5
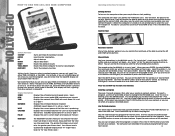
... You will flash. User Defined program This allows you press ENTER, to select MANUAL, the resistance LEVEL bar will flash across the bottom of the bike by pressing ENTER. Your fitness level is turned on it is set a DISTANCE or CALORIE goal, just continue to set LEVEL or a goal as...default goals for that display will count down if it will prompt you to access your workout is pressed. HOW TO USE THE 103/203 BIKE COMPUTER Button Functions ST/STOP ENTER UP DOWN RESET TOTAL RESET RECOVERY Starts and Stops the workout session Used to enter information Adjusts data...
... You will flash. User Defined program This allows you press ENTER, to select MANUAL, the resistance LEVEL bar will flash across the bottom of the bike by pressing ENTER. Your fitness level is turned on it is set a DISTANCE or CALORIE goal, just continue to set LEVEL or a goal as...default goals for that display will count down if it will prompt you to access your workout is pressed. HOW TO USE THE 103/203 BIKE COMPUTER Button Functions ST/STOP ENTER UP DOWN RESET TOTAL RESET RECOVERY Starts and Stops the workout session Used to enter information Adjusts data...

Owner's Manual
Page 6
...value, which will stop automatically. 3. Automatic turn off : If no pedal signal is received. 103/203 RECUMBENT BIKE MAINTENANCE FIG.19 ■ Moving your actual Heart Rate is in both hands on your Schwinn home fitness equipment and exercise in a gym, especially if they want to stay fit. Burke, ... that has different schedules. Once the desired target is one step every 15 seconds until your 103/203 bike Carefully lift the horizontal rear floor support to move and steer the 103 bike to wipe your age. For many people who reported for many , home workouts are being...
...value, which will stop automatically. 3. Automatic turn off : If no pedal signal is received. 103/203 RECUMBENT BIKE MAINTENANCE FIG.19 ■ Moving your actual Heart Rate is in both hands on your Schwinn home fitness equipment and exercise in a gym, especially if they want to stay fit. Burke, ... that has different schedules. Once the desired target is one step every 15 seconds until your 103/203 bike Carefully lift the horizontal rear floor support to move and steer the 103 bike to wipe your age. For many people who reported for many , home workouts are being...