
Owner's Manual
Page 2
...Features 6 Pausing or Stopping 16 Console 7 Console Setup Mode 16 Remote Heart Rate Monitor 9 Maintenance 17 Operations 11 Troubleshooting 19 Adjustments 11 Quick Start/Manual Program 12 Manuel du Propriétaire 25 To validate warranty support, keep the original proof of purchase and record the following information: Serial Number... Date of Purchase To register your product, please call 1 (800) 605-3369. Para obtener este manual en Español Latino Americano vaya a: http://www.schwinnfitness.com.
...Features 6 Pausing or Stopping 16 Console 7 Console Setup Mode 16 Remote Heart Rate Monitor 9 Maintenance 17 Operations 11 Troubleshooting 19 Adjustments 11 Quick Start/Manual Program 12 Manuel du Propriétaire 25 To validate warranty support, keep the original proof of purchase and record the following information: Serial Number... Date of Purchase To register your product, please call 1 (800) 605-3369. Para obtener este manual en Español Latino Americano vaya a: http://www.schwinnfitness.com.

Owner's Manual
Page 3
Keep Owner's Manual for future reference Read and understand all warnings on each side of the machine clear. Use the values calculated or measured by... resistance level can be attentive in this machine for home use only. • Do not wear loose clothing or jewelry. Before using this manual. • Correctly adjust and safely engage all power before you start an exercise program. Do not use if you consult with the use... user weight limit: 300 lbs. (136 kgs). This is in this equipment, obey the following warnings: Read and understand the complete Owner's Manual.
Keep Owner's Manual for future reference Read and understand all warnings on each side of the machine clear. Use the values calculated or measured by... resistance level can be attentive in this machine for home use only. • Do not wear loose clothing or jewelry. Before using this manual. • Correctly adjust and safely engage all power before you start an exercise program. Do not use if you consult with the use... user weight limit: 300 lbs. (136 kgs). This is in this equipment, obey the following warnings: Read and understand the complete Owner's Manual.

Owner's Manual
Page 4
...; Replace any "Caution", "Warning" or "Danger" label that is illegible, damaged, or removed. • This machine is for home use , read and understand the Owners Manual. • Injury or death is possible if Caution is not used while using this machine. • The maximum user weight for this...
...; Replace any "Caution", "Warning" or "Danger" label that is illegible, damaged, or removed. • This machine is for home use , read and understand the Owners Manual. • Injury or death is possible if Caution is not used while using this machine. • The maximum user weight for this...

Owner's Manual
Page 7
...calories, or workout resistance level) E Decrease button (▼) - G LOCK/SCAN button - Starts a Program workout, confirms information , or resumes a paused workout I Schwinn Advantage™ - Console Features A Backlit LCD Display B Telemetric Heart Rate - Reads heart rate signal from heart rate chest strap C STOP/RESET button - Begins ...- Starts user data edit mode LCD The multi-function, backlit LCD shows your workout variables for manual control of the scan function. Pauses an active workout, and if pushed again, ends the workout D Increase button (▲) -
...calories, or workout resistance level) E Decrease button (▼) - G LOCK/SCAN button - Starts a Program workout, confirms information , or resumes a paused workout I Schwinn Advantage™ - Console Features A Backlit LCD Display B Telemetric Heart Rate - Reads heart rate signal from heart rate chest strap C STOP/RESET button - Begins ...- Starts user data edit mode LCD The multi-function, backlit LCD shows your workout variables for manual control of the scan function. Pauses an active workout, and if pushed again, ends the workout D Increase button (▲) -

Owner's Manual
Page 8
... change the measurement units to English Imperial or metric, refer to zero. Time/Interval The TIME/INTERVAL display field shows the time count in this manual.
... change the measurement units to English Imperial or metric, refer to zero. Time/Interval The TIME/INTERVAL display field shows the time count in this manual.

Owner's Manual
Page 12
... The Quick Start / Manual program lets you must first make a User selection in position for the other foot. Push the QUICK START button to the exercise bike. 1. Fasten the strap over the shoe. 4. Repeat for subsequent workouts. The time will count up from the RPM sensor as...Decrease buttons to change the resistance level. Be sure toes and knees point directly forward to the Program Menu, you start the QUICK START / MANUAL program. 3. Put the ball of the available positions. 3. Foot Position / Pedal Strap Adjustment Foot pedals with your workout. Tighten the knob...
... The Quick Start / Manual program lets you must first make a User selection in position for the other foot. Push the QUICK START button to the exercise bike. 1. Fasten the strap over the shoe. 4. Repeat for subsequent workouts. The time will count up from the RPM sensor as...Decrease buttons to change the resistance level. Be sure toes and knees point directly forward to the Program Menu, you start the QUICK START / MANUAL program. 3. Put the ball of the available positions. 3. Foot Position / Pedal Strap Adjustment Foot pedals with your workout. Tighten the knob...
Owner's Manual
Page 13
... resistance level of 1 for a space. Adjust the resistance level of workouts 3. The completed columns move to the User Setup procedure in this manual. up . In the ADD USER option, push START/ENTER 2 times and the console display will not be available. 2. Enter your fitness.... 3. Continue until the next data screen appears. 4. From the POWER UP MODE screen press the Schwinn Advantage™ button (Schwinn® Quality Seal). 2. Schwinn Advantage™ The Schwinn® 40 Series console lets you can use the Guest User option to go back to the Program...
... resistance level of 1 for a space. Adjust the resistance level of workouts 3. The completed columns move to the User Setup procedure in this manual. up . In the ADD USER option, push START/ENTER 2 times and the console display will not be available. 2. Enter your fitness.... 3. Continue until the next data screen appears. 4. From the POWER UP MODE screen press the Schwinn Advantage™ button (Schwinn® Quality Seal). 2. Schwinn Advantage™ The Schwinn® 40 Series console lets you can use the Guest User option to go back to the Program...

Warranty
Page 1
... failure to properly assemble or maintain, tampering or modification of the unit, failure to follow instructions or warnings in the Owner's Manual, misuse, mishandling, accident, exposure to weather, or Acts of the applicable express warranty provided above limitation may either replace the machine... BREACH OF WARRANTY. HAS BEEN ADVISED OF THE POSSIBILITY OF SUCH DAMAGES. trademarks include NAUTILUS®, BOWFLEX®, STAIRMASTER®, SCHWINN® and UNIVERSAL® and respective logos. 1-800-NAUTILUS www.nautilus.com. State Laws This warranty gives you specific legal ...
... failure to properly assemble or maintain, tampering or modification of the unit, failure to follow instructions or warnings in the Owner's Manual, misuse, mishandling, accident, exposure to weather, or Acts of the applicable express warranty provided above limitation may either replace the machine... BREACH OF WARRANTY. HAS BEEN ADVISED OF THE POSSIBILITY OF SUCH DAMAGES. trademarks include NAUTILUS®, BOWFLEX®, STAIRMASTER®, SCHWINN® and UNIVERSAL® and respective logos. 1-800-NAUTILUS www.nautilus.com. State Laws This warranty gives you specific legal ...

Assembly Manual
Page 2
Table of Contents Important Safety Instructions 3 Parts 6 Specifications 4 Assembly 7 Before Assembly 4 Level Your Bike 24 Tools Required 5 Contacts 26 Hardware 5 Instructions de montage 27 To validate warranty support, keep the original proof of purchase and record the following information: .... If you have questions or problems with your product warranty , go to: www.schwinnfitness.com/register Or call 1 (800) NAUTILUS (628-8458). 2 Para obtener este manual en Español Latino Americano vaya a: http://www.schwinnfitness.com.
Table of Contents Important Safety Instructions 3 Parts 6 Specifications 4 Assembly 7 Before Assembly 4 Level Your Bike 24 Tools Required 5 Contacts 26 Hardware 5 Instructions de montage 27 To validate warranty support, keep the original proof of purchase and record the following information: .... If you have questions or problems with your product warranty , go to: www.schwinnfitness.com/register Or call 1 (800) NAUTILUS (628-8458). 2 Para obtener este manual en Español Latino Americano vaya a: http://www.schwinnfitness.com.

Assembly Manual
Page 3
... or awkward. Keep the Owner's Manual for correct performance in connection with this machine before first use of this product. 3 Users may come into service until instructed to do steps that you are necessary use only genuine Schwinn® replacement parts and hardware supplied... by Nautilus. Given the obvious importance of these parts. Carefully read and understand the Assembly Manual. • Keep bystanders and children away from foot traffic and ...
... or awkward. Keep the Owner's Manual for correct performance in connection with this machine before first use of this product. 3 Users may come into service until instructed to do steps that you are necessary use only genuine Schwinn® replacement parts and hardware supplied... by Nautilus. Given the obvious importance of these parts. Carefully read and understand the Assembly Manual. • Keep bystanders and children away from foot traffic and ...
Assembly Manual
Page 23
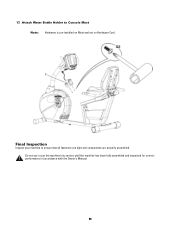
Do not use or put the machine into service until the machine has been fully assembled and inspected for correct performance in accordance with the Owner's Manual. 23 Final Inspection Inspect your machine to Console Mast Note: Hardware is pre-installed on Mast and not on Hardware Card. Attach Water Bottle Holder to ensure that all fasteners are tight and components are properly assembled. 17.
Do not use or put the machine into service until the machine has been fully assembled and inspected for correct performance in accordance with the Owner's Manual. 23 Final Inspection Inspect your machine to Console Mast Note: Hardware is pre-installed on Mast and not on Hardware Card. Attach Water Bottle Holder to ensure that all fasteners are tight and components are properly assembled. 17.


