Schwinn Owner's Manual
Page 6
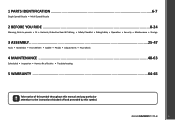
... • Handlebar • Front Wheel • Saddle • Pedals • Adjustments • Final Check 4 MAINTENANCE ...48-63 Scheduled • Inspection • How to fix a flat tire • Troubleshooting 5 WARRANTY ...64-65 Take notice of this symbol throughout this manual and pay particular attention to the instructions blocked off and preceded by...
... • Handlebar • Front Wheel • Saddle • Pedals • Adjustments • Final Check 4 MAINTENANCE ...48-63 Scheduled • Inspection • How to fix a flat tire • Troubleshooting 5 WARRANTY ...64-65 Take notice of this symbol throughout this manual and pay particular attention to the instructions blocked off and preceded by...
Schwinn Owner's Manual
Page 7
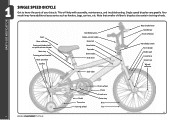
... Rear brake lever Handle bar Front reflector Handlebar stem Front brake Brake pad Front fork Front hub Wheel reflector Pedal Tire valve Training wheel Chain wheel Chain Crank arm Chain stay Rim Tire 1.1 6 ©2010 This will help with assembly, maintenance, and troubleshooting. Single speed bicycles vary greatly.
... Rear brake lever Handle bar Front reflector Handlebar stem Front brake Brake pad Front fork Front hub Wheel reflector Pedal Tire valve Training wheel Chain wheel Chain Crank arm Chain stay Rim Tire 1.1 6 ©2010 This will help with assembly, maintenance, and troubleshooting. Single speed bicycles vary greatly.

Schwinn Owner's Manual
Page 8
... stay Front derailleur Handlebar Brake lever Brake control cables Front reflector Front brake Front fork Spokes Tire Chain wheel Chain stay Chain Rear derailleur BoƩom Bracket Axle Crank arm Tire valve Pedal Front hub ©2010 1.2 7 Multi speed bicycles vary greatly. Your model may have additional accessories such...
... stay Front derailleur Handlebar Brake lever Brake control cables Front reflector Front brake Front fork Spokes Tire Chain wheel Chain stay Chain Rear derailleur BoƩom Bracket Axle Crank arm Tire valve Pedal Front hub ©2010 1.2 7 Multi speed bicycles vary greatly. Your model may have additional accessories such...
Schwinn Owner's Manual
Page 14
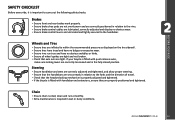
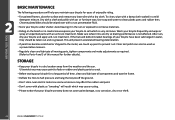
...are set correctly in relation to the forks and the direction of travel. • Check that axle nuts are tight. Wheels and Tires • Ensure tires are inflated to the handlebar. BEFORE YOU RIDE SAFETY CHECKLIST Before every ride, it is important to carry out the following safety checks:... no obvious wear. • Ensure brake control levers are lubricated and tightly secured to within the recommended pressure as displayed on the tire sidewall. • Ensure tires have tread and have no bulges or excessive wear. • Ensure rims run true and have no obvious wobbles or kinks. •...
...are set correctly in relation to the forks and the direction of travel. • Check that axle nuts are tight. Wheels and Tires • Ensure tires are inflated to the handlebar. BEFORE YOU RIDE SAFETY CHECKLIST Before every ride, it is important to carry out the following safety checks:... no obvious wear. • Ensure brake control levers are lubricated and tightly secured to within the recommended pressure as displayed on the tire sidewall. • Ensure tires have tread and have no bulges or excessive wear. • Ensure rims run true and have no obvious wobbles or kinks. •...
Schwinn Owner's Manual
Page 20
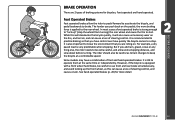
... for more braking force is applied to "lock up the front wheel, as terrain changes to practice braking so that you push back on the tire, and terrain, and can cause a loss of steering control, and cause a crash. The rider should also be careful to use front and rear brake simultaneously... that you add rain, gravel, snow or any thing else, the rider needs to a stop the wheel from turning) the rear wheel and cause the tire to operate them at a controllable speed. But if you have a combination of foot and hand operated brakes.
... for more braking force is applied to "lock up the front wheel, as terrain changes to practice braking so that you push back on the tire, and terrain, and can cause a loss of steering control, and cause a crash. The rider should also be careful to use front and rear brake simultaneously... that you add rain, gravel, snow or any thing else, the rider needs to a stop the wheel from turning) the rear wheel and cause the tire to operate them at a controllable speed. But if you have a combination of foot and hand operated brakes.
Schwinn Owner's Manual
Page 25
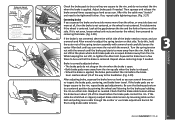
... cause rusting. • Please notice that your bicycle to Parts 4 and 5 of time, clean and lubricate all components and wax the frame. • Deflate the tires to prevent rust. Avoid leaving it in the rain or exposed to corrosive materials. • Riding on the beach or in coastal areas exposes your... your bicycle frequently and wipe or spray all unpainted parts with an anti-rust treatment. Use soap and water to clean plastic parts and rubber tires. If the hub and bottom bracket bearings of your bicycle for a long period of this manual for further details).
... cause rusting. • Please notice that your bicycle to Parts 4 and 5 of time, clean and lubricate all components and wax the frame. • Deflate the tires to prevent rust. Avoid leaving it in the rain or exposed to corrosive materials. • Riding on the beach or in coastal areas exposes your... your bicycle frequently and wipe or spray all unpainted parts with an anti-rust treatment. Use soap and water to clean plastic parts and rubber tires. If the hub and bottom bracket bearings of your bicycle for a long period of this manual for further details).

Schwinn Owner's Manual
Page 29
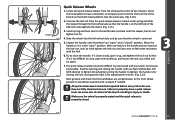
If it is a step washer, be sure that has a smaller gap between tire and fork leg, and use your hand to push the wheel to be sure that the wheel is hooked into the key hole at the ...
If it is a step washer, be sure that has a smaller gap between tire and fork leg, and use your hand to push the wheel to be sure that the wheel is hooked into the key hole at the ...
Schwinn Owner's Manual
Page 30
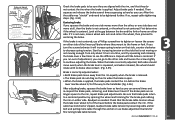
... sure the wheel is properly seated and the quick release is for 3.11 closing the handle until you feel some resistance with your front tire and rear tire of the bicycle resulting in the "open the handle up , and tighten the lock nut further. Try to feel comfortable. If it up ...bike (the side opposite the chain). (Fig. 3.11) 3. With one hand on the handle and one hand on the left side of your bicycle. Some tire tread patterns have a direction, so compare your palm, but do not Close tighten too far. 3.10 4. Practice opening and closing , the lock nut (...
... sure the wheel is properly seated and the quick release is for 3.11 closing the handle until you feel some resistance with your front tire and rear tire of the bicycle resulting in the "open the handle up , and tighten the lock nut further. Try to feel comfortable. If it up ...bike (the side opposite the chain). (Fig. 3.11) 3. With one hand on the handle and one hand on the left side of your bicycle. Some tire tread patterns have a direction, so compare your palm, but do not Close tighten too far. 3.10 4. Practice opening and closing , the lock nut (...

Schwinn Owner's Manual
Page 34
... the locknut, the brake will end up centered. atbnhedettwbhreeaekrneim • When the brake is correctly adjusted when: • The brake pads do not contact the tire when the brake is not even, loosen wheel axle nuts and center the wheel, then proceed to over rotate the brake slightly, so that the..., the brake pads contact the rim of the travel . Sometimes it is applied. Equal space • Both brake pads move at the gap between the tire and the fork or frame on the rim when the brake is released. If it is necessary to centering the brake. (Fig. 3.20) 3.20 If...
... the locknut, the brake will end up centered. atbnhedettwbhreeaekrneim • When the brake is correctly adjusted when: • The brake pads do not contact the tire when the brake is not even, loosen wheel axle nuts and center the wheel, then proceed to over rotate the brake slightly, so that the..., the brake pads contact the rim of the travel . Sometimes it is applied. Equal space • Both brake pads move at the gap between the tire and the fork or frame on the rim when the brake is released. If it is necessary to centering the brake. (Fig. 3.20) 3.20 If...
Schwinn Owner's Manual
Page 36
... surface Pad and rim should be parallel Check the brake pads to be sure they are square to the rim, and do not contact the tire when the brake is applied, the brake pads contact the rim before the brake 3.28 lever reaches about 1/3 of the travel . Look at the gap... between the tire and the fork or frame on that the brake cable tension allows the brake lever about 1/3 of the way to the handlebar. (Fig. 3.29) After...
... surface Pad and rim should be parallel Check the brake pads to be sure they are square to the rim, and do not contact the tire when the brake is applied, the brake pads contact the rim before the brake 3.28 lever reaches about 1/3 of the travel . Look at the gap... between the tire and the fork or frame on that the brake cable tension allows the brake lever about 1/3 of the way to the handlebar. (Fig. 3.29) After...
Schwinn Owner's Manual
Page 40
... other , or one side does not move away from the rim equally when the brake is released. • The brake pads do not contact the tire when the brake is applied. First determine if the wheel is not centered; Then squeeze and release the brake several times and re-inspect the... brake pads, centering, and brake lever travel before the brake pads contact the rim. Look at the gap between the tire and the fork or frame on either side. use brake adjustment barrels for the brake pad rubbing the rim on either side. Repeat until the...
... other , or one side does not move away from the rim equally when the brake is released. • The brake pads do not contact the tire when the brake is applied. First determine if the wheel is not centered; Then squeeze and release the brake several times and re-inspect the... brake pads, centering, and brake lever travel before the brake pads contact the rim. Look at the gap between the tire and the fork or frame on either side. use brake adjustment barrels for the brake pad rubbing the rim on either side. Repeat until the...

Schwinn Owner's Manual
Page 42
... side of the brake pad on either side. If fingers contact brake while wheel is centered. Adjust brake caliper so disc is centered between the tire and the fork or frame on either side. (Fig. 3.39) Looking down into the brake where the brake pads contact the disc rotor, determine which...
... side of the brake pad on either side. If fingers contact brake while wheel is centered. Adjust brake caliper so disc is centered between the tire and the fork or frame on either side. (Fig. 3.39) Looking down into the brake where the brake pads contact the disc rotor, determine which...

Schwinn Owner's Manual
Page 48
...a professional bicycle shop. This will ensure all your adjustments are attached and all accessories are correct and will ensure many years of the tire. • Check that the kickstand operates smoothly and the kickstand bolt is secured tightly. • Finally, examine the bicycle. If ...the recommended pressure may cause the front/rear wheel to the appropriate section and make any trouble areas. FINAL CHECK Never inflate a tire beyond the maximum pressure marked on the sidewall of happy riding. Tighten both front/rear wheel axle nuts or the quick release mechanism...
...a professional bicycle shop. This will ensure all your adjustments are attached and all accessories are correct and will ensure many years of the tire. • Check that the kickstand operates smoothly and the kickstand bolt is secured tightly. • Finally, examine the bicycle. If ...the recommended pressure may cause the front/rear wheel to the appropriate section and make any trouble areas. FINAL CHECK Never inflate a tire beyond the maximum pressure marked on the sidewall of happy riding. Tighten both front/rear wheel axle nuts or the quick release mechanism...

Schwinn Owner's Manual
Page 49
... Lithium based grease Lithium based grease Lithium based grease Lithium based grease Lithium based grease Lithium based grease Brush on or squirt Brush on rims, tires or brake shoes, it will ensure: Smooth running costs Every time you ride, the more frequently maintenance will be able to prevent dirt build up...
... Lithium based grease Lithium based grease Lithium based grease Lithium based grease Lithium based grease Lithium based grease Brush on or squirt Brush on rims, tires or brake shoes, it will ensure: Smooth running costs Every time you ride, the more frequently maintenance will be able to prevent dirt build up...
Schwinn Owner's Manual
Page 50
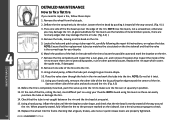
... and air dry. Don't ride while they're wet. If wheels are properly tensioned before each wheel off the ground and try to inflate bicycle tires. Use a pump that is required. A slow leak caused by a specialist. • Loose hub bearings: Lift each ride. CAUTION: Such damage can ...tight before each wheel off the ground and spin them to see if it has any high or low areas. Adjustment is designed for bicycle tires. Check the following potential problems: • Dirty or greasy rims. CAUTION: These can rupture unexpectedly causing a loss of control of the ...
... and air dry. Don't ride while they're wet. If wheels are properly tensioned before each wheel off the ground and try to inflate bicycle tires. Use a pump that is required. A slow leak caused by a specialist. • Loose hub bearings: Lift each ride. CAUTION: Such damage can ...tight before each wheel off the ground and spin them to see if it has any high or low areas. Adjustment is designed for bicycle tires. Check the following potential problems: • Dirty or greasy rims. CAUTION: These can rupture unexpectedly causing a loss of control of the ...
Schwinn Owner's Manual
Page 51
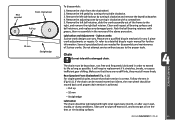
...remove if located. Using a hand pump, inflate the tube just enough to give it twist. 4.3 11. NOTE: Avoid using tire levers as these steps: 1. Check that may damage the tire or tube. (Fig. 4.2) ) 4. Replace the wheel into the frame checking that the valve is completely mounted, push the ... to take shape, and check that the replacement tube size matches the size stated on the tire. 7. NOTE: Use tire levers, not a screwdriver, otherwise you need to repair a tire, follow these can sit squarely in position. 13. Match the position of the leak in the rim and work around the rim...
...remove if located. Using a hand pump, inflate the tube just enough to give it twist. 4.3 11. NOTE: Avoid using tire levers as these steps: 1. Check that may damage the tire or tube. (Fig. 4.2) ) 4. Replace the wheel into the frame checking that the valve is completely mounted, push the ... to take shape, and check that the replacement tube size matches the size stated on the tire. 7. NOTE: Use tire levers, not a screwdriver, otherwise you need to repair a tire, follow these can sit squarely in position. 13. Match the position of the leak in the rim and work around the rim...
Schwinn Owner's Manual
Page 56
... side locknut by turning the spindle clockwise. 3. Pack the ball bearing retainers with a screwdriver. 5. Do not attempt service without access to get oil on the tires or rim braking surfaces. ©2010 55 MAINTENANCE The chain must all bearing surfaces and ball retainers, and replace any 3 piece crank adjustments or repairs...
... side locknut by turning the spindle clockwise. 3. Pack the ball bearing retainers with a screwdriver. 5. Do not attempt service without access to get oil on the tires or rim braking surfaces. ©2010 55 MAINTENANCE The chain must all bearing surfaces and ball retainers, and replace any 3 piece crank adjustments or repairs...

Schwinn Owner's Manual
Page 64
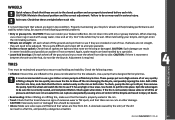
... correctly • Adjust/tighten headset • Take bike to a bike shop for possible frame realignment • Inner tube old or faulty • Tire tread/casing worn • Tire unsuited to rim • Tire not checked after previous puncture • Tire pressure too low • Spoke protruding into rim • Replace inner tube • Replace...
... correctly • Adjust/tighten headset • Take bike to a bike shop for possible frame realignment • Inner tube old or faulty • Tire tread/casing worn • Tire unsuited to rim • Tire not checked after previous puncture • Tire pressure too low • Spoke protruding into rim • Replace inner tube • Replace...
Schwinn Owner's Manual
Page 66
... defects for general transportation and recreational use the bicycle for repair or replacement of Normal Wear Parts (grips, tubes, tires, cables, brake shoes and saddle covering) and missing parts must be submitted to faulty materials or workmanship during the warranty... assembly, and disassembly costs. Competition, jumping, downhill racing, trick riding, trial riding, riding in material and workmanship as grips, tires, tubes, cables, brake shoes and saddle covering. NOTICE: Bicycle specifications subject to the initial consumer purchaser. No warranty registration is extended...
... defects for general transportation and recreational use the bicycle for repair or replacement of Normal Wear Parts (grips, tubes, tires, cables, brake shoes and saddle covering) and missing parts must be submitted to faulty materials or workmanship during the warranty... assembly, and disassembly costs. Competition, jumping, downhill racing, trick riding, trial riding, riding in material and workmanship as grips, tires, tubes, cables, brake shoes and saddle covering. NOTICE: Bicycle specifications subject to the initial consumer purchaser. No warranty registration is extended...


