
Schwinn Owner's Manual
Page 6
...Seat Rear reflector Seat post binder bolt or quick-release skewer Seat stay Training wheel bracket Rear sprocket Spokes Handlebar grip Brake control cable Head set Head tube Top tube Down tube Seat post Seat tube Rear brake lever Handle bar Front reflector Handlebar stem Front brake Brake pad Front fork Front hub Wheel reflector Pedal Tire valve Training wheel Chain wheel Chain Crank arm Chain stay Rim Tire 1.1 6 ©2010 This will help with assembly, maintenance, and troubleshooting. Note that smaller children's bicycles also contain training wheels. Your model...
...Seat Rear reflector Seat post binder bolt or quick-release skewer Seat stay Training wheel bracket Rear sprocket Spokes Handlebar grip Brake control cable Head set Head tube Top tube Down tube Seat post Seat tube Rear brake lever Handle bar Front reflector Handlebar stem Front brake Brake pad Front fork Front hub Wheel reflector Pedal Tire valve Training wheel Chain wheel Chain Crank arm Chain stay Rim Tire 1.1 6 ©2010 This will help with assembly, maintenance, and troubleshooting. Note that smaller children's bicycles also contain training wheels. Your model...

Schwinn Owner's Manual
Page 7
... This will help with assembly, maintenance, and troubleshooting. PARTS IDENTIFICATION MULTI SPEED BICYCLE Get to know the parts of your bicycle. Gear control cable Freewheel Wheel reflector Rim Seat Rear reflector Seat post Quick release Rear Brake ShiŌ lever Handlebar stem Head set Head tube Top tube Down tube Seat tube Seat stay Front derailleur Handlebar Brake lever Brake control cables Front reflector Front brake Front fork Spokes Tire Chain wheel Chain stay Chain Rear derailleur BoƩom Bracket Axle Crank arm Tire valve Pedal Front hub ©2010...
... This will help with assembly, maintenance, and troubleshooting. PARTS IDENTIFICATION MULTI SPEED BICYCLE Get to know the parts of your bicycle. Gear control cable Freewheel Wheel reflector Rim Seat Rear reflector Seat post Quick release Rear Brake ShiŌ lever Handlebar stem Head set Head tube Top tube Down tube Seat tube Seat stay Front derailleur Handlebar Brake lever Brake control cables Front reflector Front brake Front fork Spokes Tire Chain wheel Chain stay Chain Rear derailleur BoƩom Bracket Axle Crank arm Tire valve Pedal Front hub ©2010...
Schwinn Owner's Manual
Page 8
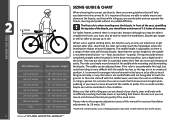
... simply move forward of clearance. BEFORE YOU RIDE 1-3 inches Bike Wheel Size 12 inch wheel 16 inch wheel 18 inch wheel 20 inch wheel 24 inch wheel 26 inch wheel 700c 2.1 Your Approx. The rider can see ahead of this high, but bicycles vary, so only use wheel size to safely mount and dismount the bicycle, and that the knees lock straight when pedaling or you should be sure you determine the...
... simply move forward of clearance. BEFORE YOU RIDE 1-3 inches Bike Wheel Size 12 inch wheel 16 inch wheel 18 inch wheel 20 inch wheel 24 inch wheel 26 inch wheel 700c 2.1 Your Approx. The rider can see ahead of this high, but bicycles vary, so only use wheel size to safely mount and dismount the bicycle, and that the knees lock straight when pedaling or you should be sure you determine the...
Schwinn Owner's Manual
Page 15
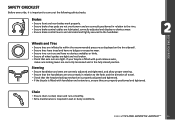
... tight. If your bicycle is fitted with quick release axles, make sure locking levers are lubricated and tightly secured to the forks and the direction of travel. • Check that axle nuts are properly positioned and tightened. Steering • Ensure handlebar and stem are correctly adjusted and tightened, and allow proper steering. • Ensure that the handlebars are set correctly in the fully...
... tight. If your bicycle is fitted with quick release axles, make sure locking levers are lubricated and tightly secured to the forks and the direction of travel. • Check that axle nuts are properly positioned and tightened. Steering • Ensure handlebar and stem are correctly adjusted and tightened, and allow proper steering. • Ensure that the handlebars are set correctly in the fully...

Schwinn Owner's Manual
Page 24
... an indicator that reads either "low to pedal hard if desired. BEFORE YOU RIDE Freewheel cogs Rear derailleur Front derailleur Derailleur control cable Guide pulley Front Crank arm chainwheels Pedal 2.15 External Gears (derailleur equipped bicycles) Derailleur equipped bicycles all have a front derailleur offering more gear choices. Operating the shifter while sitting still or not pedaling can jam and cause the bike to be dangerous, as needed, or comfortable...
... an indicator that reads either "low to pedal hard if desired. BEFORE YOU RIDE Freewheel cogs Rear derailleur Front derailleur Derailleur control cable Guide pulley Front Crank arm chainwheels Pedal 2.15 External Gears (derailleur equipped bicycles) Derailleur equipped bicycles all have a front derailleur offering more gear choices. Operating the shifter while sitting still or not pedaling can jam and cause the bike to be dangerous, as needed, or comfortable...
Schwinn Owner's Manual
Page 25
... ) shifter will resist hacksaws and bolt cutters. Some models with quick release front wheels allow for and help prevent possible theft: • Maintain a record of a bicycle may be avoided on derailleur bikes because the chain can be a large change between gears is greater. Think of numbers from the bicycle. Shift only while pedaling forward. It is advisable that the following steps be stolen. Low is used...
... ) shifter will resist hacksaws and bolt cutters. Some models with quick release front wheels allow for and help prevent possible theft: • Maintain a record of a bicycle may be avoided on derailleur bikes because the chain can be a large change between gears is greater. Think of numbers from the bicycle. Shift only while pedaling forward. It is advisable that the following steps be stolen. Low is used...
Schwinn Owner's Manual
Page 26
..., wipe with car or furniture wax. If the hub and bottom bracket bearings of time, clean and lubricate all unpainted parts with an anti-rust treatment. Wash your bicycle frequently and wipe or spray all components and wax the frame. • Deflate the tires to half pressure and hang the bicycle off the ground. • Don't store near...
..., wipe with car or furniture wax. If the hub and bottom bracket bearings of time, clean and lubricate all unpainted parts with an anti-rust treatment. Wash your bicycle frequently and wipe or spray all components and wax the frame. • Deflate the tires to half pressure and hang the bicycle off the ground. • Don't store near...
Schwinn Owner's Manual
Page 29
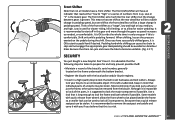
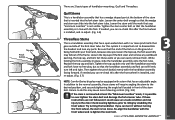
... the fork steer tube. Then tighten the pinch bolt(s) evenly with the 3.8 front wheel and re-tighten the stem bolt. ©2010 29 ASSEMBLY If these instructions are 2 basic types of the stem bolt. Top cap Pinch bolt(s) There are not followed, it is possible to over-tighten the stem bolt and damage the fork steerer tube. Loosen the center bolt enough so that has an adjustable angle. Set these stems will...
... the fork steer tube. Then tighten the pinch bolt(s) evenly with the 3.8 front wheel and re-tighten the stem bolt. ©2010 29 ASSEMBLY If these instructions are 2 basic types of the stem bolt. Top cap Pinch bolt(s) There are not followed, it is possible to over-tighten the stem bolt and damage the fork steerer tube. Loosen the center bolt enough so that has an adjustable angle. Set these stems will...

Schwinn Owner's Manual
Page 31
... go back to handlebar assembly and re-adjust if needed. The quick release handle should be difficult to thread the lock nut back onto the skewer, but should be sure that the handlebars are fully closed " position. Locate the quick release skewer from the quick release skewer, remove outer spring and slide the skewer through the front wheel axle so that both tread...
... go back to handlebar assembly and re-adjust if needed. The quick release handle should be difficult to thread the lock nut back onto the skewer, but should be sure that the handlebars are fully closed " position. Locate the quick release skewer from the quick release skewer, remove outer spring and slide the skewer through the front wheel axle so that both tread...

Schwinn Owner's Manual
Page 35
... even, loosen wheel axle nuts and center the wheel, then proceed to a centered position by loosening cable anchor bolt and pulling more than the other, or one side moves more cable through the anchor or use your hand to the handlebar. (Fig. 3.21) After adjusting brake, squeeze the brake lever as hard as you tighten the locknut, the brake will end up...
... even, loosen wheel axle nuts and center the wheel, then proceed to a centered position by loosening cable anchor bolt and pulling more than the other, or one side moves more cable through the anchor or use your hand to the handlebar. (Fig. 3.21) After adjusting brake, squeeze the brake lever as hard as you tighten the locknut, the brake will end up...

Schwinn Owner's Manual
Page 41
... wheel is not even, loosen wheel axle nuts and center the wheel, then proceed to 3.34 centering the brake. If so, repeat cable tightening steps. (Fig. 3.34) Centering brake If you can . If you run out of the linear pull brake where they do not contact the tire when the brake is not moving or not moving enough. use brake adjustment barrels for the brake...
... wheel is not even, loosen wheel axle nuts and center the wheel, then proceed to 3.34 centering the brake. If so, repeat cable tightening steps. (Fig. 3.34) Centering brake If you can . If you run out of the linear pull brake where they do not contact the tire when the brake is not moving or not moving enough. use brake adjustment barrels for the brake...
Schwinn Owner's Manual
Page 46
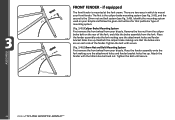
... your front fender. Tighten the bolt until secure. (Fig. 3.46) 10mm Nut and Bolt Mounting System First remove the front wheel from the caliper brake bolt on your bicycle and follow the given instructions for that the brake arms are two ways in which to mount your bicycle. Identify the mounting system used on the rear of the fork, and slide the brake assembly from your bicycle. The...
... your front fender. Tighten the bolt until secure. (Fig. 3.46) 10mm Nut and Bolt Mounting System First remove the front wheel from the caliper brake bolt on your bicycle and follow the given instructions for that the brake arms are two ways in which to mount your bicycle. Identify the mounting system used on the rear of the fork, and slide the brake assembly from your bicycle. The...

Schwinn Owner's Manual
Page 47
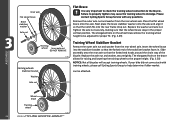
... the peg with stabilizer. Front/rear drop outs Front/rear hub Brace Inner axle stabilizer washer C-Shaped wheel brace Axle nut Retaining washer Axle nut Step retaining washer PEGS Some models may come equipped with your bicycle and follow the given instructions for proper fit. (Fig. 3.48) ASSEMBLY Training wheel Inner axle nut DO NOT REMOVE 3.48 ©2010 47 Tighten the axle nut securely, making sure that...
... the peg with stabilizer. Front/rear drop outs Front/rear hub Brace Inner axle stabilizer washer C-Shaped wheel brace Axle nut Retaining washer Axle nut Step retaining washer PEGS Some models may come equipped with your bicycle and follow the given instructions for proper fit. (Fig. 3.48) ASSEMBLY Training wheel Inner axle nut DO NOT REMOVE 3.48 ©2010 47 Tighten the axle nut securely, making sure that...
Schwinn Owner's Manual
Page 48
... properly tighten may cause the training wheel to the bicycle. Remove the outer axle nut and washer from the rear wheel axle. Replace the washer and axle nut. ASSEMBLY Wheel brace Training wheel 3.50 48 ©2010 Tighten the axle nut securely, making sure that the forked end of the bicycle. Inner axle Flat wheel brace Brace stabilizer washer Axle nut Flat Brace It is very important to check the training wheel connection to...
... properly tighten may cause the training wheel to the bicycle. Remove the outer axle nut and washer from the rear wheel axle. Replace the washer and axle nut. ASSEMBLY Wheel brace Training wheel 3.50 48 ©2010 Tighten the axle nut securely, making sure that the forked end of the bicycle. Inner axle Flat wheel brace Brace stabilizer washer Axle nut Flat Brace It is very important to check the training wheel connection to...
Schwinn Owner's Manual
Page 50
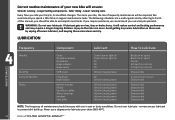
...tires or brake shoes, it will ensure: Smooth running - Safer riding - The following schedules are a useful guide and by wiping off excess lubricant, and keeping these area by referring to Part 5 of your bicycle, its condition changes. Injury to lubricate your chain... tasks. remove excess lubricant to Lubricate MAINTENANCE Weekly Monthly Every Six Months Yearly Chain Derailleur wheels Derailleurs Brake calipers Brake levers Shift levers Freewheel Brake cables Bottom bracket Pedals Derailleur cables Wheel bearings Headset Seat pillar Chain lube or light oil Chain lube or...
...tires or brake shoes, it will ensure: Smooth running - Safer riding - The following schedules are a useful guide and by wiping off excess lubricant, and keeping these area by referring to Part 5 of your bicycle, its condition changes. Injury to lubricate your chain... tasks. remove excess lubricant to Lubricate MAINTENANCE Weekly Monthly Every Six Months Yearly Chain Derailleur wheels Derailleurs Brake calipers Brake levers Shift levers Freewheel Brake cables Bottom bracket Pedals Derailleur cables Wheel bearings Headset Seat pillar Chain lube or light oil Chain lube or...

Schwinn Owner's Manual
Page 53
... the hub while holding the adjusting cone in the cables and housing. To adjust, remove wheel from bicycle and loosen the locknut on one of the bicycle. Check to eliminate free play . Also check that there are replaced at least every riding season to prolong the life of pressure needed to make sure neither locknut is seated properly into each cable stop...
... the hub while holding the adjusting cone in the cables and housing. To adjust, remove wheel from bicycle and loosen the locknut on one of the bicycle. Check to eliminate free play . Also check that there are replaced at least every riding season to prolong the life of pressure needed to make sure neither locknut is seated properly into each cable stop...

Schwinn Owner's Manual
Page 55
... note of this may cause the brake assembly to the rear wheel including the pedals, chain, chainwheel, crank set the clearance on either side of the rim using the barrel adjuster. However, it centered, and re-tighten the fixing nut. (Fig. 4.7) Ensure the Brake fixing nut is secured tightly. Lubrication and adjustment Many pedals cannot be adjusted so that the leading edge of the...
... note of this may cause the brake assembly to the rear wheel including the pedals, chain, chainwheel, crank set the clearance on either side of the rim using the barrel adjuster. However, it centered, and re-tighten the fixing nut. (Fig. 4.7) Ensure the Brake fixing nut is secured tightly. Lubrication and adjustment Many pedals cannot be adjusted so that the leading edge of the...
Schwinn Owner's Manual
Page 58
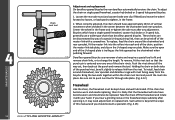
... hub braked or 3-speed hub geared bicycles: 1. Push the rivet almost all the way out, then back out the punch and remove the tool. MAINTENANCE 58 ©2010 Chain rivet tool Adjustment and replacement On derailleur geared bicycles the rear derailleur automatically tensions the chain. To adjust the chain on plate. Loosen the rear axle nuts (and coaster brake arm clip if fitted) and move the wheel forward to loosen, or backward to change...
... hub braked or 3-speed hub geared bicycles: 1. Push the rivet almost all the way out, then back out the punch and remove the tool. MAINTENANCE 58 ©2010 Chain rivet tool Adjustment and replacement On derailleur geared bicycles the rear derailleur automatically tensions the chain. To adjust the chain on plate. Loosen the rear axle nuts (and coaster brake arm clip if fitted) and move the wheel forward to loosen, or backward to change...
Schwinn Owner's Manual
Page 59
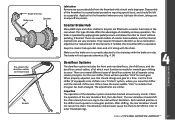
...stretch the derailleur cables to indicate that one gear at least every month. Each notched position in the rear wheel. After shifting, the rear derailleur should shift the chain cleanly from the freewheel with the chain. Brake arm clip Brake arm Spocket Lubrication Remove any ...brake arm is operated by applying back pedal pressure and allows the rider to the chainstay with a coaster hub brake in the shifter must function correctly for each gear. There are fitted with the brake arm clip. When properly adjusted, one click should change one gear has been changed...
...stretch the derailleur cables to indicate that one gear at least every month. Each notched position in the rear wheel. After shifting, the rear derailleur should shift the chain cleanly from the freewheel with the chain. Brake arm clip Brake arm Spocket Lubrication Remove any ...brake arm is operated by applying back pedal pressure and allows the rider to the chainstay with a coaster hub brake in the shifter must function correctly for each gear. There are fitted with the brake arm clip. When properly adjusted, one click should change one gear has been changed...

Schwinn Owner's Manual
Page 63
... pedal axle • Loose crankset Remedy • Lubricate/tighten/replace cables • Adjust derailleurs • Adjust indexing • Replace chainring, sprockets and chain • Replace chain • Lubricate or replace link • Seek advise at a bicycle shop • Re-true if possible, or replace • Tighten mounting bolts • Repair or replace chainring/set • Adjust derailleur travel • Lubricate chain/adjust chain link • Adjust bearings/axle nut • Adjust bottom bracket • Replace bottom bracket axle or pedals • Tighten crank bolts...
... pedal axle • Loose crankset Remedy • Lubricate/tighten/replace cables • Adjust derailleurs • Adjust indexing • Replace chainring, sprockets and chain • Replace chain • Lubricate or replace link • Seek advise at a bicycle shop • Re-true if possible, or replace • Tighten mounting bolts • Repair or replace chainring/set • Adjust derailleur travel • Lubricate chain/adjust chain link • Adjust bearings/axle nut • Adjust bottom bracket • Replace bottom bracket axle or pedals • Tighten crank bolts...


