Instructions for use
Page 2
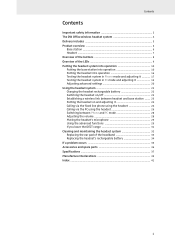
... line phone using the headset 24 Calling via the PC using the headset 26 Switching between Phone and PC mode 28 Adjusting the volume 28 Muting the headset's microphone 29 Using the advanced functions 29 If you leave the DECT range 31 Cleaning and maintaining the headset system 32 Replacing the ear pad of the headband 33 Replacing the headset's rechargeable battery 34 If a problem occurs ...35 Accessories and spare parts 36 Specifications ...37...
... line phone using the headset 24 Calling via the PC using the headset 26 Switching between Phone and PC mode 28 Adjusting the volume 28 Muting the headset's microphone 29 Using the advanced functions 29 If you leave the DECT range 31 Cleaning and maintaining the headset system 32 Replacing the ear pad of the headband 33 Replacing the headset's rechargeable battery 34 If a problem occurs ...35 Accessories and spare parts 36 Specifications ...37...
Instructions for use
Page 3
... these instructions carefully and completely before using the product. • Make these instructions when passing the product on page 37). 2 Always include these instructions easily accessible to all times. when performing skilled jobs). • Always keep the product dry and do not expose it in a clean, dust-free environment. • Switch off the headset after use to conserve battery power. • Only use the DW Office base...
... these instructions carefully and completely before using the product. • Make these instructions when passing the product on page 37). 2 Always include these instructions easily accessible to all times. when performing skilled jobs). • Always keep the product dry and do not expose it in a clean, dust-free environment. • Switch off the headset after use to conserve battery power. • Only use the DW Office base...
Instructions for use
Page 5
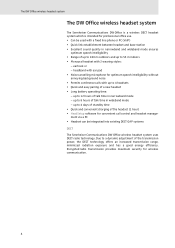
... pairing of talk time in narrowband mode - headband with ear pad • Noise cancelling microphone for optimum speech intelligibility without annoying background noise • Permits conference calls with up to 4 days of standby time • Quick and convenient charging of the headset (1 hour) • HeadSetup software for convenient call control and headset management via a PC • Headset can be used with a fixed line phone or PC (VoIP) • Quick link establishment between headset...
... pairing of talk time in narrowband mode - headband with ear pad • Noise cancelling microphone for optimum speech intelligibility without annoying background noise • Permits conference calls with up to 4 days of standby time • Quick and convenient charging of the headset (1 hour) • HeadSetup software for convenient call control and headset management via a PC • Headset can be used with a fixed line phone or PC (VoIP) • Quick link establishment between headset...
Instructions for use
Page 10
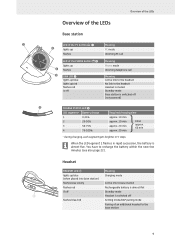
...; 3 Overview of the LEDs Base station Overview of the LEDs LED of the PC button ³ » lights up red flashes red is off Meaning PC mode Incoming PC call Meaning Phone mode Incoming telephone call Meaning Active link to the headset No link to the headset Headset is muted Standby mode Base station is switched off (not powered) CHARGE STATUS LED ´ LED segment* Battery charge 1 0-25% 2 25-50% 3 50-75% 4 75-100% Required charging time approx. 10 min...
...; 3 Overview of the LEDs Base station Overview of the LEDs LED of the PC button ³ » lights up red flashes red is off Meaning PC mode Incoming PC call Meaning Phone mode Incoming telephone call Meaning Active link to the headset No link to the headset Headset is muted Standby mode Base station is switched off (not powered) CHARGE STATUS LED ´ LED segment* Battery charge 1 0-25% 2 25-50% 3 50-75% 4 75-100% Required charging time approx. 10 min...
Instructions for use
Page 12
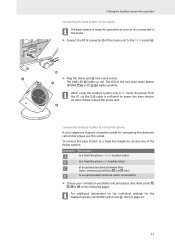
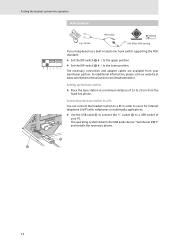
... base station to an optional electronic hook switch control (EHS) ̈ Choose your telephone features a headset socket for connecting the electronic call control, please use this socket. The LINK LED ¿ lights up white. The LED of the mains unit to the DC IN socket ¹. ¹ ³ ƻ » ̈ Plug the mains unit ƺ into operation Connecting the base station to the...
... base station to an optional electronic hook switch control (EHS) ̈ Choose your telephone features a headset socket for connecting the electronic call control, please use this socket. The LINK LED ¿ lights up white. The LED of the mains unit to the DC IN socket ¹. ¹ ³ ƻ » ̈ Plug the mains unit ƺ into operation Connecting the base station to the...
Instructions for use
Page 13
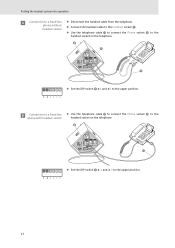
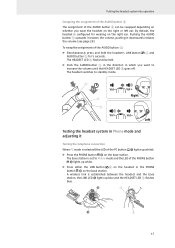
... operation A Connection to the upper position. 12 B Connection to a fixed line phone with headset socket ̈ Use the telephone cable Ƽ to connect the Phone socket º to the headset socket on the telephone. º ¾ Ƽ ̈ Set the DIP switch ¸ #1 and #2 to the upper position. phone without headset socket ̈ Connect the handset cable to the Handset socket ¾. ̈ Use the telephone cable Ƽ to connect the Phone...
... operation A Connection to the upper position. 12 B Connection to a fixed line phone with headset socket ̈ Use the telephone cable Ƽ to connect the Phone socket º to the headset socket on the telephone. º ¾ Ƽ ̈ Set the DIP switch ¸ #1 and #2 to the upper position. phone without headset socket ̈ Connect the handset cable to the Handset socket ¾. ̈ Use the telephone cable Ƽ to connect the Phone...
Instructions for use
Page 14
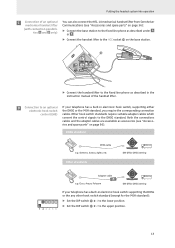
... DW Office DHSG setting If your telephone has a built-in electronic hook switch, supporting either electronic hook switch the DHSG or the MSH standard, you require the corresponding connection control (EHS) cables. D Connection to the DHSG standard. Other hook switch standards require suitable adapter cables which convert the control signals to an optional If your telephone has a built-in the instruction manual of the handset lifter. Both the connections cables and the adapter cables...
... DW Office DHSG setting If your telephone has a built-in electronic hook switch, supporting either electronic hook switch the DHSG or the MSH standard, you require the corresponding connection control (EHS) cables. D Connection to the DHSG standard. Other hook switch standards require suitable adapter cables which convert the control signals to an optional If your telephone has a built-in the instruction manual of the handset lifter. Both the connections cables and the adapter cables...
Instructions for use
Page 15
...; to 20 cm from your telephone has a built-in electronic hook switch supporting the MSH standard: ̈ Set the DIP switch ¸ # 1 to the upper position. ̈ Set the DIP switch ¸ # 2 to the lower position. The necessary connection and adapter cables are available from the fixed line phone. Putting the headset system into operation MSH standard MSH cable e.g. Alcatel DW Office MSH setting If your Sennheiser partner.
...; to 20 cm from your telephone has a built-in electronic hook switch supporting the MSH standard: ̈ Set the DIP switch ¸ # 1 to the upper position. ̈ Set the DIP switch ¸ # 2 to the lower position. The necessary connection and adapter cables are available from the fixed line phone. Putting the headset system into operation MSH standard MSH cable e.g. Alcatel DW Office MSH setting If your Sennheiser partner.
Instructions for use
Page 18
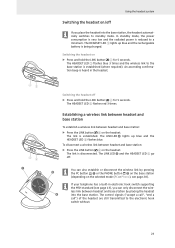
... AUDIO button ቦ in the direction in Phone mode and adjusting it downwards reduces the volume (see page 28). A wireless link is configured for 5 seconds. To swap the assignment of the AUDIO button ቦ: ̈ Simultaneously press and hold the headset's LINK button AUDIO button ቦ for wearing on the right ear. The headset switches to Phone mode and the LED of the PHONE button » lights up blue and the HEADSET LED ቤ flashes blue. » 4 ¿ 3 17 By default, the headset...
... AUDIO button ቦ in the direction in Phone mode and adjusting it downwards reduces the volume (see page 28). A wireless link is configured for 5 seconds. To swap the assignment of the AUDIO button ቦ: ̈ Simultaneously press and hold the headset's LINK button AUDIO button ቦ for wearing on the right ear. The headset switches to Phone mode and the LED of the PHONE button » lights up blue and the HEADSET LED ቤ flashes blue. » 4 ¿ 3 17 By default, the headset...
Instructions for use
Page 20
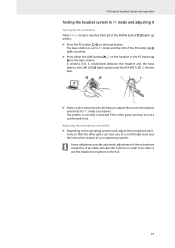
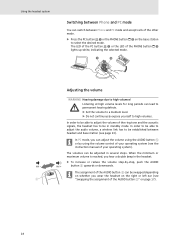
... PC connection When Phone mode is established between the headset and the base station, the LINK LED ¿ lights up blue and the HEADSET LED ቤ flashes blue. ³ ¿ 4 3 ̈ Make a call to someone who will help you adjust the correct microphone sensitivity for PC mode (see the instruction manual of your operating system). Putting the headset system into operation Testing the headset system in order to be able to use the headset microphone to PC mode...
... PC connection When Phone mode is established between the headset and the base station, the LINK LED ¿ lights up blue and the HEADSET LED ቤ flashes blue. ³ ¿ 4 3 ̈ Make a call to someone who will help you adjust the correct microphone sensitivity for PC mode (see the instruction manual of your operating system). Putting the headset system into operation Testing the headset system in order to be able to use the headset microphone to PC mode...
Instructions for use
Page 23
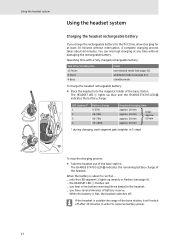
... the headset. ... A complete charging process takes about to conserve battery power. 22 You can interrupt charging at least 20 minutes without damaging the rechargeable battery. Operating time with a fully charged rechargeable battery: Talk time/standby time 12 hours 8 hours 4 days Mode narrowband mode (see page 21) wideband mode (see page 9). ... the HEADSET LED ቤ flashes red. ... Using the headset system Using the headset system Charging the headset rechargeable battery If you have several minutes of battery reserve. The HEADSET LED ቤ lights...
... the headset. ... A complete charging process takes about to conserve battery power. 22 You can interrupt charging at least 20 minutes without damaging the rechargeable battery. Operating time with a fully charged rechargeable battery: Talk time/standby time 12 hours 8 hours 4 days Mode narrowband mode (see page 21) wideband mode (see page 9). ... the HEADSET LED ቤ flashes red. ... Using the headset system Using the headset system Charging the headset rechargeable battery If you have several minutes of battery reserve. The HEADSET LED ቤ lights...
Instructions for use
Page 24
... PHONE button » on the base station (depending on the headset. An ascending confirmation beep is established (where required). The control signals ("accept a call", "end a call") of the headset are still transmitted to the base station is heard in electronic hook switch supporting the MSH standard (see page 28). The HEADSET LED ቤ flashes blue 3 times and the wireless link to the electronic hook switch without. 23 43 43 ³ Using...
... PHONE button » on the base station (depending on the headset. An ascending confirmation beep is established (where required). The control signals ("accept a call", "end a call") of the headset are still transmitted to the base station is heard in electronic hook switch supporting the MSH standard (see page 28). The HEADSET LED ቤ flashes blue 3 times and the wireless link to the electronic hook switch without. 23 43 43 ³ Using...
Instructions for use
Page 26
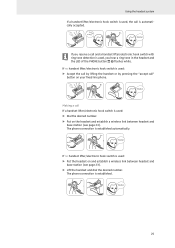
... call is used: ̈ Accept the call by lifting the handset or by pressing the "accept call" button on your fixed line phone. If you hear a ring tone in the headset and the LED of the PHONE button » flashes white. Making a call and a handset lifter/electronic hook switch with ring tone detection is used , you receive a call If a handset lifter/electronic hook switch is used : ̈ Dial the desired number. ̈ Put on the headset and establish a wireless link between headset...
... call is used: ̈ Accept the call by lifting the handset or by pressing the "accept call" button on your fixed line phone. If you hear a ring tone in the headset and the LED of the PHONE button » flashes white. Making a call and a handset lifter/electronic hook switch with ring tone detection is used , you receive a call If a handset lifter/electronic hook switch is used : ̈ Dial the desired number. ̈ Put on the headset and establish a wireless link between headset...
Instructions for use
Page 29
... be able to adjust the audio volume, a wireless link has to be established between Phone and PC mode and accept calls of your operating system (see "Swapping the assignment of the ring tone and the acoustic signals, the headset has to be adjusted in the headset. ̈ To increase or reduce the volume step-by using the volume control of your operating system). Listening at high volume levels for long...
... be able to adjust the audio volume, a wireless link has to be established between Phone and PC mode and accept calls of your operating system (see "Swapping the assignment of the ring tone and the acoustic signals, the headset has to be adjusted in the headset. ̈ To increase or reduce the volume step-by using the volume control of your operating system). Listening at high volume levels for long...
Instructions for use
Page 30
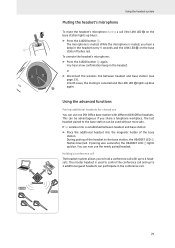
... paired headset. The last headset paired to the base station, the HEADSET LED ቤ flashes blue/red. During pairing of the base station. In both cases, the muting is muted, you hear a beep in the headset every 5 seconds and the LINK LED ¿ on the base station lights up blue ¿ again. You can be advantageous if you to hold a conference call with different DW Office headsets. To unmute the headset's microphone: ̈ Press the AUDIO button...
... paired headset. The last headset paired to the base station, the HEADSET LED ቤ flashes blue/red. During pairing of the base station. In both cases, the muting is muted, you hear a beep in the headset every 5 seconds and the LINK LED ¿ on the base station lights up blue ¿ again. You can be advantageous if you to hold a conference call with different DW Office headsets. To unmute the headset's microphone: ̈ Press the AUDIO button...
Instructions for use
Page 31
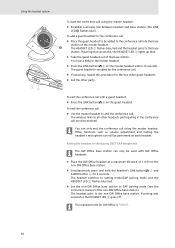
... as volume adjustment and muting the headset's microphone can only be used with a guest headset: ̈ Press the LINK button ብ on the guest headset. If pairing was successful, the HEADSET LED ቤ goes off. Using the headset system 43 To start the conference call using the master headset. To exit the conference call . The headset switches to setting mode/GAP pairing mode and the HEADSET LED ቤ flashes blue/red. ̈ Set the non-DW Office base station to GAP pairing mode (see the instruction manual of...
... as volume adjustment and muting the headset's microphone can only be used with a guest headset: ̈ Press the LINK button ብ on the guest headset. If pairing was successful, the HEADSET LED ቤ goes off. Using the headset system 43 To start the conference call using the master headset. To exit the conference call . The headset switches to setting mode/GAP pairing mode and the HEADSET LED ቤ flashes blue/red. ̈ Set the non-DW Office base station to GAP pairing mode (see the instruction manual of...
Instructions for use
Page 32
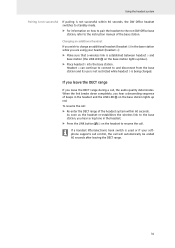
... the DECT range during a call : ̈ Re-enter the DECT range of the headset system within 60 seconds, the DW Office headset switches to standby mode. ̈ For information on how to pair the headset to the non-DW Office base station, refer to the instruction manual of beeps in the headset and the LINK LED ¿ on the base station lights up red. If a handset lifter/electronic hook switch is being charged.
... the DECT range during a call : ̈ Re-enter the DECT range of the headset system within 60 seconds, the DW Office headset switches to standby mode. ̈ For information on how to pair the headset to the non-DW Office base station, refer to the instruction manual of beeps in the headset and the LINK LED ¿ on the base station lights up red. If a handset lifter/electronic hook switch is being charged.
Instructions for use
Page 36
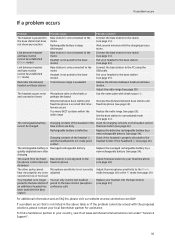
... www.sennheisercommunications.com under "Service & Support". 35 Pair your headset into the base station but does not show any reaction Base station is not connected to the mains Rechargeable battery is deep discharged Connect the base station to the PC using the USB cable. To find a Sennheiser partner in the above table or if the problem cannot be charged base station are dirty...
... www.sennheisercommunications.com under "Service & Support". 35 Pair your headset into the base station but does not show any reaction Base station is not connected to the mains Rechargeable battery is deep discharged Connect the base station to the PC using the USB cable. To find a Sennheiser partner in the above table or if the problem cannot be charged base station are dirty...
Instructions for use
Page 42
... phone 24 via the PC 26 calling making a call (fixed line phone) 25 D DECT 4 leaving the DECT range 31 DECT GAP telephone pairing 30 DHSG connection of an optional electronic hook switch 13 Dial tone adjusting 18 DIP switch 1 and 2 configuring the handset lifter/ hook switch 20 DIP switch 3 adjusting the radio range 20 DIP switch 4 establishing the wireless link 21 DIP switch 5 switching between wideband and narrowband mode 21 DIP switch 6 limiting the volume 21 E Ear pad replacing...
... phone 24 via the PC 26 calling making a call (fixed line phone) 25 D DECT 4 leaving the DECT range 31 DECT GAP telephone pairing 30 DHSG connection of an optional electronic hook switch 13 Dial tone adjusting 18 DIP switch 1 and 2 configuring the handset lifter/ hook switch 20 DIP switch 3 adjusting the radio range 20 DIP switch 4 establishing the wireless link 21 DIP switch 5 switching between wideband and narrowband mode 21 DIP switch 6 limiting the volume 21 E Ear pad replacing...
Instructions for use
Page 43
... headset socket 12 Phone and PC mode switching between Phone and PC mode 28 Phone mode adjusting 17 testing 17 R Radio range adjusting 20 exceeding 31 Rechargeable battery charging 22 replacing 34 Ring tone adjusting the volume 28 S Softphone calling via the PC 26 supported softphones 15 Specifications HeadSetup 15 T Telephone connection testing 17 Troubleshooting 35 V Volume adjusting 28 limiting 21 Volume button swapping the assignment 17 W Wideband and narrowband mode switching between wideband and narrowband mode 21 Wireless link...
... headset socket 12 Phone and PC mode switching between Phone and PC mode 28 Phone mode adjusting 17 testing 17 R Radio range adjusting 20 exceeding 31 Rechargeable battery charging 22 replacing 34 Ring tone adjusting the volume 28 S Softphone calling via the PC 26 supported softphones 15 Specifications HeadSetup 15 T Telephone connection testing 17 Troubleshooting 35 V Volume adjusting 28 limiting 21 Volume button swapping the assignment 17 W Wideband and narrowband mode switching between wideband and narrowband mode 21 Wireless link...


