Instructions for use
Page 2
Contents Contents Important safety information 2 The DW Office wireless headset system 4 Delivery includes ...5 Product overview ...6 Base station ...6 Headset ...7 Overview of the buttons 8 Overview of the LEDs ...9 Putting the headset system into ...'s microphone 29 Using the advanced functions 29 If you leave the DECT range 31 Cleaning and maintaining the headset system 32 Replacing the ear pad of the headband 33 Replacing the headset's rechargeable battery 34 If a problem occurs ...35 Accessories and spare parts 36 Specifications ...37 Manufacturer Declarations 39 Index ...41 1
Contents Contents Important safety information 2 The DW Office wireless headset system 4 Delivery includes ...5 Product overview ...6 Base station ...6 Headset ...7 Overview of the buttons 8 Overview of the LEDs ...9 Putting the headset system into ...'s microphone 29 Using the advanced functions 29 If you leave the DECT range 31 Cleaning and maintaining the headset system 32 Replacing the ear pad of the headband 33 Replacing the headset's rechargeable battery 34 If a problem occurs ...35 Accessories and spare parts 36 Specifications ...37 Manufacturer Declarations 39 Index ...41 1
Instructions for use
Page 17
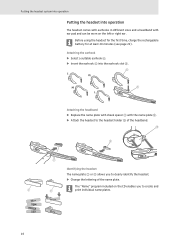
... included on the left or right ear. Putting the headset system into operation Putting the headset into the earhook slot ቩ. 6 8 Attaching the headband ̈ Replace the name plate with cheek spacer ባ with ear pad and can be worn on the CD enables you to the headset holder ቱ of... plate ቭ. ̈ Attach the headset to create and print individual name plates. 16 Before using the headset for the first time, charge the rechargeable battery for at least 20 minutes (see page 22).
... included on the left or right ear. Putting the headset system into operation Putting the headset into the earhook slot ቩ. 6 8 Attaching the headband ̈ Replace the name plate with cheek spacer ባ with ear pad and can be worn on the CD enables you to the headset holder ቱ of... plate ቭ. ̈ Attach the headset to create and print individual name plates. 16 Before using the headset for the first time, charge the rechargeable battery for at least 20 minutes (see page 22).
Instructions for use
Page 35
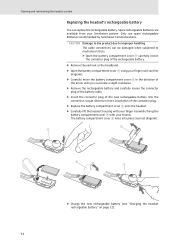
.... ̈ Insert the connector plug of the connector plug. ̈ Replace the battery compartment cover ቪ onto the headset. ̈ Carefully lift the headset housing with your finger nail while fixing the battery compartment cover ቪ with your Sennheiser partner. Spare rechargeable batteries are available from your thumb. CAUTION Damage to the product due to...
.... ̈ Insert the connector plug of the connector plug. ̈ Replace the battery compartment cover ቪ onto the headset. ̈ Carefully lift the headset housing with your finger nail while fixing the battery compartment cover ቪ with your Sennheiser partner. Spare rechargeable batteries are available from your thumb. CAUTION Damage to the product due to...
Instructions for use
Page 36
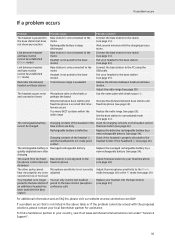
...cheek or and connection losses perhaps the beard Use the name plate with the base station Replace your headset to your country, search at www.sennheiser.com/DW If a problem occurs that interference occurs Increase the distance between base station and fixed ...line phone (see page 14). The rechargeable battery is Overaged rechargeable battery quickly depleted even after charging Replace the overaged rechargeable battery by a new rechargeable battery (see ...
...cheek or and connection losses perhaps the beard Use the name plate with the base station Replace your headset to your country, search at www.sennheiser.com/DW If a problem occurs that interference occurs Increase the distance between base station and fixed ...line phone (see page 14). The rechargeable battery is Overaged rechargeable battery quickly depleted even after charging Replace the overaged rechargeable battery by a new rechargeable battery (see ...
Instructions for use
Page 43
... Phone and PC mode switching between Phone and PC mode 28 Phone mode adjusting 17 testing 17 R Radio range adjusting 20 exceeding 31 Rechargeable battery charging 22 replacing 34 Ring tone adjusting the volume 28 S Softphone calling via the PC 26 supported softphones 15 Specifications HeadSetup 15 T Telephone connection testing 17 Troubleshooting...
... Phone and PC mode switching between Phone and PC mode 28 Phone mode adjusting 17 testing 17 R Radio range adjusting 20 exceeding 31 Rechargeable battery charging 22 replacing 34 Ring tone adjusting the volume 28 S Softphone calling via the PC 26 supported softphones 15 Specifications HeadSetup 15 T Telephone connection testing 17 Troubleshooting...

