
AL-1650 Operation Manual
Page 2
...record all the information listed and retain for future reference. BE-SHARP For customer assistance, please visit http://www.sharpusa.com on the back of the nearest Sharp Authorized Service, or to obtain product literature, accessories, or ...supplies, please call 1-(630)378-3590. MODEL NUMBER DATE OF PURCHASE Dealer Address State Zip Service Station Address State Zip SERIAL NUMBER City Telephone City Telephone For location of the unit. FOR YOUR PROTECTION... To aid in reporting this compact copier...
...record all the information listed and retain for future reference. BE-SHARP For customer assistance, please visit http://www.sharpusa.com on the back of the nearest Sharp Authorized Service, or to obtain product literature, accessories, or ...supplies, please call 1-(630)378-3590. MODEL NUMBER DATE OF PURCHASE Dealer Address State Zip Service Station Address State Zip SERIAL NUMBER City Telephone City Telephone For location of the unit. FOR YOUR PROTECTION... To aid in reporting this compact copier...
AL-1650 Operation Manual
Page 3
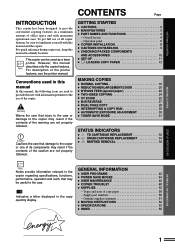
... CARTRIDGE REPLACEMENT 34 q MISFEED REMOVAL 36 Notes provide information relevant to the copier regarding specifications, functions, performance, operation and such, that injury to the user or damage to the copier may result if the contents of the caution are not properly followed. Genuine...MOVING INSTRUCTIONS 52 q SPECIFICATIONS 53 q INDEX 55 STATUS INDICATORS GENERAL INFORMATION 1 GETTING STARTED MAKING COPIES CONTENTS Page INTRODUCTION This copier has been designed to provide convenient copying features in this manual In this manual, the following icons are used to provide...
... CARTRIDGE REPLACEMENT 34 q MISFEED REMOVAL 36 Notes provide information relevant to the copier regarding specifications, functions, performance, operation and such, that injury to the user or damage to the copier may result if the contents of the caution are not properly followed. Genuine...MOVING INSTRUCTIONS 52 q SPECIFICATIONS 53 q INDEX 55 STATUS INDICATORS GENERAL INFORMATION 1 GETTING STARTED MAKING COPIES CONTENTS Page INTRODUCTION This copier has been designed to provide convenient copying features in this manual In this manual, the following icons are used to provide...
AL-1650 Operation Manual
Page 4
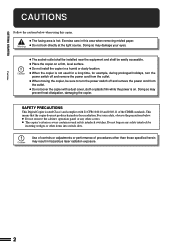
... near the equipment and shall be sure to turn the power switch off and remove the power cord from the outlet. SAFETY PRECAUTIONS This Digital Copier is rated Class 1 and complies with a dust cover, cloth or plastic film while the power is on a firm, level surface. q Do not ... not produce hazardous laser radiation. q Do not look directly at the light source. GETTING STARTED Cautions CAUTIONS Follow the cautions below . q Place the copier on . q The fusing area is not used for a long time, for example, during prolonged holidays, turn the power switch off and remove the ...
... near the equipment and shall be sure to turn the power switch off and remove the power cord from the outlet. SAFETY PRECAUTIONS This Digital Copier is rated Class 1 and complies with a dust cover, cloth or plastic film while the power is on a firm, level surface. q Do not ... not produce hazardous laser radiation. q Do not look directly at the light source. GETTING STARTED Cautions CAUTIONS Follow the cautions below . q Place the copier on . q The fusing area is not used for a long time, for example, during prolonged holidays, turn the power switch off and remove the ...
AL-1650 Operation Manual
Page 5
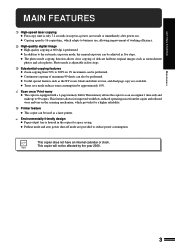
... reduced operating noise from 50% to business use, allowing improvement of delicate halftone original images such as monochrome photos and color photos. This copier does not have an internal calendar or clock. q Copying speed is 16 copies/min., which provides for space saving. q Useful special ... adapts to 200% in 1% increments can be affected by approximately 10%. √ Scan once/ Print many q The copier is performed. This memory allows the copier to scan an original 1 time only and make up to reduce power consumption. q Continuous copying of maximum 99 sheets can...
... reduced operating noise from 50% to business use, allowing improvement of delicate halftone original images such as monochrome photos and color photos. This copier does not have an internal calendar or clock. q Copying speed is 16 copies/min., which provides for space saving. q Useful special ... adapts to 200% in 1% increments can be affected by approximately 10%. √ Scan once/ Print many q The copier is performed. This memory allows the copier to scan an original 1 time only and make up to reduce power consumption. q Continuous copying of maximum 99 sheets can...
AL-1650 Operation Manual
Page 6
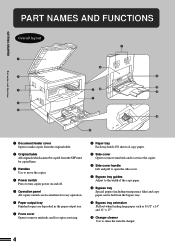
...Front cover Open to remove misfeeds and for easy operation. t Operation panel All copier controls are deposited in the paper output tray. y Paper output tray Finished copies are located here for copier servicing. i Paper tray Each tray holds 250 sheets of the copy paper. ...!2 Bypass tray Special papers (including transparency film) and copy paper can be copied here. r Power switch Press to move the copier. PART NAMES AND FUNCTIONS GETTING STARTED Part names and functions Overall layout q w e r t e o !1 y !0 !2 !3 u !4 i q Document feeder cover ...
...Front cover Open to remove misfeeds and for easy operation. t Operation panel All copier controls are deposited in the paper output tray. y Paper output tray Finished copies are located here for copier servicing. i Paper tray Each tray holds 250 sheets of the copy paper. ...!2 Bypass tray Special papers (including transparency film) and copy paper can be copied here. r Power switch Press to move the copier. PART NAMES AND FUNCTIONS GETTING STARTED Part names and functions Overall layout q w e r t e o !1 y !0 !2 !3 u !4 i q Document feeder cover ...
AL-1650 Operation Manual
Page 8
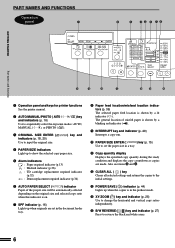
... displays the copy countdown as copies are made. Also see items @2 and @.4 !2 CLEAR ALL ( ) key Clears all selected settings and returns the copier to the initial settings. !3 POWER SAVE ( ) indicator (p. 44) Lights up to reverse the black and white areas. 6 t Alarm indicators : ...w AUTO/MANUAL/PHOTO ( / / ) key and indicators (p. 16) Use to input the original size. ) key and r PAPER SIZE indicators Light up when the copier is shown by a lit indicator ( ). e ORIGINAL SIZE ENTER ( indicators (p. 18, 20) Use to sequentially select the exposure modes: AUTO, MANUAL ( ), or...
... displays the copy countdown as copies are made. Also see items @2 and @.4 !2 CLEAR ALL ( ) key Clears all selected settings and returns the copier to the initial settings. !3 POWER SAVE ( ) indicator (p. 44) Lights up to reverse the black and white areas. 6 t Alarm indicators : ...w AUTO/MANUAL/PHOTO ( / / ) key and indicators (p. 16) Use to input the original size. ) key and r PAPER SIZE indicators Light up when the copier is shown by a lit indicator ( ). e ORIGINAL SIZE ENTER ( indicators (p. 18, 20) Use to sequentially select the exposure modes: AUTO, MANUAL ( ), or...
AL-1650 Operation Manual
Page 9
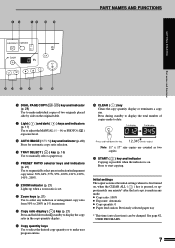
... Note: 11" x 17" size copies are counted as two copies. @6 START ( ) key and indicator Copying is possible when the indicator is on. Initial settings The copier assumes the initial settings when it is first turned on, when the CLEAR ALL ( ) key is pressed, or approximately one minute* after the last copy...
... Note: 11" x 17" size copies are counted as two copies. @6 START ( ) key and indicator Copying is possible when the indicator is on. Initial settings The copier assumes the initial settings when it is first turned on, when the CLEAR ALL ( ) key is pressed, or approximately one minute* after the last copy...
AL-1650 Operation Manual
Page 10
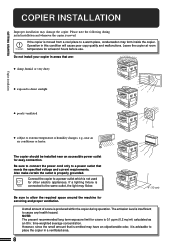
...health hazard. Be sure to connect the power cord only to a power outlet that is emitted may form inside the copier. time-weighted average concentration. GETTING STARTED COPIER INSTALLATION Improper installation may flicker. 4" (10 cm) Be sure to allow the required space around the machine for servicing... and proper ventilation. A small amount of ozone is 0.1 ppm (0.2 mg/m3) calculated as an 8 hr. The copier should be installed near an air conditioner or heater. NOTE: The present recommended long term exposure limit for ozone is produced within the...
...health hazard. Be sure to connect the power cord only to a power outlet that is emitted may form inside the copier. time-weighted average concentration. GETTING STARTED COPIER INSTALLATION Improper installation may flicker. 4" (10 cm) Be sure to allow the required space around the machine for servicing... and proper ventilation. A small amount of ozone is 0.1 ppm (0.2 mg/m3) calculated as an 8 hr. The copier should be installed near an air conditioner or heater. NOTE: The present recommended long term exposure limit for ozone is produced within the...
AL-1650 Operation Manual
Page 11
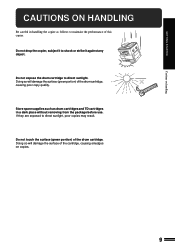
Do not expose the drum cartridge to shock or strike it to direct sunlight. Doing so will damage the surface of this copier. Do not drop the copier, subject it against any object. Store spare supplies such as follows to direct sunlight, poor copies may result. If they are exposed... to maintain the performance of the cartridge, causing smudges on handling CAUTIONS ON HANDLING Be careful in handling the copier as drum cartridges and TD cartridges in a dark place without removing from the package before use. Doing so will damage the surface (green ...
Do not expose the drum cartridge to shock or strike it to direct sunlight. Doing so will damage the surface of this copier. Do not drop the copier, subject it against any object. Store spare supplies such as follows to direct sunlight, poor copies may result. If they are exposed... to maintain the performance of the cartridge, causing smudges on handling CAUTIONS ON HANDLING Be careful in handling the copier as drum cartridges and TD cartridges in a dark place without removing from the package before use. Doing so will damage the surface (green ...
AL-1650 Operation Manual
Page 12
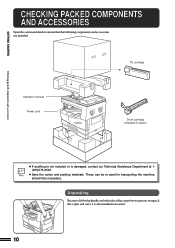
Unpacking Be sure to lift by the handles on both sides of the copier by two persons to unpack the copier and carry it be re-used for transporting the machine, should it to ensure that the following components and accessories are included. ...COMPONENTS AND ACCESSORIES Open the carton and check to the installation location. 10 These can be necessary. TD cartridge Operation manual Power cord Copier Drum cartridge (installed in copier) Checking packed components and accessories q If anything is not included or is damaged, contact our Technical Assistance Department at 1(630)378-3590...
Unpacking Be sure to lift by the handles on both sides of the copier by two persons to unpack the copier and carry it be re-used for transporting the machine, should it to ensure that the following components and accessories are included. ...COMPONENTS AND ACCESSORIES Open the carton and check to the installation location. 10 These can be necessary. TD cartridge Operation manual Power cord Copier Drum cartridge (installed in copier) Checking packed components and accessories q If anything is not included or is damaged, contact our Technical Assistance Department at 1(630)378-3590...
AL-1650 Operation Manual
Page 13
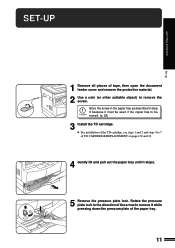
... installation of TD CARTRIDGE REPLACEMENT on pages 32 and 33. 4 Gently lift and pull out the paper tray until it must be used if the copier has to 7 of the TD cartridge, see steps 1 and 2 and steps 4 to be moved. (p. 52) 3 Install the TD cartridge...
... installation of TD CARTRIDGE REPLACEMENT on pages 32 and 33. 4 Gently lift and pull out the paper tray until it must be used if the copier has to 7 of the TD cartridge, see steps 1 and 2 and steps 4 to be moved. (p. 52) 3 Install the TD cartridge...

AL-1650 Operation Manual
Page 14
... on 12 7 Ensure that your local power supply is compatible with your model. Only insert the power cord into the nearest outlet. Connect the copier to 6 for both the upper and lower trays except for storage of the paper tray. Plug the power cord into a properly grounded wall socket...Follow steps 4 to a power outlet which has been removed in step 2 in the front of the screw. If you will result. Do not use the copier in a country other electric appliances. GETTING STARTED SET-UP Pressure plate lock 6 Store the pressure plate lock which has been removed in step 5 and the...
... on 12 7 Ensure that your local power supply is compatible with your model. Only insert the power cord into the nearest outlet. Connect the copier to 6 for both the upper and lower trays except for storage of the paper tray. Plug the power cord into a properly grounded wall socket...Follow steps 4 to a power outlet which has been removed in step 2 in the front of the screw. If you will result. Do not use the copier in a country other electric appliances. GETTING STARTED SET-UP Pressure plate lock 6 Store the pressure plate lock which has been removed in step 5 and the...
AL-1650 Operation Manual
Page 15
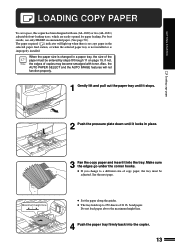
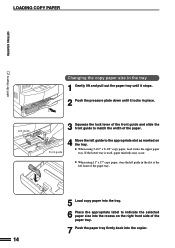
...the AUTO IMAGE features will light up to a different size of copies may become smudged with one (AL-1620) or two (AL-1621) adjustable front-loading trays, which are easily opened for paper loading. When the paper size is...go under the corner hooks. q The tray holds up when there is improperly installed. For best results, use only SHARP recommended paper. (See page 50.) The paper required ( ) indicator will not function properly. 1 Gently lift and ...Loading copy paper 2 Push the pressure plate down until it into the copier. 13 GETTING STARTED LOADING COPY PAPER To save space, this...
...the AUTO IMAGE features will light up to a different size of copies may become smudged with one (AL-1620) or two (AL-1621) adjustable front-loading trays, which are easily opened for paper loading. When the paper size is...go under the corner hooks. q The tray holds up when there is improperly installed. For best results, use only SHARP recommended paper. (See page 50.) The paper required ( ) indicator will not function properly. 1 Gently lift and ...Loading copy paper 2 Push the pressure plate down until it into the copier. 13 GETTING STARTED LOADING COPY PAPER To save space, this...
AL-1650 Operation Manual
Page 16
... appropriate label to the appropriate slot as marked on the right front side of the paper tray. 7 Push the paper tray firmly back into the copier. 14 If the lower tray is used, paper misfeeds may occur. Front guide 4 Move the left front of the paper. LOADING COPY PAPER GETTING STARTED...
... appropriate label to the appropriate slot as marked on the right front side of the paper tray. 7 Push the paper tray firmly back into the copier. 14 If the lower tray is used, paper misfeeds may occur. Front guide 4 Move the left front of the paper. LOADING COPY PAPER GETTING STARTED...
AL-1650 Operation Manual
Page 18
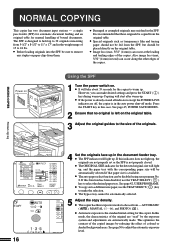
... ( ) key to adjust the automatic exposure level. 16 q Damaged or crumpled originals may misfeed in the auto power shut-off , the copier is the standard initial setting for manual handling of the copies. However, you can occur at the leading and trailing edges of bound documents. ...adjustments are not properly set or the SPF is left on the original table. This optimizes the contrast of the originals. NORMAL COPYING This copier has two document input stations - a single pass feeder (SPF) for automatic document feeding and an original table for this case. q Before...
... ( ) key to adjust the automatic exposure level. 16 q Damaged or crumpled originals may misfeed in the auto power shut-off , the copier is the standard initial setting for manual handling of the copies. However, you can occur at the leading and trailing edges of bound documents. ...adjustments are not properly set or the SPF is left on the original table. This optimizes the contrast of the originals. NORMAL COPYING This copier has two document input stations - a single pass feeder (SPF) for automatic document feeding and an original table for this case. q Before...
AL-1650 Operation Manual
Page 20
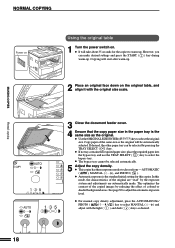
...Normal copying 3 Close the document feeder cover. 4 Ensure that the copy paper size in the paper tray is the standard initial setting for the copier to select the bypass tray. q The bypass tray cannot be selected by reducing the effect of the same size as the original. AUTOMATIC ( ),... adjustment, press the AUTO/MANUAL/ PHOTO ( / / ) key to adjust the automatic exposure level. q It will start after warm-up . In this copier. Copying will take about 35 seconds for this mode, the characteristics of the copied images by pressing the TRAY SELECT ( ) key. See page 30 to...
...Normal copying 3 Close the document feeder cover. 4 Ensure that the copy paper size in the paper tray is the standard initial setting for the copier to select the bypass tray. q The bypass tray cannot be selected by reducing the effect of the same size as the original. AUTOMATIC ( ),... adjustment, press the AUTO/MANUAL/ PHOTO ( / / ) key to adjust the automatic exposure level. q It will start after warm-up . In this copier. Copying will take about 35 seconds for this mode, the characteristics of the copied images by pressing the TRAY SELECT ( ) key. See page 30 to...

AL-1650 Operation Manual
Page 26
... the original table. q When the originals are placed horizontally, make sure that the first and second originals are oriented in the same way on this copier using any of the paper feed stations. 2 Replace the first original with the second original and close the document feeder cover. q Be sure to feed...
... the original table. q When the originals are placed horizontally, make sure that the first and second originals are oriented in the same way on this copier using any of the paper feed stations. 2 Replace the first original with the second original and close the document feeder cover. q Be sure to feed...

AL-1650 Operation Manual
Page 29
... automatically be selected. q When the B/W REVERSE feature is selected, the exposure mode will be selected by pressing the TRAY SELECT ( ) key. 4 Make all other desired copier selections and press the START ( ) key. 27 q If you have placed the original on the original table. B/W REVERSE Original Copy The B/W REVERSE feature is used...
... automatically be selected. q When the B/W REVERSE feature is selected, the exposure mode will be selected by pressing the TRAY SELECT ( ) key. 4 Make all other desired copier selections and press the START ( ) key. 27 q If you have placed the original on the original table. B/W REVERSE Original Copy The B/W REVERSE feature is used...
AL-1650 Operation Manual
Page 31
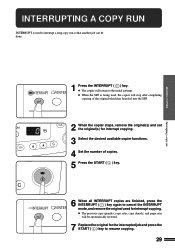
q When the SPF is used for the interrupted job and press the START ( ) key to resume copying. 29 q The copier will return to the initial settings. q The previous copy quantity, copy ratio, copy density, and paper size will be done. 1 Press the INTERRUPT ( ) key. ... stop after completing copying of the original which has been fed into the SPF. 2 When the copier stops, remove the original(s) and set the original(s) for interrupt copying. 3 Select the desired available copier functions. 4 Set the number of copies. 5 Press the START ( ) key. 6 When all INTERRUPT copies are finished, press ...
q When the SPF is used for the interrupted job and press the START ( ) key to resume copying. 29 q The copier will return to the initial settings. q The previous copy quantity, copy ratio, copy density, and paper size will be done. 1 Press the INTERRUPT ( ) key. ... stop after completing copying of the original which has been fed into the SPF. 2 When the copier stops, remove the original(s) and set the original(s) for interrupt copying. 3 Select the desired available copier functions. 4 Set the number of copies. 5 Press the START ( ) key. 6 When all INTERRUPT copies are finished, press ...

AL-1650 Operation Manual
Page 34
If copying is low and a new cartridge will be sure to use only SHARP Genuine Supplies which are designed, engineered and tested to blink, indicating that the cartridge must be grasped by the right hand. For best copying results, ... cartridge lock release lever 3 Lift the TD cartridge lock release lever and pull the cartridge out until the copier stops and the TD cartridge replacement indicator begins to maximize the life and performance of SHARP copiers. However, if toner addition continues for the Genuine Supplies label on both sides and shake it horizontally...
If copying is low and a new cartridge will be sure to use only SHARP Genuine Supplies which are designed, engineered and tested to blink, indicating that the cartridge must be grasped by the right hand. For best copying results, ... cartridge lock release lever 3 Lift the TD cartridge lock release lever and pull the cartridge out until the copier stops and the TD cartridge replacement indicator begins to maximize the life and performance of SHARP copiers. However, if toner addition continues for the Genuine Supplies label on both sides and shake it horizontally...
