

Operation Manual
Page 2
... modification, or recall that you immediately receive the full benefit of the parts, service and labor warranty applicable to your new SHARP Projector, using the projector, please read this operation manual carefully. Be especially careful that may be of sufficient magnitude to constitute a risk or electric ... the user's authority to operate this equip- CAUTION: TO REDUCE THE RISK OF ELECTRIC SHOCK, DO NOT REMOVE COVER. ment. E-1 DT-200(E)#p01_07.p65 1 02.11.21, 11:27 AM REFER SERVICING TO QUALIFIED SERVICE PERSONNEL. ONLY PRODUCT DISPOSAL This product utilizes tin-lead solder...
... modification, or recall that you immediately receive the full benefit of the parts, service and labor warranty applicable to your new SHARP Projector, using the projector, please read this operation manual carefully. Be especially careful that may be of sufficient magnitude to constitute a risk or electric ... the user's authority to operate this equip- CAUTION: TO REDUCE THE RISK OF ELECTRIC SHOCK, DO NOT REMOVE COVER. ment. E-1 DT-200(E)#p01_07.p65 1 02.11.21, 11:27 AM REFER SERVICING TO QUALIFIED SERVICE PERSONNEL. ONLY PRODUCT DISPOSAL This product utilizes tin-lead solder...

Operation Manual
Page 3
... 1 HOUR TO COOL BEFORE REPLACING THE LAMP. PRECAUTIONS A OBSERVER LORS DU REMPLACEMENT DE LA LAMPE. Therefore you may cause undesired operation. ONLY Declaration of Conformity SHARP PROJECTOR, MODEL DT-200 This device complies with Part 15 of the following conditions: (1) This device may not cause harmful interference, and (2) this equipment does cause harmful interference...
... 1 HOUR TO COOL BEFORE REPLACING THE LAMP. PRECAUTIONS A OBSERVER LORS DU REMPLACEMENT DE LA LAMPE. Therefore you may cause undesired operation. ONLY Declaration of Conformity SHARP PROJECTOR, MODEL DT-200 This device complies with Part 15 of the following conditions: (1) This device may not cause harmful interference, and (2) this equipment does cause harmful interference...

Operation Manual
Page 4
...or rack unless proper ventilation is operated. 2. Power Sources This product should never be adhered to your home, consult your obsolete outlet. DT-200(E)#p01_07.p65 3 02.11.21, 11:27 AM Cleaning Unplug this can perform many useful functions. This will only fit into a ... If the product exhibits a distinct change in a risk of power supply to . 4. If you are unable to insert the plug into this Projector, observe the following basic rules for future reference. 3. Do not use a mounting accessory recommended by items placed upon or against them, paying particular...
...or rack unless proper ventilation is operated. 2. Power Sources This product should never be adhered to your home, consult your obsolete outlet. DT-200(E)#p01_07.p65 3 02.11.21, 11:27 AM Cleaning Unplug this can perform many useful functions. This will only fit into a ... If the product exhibits a distinct change in a risk of power supply to . 4. If you are unable to insert the plug into this Projector, observe the following basic rules for future reference. 3. Do not use a mounting accessory recommended by items placed upon or against them, paying particular...
Operation Manual
Page 5
...AVEC PRECAUTION, SE REPORTER AU MODE D'EMPLOI. 95˚F (+35˚C) 41˚F DT-200 (+5˚C) DT-200 Cautions Concerning the Setup of the Projector For minimal servicing and to maintain high image quality, SHARP recommends that this manner, use in . Please note that children do not touch these areas...176;F to 140°F (-20°C to +60°C) Notes on the power by a Sharp Authorized Service Center or Dealer. • Do not expose the projector to extreme heat or cold. E-4 DT-200(E)#p01_07.p65 4 02.11.21, 11:27 AM This does not indicate a malfunction. WARNING: ...
...AVEC PRECAUTION, SE REPORTER AU MODE D'EMPLOI. 95˚F (+35˚C) 41˚F DT-200 (+5˚C) DT-200 Cautions Concerning the Setup of the Projector For minimal servicing and to maintain high image quality, SHARP recommends that this manner, use in . Please note that children do not touch these areas...176;F to 140°F (-20°C to +60°C) Notes on the power by a Sharp Authorized Service Center or Dealer. • Do not expose the projector to extreme heat or cold. E-4 DT-200(E)#p01_07.p65 4 02.11.21, 11:27 AM This does not indicate a malfunction. WARNING: ...

Operation Manual
Page 6
Lamp Monitor Function When the projector is automatically controlled. If the lamp has been used for 2,400 hours, "LAMP" and " " will blink in the lower-left corner of the picture to advise you to replace the lamp. E-5 DT-200(E)#p01_07.p65 5 02.11.21, 11:27 AM If the temperature continues to rise,... the lamp will turn off and the projector will shut off period the power will enter standby mode. Refer to "Lamp/Maintenance ...
Lamp Monitor Function When the projector is automatically controlled. If the lamp has been used for 2,400 hours, "LAMP" and " " will blink in the lower-left corner of the picture to advise you to replace the lamp. E-5 DT-200(E)#p01_07.p65 5 02.11.21, 11:27 AM If the temperature continues to rise,... the lamp will turn off and the projector will shut off period the power will enter standby mode. Refer to "Lamp/Maintenance ...

Operation Manual
Page 8
... video images. 4. Easy-to the projector by pressing the PICTURE SETTING button on the projector or on the remote control. 13. Color Temperature Adjustment The function can be used to select the values to suit the type of projected images. E-7 DT-200(E)#p01_07.p65 7 02.11.21, ...11:27 AM The function allows for simple adjustment when setting up the projector for a higher contrast image. HDCP (High-bandwidth Digital Content Protection) System Digital ...
... video images. 4. Easy-to the projector by pressing the PICTURE SETTING button on the projector or on the remote control. 13. Color Temperature Adjustment The function can be used to select the values to suit the type of projected images. E-7 DT-200(E)#p01_07.p65 7 02.11.21, ...11:27 AM The function allows for simple adjustment when setting up the projector for a higher contrast image. HDCP (High-bandwidth Digital Content Protection) System Digital ...

Operation Manual
Page 9
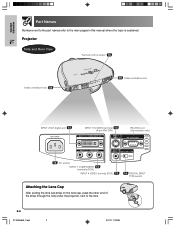
Projector Front and Top View Lens shift dial 18 Zoom knob 16 Exhaust ventilative hole 4 DT-200 Focus ring 16 Remote control sensor 15 5 TEMPERATURE WARNING indicator 5 LAMP REPLACEMENT indicator 16 POWER indicator 4 Exhaust ventilative hole 9 Lens cap ADJUSTMENT buttons 19 UNDO ... 24 INPUT button (ON/OFF) PICTURE SETTING button 32 ENTER button 26 24 RESIZE button Side and Rear View 17 Swivel Stand LOCK/UNLOCK lever DT-200(E)#p08_11.pm6 8 02.11.21, 11:29 AM E-8 Important Information Part Names Numbers next to the part names refer to the main pages in this...
Projector Front and Top View Lens shift dial 18 Zoom knob 16 Exhaust ventilative hole 4 DT-200 Focus ring 16 Remote control sensor 15 5 TEMPERATURE WARNING indicator 5 LAMP REPLACEMENT indicator 16 POWER indicator 4 Exhaust ventilative hole 9 Lens cap ADJUSTMENT buttons 19 UNDO ... 24 INPUT button (ON/OFF) PICTURE SETTING button 32 ENTER button 26 24 RESIZE button Side and Rear View 17 Swivel Stand LOCK/UNLOCK lever DT-200(E)#p08_11.pm6 8 02.11.21, 11:29 AM E-8 Important Information Part Names Numbers next to the part names refer to the main pages in this...
Operation Manual
Page 10
E-9 DT-200(E)#p08_11.pm6 9 02.11.21, 11:29 AM Projector Side and Rear View Remote control sensor 15 Intake ventilative hole 48 48 Intake ventilative hole INPUT 2 DVI digital port 13 INPUT 3 S-VIDEO terminal 13 (4-...) INPUT 4 VIDEO terminal (RCA) 13 14 DIGITAL INPUT TYPE switch Attaching the Lens Cap DT-200 After putting the lens cap strap on the lens cap, pass the other end of the strap through the hole under the projector, next to the main pages in this manual where the topic is explained. Important...
E-9 DT-200(E)#p08_11.pm6 9 02.11.21, 11:29 AM Projector Side and Rear View Remote control sensor 15 Intake ventilative hole 48 48 Intake ventilative hole INPUT 2 DVI digital port 13 INPUT 3 S-VIDEO terminal 13 (4-...) INPUT 4 VIDEO terminal (RCA) 13 14 DIGITAL INPUT TYPE switch Attaching the Lens Cap DT-200 After putting the lens cap strap on the lens cap, pass the other end of the strap through the hole under the projector, next to the main pages in this manual where the topic is explained. Important...
Operation Manual
Page 13
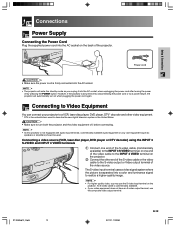
... Connections Connections Power Supply Connecting the Power Cord Plug the supplied power cord into the AC socket on when plugging the power cord again. DT-200(E)#p12_14.p65 12 02.11.21, 11:29 AM E-12 An S-video cable is separated into a color and luminance signal to Video Equipment... You can connect your video equipment does not have an S-video output terminal, use the S-video input terminal on the projector. 2 Connect the other video equipment. * DTV is the umbrella term used . Connecting to realize a higher-quality image. • For higher ...
... Connections Connections Power Supply Connecting the Power Cord Plug the supplied power cord into the AC socket on when plugging the power cord again. DT-200(E)#p12_14.p65 12 02.11.21, 11:29 AM E-12 An S-video cable is separated into a color and luminance signal to Video Equipment... You can connect your video equipment does not have an S-video output terminal, use the S-video input terminal on the projector. 2 Connect the other video equipment. * DTV is the umbrella term used . Connecting to realize a higher-quality image. • For higher ...
Operation Manual
Page 14
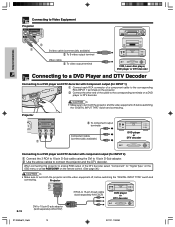
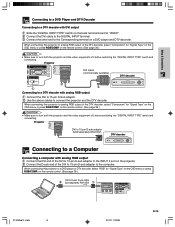
...off , before switching the "DIGITAL INPUT TYPE" swich and connecting. Projector E-13 DVI to 15-pin D-sub adaptor (sold separately AN-A1DV) DT-200(E)#p12_14.p65 13 3 RCA to connect the projector and the DTV decoder. Projector 2 To component output terminals DVD player Component cable (commercially available)...DTV decoder with Component output (for INPUT 1) 1 Connect each RCA connector of a component cable to the corresponding RCA INPUT 1 terminals on the projector. 2 Connect the other end of the DTV decoder, select "Component" for INPUT 2) 1 Connect the 3 RCA to 15-pin D-Sub cable...
...off , before switching the "DIGITAL INPUT TYPE" swich and connecting. Projector E-13 DVI to 15-pin D-sub adaptor (sold separately AN-A1DV) DT-200(E)#p12_14.p65 13 3 RCA to connect the projector and the DTV decoder. Projector 2 To component output terminals DVD player Component cable (commercially available)...DTV decoder with Component output (for INPUT 1) 1 Connect each RCA connector of a component cable to the corresponding RCA INPUT 1 terminals on the projector. 2 Connect the other end of the DTV decoder, select "Component" for INPUT 2) 1 Connect the 3 RCA to 15-pin D-Sub cable...
Operation Manual
Page 15
...for "Signal Type" on a DVD player and DTV decorder. on the remote control. (See page 36.) CAUTION • Make sure to turn both the projector and the video equipment off , before switching the "DIGITAL INPUT TYPE" swich and connecting. on the remote control. (See page 36.) CAUTION • ...the OSD menu or press RGB/COMP. When connecting this projector to connect the projector and the DTV decoder. Projector DVI to 15-pin D-sub adaptor (sold separately AN-A1DV) 1 DT-200(E)#p12_14.p65 14 02.11.21, 11:30 AM E-14 on the projector. 2 Connect the D-sub end of the DVI to ...
...for "Signal Type" on a DVD player and DTV decorder. on the remote control. (See page 36.) CAUTION • Make sure to turn both the projector and the video equipment off , before switching the "DIGITAL INPUT TYPE" swich and connecting. on the remote control. (See page 36.) CAUTION • ...the OSD menu or press RGB/COMP. When connecting this projector to connect the projector and the DTV decoder. Projector DVI to 15-pin D-sub adaptor (sold separately AN-A1DV) 1 DT-200(E)#p12_14.p65 14 02.11.21, 11:30 AM E-14 on the projector. 2 Connect the D-sub end of the DVI to ...
Operation Manual
Page 16
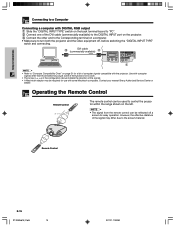
... Sharp Authorized Service Center or Dealer. Setup & Connections Connecting to a Computer Connecting a computer with DIGITAL RGB output 1 Slide the "DIGITAL INPUT TYPE" switch on the back terminal board to "PC". 2 Connect one of the DVI cable (commercially available) to the DIGITAL INPUT port on the projector....in the configuration above indicate the direction of the functions not to control the projector within the range shown on page 51 for easy operation. DT-200 45˚ 30˚ Remote Control E-15 DT-200(E)#p15_21.p65 15 02.11.21, 11:30 AM Use with computer signals other...
... Sharp Authorized Service Center or Dealer. Setup & Connections Connecting to a Computer Connecting a computer with DIGITAL RGB output 1 Slide the "DIGITAL INPUT TYPE" switch on the back terminal board to "PC". 2 Connect one of the DVI cable (commercially available) to the DIGITAL INPUT port on the projector....in the configuration above indicate the direction of the functions not to control the projector within the range shown on page 51 for easy operation. DT-200 45˚ 30˚ Remote Control E-15 DT-200(E)#p15_21.p65 15 02.11.21, 11:30 AM Use with computer signals other...

Operation Manual
Page 17
.... A dimly lit screen is displayed for a short time (about 90 seconds. Then, message "Terminating. The projector will soon disappear with use. When the power is warming up . / Cooling down. DT-200(E)#p15_21.p65 16 02.11.21, 11:30 AM E-16 LAMP POWER Press POWER ON. • The blinking... is on . • After the projector is ready. The image can be emitted from the exhaust ventilative hole. Setup & Connections Power ON/OFF POWER buttons TEMP. Please wait." Wait until the image on again by the Zoom knob and the Focus ring. 1 DT-200 2 1 Slide the Zoom knob. Green...
.... A dimly lit screen is displayed for a short time (about 90 seconds. Then, message "Terminating. The projector will soon disappear with use. When the power is warming up . / Cooling down. DT-200(E)#p15_21.p65 16 02.11.21, 11:30 AM E-16 LAMP POWER Press POWER ON. • The blinking... is on . • After the projector is ready. The image can be emitted from the exhaust ventilative hole. Setup & Connections Power ON/OFF POWER buttons TEMP. Please wait." Wait until the image on again by the Zoom knob and the Focus ring. 1 DT-200 2 1 Slide the Zoom knob. Green...
Operation Manual
Page 18
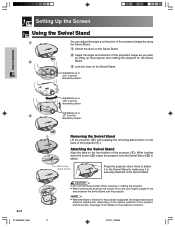
E-17 DT-200(E)#p15_21.p65 2 1 Removing the Swivel Stand Lift the projector (2) with pressing the removing-stand button on the keystone correction. 17 02.11.21, 11:30 AM Setup & Connections Adjustable up to 3 ± 3° from ... Stand to make sure it is securely attached to the Swivel Stand. 1 3 2 CAUTION • Do not hold the lens when lifting, lowering or rotating the projector. • When lowering the projector, be careful not to get your fingers caught in the area between the Swivel Stand and the...
E-17 DT-200(E)#p15_21.p65 2 1 Removing the Swivel Stand Lift the projector (2) with pressing the removing-stand button on the keystone correction. 17 02.11.21, 11:30 AM Setup & Connections Adjustable up to 3 ± 3° from ... Stand to make sure it is securely attached to the Swivel Stand. 1 3 2 CAUTION • Do not hold the lens when lifting, lowering or rotating the projector. • When lowering the projector, be careful not to get your fingers caught in the area between the Swivel Stand and the...

Operation Manual
Page 19
Projector Projected Image Lens shift dial UP DOWN Setup & Connections DT-200(E)#p15_21.p65 18 02.11.21, 11:30 AM E-18 Using the Lens Shift The picture can be adjusted within the shift range of the lens by rotating the lens shift dial on the top of the projector using your finger.
Projector Projected Image Lens shift dial UP DOWN Setup & Connections DT-200(E)#p15_21.p65 18 02.11.21, 11:30 AM E-18 Using the Lens Shift The picture can be adjusted within the shift range of the lens by rotating the lens shift dial on the top of the projector using your finger.
Operation Manual
Page 20
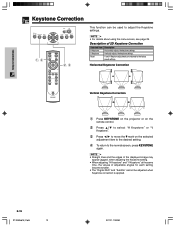
...2, 3 • For details about using the menu screen, see page 26. Horizontal Keystone Correction FREEZE Vertical Keystone Correction 1 Press KEYSTONE on the projector or on the remote control. 2 Press / to select "H Keystone" or "V Keystone". 3 Press / to move the mark on the selected...Keystone Correction Selected item H Keystone V Keystone Reset Description Horizontally adjusts the keystone settings. Vertically adjusts the keystone settings. E-19 DT-200(E)#p15_21.p65 19 02.11.21, 11:30 AM Setup & Connections Keystone Correction This function can be adjusted when Keystone ...
...2, 3 • For details about using the menu screen, see page 26. Horizontal Keystone Correction FREEZE Vertical Keystone Correction 1 Press KEYSTONE on the projector or on the remote control. 2 Press / to select "H Keystone" or "V Keystone". 3 Press / to move the mark on the selected...Keystone Correction Selected item H Keystone V Keystone Reset Description Horizontally adjusts the keystone settings. Vertically adjusts the keystone settings. E-19 DT-200(E)#p15_21.p65 19 02.11.21, 11:30 AM Setup & Connections Keystone Correction This function can be adjusted when Keystone ...
Operation Manual
Page 21
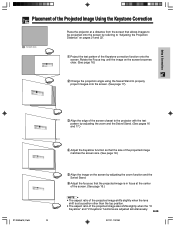
... edge of the screen closest to the projector with the test pattern by adjusting the zoom and the Swivel Stand. (See pages 16 and 17.) 4 Adjust the Keystone function so that the size of the projected image matches the screen size. (See page 19.) DT-200(E)#p15_21.p65 20 5 Align the image ...are adjusted simultaneously. E-20 02.11.21, 11:31 AM Setup & Connections Placement of the Projected Image Using the Keystone Correction : Screen area Place the projector at a distance from the screen that the projected image is in focus at the center of the screen. (See page 16.) • The aspect ...
... edge of the screen closest to the projector with the test pattern by adjusting the zoom and the Swivel Stand. (See pages 16 and 17.) 4 Adjust the Keystone function so that the size of the projected image matches the screen size. (See page 19.) DT-200(E)#p15_21.p65 20 5 Align the image ...are adjusted simultaneously. E-20 02.11.21, 11:31 AM Setup & Connections Placement of the Projected Image Using the Keystone Correction : Screen area Place the projector at a distance from the screen that the projected image is in focus at the center of the screen. (See page 16.) • The aspect ...
Operation Manual
Page 22
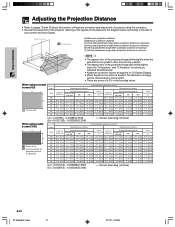
... (0.9 m) 3'11" (1.2 m) 14' 9" (4.5 m) 3' 7" (1.1 m) 2' 7" (0.8 m) 1'12" (0.6 m) 3' 3" (1.0 m) : Picture area : Area covered by the projection panel of the projector 106" 14' 2" (4.3 m) 4' 3" (1.3 m) 2'11" (0.9 m) 2' 4" (0.7 m) 2'11" (0.9 m) 11' 8" (3.6 m) 2' 7" (0.8 m) 1'12" (0.6 m) 1' 8" (0.5 m) ...m) 8" (0.2 m) 4" (0.1 m) 8" (0.2 m) (a) = (0.041019x - 0.033286)/0.3048 (b) = (0.033972x - 0.033542)/0.3048 x : Screen size (diag.) (inches) E-21 DT-200(E)#p15_21.p65 21 02.11.21, 11:31 AM distance (a) Composite, S-video 480i/P, 1080i 720P RGB placement range (e) distance (b) Composite...
... (0.9 m) 3'11" (1.2 m) 14' 9" (4.5 m) 3' 7" (1.1 m) 2' 7" (0.8 m) 1'12" (0.6 m) 3' 3" (1.0 m) : Picture area : Area covered by the projection panel of the projector 106" 14' 2" (4.3 m) 4' 3" (1.3 m) 2'11" (0.9 m) 2' 4" (0.7 m) 2'11" (0.9 m) 11' 8" (3.6 m) 2' 7" (0.8 m) 1'12" (0.6 m) 1' 8" (0.5 m) ...m) 8" (0.2 m) 4" (0.1 m) 8" (0.2 m) (a) = (0.041019x - 0.033286)/0.3048 (b) = (0.033972x - 0.033542)/0.3048 x : Screen size (diag.) (inches) E-21 DT-200(E)#p15_21.p65 21 02.11.21, 11:31 AM distance (a) Composite, S-video 480i/P, 1080i 720P RGB placement range (e) distance (b) Composite...
Operation Manual
Page 23
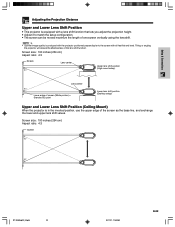
... and exchange the lower and upper lens shift values. Tilting or angling the projector will reduce the effectiveness of the lens shift function. Screen size: 100 inches (254 cm) Aspect ratio: 4:3 Screen 90° 90° DT-200(E)#p22_23.p65 22 02.11.21, 11:40 AM E-22 Setup & Connections... Adjusting the Projection Distance Upper and Lower Lens Shift Position • This projector is equipped with all feet flat and level.
... and exchange the lower and upper lens shift values. Tilting or angling the projector will reduce the effectiveness of the lens shift function. Screen size: 100 inches (254 cm) Aspect ratio: 4:3 Screen 90° 90° DT-200(E)#p22_23.p65 22 02.11.21, 11:40 AM E-22 Setup & Connections... Adjusting the Projection Distance Upper and Lower Lens Shift Position • This projector is equipped with all feet flat and level.
Operation Manual
Page 57
... TO THE PERIOD(S) FROM THE DATE OF PURCHASE SET FORTH BELOW. Some states do not allow limitations on behalf of Sharp. Model Specific Section (In-Home Service) Your Product Model Number & Description: DT-200 Projector (Be sure to have Proof of Purchase available. Additional Item(s) Excluded from date of purchase. The Servicer will come...
... TO THE PERIOD(S) FROM THE DATE OF PURCHASE SET FORTH BELOW. Some states do not allow limitations on behalf of Sharp. Model Specific Section (In-Home Service) Your Product Model Number & Description: DT-200 Projector (Be sure to have Proof of Purchase available. Additional Item(s) Excluded from date of purchase. The Servicer will come...


