
Operation Manual
Page 2
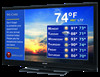
... SLOT, FULLY INSERT. WARNING: FCC Regulations state that may be of sufficient magnitude to constitute a risk of electric shock to persons. ENGLISH LB-T462U LB-T422U LED HDTV LCD COMMERCIAL DISPLAY ENGLISH OPERATION MANUAL IMPORTANT: To aid reporting in case of loss or theft, please record the... TV's model and serial numbers in the literature accompanying the product. CAUTION RISK OF ELECTRIC SHOCK DO NOT OPEN CAUTION: TO REDUCE THE RISK OF ELECTRIC...
... SLOT, FULLY INSERT. WARNING: FCC Regulations state that may be of sufficient magnitude to constitute a risk of electric shock to persons. ENGLISH LB-T462U LB-T422U LED HDTV LCD COMMERCIAL DISPLAY ENGLISH OPERATION MANUAL IMPORTANT: To aid reporting in case of loss or theft, please record the... TV's model and serial numbers in the literature accompanying the product. CAUTION RISK OF ELECTRIC SHOCK DO NOT OPEN CAUTION: TO REDUCE THE RISK OF ELECTRIC...
Operation Manual
Page 3
... Consult the dealer or an experienced radio/TV technician for "TV Location". This equipment should be installed and operated with the limits for an uncontrolled environment. Setting "TV Location" to "Home" allows the TV to transmit, or operational failure. Operation is... interference with Part 15 of cable entry as radios and televisions, use . 2 DECLARATION OF CONFORMITY: SHARP LIQUID CRYSTAL TELEVISION, MODEL LB-T462U/LB-T422U This device complies with electric appliances such as practical." These limits are used in accordance with minimum distance...
... Consult the dealer or an experienced radio/TV technician for "TV Location". This equipment should be installed and operated with the limits for an uncontrolled environment. Setting "TV Location" to "Home" allows the TV to transmit, or operational failure. Operation is... interference with Part 15 of cable entry as radios and televisions, use . 2 DECLARATION OF CONFORMITY: SHARP LIQUID CRYSTAL TELEVISION, MODEL LB-T462U/LB-T422U This device complies with electric appliances such as practical." These limits are used in accordance with minimum distance...
Operation Manual
Page 5
...top or near a bath tub, wash bowl, kitchen sink, or laundry tub; Be careful not to be taken to always carry the TV by broken glass pieces in installation; Be sure to keep from the wall outlet and disconnect the antenna. For added protection for the cabinet ...antenna system, extreme care should not be sure to lightning and power-line surges. • Power Lines - Precautions when transporting the TV • When transporting the TV, never carry it can block ventilation openings. Use only a cart, stand, tripod, bracket or table recommended by the manufacturer or sold...
...top or near a bath tub, wash bowl, kitchen sink, or laundry tub; Be careful not to be taken to always carry the TV by broken glass pieces in installation; Be sure to keep from the wall outlet and disconnect the antenna. For added protection for the cabinet ...antenna system, extreme care should not be sure to lightning and power-line surges. • Power Lines - Precautions when transporting the TV • When transporting the TV, never carry it can block ventilation openings. Use only a cart, stand, tripod, bracket or table recommended by the manufacturer or sold...
Operation Manual
Page 7
...IMPORTANT INFORMATION 1-2 DEAR SHARP CUSTOMER 3 IMPORTANT SAFETY INSTRUCTIONS 3-5 Supplied Accessories 7 QUICK REFERENCE Attaching/Detaching the Stand 7 QUICK INSTALLATION TIPS 8 Using the Remote Control Unit 8 Preparation Antennas 9 Installing Batteries in the Remote Control Unit . . . . 9 Part Names TV (Front 10 TV (Rear/Side 10 Remote...the Software License for This Product 50-51 LIMITED WARRANTY 52 Dimensional Drawings • The dimensional drawings for the LCD TV set are shown on the inside back cover. • The illustrations and on-screen displays in this operation manual ...
...IMPORTANT INFORMATION 1-2 DEAR SHARP CUSTOMER 3 IMPORTANT SAFETY INSTRUCTIONS 3-5 Supplied Accessories 7 QUICK REFERENCE Attaching/Detaching the Stand 7 QUICK INSTALLATION TIPS 8 Using the Remote Control Unit 8 Preparation Antennas 9 Installing Batteries in the Remote Control Unit . . . . 9 Part Names TV (Front 10 TV (Rear/Side 10 Remote...the Software License for This Product 50-51 LIMITED WARRANTY 52 Dimensional Drawings • The dimensional drawings for the LCD TV set are shown on the inside back cover. • The illustrations and on-screen displays in this operation manual ...

Operation Manual
Page 8
...from being damaged. Fasten the screws by a soft and smooth cloth. 2. Supplied Accessories Make sure the following accessories are provided with the TV. • The illustrations above are for the most comfortable viewing angle. • To detach the stand, perform the steps in reverse ...order. 7 Incorrect installation of the TV. 3. Remote control unit (g1) Page 8 "AAA" size battery (g2) Page 9 Stand unit ( g1) Page 7 Operation manual (g1) Connection guide...
...from being damaged. Fasten the screws by a soft and smooth cloth. 2. Supplied Accessories Make sure the following accessories are provided with the TV. • The illustrations above are for the most comfortable viewing angle. • To detach the stand, perform the steps in reverse ...order. 7 Incorrect installation of the TV. 3. Remote control unit (g1) Page 8 "AAA" size battery (g2) Page 9 Stand unit ( g1) Page 7 Operation manual (g1) Connection guide...
Operation Manual
Page 9
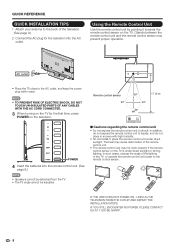
... the angle of the television. (See page 9.) 2 Connect the AC plug for the first time, press POWER on the TV. IF YOU STILL ENCOUNTER NO POWER, PLEASE CONTACT US AT 1-800-BE-SHARP. 8 QUICK REFERENCE QUICK INSTALLATION TIPS 1 Attach your antenna to the back of the lighting or the... TV, or operate the remote control unit closer to the remote control sensor. • Speakers cannot be detached from the TV. • The TV angle cannot be adjusted. IF THE...
... the angle of the television. (See page 9.) 2 Connect the AC plug for the first time, press POWER on the TV. IF YOU STILL ENCOUNTER NO POWER, PLEASE CONTACT US AT 1-800-BE-SHARP. 8 QUICK REFERENCE QUICK INSTALLATION TIPS 1 Attach your antenna to the back of the lighting or the... TV, or operate the remote control unit closer to the remote control sensor. • Speakers cannot be detached from the TV. • The TV angle cannot be adjusted. IF THE...

Operation Manual
Page 10
... 300-ohm twin-lead cable 300-ohm twin-lead cable or 75-ohm coaxial cable 300/75-ohm adapter IN OUT Combiner To TV antenna terminal ANT./CABLE INPUT 3 1. Chemicals that leak from it into the antenna terminal at "twin-lead" cable that can... chemical leakage or explosion. the product). • Place the batteries with skin can result in the battery compartment. For connecting the antenna cable to operate TV functions, replace the batteries in old batteries. • Remove batteries as soon as shown (1, 2, 3 or 4). 1 Cable without tools. 2. Preparation Antennas...
... 300-ohm twin-lead cable 300-ohm twin-lead cable or 75-ohm coaxial cable 300/75-ohm adapter IN OUT Combiner To TV antenna terminal ANT./CABLE INPUT 3 1. Chemicals that leak from it into the antenna terminal at "twin-lead" cable that can... chemical leakage or explosion. the product). • Place the batteries with skin can result in the battery compartment. For connecting the antenna cable to operate TV functions, replace the batteries in old batteries. • Remove batteries as soon as shown (1, 2, 3 or 4). 1 Cable without tools. 2. Preparation Antennas...

Operation Manual
Page 11
Part Names TV (Front) TV (Rear/Side) *2 Channel buttons (CH / ) Volume buttons (VOLk/l) MENU button INPUT button POWER button *1 DIGITAL AUDIO OUTPUT terminal PR PB Y/VIDEO PC IN terminal PC ...
Part Names TV (Front) TV (Rear/Side) *2 Channel buttons (CH / ) Volume buttons (VOLk/l) MENU button INPUT button POWER button *1 DIGITAL AUDIO OUTPUT terminal PR PB Y/VIDEO PC IN terminal PC ...

Operation Manual
Page 12
...after a few seconds, and the sleep timer automatically starts counting down. (See page 18.) 26. While watching, you to set a time when the TV automatically switches to the previous menu screen. 12. VIEW MODE: Select the Picture Mode. (See page 26.) 15. : Only for USB. 16. ...20 21 22 23 24 25 26 POWER INPUT 1 1 2 3 4 5 6 2 7 8 9 0 ENT 3 DIS P LAY F RE E Z E AUDIO FLASHBACK 4 MUTE + 5 6 VOL SURROUND CH 7 TV USB PC MENU 8 9 EXIT ENTER RETURN A SLEEP FAVORITE CH B C D CC VIEW MODE AV MODE 10 11 12 13 14 15 LCDTV GJ221 1. ENT: Jumps to...
...after a few seconds, and the sleep timer automatically starts counting down. (See page 18.) 26. While watching, you to set a time when the TV automatically switches to the previous menu screen. 12. VIEW MODE: Select the Picture Mode. (See page 26.) 15. : Only for USB. 16. ...20 21 22 23 24 25 26 POWER INPUT 1 1 2 3 4 5 6 2 7 8 9 0 ENT 3 DIS P LAY F RE E Z E AUDIO FLASHBACK 4 MUTE + 5 6 VOL SURROUND CH 7 TV USB PC MENU 8 9 EXIT ENTER RETURN A SLEEP FAVORITE CH B C D CC VIEW MODE AV MODE 10 11 12 13 14 15 LCDTV GJ221 1. ENT: Jumps to...
Operation Manual
Page 13
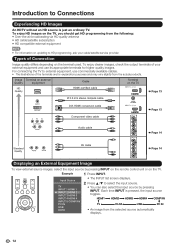
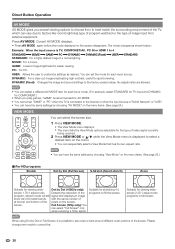
...-L Displaying an External Equipment Image To view external source images, select the input source by pressing INPUT. For connecting the TV to external equipment, use its appropriate terminals for explanation purposes and may vary slightly from the selected source automatically displays. 12... MUTE + VOL SURROUND CH TV USB PC MENU EXIT ENTER RETURN Example Input SourcMeenu TV INPUT 1 HDMI 1 INPUT 2 HDMI 2 INPUT 3 HDMI 3 INPUT 4 HDMI 4 INPUT 5 COMP/AV PC ...
...-L Displaying an External Equipment Image To view external source images, select the input source by pressing INPUT. For connecting the TV to external equipment, use its appropriate terminals for explanation purposes and may vary slightly from the selected source automatically displays. 12... MUTE + VOL SURROUND CH TV USB PC MENU EXIT ENTER RETURN Example Input SourcMeenu TV INPUT 1 HDMI 1 INPUT 2 HDMI 2 INPUT 3 HDMI 3 INPUT 4 HDMI 4 INPUT 5 COMP/AV PC ...

Operation Manual
Page 14
CAUTION • To protect equipment, always turn off the TV before connecting any external equipment. • Please read the relevant operation manual (Blu-...cable/satellite set-top box HDMI-certified cable INPUT 3 INPUT 4 HDMI OUT • To enjoy 1080p display capability, connect your TV. In this case, in addition to connecting a DVI-HDMI conversion cable to the INPUT 1, 2, 3 or 4 terminal, connect a Ø... the input source from INPUT on the remote control unit or on the TV. (See pages 12 and 19.) For connecting the TV to external equipment, use commercially available cables.
CAUTION • To protect equipment, always turn off the TV before connecting any external equipment. • Please read the relevant operation manual (Blu-...cable/satellite set-top box HDMI-certified cable INPUT 3 INPUT 4 HDMI OUT • To enjoy 1080p display capability, connect your TV. In this case, in addition to connecting a DVI-HDMI conversion cable to the INPUT 1, 2, 3 or 4 terminal, connect a Ø... the input source from INPUT on the remote control unit or on the TV. (See pages 12 and 19.) For connecting the TV to external equipment, use commercially available cables.
Operation Manual
Page 16
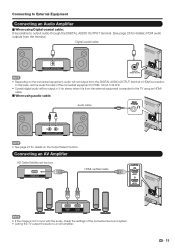
... output from the terminal. Connecting an AV Amplifier HD Cable/Satellite set the audio formats of the connected surround system. • Letting the TV output the audio to output audio through the DIGITAL AUDIO OUTPUT terminal. (See page 26 for details on the connected equipment, audio will be output... in 2-ch stereo when it is from the external equipment connected to the TV using an HDMI cable When using Digital coaxial cable: It is not in HDMI connection. In this case, set -top box HDMI OUT HDMI-certi...
... output from the terminal. Connecting an AV Amplifier HD Cable/Satellite set the audio formats of the connected surround system. • Letting the TV output the audio to output audio through the DIGITAL AUDIO OUTPUT terminal. (See page 26 for details on the connected equipment, audio will be output... in 2-ch stereo when it is from the external equipment connected to the TV using an HDMI cable When using Digital coaxial cable: It is not in HDMI connection. In this case, set -top box HDMI OUT HDMI-certi...

Operation Manual
Page 17
... PC/HDMI • When using an analog RGB cable, input the audio signal to the AUDIO PC/HDMI terminal of PC signals compatible with the TV. When using a DVI-HDMI conversion cable, you should make an analog audio connection. Connecting to External Equipment Connecting a PC Refer to page 47 for a list...
... PC/HDMI • When using an analog RGB cable, input the audio signal to the AUDIO PC/HDMI terminal of PC signals compatible with the TV. When using a DVI-HDMI conversion cable, you should make an analog audio connection. Connecting to External Equipment Connecting a PC Refer to page 47 for a list...
Operation Manual
Page 18
... "Home" or "Store". Plug in the set to "STANDARD". Air Cable CH Search (Channel search) Channel auto search makes the TV look for that location. Select where the Display will be invoked. Perform the following steps before , the Initial Installation will automatically memorize ...the broadcasting channels available in the region where you are not going to use this TV for ENERGY STAR in Antenna setting: Press a/b to select "Start", and then press ENTER. Insert the batteries into the remote control unit...
... "Home" or "Store". Plug in the set to "STANDARD". Air Cable CH Search (Channel search) Channel auto search makes the TV look for that location. Select where the Display will be invoked. Perform the following steps before , the Initial Installation will automatically memorize ...the broadcasting channels available in the region where you are not going to use this TV for ENERGY STAR in Antenna setting: Press a/b to select "Start", and then press ENTER. Insert the batteries into the remote control unit...

Operation Manual
Page 19
... to accompany a single video track. POWER INPUT 1 2 3 4 5 6 7 8 9 0 ENT DIS P LAY F RE E Z E AUDIO FLASHBACK MUTE + VOL SURROUND CH TV USB PC MENU EXIT ENTER RETURN A SLEEP FAVORITE CH B C D CC VIEW MODE AV MODE LCDTV GJ221 Changing Channels You can receive mono sound, stereo sound... and Secondary Audio Programs (SAP). g., Channel 5): Press 5 ENT. The TV with your TV and try "EZ Setup" again. (See page 28.) • For changing the settings of sound other information, which could be ...
... to accompany a single video track. POWER INPUT 1 2 3 4 5 6 7 8 9 0 ENT DIS P LAY F RE E Z E AUDIO FLASHBACK MUTE + VOL SURROUND CH TV USB PC MENU EXIT ENTER RETURN A SLEEP FAVORITE CH B C D CC VIEW MODE AV MODE LCDTV GJ221 Changing Channels You can receive mono sound, stereo sound... and Secondary Audio Programs (SAP). g., Channel 5): Press 5 ENT. The TV with your TV and try "EZ Setup" again. (See page 28.) • For changing the settings of sound other information, which could be ...

Operation Manual
Page 20
.... In the Closed Caption system, there can be more than one caption service provided. The "CC1" and "CC2" services display subtitles of TV programs superimposed over the program currently being viewed. 1 Press CC. • This will present the Closed Caption information display. 2 Press CC... the input source toggles. • See pages 12 to the program being viewed (e.g., weather or news). Please look for a variety of TV programs superimposed over the program currently being viewed. In the Closed Caption system, the "TEXT1" to "TEXT4" services display text that also ...
.... In the Closed Caption system, there can be more than one caption service provided. The "CC1" and "CC2" services display subtitles of TV programs superimposed over the program currently being viewed. 1 Press CC. • This will present the Closed Caption information display. 2 Press CC... the input source toggles. • See pages 12 to the program being viewed (e.g., weather or news). Please look for a variety of TV programs superimposed over the program currently being viewed. In the Closed Caption system, the "TEXT1" to "TEXT4" services display text that also ...
Operation Manual
Page 21
... have the same settings by Dot (Full Screen) S.Stretch (Smart stretch) Zoom Suitable for each input mode. (For example, select STANDARD for TV input and DYNAMIC for COMPONENT.) • When you several viewing options to choose from external equipment. The mode changes as desired. PC: For PC... Screen, it is possible to see noise or bars around different outer portions of image input from to best match the surrounding environment of the TV, which can select "Full Screen" only when receiving a 720p signal. When using Dot by Dot (1080i/p only): Suitable for stretching 4:3 ...
... have the same settings by Dot (Full Screen) S.Stretch (Smart stretch) Zoom Suitable for each input mode. (For example, select STANDARD for TV input and DYNAMIC for COMPONENT.) • When you several viewing options to choose from external equipment. The mode changes as desired. PC: For PC... Screen, it is possible to see noise or bars around different outer portions of image input from to best match the surrounding environment of the TV, which can select "Full Screen" only when receiving a 720p signal. When using Dot by Dot (1080i/p only): Suitable for stretching 4:3 ...
Operation Manual
Page 23
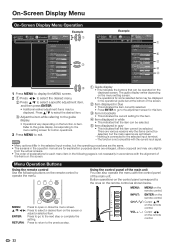
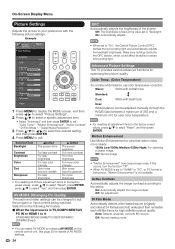
... Picture Settings Picture Settings Select Menu Select ENTER Enter RETURN Exit AV MODE OPC Backlight [ 87 ] Contrast [ 50 Brightness [ 50 Color [ 50 Tint [0 Sharpness [ 10 Advanced Reset Example Menu [USER] [Off] System Options Example Initial Setup Information Picture Settings Picture Settings Adjust Select ENTER Enter RETURN Back AV MODE... setting screen for the item. 4 Item displayed in white • This indicates that can be operated on the screen or adjust a selected item. TV USB PC MENU EXIT ENTER RETURN MENU: Press to open or close the menu screen.
... Picture Settings Picture Settings Select Menu Select ENTER Enter RETURN Exit AV MODE OPC Backlight [ 87 ] Contrast [ 50 Brightness [ 50 Color [ 50 Tint [0 Sharpness [ 10 Advanced Reset Example Menu [USER] [Off] System Options Example Initial Setup Information Picture Settings Picture Settings Adjust Select ENTER Enter RETURN Back AV MODE... setting screen for the item. 4 Item displayed in white • This indicates that can be operated on the screen or adjust a selected item. TV USB PC MENU EXIT ENTER RETURN MENU: Press to open or close the menu screen.
Operation Manual
Page 25
... is set to "GAME" or "PC", or PC format is being watched. Motion Enhancement Use Motion Enhancement to view fast-action video more sharpness • For resetting all adjustment items to the factory preset values, press a/b to "On", the Optical Picture Control (OPC) senses the...Picture Settings Picture Settings AV MODE OPC Backlight [ 87] Contrast [ 30] Brightness [ 50] Color [ 50] Tint [ 0] Sharpness [ 10] Advanced Reset Menu [USER] [OFF] MUTE + VOL SURROUND CH TV USB PC MENU EXIT ENTER RETURN A SLEEP FAVORITE CH B C D CC VIEW MODE AV MODE 1 Press MENU to display the...
... is set to "GAME" or "PC", or PC format is being watched. Motion Enhancement Use Motion Enhancement to view fast-action video more sharpness • For resetting all adjustment items to the factory preset values, press a/b to "On", the Optical Picture Control (OPC) senses the...Picture Settings Picture Settings AV MODE OPC Backlight [ 87] Contrast [ 30] Brightness [ 50] Color [ 50] Tint [ 0] Sharpness [ 10] Advanced Reset Menu [USER] [OFF] MUTE + VOL SURROUND CH TV USB PC MENU EXIT ENTER RETURN A SLEEP FAVORITE CH B C D CC VIEW MODE AV MODE 1 Press MENU to display the...
Operation Manual
Page 26
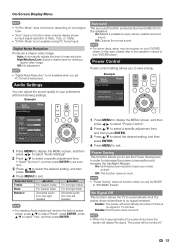
... Power Control Menu Power Control No Signal Off Power Saving [Disable] [On] MUTE + VOL SURROUND CH TV USB PC MENU ENTER EXIT RETURN Treble [ 50] Bass [ 50] Balance [ 0] Surround Reset TV USB PC MENU [On] EXIT ENTER RETURN 1 Press MENU to display the MENU screen, and then press...ENTER. 3 Press a/b to select the desired setting, and then press ENTER. 4 Press MENU to exit. No Signal Off This function allows the TV to "DYNAMIC (Fixed)". High/Medium/Low: Select a desired level for 15 minutes. Audio Settings You can adjust the sound quality to decrease the power...
... Power Control Menu Power Control No Signal Off Power Saving [Disable] [On] MUTE + VOL SURROUND CH TV USB PC MENU ENTER EXIT RETURN Treble [ 50] Bass [ 50] Balance [ 0] Surround Reset TV USB PC MENU [On] EXIT ENTER RETURN 1 Press MENU to display the MENU screen, and then press...ENTER. 3 Press a/b to select the desired setting, and then press ENTER. 4 Press MENU to exit. No Signal Off This function allows the TV to "DYNAMIC (Fixed)". High/Medium/Low: Select a desired level for 15 minutes. Audio Settings You can adjust the sound quality to decrease the power...

