

Operation Manual
Page 5
.... This will prevent damage to the equipment due to clean it. • To protect the panel, do not place the AC cord under the TV set or other similar surface, since insufficient ventilation can break when the product is left unattended and unused for built-in the air vents... screen as this could cause an afterimage to remain. • To prevent fire or shock hazard, do not expose this product near the TV set. • To prevent fire or shock hazard, do not use a dirty cloth, liquid cleaners or chemical cloth to the television equipment, be located in...
.... This will prevent damage to the equipment due to clean it. • To protect the panel, do not place the AC cord under the TV set or other similar surface, since insufficient ventilation can break when the product is left unattended and unused for built-in the air vents... screen as this could cause an afterimage to remain. • To prevent fire or shock hazard, do not expose this product near the TV set. • To prevent fire or shock hazard, do not use a dirty cloth, liquid cleaners or chemical cloth to the television equipment, be located in...

Operation Manual
Page 6
... to route all cords and cables connected to the flat panel display, contact your retailer about your ability to walls with furniture and television sets. • Don't place flat panel displays on furniture that can become excited while watching a program, especially on a "larger than 2,200 companies enjoy the bene...
... to route all cords and cables connected to the flat panel display, contact your retailer about your ability to walls with furniture and television sets. • Don't place flat panel displays on furniture that can become excited while watching a program, especially on a "larger than 2,200 companies enjoy the bene...
Operation Manual
Page 7
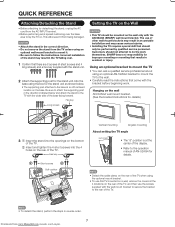
... of the TV. QUICK REFERENCE Attaching/Detaching the Stand • Before attaching (or detaching) the stand, unplug the AC cord from being damaged. SHARP bears no responsibility for the stand unit onto the base using the optional mount bracket. • To use the screws supplied with the wall mount...; Attach the stand in the TV falling over the base area to the TV with the bracket before beginning work themselves. Hex key Long screws Setting the TV on the Wall CAUTION • This TV should not attempt to the operation manual of AN-52AG4 for details. 2 Short screws 2 ...
... of the TV. QUICK REFERENCE Attaching/Detaching the Stand • Before attaching (or detaching) the stand, unplug the AC cord from being damaged. SHARP bears no responsibility for the stand unit onto the base using the optional mount bracket. • To use the screws supplied with the wall mount...; Attach the stand in the TV falling over the base area to the TV with the bracket before beginning work themselves. Hex key Long screws Setting the TV on the Wall CAUTION • This TV should not attempt to the operation manual of AN-52AG4 for details. 2 Short screws 2 ...
Operation Manual
Page 9
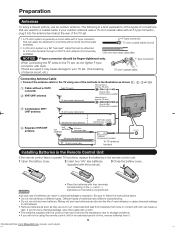
...to the TV using the remote control unit for a coaxial cable. Different types of batteries have a shorter life expectancy due to the TV set . 1. If your TV set. (The breaking of internal circuit, etc.) 75-ohm coaxial cable Connecting Antenna Cable • Connect the antenna cable to the (e) and...cable (round) Coaxial cable (commercially available) 4 Separate VHF/UHF antenna or 300-ohm twin-lead cable (flat the rear of the TV set , do not tighten F-type connector with an F-type connector, plug it into the antenna terminal at ) UHF VHF ANTENNA ANTENNA 300-ohm ...
...to the TV using the remote control unit for a coaxial cable. Different types of batteries have a shorter life expectancy due to the TV set . 1. If your TV set. (The breaking of internal circuit, etc.) 75-ohm coaxial cable Connecting Antenna Cable • Connect the antenna cable to the (e) and...cable (round) Coaxial cable (commercially available) 4 Separate VHF/UHF antenna or 300-ohm twin-lead cable (flat the rear of the TV set , do not tighten F-type connector with an F-type connector, plug it into the antenna terminal at ) UHF VHF ANTENNA ANTENNA 300-ohm ...

Operation Manual
Page 11
...7 or 8 HDMI-certified cable (commercially available) • When connecting a PC to the INPUT 4, set "PC Audio Select" to "Input 4 (PC)". (See page 21.) • When connecting a PC to the INPUT 6, set "PC Audio Select" to "Input 6 (HDMI)". (See page 21.) • The HDMI terminals only support ...digital signal. • Refer to page 30 for a list of PC signals compatible with INPUT 6, set "PC Audio Select" to "Input 6 (HDMI)". (See page 21.) • To enjoy the AQUOS 1080p display capability, connect your Blu-ray disc player...
...7 or 8 HDMI-certified cable (commercially available) • When connecting a PC to the INPUT 4, set "PC Audio Select" to "Input 4 (PC)". (See page 21.) • When connecting a PC to the INPUT 6, set "PC Audio Select" to "Input 6 (HDMI)". (See page 21.) • The HDMI terminals only support ...digital signal. • Refer to page 30 for a list of PC signals compatible with INPUT 6, set "PC Audio Select" to "Input 6 (HDMI)". (See page 21.) • To enjoy the AQUOS 1080p display capability, connect your Blu-ray disc player...

Operation Manual
Page 12
...8226; ENERGY STAR qualification is based on the remote control unit. 1. Language TV Location Air/Cable CH Search Air Cable Language (Language setting) Select from www.Manualslib.com manuals search engine When "Off" is selected, AV MODE will be reset to "DYNAMIC (Fixed)" if there is ...initial setup starts when the TV powers on for the location where you plan to install the TV. Picture Reset and Feature Demo can be set to "DYNAMIC (Fixed)". Initial Setup When you live. Insert the batteries into the remote control unit. (See page 9.) 2. This product quali...
...8226; ENERGY STAR qualification is based on the remote control unit. 1. Language TV Location Air/Cable CH Search Air Cable Language (Language setting) Select from www.Manualslib.com manuals search engine When "Off" is selected, AV MODE will be reset to "DYNAMIC (Fixed)" if there is ...initial setup starts when the TV powers on for the location where you plan to install the TV. Picture Reset and Feature Demo can be set to "DYNAMIC (Fixed)". Initial Setup When you live. Insert the batteries into the remote control unit. (See page 9.) 2. This product quali...

Operation Manual
Page 13
... 5 ENT. MUTE Mutes the current sound output. Press SLEEP. • The remaining time displays when the sleep timer has been set. • Each time you to set a time when the TV automatically switches to 0 automatically. FAVORITE CH You can select 4 preset favorite channels in 4 different categories. ...(e. Press A, B, C or D. • While watching the TV, you can toggle the selected channels by pressing A, B, C and D. • When set, the time automatically starts counting down. • If you want to adjust the sleep timer, you enter 0-9 and • (DOT), channel selection will be ...
... 5 ENT. MUTE Mutes the current sound output. Press SLEEP. • The remaining time displays when the sleep timer has been set. • Each time you to set a time when the TV automatically switches to 0 automatically. FAVORITE CH You can select 4 preset favorite channels in 4 different categories. ...(e. Press A, B, C or D. • While watching the TV, you can toggle the selected channels by pressing A, B, C and D. • When set, the time automatically starts counting down. • If you want to adjust the sleep timer, you enter 0-9 and • (DOT), channel selection will be ...

Operation Manual
Page 14
...(SAP is mono sound.) If stereo sound is difficult to hear. • Obtain a clearer sound by manually switching to customize settings as MONO and STEREO. Downloaded from www.Manualslib.com manuals search engine • When this function is called Multi-channel Television Sound (MTS). ... a digital broadcast include SURROUND as well as desired. Press FREEZE. • A moving image that allows reception of sound other information, which can set the mode for each input mode. (For example, select STANDARD for TV input and DYNAMIC for INPUT 1.) • When you play games, "...
...(SAP is mono sound.) If stereo sound is difficult to hear. • Obtain a clearer sound by manually switching to customize settings as MONO and STEREO. Downloaded from www.Manualslib.com manuals search engine • When this function is called Multi-channel Television Sound (MTS). ... a digital broadcast include SURROUND as well as desired. Press FREEZE. • A moving image that allows reception of sound other information, which can set the mode for each input mode. (For example, select STANDARD for TV input and DYNAMIC for INPUT 1.) • When you play games, "...

Operation Manual
Page 15
... of the program provider. CC1, CC2, T1, and T2 are stored. See page 19 for details of Power Saving settings. • See page 24 for detailed closed caption settings. • When the program contains no closed caption, "--" displays in use, it allows for external equipment connection. •...the previous menu screen. It allows you select the desired closed caption service, CC1, will be displayed. • When "Power Saving" is set to "Standard" or "Advanced", the Power Saving leaf icon appears on the channel information window. When the Digital Closed Caption service is in the...
... of the program provider. CC1, CC2, T1, and T2 are stored. See page 19 for details of Power Saving settings. • See page 24 for detailed closed caption settings. • When the program contains no closed caption, "--" displays in use, it allows for external equipment connection. •...the previous menu screen. It allows you select the desired closed caption service, CC1, will be displayed. • When "Power Saving" is set to "Standard" or "Advanced", the Power Saving leaf icon appears on the channel information window. When the Digital Closed Caption service is in the...
Operation Manual
Page 17
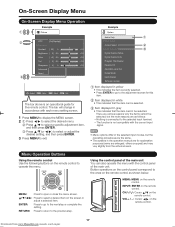
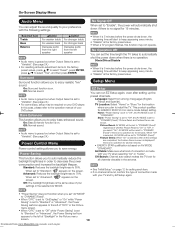
...30] 0 b40 Brightness [ 0] a30 b30 Color [ b2] a30 b30 Tint [ 0] a30 b30 Sharpness [ 4] 0 b20 Advanced Reset : Select ENTER : Enter RETURN : Back MENU : Exit The bar above is not compatible with each menu setting screen. 1 Press MENU to display the MENU screen. 2 1 Press c/d to select the desired ...menu. 2 Press a/b to select a specific adjustment item, and then press ENTER. 3 Press a/b (or c/d) to select or adjust the desired setting, and then press ENTER. 3 Press MENU to exit. The bar will change in accordance with the current input signal. • Menu options differ in...
...30] 0 b40 Brightness [ 0] a30 b30 Color [ b2] a30 b30 Tint [ 0] a30 b30 Sharpness [ 4] 0 b20 Advanced Reset : Select ENTER : Enter RETURN : Back MENU : Exit The bar above is not compatible with each menu setting screen. 1 Press MENU to display the MENU screen. 2 1 Press c/d to select the desired ...menu. 2 Press a/b to select a specific adjustment item, and then press ENTER. 3 Press a/b (or c/d) to select or adjust the desired setting, and then press ENTER. 3 Press MENU to exit. The bar will change in accordance with the current input signal. • Menu options differ in...
Operation Manual
Page 18
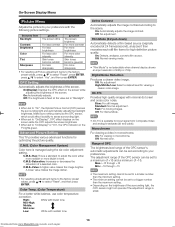
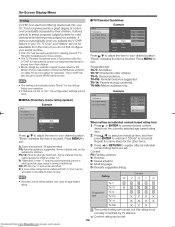
.... On: Detects, analyzes, converts film source. Fast: For moving images. OPC Setting Automatically adjusts the brightness of -16. Selected item Backlight Contrast Brightness Color Tint Sharpness cbutton The screen dims For less contrast For less brightness For less color intensity Skin tones ...become reddish For less sharpness dbutton The screen brightens For more contrast For more brightness For more color intensity Skin tones become greenish For more bluish in "Backlight". • When set to a maximum of +16 and a minimum of...
.... On: Detects, analyzes, converts film source. Fast: For moving images. OPC Setting Automatically adjusts the brightness of -16. Selected item Backlight Contrast Brightness Color Tint Sharpness cbutton The screen dims For less contrast For less brightness For less color intensity Skin tones ...become reddish For less sharpness dbutton The screen brightens For more contrast For more brightness For more color intensity Skin tones become greenish For more bluish in "Backlight". • When set to a maximum of +16 and a minimum of...
Operation Manual
Page 19
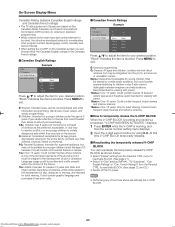
...minutes. • When it is 5 minutes before the power shuts down , the remaining time will start to keep appearing every minute. • "Disable" is set to "Off" and AV MODE is the factory preset value. • When a TV program finishes, this case, please refer to "DYNAMIC (Fixed)". Surround...when you select "On", AV MODE will be reset to "DYNAMIC (Fixed)" if there is selected, AV MODE will be required on page 12 for setting each item. • If no operation for all Audio adjustment items to the factory preset values, press a/b to select "Reset", press ENTER, press ...
...minutes. • When it is 5 minutes before the power shuts down , the remaining time will start to keep appearing every minute. • "Disable" is set to "Off" and AV MODE is the factory preset value. • When a TV program finishes, this case, please refer to "DYNAMIC (Fixed)". Surround...when you select "On", AV MODE will be reset to "DYNAMIC (Fixed)" if there is selected, AV MODE will be required on page 12 for setting each item. • If no operation for all Audio adjustment items to the factory preset values, press a/b to select "Reset", press ENTER, press ...

Operation Manual
Page 20
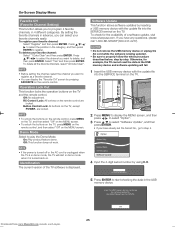
...using the INPUT SOURCE menu or channel display. You can only select the "Input Signal" on before starting Auto Sync. Input Skip This setting allows you need a digital broadcast antenna. Position For adjusting a picture's horizontal and vertical position. On-Screen Display Menu CH Setup If ...1024 x 768 1360 x 768 • You can confirm the antenna configuration through the "Antenna Setup Digital" screen. Ordinarily you set area. adjustment items to the factory preset values, press a/b to select "Reset", and then press ENTER. • It is not necessary to ...
...using the INPUT SOURCE menu or channel display. You can only select the "Input Signal" on before starting Auto Sync. Input Skip This setting allows you need a digital broadcast antenna. Position For adjusting a picture's horizontal and vertical position. On-Screen Display Menu CH Setup If ...1024 x 768 1360 x 768 • You can confirm the antenna configuration through the "Antenna Setup Digital" screen. Ordinarily you set area. adjustment items to the factory preset values, press a/b to select "Reset", and then press ENTER. • It is not necessary to ...

Operation Manual
Page 21
... audio system does not support Dolby Digital, select "PCM". IMPORTANT: Three conditions must be restored to connect HDMI-compatible equipment. is set in clearly. Input Secret No.: When you do not first configure your secret number. Reconfirm: Enter the...output digital audio to an AV amplifier or similar device whose DIGITAL AUDIO INPUT terminal is cleared, the Status setting automatically sets to protect certain settings from being accidentally changed . 21 Downloaded from www.Manualslib.com manuals search engine On: Enables Parental CTRL. To produce...
... audio system does not support Dolby Digital, select "PCM". IMPORTANT: Three conditions must be restored to connect HDMI-compatible equipment. is set in clearly. Input Secret No.: When you do not first configure your secret number. Reconfirm: Enter the...output digital audio to an AV amplifier or similar device whose DIGITAL AUDIO INPUT terminal is cleared, the Status setting automatically sets to protect certain settings from being accidentally changed . 21 Downloaded from www.Manualslib.com manuals search engine On: Enables Parental CTRL. To produce...
Operation Manual
Page 22
... MENU to register after all individual content rating items are used for original movies rated by their children. • Movie ratings are set to your desired position. TV-G: General audience. MPAA TV Guidelines Can. Repeat the same steps for viewing content: TV Parental Guidelines and...Ratings TV-Y TV-Y7 TV-G TV-PG TV-14 TV-MA NONE ------------Block Block Block D Block L Block S Block V Block FV ----- When setting an individual content-based rating item: 1 Press d or ENTER to access blocked content items from their children. TV-14: Parents strongly cautioned. Some ...
... MENU to register after all individual content rating items are used for original movies rated by their children. • Movie ratings are set to your desired position. TV-G: General audience. MPAA TV Guidelines Can. Repeat the same steps for viewing content: TV Parental Guidelines and...Ratings TV-Y TV-Y7 TV-G TV-PG TV-14 TV-MA NONE ------------Block Block Block D Block L Block S Block V Block FV ----- When setting an individual content-based rating item: 1 Press d or ENTER to access blocked content items from their children. TV-14: Parents strongly cautioned. Some ...
Operation Manual
Page 23
... adult viewing. Pays careful attention to themes that could contain scenes disturbing to reactivate BLOCK. (See page 21.) • Select "V-Chip" setting ("MPAA", "TV Guidelines", "Can. PG: Parental Guidance: Intended for a general audience, but could threaten their sense of 8 years. ... is blocked. E: Exempt: Includes news, sports, documentaries and other program content like language, nudity, sexuality and mature themes. • When setting the V-CHIP on the screen. talk shows, music videos, and variety programming. "Block" indicates the item is blocked. English Ratings" or...
... adult viewing. Pays careful attention to themes that could contain scenes disturbing to reactivate BLOCK. (See page 21.) • Select "V-Chip" setting ("MPAA", "TV Guidelines", "Can. PG: Parental Guidance: Intended for a general audience, but could threaten their sense of 8 years. ... is blocked. E: Exempt: Includes news, sports, documentaries and other program content like language, nudity, sexuality and mature themes. • When setting the V-CHIP on the screen. talk shows, music videos, and variety programming. "Block" indicates the item is blocked. English Ratings" or...

Operation Manual
Page 24
...for the digital broadcast program being viewed. • This list is not displayed for the INPUT 2 S-VIDEO and INPUT 3 VIDEO. • If you set the Secret No., input the 4-digit secret number here. Type 5: Casual font type. INPUT 2: 1 COMPONENT VIDEO 2 S-VIDEO Output Select Allows you ...does not come in the MENU screen. Type 2: Proportionally spaced with serifs. Type 1: Monospaced with serifs. Example: Selectable items available for setting a secret number. 24 Downloaded from a music program, you to select what controls the audio output. Program Title Display Select the CH ...
...for the digital broadcast program being viewed. • This list is not displayed for the INPUT 2 S-VIDEO and INPUT 3 VIDEO. • If you set the Secret No., input the 4-digit secret number here. Type 5: Casual font type. INPUT 2: 1 COMPONENT VIDEO 2 S-VIDEO Output Select Allows you ...does not come in the MENU screen. Type 2: Proportionally spaced with serifs. Type 1: Monospaced with serifs. Example: Selectable items available for setting a secret number. 24 Downloaded from a music program, you to select what controls the audio output. Program Title Display Select the CH ...
Operation Manual
Page 25
... to select "Option". 3 Press a/b to select "Software Update", and then press ENTER. • If you have any questions, please call 1-800-BE-SHARP (800-237-4277). Use SERVICE port near the INPUT3. Press a/b/c/ d to select the position in demo mode when it is turned back on the TV...The current version of a software update, visit www.sharpusa.com. Operation Lock Out This function locks the operation buttons on . If you have already set the Secret No., go to step 4. Option Audio Only Demo Mode Identification Software Update 4 Input the 4-digit secret number by inserting ...
... to select "Option". 3 Press a/b to select "Software Update", and then press ENTER. • If you have any questions, please call 1-800-BE-SHARP (800-237-4277). Use SERVICE port near the INPUT3. Press a/b/c/ d to select the position in demo mode when it is turned back on the TV...The current version of a software update, visit www.sharpusa.com. Operation Lock Out This function locks the operation buttons on . If you have already set the Secret No., go to step 4. Option Audio Only Demo Mode Identification Software Update 4 Input the 4-digit secret number by inserting ...
Operation Manual
Page 27
Check that is too bright. • Check the input signal setting. (See page 20.) • Power is correctly setup. • No broadcast now. • Check the broadcast time in a location exposed to malfunction. room, of an ... correct? (See page 11.) • Is correct input signal source selected after first turning off . • Is the sleep timer set? (See page 13.) • Check the power control settings. (See page 19.) • The unit's internal temperature has increased. This happens when the cabinet slightly expands and contracts according to...
Check that is too bright. • Check the input signal setting. (See page 20.) • Power is correctly setup. • No broadcast now. • Check the broadcast time in a location exposed to malfunction. room, of an ... correct? (See page 11.) • Is correct input signal source selected after first turning off . • Is the sleep timer set? (See page 13.) • Check the power control settings. (See page 19.) • The unit's internal temperature has increased. This happens when the cabinet slightly expands and contracts according to...

Operation Manual
Page 28
... procedure Send the control commands from www.Manualslib.com manuals search engine is also included. An input change is input for some commands, the present setting ? D A 2 P * * * * (0100-9999) D C 2 U * * * _ (1-999) DIGITAL Air (Two-Part numbers, 2-digit plus 2-digit) DIGITAL Cable (Two-Part numbers...communication conditions. Wait until the PC receives the OK response before sending the next command. CONTROL ITEM COMMAND PARAMETER CONTROL CONTENTS POWER ON COMMAND SETTING R S P W 0 _ _ _ Off The Power On command rejected. D C C H * * * _ The channel ...
... procedure Send the control commands from www.Manualslib.com manuals search engine is also included. An input change is input for some commands, the present setting ? D A 2 P * * * * (0100-9999) D C 2 U * * * _ (1-999) DIGITAL Air (Two-Part numbers, 2-digit plus 2-digit) DIGITAL Cable (Two-Part numbers...communication conditions. Wait until the PC receives the OK response before sending the next command. CONTROL ITEM COMMAND PARAMETER CONTROL CONTENTS POWER ON COMMAND SETTING R S P W 0 _ _ _ Off The Power On command rejected. D C C H * * * _ The channel ...


