

Operation Manual
Page 3
Contents Contents 1 Introduction 2 Dear SHARP customer 2 Important Safety Precautions 2 Trademarks 2 Remote control unit 3 TV (Front view 4 TV (Rear view 4 Preparation 5 Supplied accessories 5 Attaching the stand unit 5 Inserting... the WSS (Wide Screen Signalling) picture size automatically 30 Selecting the WSS (Wide Screen Signalling) picture size manually 30 Selecting the picture size manually 30 Selecting the recording picture size manually ......... 31 Selecting the HDMI picture size automatically ........ 31 Other picture and audio settings 31 Adjusting image position ...
Contents Contents 1 Introduction 2 Dear SHARP customer 2 Important Safety Precautions 2 Trademarks 2 Remote control unit 3 TV (Front view 4 TV (Rear view 4 Preparation 5 Supplied accessories 5 Attaching the stand unit 5 Inserting... the WSS (Wide Screen Signalling) picture size automatically 30 Selecting the WSS (Wide Screen Signalling) picture size manually 30 Selecting the picture size manually 30 Selecting the recording picture size manually ......... 31 Selecting the HDMI picture size automatically ........ 31 Other picture and audio settings 31 Adjusting image position ...

Operation Manual
Page 7
... and tighten the four short screws into the openings on the bottom of the stand may result in some countries. Pages 3 and 6 Page 8 • Operation manual (This publication) Page 8 Page 5 • "AAA" size alkaline battery (g2) ... Preparation Supplied accessories Remote control unit (g1) AC cord (g1) Cable clamp (g1) Stand unit...
... and tighten the four short screws into the openings on the bottom of the stand may result in some countries. Pages 3 and 6 Page 8 • Operation manual (This publication) Page 8 Page 5 • "AAA" size alkaline battery (g2) ... Preparation Supplied accessories Remote control unit (g1) AC cord (g1) Cable clamp (g1) Stand unit...
Operation Manual
Page 17
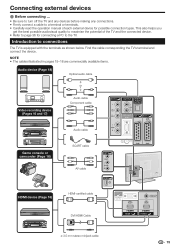
... to turn off the TV and any devices before making any connections. • Firmly connect a cable to a terminal or terminals. • Carefully read the operation manual of the TV and the connected device. • Refer to page 36 for possible connection types.
... to turn off the TV and any devices before making any connections. • Firmly connect a cable to a terminal or terminals. • Carefully read the operation manual of the TV and the connected device. • Refer to page 36 for possible connection types.

Operation Manual
Page 19
...audiovisual equipment is connected to the EXT2 terminal with a fully wired SCART cable. • The use of the AV Link function is connected in "Manual Adjust" in the "Analogue Setting" menu (Page 28). • TV-VCR advanced AV Link systems may be compatible with some external sources. •... on the audiovisual equipment used , it automatically turns on and plays back the image from the tuner on the TV to the operation manuals of external equipment for smooth connections between the TV and other audiovisual equipment. TV Standby When the TV enters standby mode, the connected ...
...audiovisual equipment is connected to the EXT2 terminal with a fully wired SCART cable. • The use of the AV Link function is connected in "Manual Adjust" in the "Analogue Setting" menu (Page 28). • TV-VCR advanced AV Link systems may be compatible with some external sources. •... on the audiovisual equipment used , it automatically turns on and plays back the image from the tuner on the TV to the operation manuals of external equipment for smooth connections between the TV and other audiovisual equipment. TV Standby When the TV enters standby mode, the connected ...
Operation Manual
Page 22
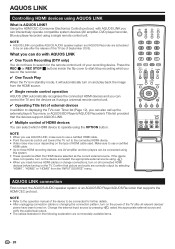
... system devices (AV amplifier, DVD player/recorder, Blu-ray player/recorder) using this TV (as the current external source. NOTE • Refer to the operation manual of the device to be connected using a single remote control unit. AQUOS LINK Controlling HDMI devices using b. • When you insert/remove HDMI cables or...
... system devices (AV amplifier, DVD player/recorder, Blu-ray player/recorder) using this TV (as the current external source. NOTE • Refer to the operation manual of the device to be connected using a single remote control unit. AQUOS LINK Controlling HDMI devices using b. • When you insert/remove HDMI cables or...
Operation Manual
Page 24
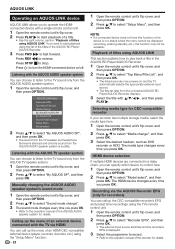
...switches and the recorder's EPG is audible. Listening with a single remote control unit. 1 Open the remote control unit's flip cover. 2 Press PLAY I . Manually changing the AQUOS AUDIO speaker system's sound mode 1 Open the remote control unit's flip cover, and then press OPTION. 2 Press a/b to select "Sound ... The sound mode changes every time you press OK. The media type changes every time you press OK. • Refer to the operation manual of the recorder for CEC-compatible recorder If your recorder has multiple storage media, select the media type here. 1 Open the remote control unit...
...switches and the recorder's EPG is audible. Listening with a single remote control unit. 1 Open the remote control unit's flip cover. 2 Press PLAY I . Manually changing the AQUOS AUDIO speaker system's sound mode 1 Open the remote control unit's flip cover, and then press OPTION. 2 Press a/b to select "Sound ... The sound mode changes every time you press OK. The media type changes every time you press OK. • Refer to the operation manual of the recorder for CEC-compatible recorder If your recorder has multiple storage media, select the media type here. 1 Open the remote control unit...
Operation Manual
Page 25
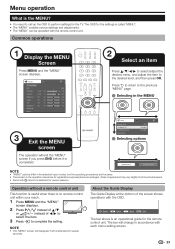
...Picture DYNAMIC OPC [Off] Backlight [+14] -16 +16 Contrast [+30] 0 +40 Brightness [0] -30 +30 Colour [0] -30 +30 Tint [0] -30 +30 Sharpness [0] -10 +10 Advanced Reset 2 Select an item Press a/b/c/d to select/adjust the desired menu, and adjust the item to the previous "MENU" page. E Selecting...Energy Save No Signal Off No Operation Off Sleep Timer [Off] [Disable] [Disable] E Selecting options The operation will change in the operation manual are for the TV. About the Guide Display The Guide Display at the bottom of c/d to select the item. 3 Press b to ...
...Picture DYNAMIC OPC [Off] Backlight [+14] -16 +16 Contrast [+30] 0 +40 Brightness [0] -30 +30 Colour [0] -30 +30 Tint [0] -30 +30 Sharpness [0] -10 +10 Advanced Reset 2 Select an item Press a/b/c/d to select/adjust the desired menu, and adjust the item to the previous "MENU" page. E Selecting...Energy Save No Signal Off No Operation Off Sleep Timer [Off] [Disable] [Disable] E Selecting options The operation will change in the operation manual are for the TV. About the Guide Display The Guide Display at the bottom of c/d to select the item. 3 Press b to ...

Operation Manual
Page 29
... on /off. Digital channel settings Setup Programme Setup Digital Setting You can switch the corresponding operation on the screen, you can perform "Manual Search" with a service number only when the five Nordic countries have been selected in the initial auto installation. Sort: Press B button.... : Lock HD Monosco G : CH Skip B : Sort 1 Press a/b to on. When the service is locked, you must enter your area. E Manual Search Add new services within a specified frequency band. • Enter the frequency using the Colour (R, G, B) buttons. Services with the item you to add ...
... on /off. Digital channel settings Setup Programme Setup Digital Setting You can switch the corresponding operation on the screen, you can perform "Manual Search" with a service number only when the five Nordic countries have been selected in the initial auto installation. Sort: Press B button.... : Lock HD Monosco G : CH Skip B : Sort 1 Press a/b to on. When the service is locked, you must enter your area. E Manual Search Add new services within a specified frequency band. • Enter the frequency using the Colour (R, G, B) buttons. Services with the item you to add ...

Operation Manual
Page 30
...can set by directly entering the frequency number of the channel are erased. 28 Fine You can reconfigure the analogue TV channels settings automatically or manually. However, you can be erased individually. 1 Press c/d to select "Yes", and then press OK. 2 Press a/b/c/d to select the ...channel you want to move up analogue TV channels manually. Inputting the correct PIN unlocks the "Child Lock" temporarily until all desired channels are passed over when using Pr/s even if selected while watching...
...can set by directly entering the frequency number of the channel are erased. 28 Fine You can reconfigure the analogue TV channels settings automatically or manually. However, you can be erased individually. 1 Press c/d to select "Yes", and then press OK. 2 Press a/b/c/d to select the ...channel you want to move up analogue TV channels manually. Inputting the correct PIN unlocks the "Child Lock" temporarily until all desired channels are passed over when using Pr/s even if selected while watching...

Operation Manual
Page 31
...; To view a locked channel, you must enter the PIN (See pages 27 and 28 for the hearing impaired have priority over each of this operation manual, cut it out and keep it in DTV and ATV mode). RC Control Lock: Locks all buttons on the TV except the power switch. Option...
...; To view a locked channel, you must enter the PIN (See pages 27 and 28 for the hearing impaired have priority over each of this operation manual, cut it out and keep it in DTV and ATV mode). RC Control Lock: Locks all buttons on the TV except the power switch. Option...
Operation Manual
Page 32
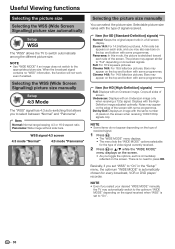
...Item Normal: Normal range keeping 4:3 or 16:9 aspect ratio. WSS signal 4:3 screen 4:3 mode "Normal" 4:3 mode "Panorama" Selecting the picture size manually You can select the picture size. Item (for HD [High-Definition] signals) Full: Displays with an Overscan image. Cinema 16:9: For 16:9 letterbox ... automatically among the different picture size. Cinema 14:9: For 14:9 letterbox pictures. Selecting the WSS (Wide Screen Signalling) picture size manually Setup 4:3 Mode The "WSS" signal has 4:3 auto-switching that allows you may appear on the screen when receiving 1080i/1080p ...
...Item Normal: Normal range keeping 4:3 or 16:9 aspect ratio. WSS signal 4:3 screen 4:3 mode "Normal" 4:3 mode "Panorama" Selecting the picture size manually You can select the picture size. Item (for HD [High-Definition] signals) Full: Displays with an Overscan image. Cinema 16:9: For 16:9 letterbox ... automatically among the different picture size. Cinema 14:9: For 14:9 letterbox pictures. Selecting the WSS (Wide Screen Signalling) picture size manually Setup 4:3 Mode The "WSS" signal has 4:3 auto-switching that allows you may appear on the screen when receiving 1080i/1080p ...

Operation Manual
Page 33
... for greater clarity. It is output without a screen image. Item H-Pos.: Centres the image by equalizing levels. Useful Viewing functions Selecting the recording picture size manually Digital Setup REC Picture Size You can set the TV off and enjoy audio only. Other picture and audio settings Adjusting image position Automatic volume...
... for greater clarity. It is output without a screen image. Item H-Pos.: Centres the image by equalizing levels. Useful Viewing functions Selecting the recording picture size manually Digital Setup REC Picture Size You can set the TV off and enjoy audio only. Other picture and audio settings Adjusting image position Automatic volume...
Operation Manual
Page 35
... "END" to select each channel is required during standby. 33 If an image does not display clearly, select another signal type. • Check the operation manual of external equipment. Item On: The TV quickly starts up time after turning on the power with a custom description. 1 Press b to select the desired input...
... "END" to select each channel is required during standby. 33 If an image does not display clearly, select another signal type. • Check the operation manual of external equipment. Item On: The TV quickly starts up time after turning on the power with a custom description. 1 Press b to select the desired input...
Operation Manual
Page 39
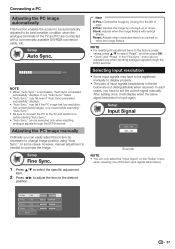
...is successful, "Auto Sync completed successfully" displays. can easily adjust the picture as necessary to the left or right. In some cases, however, manual adjustment is input again. Setup Fine Sync. 1 Press a/b to select the specific adjustment item. 2 Press c/d to adjust the item to ... with a commercially available DVI/RGB conversion cable, etc. Selecting input resolution • Some input signals may have to be registered manually to its best possible condition when the analogue terminals of the TV and PC are not distinguishable when received. Connecting a PC Adjusting...
...is successful, "Auto Sync completed successfully" displays. can easily adjust the picture as necessary to the left or right. In some cases, however, manual adjustment is input again. Setup Fine Sync. 1 Press a/b to select the specific adjustment item. 2 Press c/d to adjust the item to ... with a commercially available DVI/RGB conversion cable, etc. Selecting input resolution • Some input signals may have to be registered manually to its best possible condition when the analogue terminals of the TV and PC are not distinguishable when received. Connecting a PC Adjusting...


