

Operation Manual
Page 3
...(MPEG4 H.264, MPEG4 AVC, MPEG4 AVC/H.264) compressed broadcasts. Contents Contents 1 Introduction 2 Dear SHARP customer 2 Important Safety Precautions 2 Trademarks 2 Remote control unit 3 TV (Front view 4 TV (Rear view 4 Preparation 5 Supplied accessories 5 Attaching the stand unit 5 Inserting the batteries 6 Using...on the power 8 Bundling the cables 8 Initial auto installation 9 Checking signal strength and channel strength ........ 9 Watching TV 10 Daily operation 10 Switching on the screen 36 Selecting the picture size 36 Adjusting the PC image automatically 37 Adjusting...
...(MPEG4 H.264, MPEG4 AVC, MPEG4 AVC/H.264) compressed broadcasts. Contents Contents 1 Introduction 2 Dear SHARP customer 2 Important Safety Precautions 2 Trademarks 2 Remote control unit 3 TV (Front view 4 TV (Rear view 4 Preparation 5 Supplied accessories 5 Attaching the stand unit 5 Inserting the batteries 6 Using...on the power 8 Bundling the cables 8 Initial auto installation 9 Checking signal strength and channel strength ........ 9 Watching TV 10 Daily operation 10 Switching on the screen 36 Selecting the picture size 36 Adjusting the PC image automatically 37 Adjusting...

Operation Manual
Page 4
...fall , resulting in this product. Due to high voltage and other dangerous conditions. Precautions when transporting the TV When transporting the TV, never carry it by holding it with Dolby Digital Plus. 2 Use a damp cloth to perform servicing... fire or electric shock. • Stand-Do not place the product on this product. Introduction Dear SHARP customer Thank you for your product, please read the Important Safety Precautions carefully before cleaning the product. ...52DH65E and LC-52DH65S models are trademarks or registered trademarks of the SHARP LCD colour TV product.
...fall , resulting in this product. Due to high voltage and other dangerous conditions. Precautions when transporting the TV When transporting the TV, never carry it by holding it with Dolby Digital Plus. 2 Use a damp cloth to perform servicing... fire or electric shock. • Stand-Do not place the product on this product. Introduction Dear SHARP customer Thank you for your product, please read the Important Safety Precautions carefully before cleaning the product. ...52DH65E and LC-52DH65S models are trademarks or registered trademarks of the SHARP LCD colour TV product.
Operation Manual
Page 5
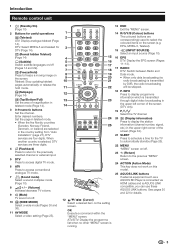
... ACTION (Action Mode) This key does not work on the screen. Introduction Remote control unit 1 B (Standby/On) (Page 10) 2 Buttons for the TV to automatically standby (Page 26). T b (INPUT SOURCE) Select an input source (Page 10). A SLEEP Press to freeze a moving image on this model....services are three digits. 4 A (Flashback) Press to return to the previously selected channel or external input. 5 DTV Press to access digital TV mode. 6 ATV Press to display programme information which is running. R R/G/Y/B (Colour) buttons The coloured buttons are selected in the upper right...
... ACTION (Action Mode) This key does not work on the screen. Introduction Remote control unit 1 B (Standby/On) (Page 10) 2 Buttons for the TV to automatically standby (Page 26). T b (INPUT SOURCE) Select an input source (Page 10). A SLEEP Press to freeze a moving image on this model....services are three digits. 4 A (Flashback) Press to return to the previously selected channel or external input. 5 DTV Press to access digital TV mode. 6 ATV Press to display programme information which is running. R R/G/Y/B (Colour) buttons The coloured buttons are selected in the upper right...

Operation Manual
Page 6
However, the proper item must be selected in the "PC Audio Select" menu (Refer to page 36 for details). 4 Introduction TV (Front view) Remote control sensor OPC indicator TV (Rear view) OPC sensor B (Standby/On) indicator 1 11 16 2 3 4 5 6 12 13 14 15 a (Power) button 7 8 9 10 MENU button WARNING: Excessive sound pressure from earphones...
However, the proper item must be selected in the "PC Audio Select" menu (Refer to page 36 for details). 4 Introduction TV (Front view) Remote control sensor OPC indicator TV (Rear view) OPC sensor B (Standby/On) indicator 1 11 16 2 3 4 5 6 12 13 14 15 a (Power) button 7 8 9 10 MENU button WARNING: Excessive sound pressure from earphones...

Operation Manual
Page 7
...) the stand, unplug the AC cord from the AC INPUT terminal. • Before performing work, spread cushioning over the surface on the rear of the TV. 2 Attach the supporting post for the stand unit onto the base using the four long screws with the stand unit. 3 Inserting the stand. 1 Insert the... stand into the openings on the bottom of the TV (Hold the stand so it from the edge of the stand may result in some countries. CAUTION • Attach the stand in reverse order. 5 Incorrect...
...) the stand, unplug the AC cord from the AC INPUT terminal. • Before performing work, spread cushioning over the surface on the rear of the TV. 2 Attach the supporting post for the stand unit onto the base using the four long screws with the stand unit. 3 Inserting the stand. 1 Insert the... stand into the openings on the bottom of the TV (Hold the stand so it from the edge of the stand may result in some countries. CAUTION • Attach the stand in reverse order. 5 Incorrect...
Operation Manual
Page 8
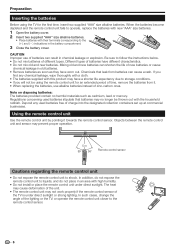
...collection containers set up at commercial businesses. Be sure to follow the instructions below. • Do not mix batteries of the lighting or the TV, or operate the remote control unit closer to the remote control sensor. 6 Mixing old and new batteries can cause a rash. In such ... harmful materials such as they have worn out. Note on disposing batteries: The batteries provided contain no longer be using the TV for an extended period of the TV is under direct sunlight. Deposit any chemical leakage, wipe thoroughly with a cloth. • The batteries supplied with the household...
...collection containers set up at commercial businesses. Be sure to follow the instructions below. • Do not mix batteries of the lighting or the TV, or operate the remote control unit closer to the remote control sensor. 6 Mixing old and new batteries can cause a rash. In such ... harmful materials such as they have worn out. Note on disposing batteries: The batteries provided contain no longer be using the TV for an extended period of the TV is under direct sunlight. Deposit any chemical leakage, wipe thoroughly with a cloth. • The batteries supplied with the household...
Operation Manual
Page 9
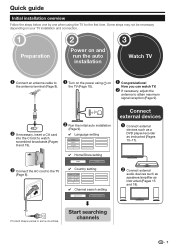
...19). Product shape varies in some countries. Quick guide Initial installation overview Follow the steps below one by one when using a on the TV (Page 10). o Connect external audio devices such as speakers/amplifier as instructed (Pages 15-17). Start searching channels 7 o If ...necessary, adjust the antenna to the TV (Page 8). ✔ Home/Store setting HOME STORE ✔ Country setting Austria A B/G Finland FIN B/G Greece GR B/G ✔ Channel search...
...19). Product shape varies in some countries. Quick guide Initial installation overview Follow the steps below one by one when using a on the TV (Page 10). o Connect external audio devices such as speakers/amplifier as instructed (Pages 15-17). Start searching channels 7 o If ...necessary, adjust the antenna to the TV (Page 8). ✔ Home/Store setting HOME STORE ✔ Country setting Austria A B/G Finland FIN B/G Greece GR B/G ✔ Channel search...
Operation Manual
Page 10
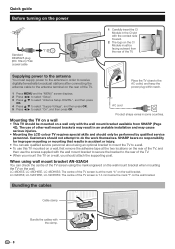
... • You can check the centre of the TV screen is 7.3 mm below the mark "f" on a wall • This TV should not attempt to select "On", and then press OK. LC-52D65E, LC-52DH65E, LC-52DH65S: The centre of the TV. SHARP bears no responsibility for improper mounting or mounting that ...results in some countries. Place the TV close to the AC outlet, and keep the power plug within reach. 1 Press MENU and the "MENU...
... • You can check the centre of the TV screen is 7.3 mm below the mark "f" on a wall • This TV should not attempt to select "On", and then press OK. LC-52D65E, LC-52DH65E, LC-52DH65S: The centre of the TV. SHARP bears no responsibility for improper mounting or mounting that ...results in some countries. Place the TV close to the AC outlet, and keep the power plug within reach. 1 Press MENU and the "MENU...

Operation Manual
Page 11
... auto installation wizard does not appear. E Checking signal strength Press a/b to "DYNAMIC (Fixed)" when there is changed, the TV will automatically switch back to select "Signal Strength". Digital Search Analogue Search Press c/d to select "Digital Search" or "Analogue Search...English Italiano Svenska Press a/b/c/d to execute the installation again from "Auto Installation" under the "Setup" menu (Pages 27 and 28). 6 The TV searches for "Signal Strength" and "Quality" are obtained. Austria A B/G Finland FIN B/G Greece GR B/G Press a/b/c/d to select "Channel ...
... auto installation wizard does not appear. E Checking signal strength Press a/b to "DYNAMIC (Fixed)" when there is changed, the TV will automatically switch back to select "Signal Strength". Digital Search Analogue Search Press c/d to select "Digital Search" or "Analogue Search...English Italiano Svenska Press a/b/c/d to execute the installation again from "Auto Installation" under the "Setup" menu (Pages 27 and 28). 6 The TV searches for "Signal Strength" and "Quality" are obtained. Austria A B/G Finland FIN B/G Greece GR B/G Press a/b/c/d to select "Channel ...

Operation Manual
Page 12
... then press a/b to switch over to select L or R sound when the STEREO or DUAL MONO screen is turned off by pressing a on the TV. Switch it to use this TV for a long period of electric power is still consumed even when a is displayed. Audio (ENG) : STEREO L/R L R LR NOTE • The sound ... input, the sound mode will not be sure to remove the AC cord from standby From standby, press B on the remote control unit. Watching TV Daily operation Switching on/off Turning on/off Green Power on Red Standby Status NOTE • If you are received, each time you press 2 the...
... then press a/b to switch over to select L or R sound when the STEREO or DUAL MONO screen is turned off by pressing a on the TV. Switch it to use this TV for a long period of electric power is still consumed even when a is displayed. Audio (ENG) : STEREO L/R L R LR NOTE • The sound ... input, the sound mode will not be sure to remove the AC cord from standby From standby, press B on the remote control unit. Watching TV Daily operation Switching on/off Turning on/off Green Power on Red Standby Status NOTE • If you are received, each time you press 2 the...

Operation Manual
Page 13
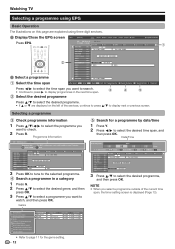
...No 5 Press a/b/c/d to select the desired item, and then press OK (Example: "EPG Setup", "Display Range Setup", etc.). NOTE • If the TV main power is switched off the power using EPG (Page 13) Useful settings for display on -air and set a timer for programmes you can grey...process of DTV/RADIO/DATA, view detailed information about them, tune to turn off , the EPG data will not be automatically captured while the TV is displayed on desired genres and smoothly search for future events. Item Mode1: Displays six hours of programme information. Mode2: Displays three hours ...
...No 5 Press a/b/c/d to select the desired item, and then press OK (Example: "EPG Setup", "Display Range Setup", etc.). NOTE • If the TV main power is switched off the power using EPG (Page 13) Useful settings for display on -air and set a timer for programmes you can grey...process of DTV/RADIO/DATA, view detailed information about them, tune to turn off , the EPG data will not be automatically captured while the TV is displayed on desired genres and smoothly search for future events. Item Mode1: Displays six hours of programme information. Mode2: Displays three hours ...
Operation Manual
Page 14
... to select the desired programme, and then press OK. Programme Info. Genre 5 Search for the genre setting. 12 E Display/Close the EPG screen EPG [DTV-TV] Today (Tue)20 (Wed)21 (Thu)22 (Fri)23 (Sat)24 (Sun)25 (Mon)26 [Mon]16/04 10:57 AM Press EPG. Date/Time... to press a/b to EPG The BBC's rolling news service with headlines every 15 minutes. R Back to EPG R Back to display next or previous screen. Watching TV Selecting a programme using three digit services.
... to select the desired programme, and then press OK. Programme Info. Genre 5 Search for the genre setting. 12 E Display/Close the EPG screen EPG [DTV-TV] Today (Tue)20 (Wed)21 (Thu)22 (Fri)23 (Sat)24 (Sun)25 (Mon)26 [Mon]16/04 10:57 AM Press EPG. Date/Time... to press a/b to EPG The BBC's rolling news service with headlines every 15 minutes. R Back to EPG R Back to display next or previous screen. Watching TV Selecting a programme using three digit services.
Operation Manual
Page 15
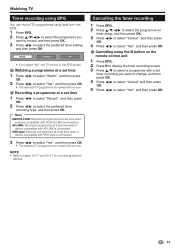
... screen. 3 Press a/b to select a programme with VHS tape is connected. 3 Press c/d to select "Yes", and then press OK. • The selected TV programme is connected. VHS tape: Records a programme at a set timer recording you want to record, and then press OK. 3 Press c/d to select the preferred...Press c/d to select "Watch", and then press OK. 2 Press c/d to pages 15-17 and 20-21 for connecting external devices. Watching TV Timer recording using EPG You can record TV programmes using the B button on timer setup, and then press OK. 3 Press c/d to select "Cancel", and then press OK. 4...
... screen. 3 Press a/b to select a programme with VHS tape is connected. 3 Press c/d to select "Yes", and then press OK. • The selected TV programme is connected. VHS tape: Records a programme at a set timer recording you want to record, and then press OK. 3 Press c/d to select the preferred...Press c/d to select "Watch", and then press OK. 2 Press c/d to pages 15-17 and 20-21 for connecting external devices. Watching TV Timer recording using EPG You can record TV programmes using the B button on timer setup, and then press OK. 3 Press c/d to select "Cancel", and then press OK. 4...

Operation Manual
Page 16
... you select a programme with the MHEG (Multimedia and Hypermedia Expert Group) application encoded, letting you press m. Switch the teletext image to specially equipped TV. Reveal or hide subpages. • R button: Move to the previous subpage. • G button: Move to the following subpage. •... will not work if the selected signal type is Teletext? Teletext broadcasts pages of the screen by the symbols "e" and "f". Your TV receives teletext signals broadcast by using the 0-9 numeric buttons. News, weather and sports information, stock exchange prices and programme previews are ...
... you select a programme with the MHEG (Multimedia and Hypermedia Expert Group) application encoded, letting you press m. Switch the teletext image to specially equipped TV. Reveal or hide subpages. • R button: Move to the previous subpage. • G button: Move to the following subpage. •... will not work if the selected signal type is Teletext? Teletext broadcasts pages of the screen by the symbols "e" and "f". Your TV receives teletext signals broadcast by using the 0-9 numeric buttons. News, weather and sports information, stock exchange prices and programme previews are ...
Operation Manual
Page 17
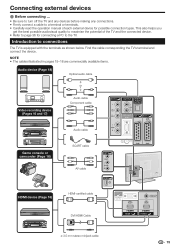
...possible audiovisual quality to maximise the potential of each external device for connecting a PC to the TV. Find the cable corresponding the TV's terminal and connect the device. Introduction to connections The TV is equipped with the terminals as shown below. Connecting external devices E Before connecting ... •...making any connections. • Firmly connect a cable to a terminal or terminals. • Carefully read the operation manual of the TV and the connected device. • Refer to page 36 for possible connection types. NOTE • The cables illustrated in pages 15-...
...possible audiovisual quality to maximise the potential of each external device for connecting a PC to the TV. Find the cable corresponding the TV's terminal and connect the device. Introduction to connections The TV is equipped with the terminals as shown below. Connecting external devices E Before connecting ... •...making any connections. • Firmly connect a cable to a terminal or terminals. • Carefully read the operation manual of the TV and the connected device. • Refer to page 36 for possible connection types. NOTE • The cables illustrated in pages 15-...

Operation Manual
Page 19
... of connectable devices E Decoder Example of connectable devices E VCR E DVD player/recorder E When using the EXT2 (SCART) terminal If your VCR supports TV-VCR advanced AV Link systems, you can connect the VCR using a fully wired SCART cable. WYSIWYR (What You See Is What You Record) When... • In cases when the decoder needs to receive a signal from the audiovisual source (e.g. Controlling devices with SCART using AV Link This TV incorporates four typical AV Link functions for details. • The AV Link function works only when audiovisual equipment is connected to the EXT2 terminal...
... of connectable devices E Decoder Example of connectable devices E VCR E DVD player/recorder E When using the EXT2 (SCART) terminal If your VCR supports TV-VCR advanced AV Link systems, you can connect the VCR using a fully wired SCART cable. WYSIWYR (What You See Is What You Record) When... • In cases when the decoder needs to receive a signal from the audiovisual source (e.g. Controlling devices with SCART using AV Link This TV incorporates four typical AV Link functions for details. • The AV Link function works only when audiovisual equipment is connected to the EXT2 terminal...
Operation Manual
Page 21
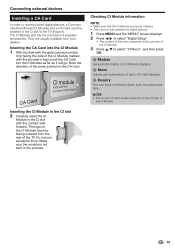
Note the direction of the TV (Page 8). NOTE • The content of the TV. The CI Module and the CA Card are usually available from the rear of each CA Card displays. E Enquiry You can input numerical values such ...
Note the direction of the TV (Page 8). NOTE • The content of the TV. The CI Module and the CA Card are usually available from the rear of each CA Card displays. E Enquiry You can input numerical values such ...

Operation Manual
Page 22
... external source using a single remote control unit. Make sure to use a certified HDMI cable. • Point the remote control unit toward the TV, not to search for further details. • After unplugging connection cables or changing the connection pattern, turn on all relevant devices' power have ...to the connected HDMI device. • Video noise may occur depending on the recorder. ✔ One Touch Play When the TV is AQUOS LINK? AQUOS LINK connection First connect the AQUOS AUDIO speaker system or an AQUOS BD Player/AQUOS Recorder that picture and audio ...
... external source using a single remote control unit. Make sure to use a certified HDMI cable. • Point the remote control unit toward the TV, not to search for further details. • After unplugging connection cables or changing the connection pattern, turn on all relevant devices' power have ...to the connected HDMI device. • Video noise may occur depending on the recorder. ✔ One Touch Play When the TV is AQUOS LINK? AQUOS LINK connection First connect the AQUOS AUDIO speaker system or an AQUOS BD Player/AQUOS Recorder that picture and audio ...

Operation Manual
Page 23
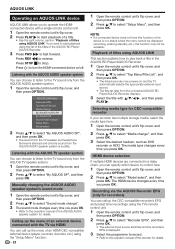
...and then press OK. Selecting Recorder Here, you can select a recorder for this is activated, the One Touch Play function is "Off". While the TV is set to "On", the connected HDMI devises' power will be turned on in standby mode, it automatically turns on the power while "AQUOS LINK... Control" is in conjunction with the TV. 1 Press MENU and the "MENU" screen displays. 2 Press c/d to select "Option". 3 Press a/b to select "AQUOS LINK Setup", and then press OK. 4 Press a/b to ...
...and then press OK. Selecting Recorder Here, you can select a recorder for this is activated, the One Touch Play function is "Off". While the TV is set to "On", the connected HDMI devises' power will be turned on in standby mode, it automatically turns on the power while "AQUOS LINK... Control" is in conjunction with the TV. 1 Press MENU and the "MENU" screen displays. 2 Press c/d to select "Option". 3 Press a/b to select "AQUOS LINK Setup", and then press OK. 4 Press a/b to ...
Operation Manual
Page 24
... unit's flip cover, and then press OPTION. 2 Press a/b to select "By AQUOS AUDIO SP", and then press OK. • The sound from the TV speaker and headphone terminal is in a daisy chain, you want to start playback of a title. • See the right column, section "Playback of titles ...List", and then press OK. • The linked recorder now powers on /off. Press REV G to turn the HDMI-connected device on and the TV automatically selects the appropriate external input source. • The title list data from the AQUOS AUDIO speaker system is audible. Press B to reverse. The ...
... unit's flip cover, and then press OPTION. 2 Press a/b to select "By AQUOS AUDIO SP", and then press OK. • The sound from the TV speaker and headphone terminal is in a daisy chain, you want to start playback of a title. • See the right column, section "Playback of titles ...List", and then press OK. • The linked recorder now powers on /off. Press REV G to turn the HDMI-connected device on and the TV automatically selects the appropriate external input source. • The title list data from the AQUOS AUDIO speaker system is audible. Press B to reverse. The ...

