

Operation Manual
Page 3
... for energy efficiency. For disposal or recycling information, please contact your local authorities or the Electronics Industries Alliance: www.eiae.org 3 Declaration of Conformity SHARP LCD Color Monitor LL-191A-W/LL-191A-B This device complies with the limits for a Class B digital device pursuant to radio or television reception, which the receiver is...
... for energy efficiency. For disposal or recycling information, please contact your local authorities or the Electronics Industries Alliance: www.eiae.org 3 Declaration of Conformity SHARP LCD Color Monitor LL-191A-W/LL-191A-B This device complies with the limits for a Class B digital device pursuant to radio or television reception, which the receiver is...
Operation Manual
Page 8
Up to 30% of the plastic in a computer casing can be used for the time being, permitted in the back light system of flat panel monitors as there today is no commercially available alternative. Cadmium** Cadmium is toxic in the colour-generating layers of certain computer displays. Cadmium damages the nervous ...
Up to 30% of the plastic in a computer casing can be used for the time being, permitted in the back light system of flat panel monitors as there today is no commercially available alternative. Cadmium** Cadmium is toxic in the colour-generating layers of certain computer displays. Cadmium damages the nervous ...

Operation Manual
Page 9
... precautions 10 Product description 11 Angle adjustment 12 Connecting the monitor and turning the monitor on and off 13 Connecting the monitor to a computer 13 Connection of headphones (commercially available 14 Connecting the monitor to a power source 14 Turning the power on 14 ...the screen display 18 Automatic screen adjustment 18 Manual screen adjustment 19 Monitor care 22 Monitor care 22 Storage 22 Troubleshooting 22 Information for customers on environmentally friendly disposal of this SHARP product 23 Specifications 24 Installing set-up information and the ICC profile...
... precautions 10 Product description 11 Angle adjustment 12 Connecting the monitor and turning the monitor on and off 13 Connecting the monitor to a computer 13 Connection of headphones (commercially available 14 Connecting the monitor to a power source 14 Turning the power on 14 ...the screen display 18 Automatic screen adjustment 18 Manual screen adjustment 19 Monitor care 22 Monitor care 22 Storage 22 Troubleshooting 22 Information for customers on environmentally friendly disposal of this SHARP product 23 Specifications 24 Installing set-up information and the ICC profile...

Operation Manual
Page 10
...: 0NIT15G4-0015) - You are registered trademarks of the supplied accessories may influence the quality of unstable objects or in case the monitor needs to retain the carton in unsafe places. Sharp Corporation holds authorship rights to fall or topple over bend it without advance notice. The shape of Microsoft Corporation. - The TFT...
...: 0NIT15G4-0015) - You are registered trademarks of the supplied accessories may influence the quality of unstable objects or in case the monitor needs to retain the carton in unsafe places. Sharp Corporation holds authorship rights to fall or topple over bend it without advance notice. The shape of Microsoft Corporation. - The TFT...

Operation Manual
Page 11
... perform automatic adjustment of the selected option. The analog signal cable is displayed: These buttons are used to overheating inside the monitor and result in malfunction. 11 The analog signal cable included should be connected here. 7. Ventilation openings Never block the ventilation .... 5. Analog RGB input terminal ..... Security lock anchor By connecting a security lock (commercially available) to the security lock anchor, the monitor is not displayed: These buttons are used to set DISPLAY MODE. 4. When the OSD Menu is fixed so that it cannot be ...
... perform automatic adjustment of the selected option. The analog signal cable is displayed: These buttons are used to overheating inside the monitor and result in malfunction. 11 The analog signal cable included should be connected here. 7. Ventilation openings Never block the ventilation .... 5. Analog RGB input terminal ..... Security lock anchor By connecting a security lock (commercially available) to the security lock anchor, the monitor is not displayed: These buttons are used to set DISPLAY MODE. 4. When the OSD Menu is fixed so that it cannot be ...
Operation Manual
Page 12
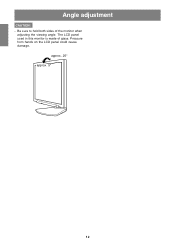
Pressure from hands on the LCD panel could cause damage. The LCD panel used in this monitor is made of the monitor when adjusting the viewing angle. approx. 25° approx. 5° 12 Angle adjustment CAUTION! - Be sure to hold both sides of glass.
Pressure from hands on the LCD panel could cause damage. The LCD panel used in this monitor is made of the monitor when adjusting the viewing angle. approx. 25° approx. 5° 12 Angle adjustment CAUTION! - Be sure to hold both sides of glass.

Operation Manual
Page 13
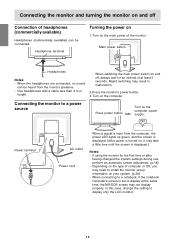
...add extension cords as this could lead to the Sun Ultra series, a conversion adapter (commercially available) may be required. 13 Connecting the monitor to a computer Connect the accessory analog signal cable to connector direction, firmly insert the signal cable vertically into the connector, and then ...tighten the screws at both the monitor and computer are switched off CAUTION! - When connecting, ensure that both sides. You can also use the headphone jack of the ...
...add extension cords as this could lead to the Sun Ultra series, a conversion adapter (commercially available) may be required. 13 Connecting the monitor to a computer Connect the accessory analog signal cable to connector direction, firmly insert the signal cable vertically into the connector, and then ...tighten the screws at both the monitor and computer are switched off CAUTION! - When connecting, ensure that both sides. You can also use the headphone jack of the ...
Operation Manual
Page 14
... be connected. Rapid switching may need to a power source Press power button. Connecting the monitor to install the monitor set to display only the LCD monitor. 14 Connecting the monitor and turning the monitor on 1. When the headphones are connected, no sound can be heard from the computer,...use, perform an automatic screen adjustment. (p.18) - ON Power terminal AC outlet Power cord When a signal is displayed.) Notes: - Press the monitor's power button. 3. Turn on , it may not display properly. Turn on the type of at the same time, the MS-DOS screen ...
... be connected. Rapid switching may need to a power source Press power button. Connecting the monitor to install the monitor set to display only the LCD monitor. 14 Connecting the monitor and turning the monitor on 1. When the headphones are connected, no sound can be heard from the computer,...use, perform an automatic screen adjustment. (p.18) - ON Power terminal AC outlet Power cord When a signal is displayed.) Notes: - Press the monitor's power button. 3. Turn on , it may not display properly. Turn on the type of at the same time, the MS-DOS screen ...

Operation Manual
Page 15
Turn the computer off 1. Press the monitor's power button. English Connecting the monitor and turning the monitor on and off Turning the power off . 2. Turn the computer off the main power switch of the monitor, and remove the power plug from the outlet. 15 The power LED will not be used for a long time, turn off . OFF Press power button. If the monitor will disappear.
Turn the computer off 1. Press the monitor's power button. English Connecting the monitor and turning the monitor on and off Turning the power off . 2. Turn the computer off the main power switch of the monitor, and remove the power plug from the outlet. 15 The power LED will not be used for a long time, turn off . OFF Press power button. If the monitor will disappear.

Operation Manual
Page 16
...the OSD Menu being displayed, press the or the button. 2. Remove the adjustment lock before attempting to operate control buttons. 3. Turn off the monitor power. 2. While pressing the MENU button, press the power button (i.e. Note: - It is not possible to adjusted values will be voided....Note: - ADJUSTMENT Menu reset Settings of items in place. On Screen display for adjustment disappears several seconds after turning the power off the monitor power. 2. Turn on the screen. Check that [BRIGHT] is displayed, the control buttons are disabled. - Press the MENU button and ...
...the OSD Menu being displayed, press the or the button. 2. Remove the adjustment lock before attempting to operate control buttons. 3. Turn off the monitor power. 2. While pressing the MENU button, press the power button (i.e. Note: - It is not possible to adjusted values will be voided....Note: - ADJUSTMENT Menu reset Settings of items in place. On Screen display for adjustment disappears several seconds after turning the power off the monitor power. 2. Turn on the screen. Check that [BRIGHT] is displayed, the control buttons are disabled. - Press the MENU button and ...
Operation Manual
Page 17
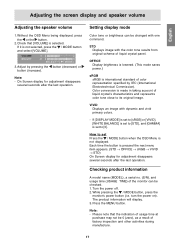
... several seconds after the last operation. VIVID Displays an image with the color tone results from original scheme of the monitor can be changed with one command. How to set to [0]. Adjusting the screen display and speaker volume English Adjusting the speaker...image. Each time the button is not displayed. Note: - Adjust by IEC (International Electrotechnical Commission). While pressing the / MODE button, press the monitor's power button (i.e. If it is selected. Checking product information A model name (MODEL), a serial no. (S/N), and usage time (USAGE TIME)...
... several seconds after the last operation. VIVID Displays an image with the color tone results from original scheme of the monitor can be changed with one command. How to set to [0]. Adjusting the screen display and speaker volume English Adjusting the speaker...image. Each time the button is not displayed. Note: - Adjust by IEC (International Electrotechnical Commission). While pressing the / MODE button, press the monitor's power button (i.e. If it is selected. Checking product information A model name (MODEL), a serial no. (S/N), and usage time (USAGE TIME)...

Operation Manual
Page 18
... be displayed. In such a case, try displaying an image that makes the entire screen light. When [OUT OF ADJUST] is "D" drive. 1. When setting up this monitor for Windows 95/98/2000/Me/ XP, and assumes that the CD-ROM drive is displayed. (When the screen displays an entirely dark image, the...
... be displayed. In such a case, try displaying an image that makes the entire screen light. When [OUT OF ADJUST] is "D" drive. 1. When setting up this monitor for Windows 95/98/2000/Me/ XP, and assumes that the CD-ROM drive is displayed. (When the screen displays an entirely dark image, the...

Operation Manual
Page 21
...OSD V-POSITION (OSD vertical position) The position of the OSD Menu can be moved up and down. ( buttons) SCALING (Level of scaling) The sharpness of the input signal, even if menu options can be displayed on when the [OFF TIMER] is set to the left and right. ( buttons...) INFORMATION A model name (MODEL), a serial no input signal, [NO SIGNAL] is enlarged to choose a language. 3. If the monitor is turned on the screen. 2. The product information will be selected, the display may change . The Language Selection Menu will be adjusted. ( buttons) Note: -...
...OSD V-POSITION (OSD vertical position) The position of the OSD Menu can be moved up and down. ( buttons) SCALING (Level of scaling) The sharpness of the input signal, even if menu options can be displayed on when the [OFF TIMER] is set to the left and right. ( buttons...) INFORMATION A model name (MODEL), a serial no input signal, [NO SIGNAL] is enlarged to choose a language. 3. If the monitor is turned on the screen. 2. The product information will be selected, the display may change . The Language Selection Menu will be adjusted. ( buttons) Note: -...
Operation Manual
Page 22
... wipe away dirt and dust from the speakers when the monitor is suitable.) CAUTION! - The monitor's fluorescent tubes have a limited life span. - Please inquire at the shop where you purchased the monitor or your nearest Sharp authorized Service Center. Is the computer turned on the screen... the volume adjustment procedure. (p.17) - Never use , due to a dampened soft cloth, wring it on the computer you purchased the monitor or your nearest Sharp authorized Service Center. - Is the power cord connected properly? (p.14) No image appears on ? (p.16) The image appears distorted. -...
... wipe away dirt and dust from the speakers when the monitor is suitable.) CAUTION! - The monitor's fluorescent tubes have a limited life span. - Please inquire at the shop where you purchased the monitor or your nearest Sharp authorized Service Center. Is the computer turned on the screen... the volume adjustment procedure. (p.17) - Never use , due to a dampened soft cloth, wring it on the computer you purchased the monitor or your nearest Sharp authorized Service Center. - Is the power cord connected properly? (p.14) No image appears on ? (p.16) The image appears distorted. -...
Operation Manual
Page 23
...fluorescent lamp containing a small amount of mercury. DO NOT DISPOSE OF THIS PRODUCT WITH YOUR HOUSEHOLD WASTE OR MIXED WITH OTHER WASTES ! Sharp Corporation is licensed for the recycling of electronic equipment. YOU MIGHT ENDANGER THE ENVIRONMENT ! MIREC services have to be regulated due to protecting... the environment and conserving energy. English Monitor care Information for customers on MIREC can be given away and disposed of in Japan Call toll free number 0120-845-530 ...
...fluorescent lamp containing a small amount of mercury. DO NOT DISPOSE OF THIS PRODUCT WITH YOUR HOUSEHOLD WASTE OR MIXED WITH OTHER WASTES ! Sharp Corporation is licensed for the recycling of electronic equipment. YOU MIGHT ENDANGER THE ENVIRONMENT ! MIREC services have to be regulated due to protecting... the environment and conserving energy. English Monitor care Information for customers on MIREC can be given away and disposed of in Japan Call toll free number 0120-845-530 ...

Operation Manual
Page 25
... 15 DDC clock - Follow your computer is DDC compliant and if it can detect the Plug & Play monitor. Frequencies for carrying out Plug & Play functions on the monitor or computer. To connect, another adapter (commercially available) may be required. - DPMS: Display Power Management ...25 Specifications Relevant signal timings Display mode VESA Hsync Vsync Dot frequency The analog RGB input connector pin (Mini D-sub connector with the monitor. - DDC is not receiving any signal (synch signal), [NO SIGNAL] will appear. Recommended resolution is compatible with 15 pins) ...
... 15 DDC clock - Follow your computer is DDC compliant and if it can detect the Plug & Play monitor. Frequencies for carrying out Plug & Play functions on the monitor or computer. To connect, another adapter (commercially available) may be required. - DPMS: Display Power Management ...25 Specifications Relevant signal timings Display mode VESA Hsync Vsync Dot frequency The analog RGB input connector pin (Mini D-sub connector with the monitor. - DDC is not receiving any signal (synch signal), [NO SIGNAL] will appear. Recommended resolution is compatible with 15 pins) ...

Operation Manual
Page 26
...Load the accessory CD-ROM into the CD-ROM drive of the computer. 2. Double click on [Change]. 6. In [Options], check [Automatically detect Plug & Play monitors] and click on [Display]. 4. Click [OK], and close the window. Please follow the steps below ), the ICC profile is "D" drive. If you want...1. When using the ICC profile, set -up information into the CD-ROM drive of the computer. 2. Double click on [Have disk], confirm that the monitor details are selected, then click [Next], [Next], and [Finish]. 10. Click on [Display]. 4. If the "Add New Hardware Wizard" appears, repeat ...
...Load the accessory CD-ROM into the CD-ROM drive of the computer. 2. Double click on [Change]. 6. In [Options], check [Automatically detect Plug & Play monitors] and click on [Display]. 4. Click [OK], and close the window. Please follow the steps below ), the ICC profile is "D" drive. If you want...1. When using the ICC profile, set -up information into the CD-ROM drive of the computer. 2. Double click on [Have disk], confirm that the monitor details are selected, then click [Next], [Next], and [Finish]. 10. Click on [Display]. 4. If the "Add New Hardware Wizard" appears, repeat ...

Operation Manual
Page 27
...drivers in a specific location, so you can select the driver you want .], then click [Next]. 4. Click on [Close]. 12. Select the monitor from 2 above. Check [Display a list of the computer. 2. Double click on the [Start] button. Click [Next], confirm that [Copy manufacturer...11. When [Upgrade Device Driver Wizard] appears, click [Next]. 7. Double click on [Change]. 6. In [Options], check [Automatically detect Plug & Play monitors] and click on [Display]. 4. Check that the CD-ROM drive is [D:], and click [OK]. 5. If the "Add New Hardware Wizard" appears, ...
...drivers in a specific location, so you can select the driver you want .], then click [Next]. 4. Click on [Close]. 12. Select the monitor from 2 above. Check [Display a list of the computer. 2. Double click on the [Start] button. Click [Next], confirm that [Copy manufacturer...11. When [Upgrade Device Driver Wizard] appears, click [Next]. 7. Double click on [Change]. 6. In [Options], check [Automatically detect Plug & Play monitors] and click on [Display]. 4. Check that the CD-ROM drive is [D:], and click [OK]. 5. If the "Add New Hardware Wizard" appears, ...
Operation Manual
Page 28
... is "D" drive. 1. Choose the profile and click on [Settings], [Advanced] and [Monitor]. 6. Installing set-up information and the ICC profile (For Windows) For Windows XP Installing monitor set-up information has already been installed, so too has the profile, and there is ... 9. Click on [Finish]. 13. Check [Don't search. Click on [General] and from a list or specific location [Advanced]] and click [Next]. 8. Select the monitor from :] is [D:], and click [OK]. 10. Click on [Properties], [Driver] and [Update Driver]. 7. Click on [Display]. 4. Double click on [Close]. 14...
... is "D" drive. 1. Choose the profile and click on [Settings], [Advanced] and [Monitor]. 6. Installing set-up information and the ICC profile (For Windows) For Windows XP Installing monitor set-up information has already been installed, so too has the profile, and there is ... 9. Click on [Finish]. 13. Check [Don't search. Click on [General] and from a list or specific location [Advanced]] and click [Next]. 8. Select the monitor from :] is [D:], and click [OK]. 10. Click on [Properties], [Driver] and [Update Driver]. 7. Click on [Display]. 4. Double click on [Close]. 14...

Operation Manual
Page 29
... profile Notes: - Copy the profile to be used from the CD-ROM to have PC Exchange or File Exchange installed in the system folder. 3. This monitor's ColorSync profile works with a compatible application. It is Apple Computer's color management system and enables color reproduction characteristics to be realized when used with MacOS... MacOS) About the ColorSync profile ColorSync is necessary to the ColorSync profile folder in your system. - Using the ColorSync on the type of the LCD monitor. Notes: -
... profile Notes: - Copy the profile to be used from the CD-ROM to have PC Exchange or File Exchange installed in the system folder. 3. This monitor's ColorSync profile works with a compatible application. It is Apple Computer's color management system and enables color reproduction characteristics to be realized when used with MacOS... MacOS) About the ColorSync profile ColorSync is necessary to the ColorSync profile folder in your system. - Using the ColorSync on the type of the LCD monitor. Notes: -

