

Operating Guide
Page 39
... start over again. (2) Back one page button Displays the previous page. (3) Forward one page button Displays the next page. (4) Return to ..." HOW TO USE THIS MANUAL Click a button below to move to the page that you wish to view. (1) (2) (3) (4) (5) (6) (1) Return to top page button If an operation does not proceed as...
... start over again. (2) Back one page button Displays the previous page. (3) Forward one page button Displays the next page. (4) Return to ..." HOW TO USE THIS MANUAL Click a button below to move to the page that you wish to view. (1) (2) (3) (4) (5) (6) (1) Return to top page button If an operation does not proceed as...

Operating Guide
Page 40
...chapter explains how to remove paper misfeeds and provides answers to this manual) The manuals in PDF format provide detailed explanations of the machine in each mode. Printed manual Manual name Quick Start Guide Contents This manual contains instructions for using the document filing function. Current settings can ...aims and the needs of a print job, as needed. 7. COPIER This chapter provides detailed explanations of the procedures for downloading the manuals is explained in "How to save the document data of a copy or fax job, or the data of your workplace. SYSTEM ...
...chapter explains how to remove paper misfeeds and provides answers to this manual) The manuals in PDF format provide detailed explanations of the machine in each mode. Printed manual Manual name Quick Start Guide Contents This manual contains instructions for using the document filing function. Current settings can ...aims and the needs of a print job, as needed. 7. COPIER This chapter provides detailed explanations of the procedures for downloading the manuals is explained in "How to save the document data of a copy or fax job, or the data of your workplace. SYSTEM ...

Operating Guide
Page 41
... refer to the Software Setup Guide. • For information on the machine. The explanations in this manual assume that occurs due to use the MX-M364N/MX-M464N/MX-M564N digital multifunctional system. The screens may differ from instances provided for by an administrator is not responsible ...This provides a supplemental explanation of the setting. In the unlikely event that can only be configured by law, SHARP is explained. ABOUT OPERATION MANUAL This manual explains how to use of the product. Illustrations and the operation panel and touch panel shown in a Windows ...
... refer to the Software Setup Guide. • For information on the machine. The explanations in this manual assume that occurs due to use the MX-M364N/MX-M464N/MX-M564N digital multifunctional system. The screens may differ from instances provided for by an administrator is not responsible ...This provides a supplemental explanation of the setting. In the unlikely event that can only be configured by law, SHARP is explained. ABOUT OPERATION MANUAL This manual explains how to use of the product. Illustrations and the operation panel and touch panel shown in a Windows ...
Operating Guide
Page 46
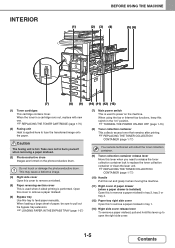
.... INTERIOR BEFORE USING THE MACHINE (1) (2) (3) (4) (5) (6) (7) (8) (9) (1) Toner cartridges This cartridge contains toner. This may cause a defective image. (4) Right side cover Open this cover to feed paper manually. Do not touch or damage the photoconductive drum. Caution The fusing unit is used to burn yourself when removing a paper misfeed. (3) Photoconductive drum Images are...
.... INTERIOR BEFORE USING THE MACHINE (1) (2) (3) (4) (5) (6) (7) (8) (9) (1) Toner cartridges This cartridge contains toner. This may cause a defective image. (4) Right side cover Open this cover to feed paper manually. Do not touch or damage the photoconductive drum. Caution The fusing unit is used to burn yourself when removing a paper misfeed. (3) Photoconductive drum Images are...

Operating Guide
Page 49
... used to enter numeric value settings (except for the system settings). (6) [CLEAR] key ( ) Press this key to return the number of the functions in this manual. (4) PRINT mode indicators ( ) • READY indicator Print jobs can be registered in the home screen to enable quick and easy operation of a problem such as...
... used to enter numeric value settings (except for the system settings). (6) [CLEAR] key ( ) Press this key to return the number of the functions in this manual. (4) PRINT mode indicators ( ) • READY indicator Print jobs can be registered in the home screen to enable quick and easy operation of a problem such as...

Operating Guide
Page 51
Messages and keys are displayed in this manual. • For details about the [HOME] key ( ), see the chapters for each function are not necessary for the intended operations. For details, see "HOME SCREEN" (...
Messages and keys are displayed in this manual. • For details about the [HOME] key ( ), see the chapters for each function are not necessary for the intended operations. For details, see "HOME SCREEN" (...
Operating Guide
Page 52
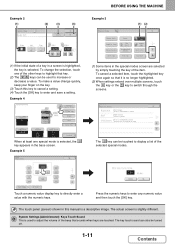
... the screens. The touch panel (screen) shown in the special modes screen are touched. To change quickly, keep your finger on the key. (3) Touch this manual is slightly different.
... the screens. The touch panel (screen) shown in the special modes screen are touched. To change quickly, keep your finger on the key. (3) Touch this manual is slightly different.
Operating Guide
Page 53
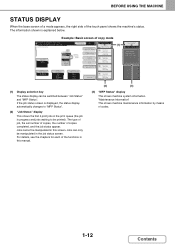
... (the job in this screen. Ready to be switched between "Job Status" and "MFP Status". Jobs can be printed). Jobs cannot be manipulated in this manual. (2) (3) (3) "MFP Status" display This shows machine system information. Interrupt Special Modes Exposure Auto 1. 81/2x11 2.81/2x11R 3. 81/2x14 4. 11x17 Plain 81/2x11 2-Sided Copy...
... (the job in this screen. Ready to be switched between "Job Status" and "MFP Status". Jobs can be printed). Jobs cannot be manipulated in this manual. (2) (3) (3) "MFP Status" display This shows machine system information. Interrupt Special Modes Exposure Auto 1. 81/2x11 2.81/2x11R 3. 81/2x14 4. 11x17 Plain 81/2x11 2-Sided Copy...

Operating Guide
Page 64
... the operation panel screen appears on the system bar of the machine. System Settings (Administrator): Remote Operation Settings Set the operation authority for using this manual. Note that a key cannot be held down to a network and a VNC application must be used on the machine. For detailed procedures, see the chapters for...
... the operation panel screen appears on the system bar of the machine. System Settings (Administrator): Remote Operation Settings Set the operation authority for using this manual. Note that a key cannot be held down to a network and a VNC application must be used on the machine. For detailed procedures, see the chapters for...
Operating Guide
Page 82
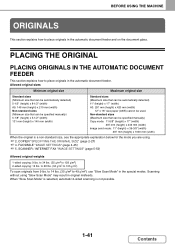
...that can be automatically detected) 5-1/2" (height) x 8-1/2" (width) A5: 148 mm (height) x 210 mm (width) Non-standard sizes (Minimum size that can be specified manually) 5-1/8" (height) x 5-1/2" (width) 131 mm (height) x 140 mm (width) Standard sizes (Maximum size that can be automatically detected) 11" (height) x 17"... (width) A3: 297 mm (height) x 420 mm (width) 12" x 18" size paper (A3W) cannot be specified manually) Copy mode: 11-5/8" (height) x 17" (width) 297 mm (height) x 432 mm (width) Image send mode: 11" (height) x 39-3/8" (width) 297 ...
...that can be automatically detected) 5-1/2" (height) x 8-1/2" (width) A5: 148 mm (height) x 210 mm (width) Non-standard sizes (Minimum size that can be specified manually) 5-1/8" (height) x 5-1/2" (width) 131 mm (height) x 140 mm (width) Standard sizes (Maximum size that can be automatically detected) 11" (height) x 17"... (width) A3: 297 mm (height) x 420 mm (width) 12" x 18" size paper (A3W) cannot be specified manually) Copy mode: 11-5/8" (height) x 17" (width) 297 mm (height) x 432 mm (width) Image send mode: 11" (height) x 39-3/8" (width) 297 ...
Operating Guide
Page 123
... 2-21 • AUTOMATIC ADJUSTMENT OF THE EXPOSURE AND ORIGINAL TYPE 2-21 • SELECTING THE ORIGINAL TYPE AND MANUALLY ADJUSTING THE EXPOSURE 2-21 REDUCTION/ENLARGEMENT/ZOOM 2-23 • AUTOMATIC RATIO SELECTION (Auto Image 2-23 • MANUALLY SELECTING THE RATIO (Preset ratios/Zoom 2-24 • ENLARGING/REDUCING THE LENGTH AND WIDTH SEPARATELY (XY Zoom...
... 2-21 • AUTOMATIC ADJUSTMENT OF THE EXPOSURE AND ORIGINAL TYPE 2-21 • SELECTING THE ORIGINAL TYPE AND MANUALLY ADJUSTING THE EXPOSURE 2-21 REDUCTION/ENLARGEMENT/ZOOM 2-23 • AUTOMATIC RATIO SELECTION (Auto Image 2-23 • MANUALLY SELECTING THE RATIO (Preset ratios/Zoom 2-24 • ENLARGING/REDUCING THE LENGTH AND WIDTH SEPARATELY (XY Zoom...

Operating Guide
Page 125
... copy, image send, and document filing modes. The tray, paper size, and paper type will appear. Touch this key to enter the original size manually. Touch this key to adjust the copy ratio. + REDUCTION/ENLARGEMENT/ZOOM (page 2-23) (5) [Original] key Touch this key to change the paper... (tray) that is displayed. If the original size is set manually, the set size appears. + ORIGINAL SIZES (page 2-27) (6) [Paper Select] key Touch this key to change the exposure or original type setting. + ...
... copy, image send, and document filing modes. The tray, paper size, and paper type will appear. Touch this key to enter the original size manually. Touch this key to adjust the copy ratio. + REDUCTION/ENLARGEMENT/ZOOM (page 2-23) (5) [Original] key Touch this key to change the paper... (tray) that is displayed. If the original size is set manually, the set size appears. + ORIGINAL SIZES (page 2-27) (6) [Paper Select] key Touch this key to change the exposure or original type setting. + ...
Operating Guide
Page 131
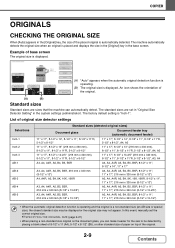
... a non-standard size (an AB size or special size), the closest standard size may not appear. The factory default setting is displayed. In this event, manually set in "Original Size Detector Setting" in the system settings (administrator). Color Mode Full Color Exposure Auto Copy Ratio 100% 1. 8½x11 2. 8½x11R 3. 8½...
... a non-standard size (an AB size or special size), the closest standard size may not appear. The factory default setting is displayed. In this event, manually set in "Original Size Detector Setting" in the system settings (administrator). Color Mode Full Color Exposure Auto Copy Ratio 100% 1. 8½x11 2. 8½x11R 3. 8½...
Operating Guide
Page 133
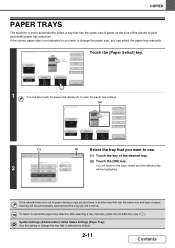
... the base screen and the selected tray will be automatically selected and the copy job will return to automatic paper tray selection after selecting a tray manually, press the [CLEAR ALL] key ( ). Color Mode Full Color Exposure Auto Copy Ratio 100% 1. 8½x11 2. 8½x11R 3. 8½x14 4....189;x11 Plain Special Modes 2-Sided Copy Output File Quick File Preview Touch the [Paper Select] key. 1 You can select the paper tray manually. If the selected tray runs out of paper during a copy job and there is selected by default. 2-11 Contents System Settings (Administrator): ...
... the base screen and the selected tray will be automatically selected and the copy job will return to automatic paper tray selection after selecting a tray manually, press the [CLEAR ALL] key ( ). Color Mode Full Color Exposure Auto Copy Ratio 100% 1. 8½x11 2. 8½x11R 3. 8½x14 4....189;x11 Plain Special Modes 2-Sided Copy Output File Quick File Preview Touch the [Paper Select] key. 1 You can select the paper tray manually. If the selected tray runs out of paper during a copy job and there is selected by default. 2-11 Contents System Settings (Administrator): ...

Operating Guide
Page 134
... originals must not be higher than the indicator line on the size of paper as the original is selected. • To change the paper size manually. 2-12 Contents Indicator line 1 Place the originals face up in the document feeder tray. Color Mode Special Modes Check the paper to make copies (1-sided...
... originals must not be higher than the indicator line on the size of paper as the original is selected. • To change the paper size manually. 2-12 Contents Indicator line 1 Place the originals face up in the document feeder tray. Color Mode Special Modes Check the paper to make copies (1-sided...
Operating Guide
Page 136
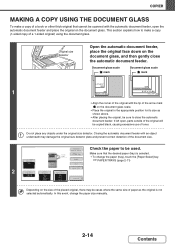
... document glass scale. • Place the original in the appropriate position for its size as the original is selected. • To change the paper size manually. 2-14 Contents Original size detector Open the automatic document feeder, place the original face down on the size of the placed original, there may damage...
... document glass scale. • Place the original in the appropriate position for its size as the original is selected. • To change the paper size manually. 2-14 Contents Original size detector Open the automatic document feeder, place the original face down on the size of the placed original, there may damage...

Operating Guide
Page 139
... 3. 8½x14 4. 11x17 Plain 8½x11 2-Sided Copy Output File Make sure that the desired paper (tray) is selected. • To change the paper size manually. 7 Special Modes Set the number of copies (number of copies is not upside down . Press the [STOP] key ( ).
... 3. 8½x14 4. 11x17 Plain 8½x11 2-Sided Copy Output File Make sure that the desired paper (tray) is selected. • To change the paper size manually. 7 Special Modes Set the number of copies (number of copies is not upside down . Press the [STOP] key ( ).

Operating Guide
Page 141
... 3. 8½x14 4. 11x17 Plain 8½x11 2-Sided Copy Output File Make sure that the desired paper (tray) is selected. • To change the paper size manually. 7 Special Modes Set the number of copies (number of sets) with the numeric keys. 2-Sided Copy Plain 5 8½ 11 • Up to 2-Sided] key. (2) Touch...
... 3. 8½x14 4. 11x17 Plain 8½x11 2-Sided Copy Output File Make sure that the desired paper (tray) is selected. • To change the paper size manually. 7 Special Modes Set the number of copies (number of sets) with the numeric keys. 2-Sided Copy Plain 5 8½ 11 • Up to 2-Sided] key. (2) Touch...

Operating Guide
Page 143
...Auto 8‰x11 Paper Select Auto 8‰x11 Plain Special Modes 2-Sided Copy Output File Quick File Preview SELECTING THE ORIGINAL TYPE AND MANUALLY ADJUSTING THE EXPOSURE If you wish to obtain a clear copy. l Original image type select keys 1 Mode Description Text Text/Prtd. ... TYPE The exposure and original image type can be selected to select the original type or manually adjust the exposure, touch the [Exposure] key in a magazine or catalogue. Exposure OK Auto Manual 1 3 5 Original Image Type Text Text/ Prtd.Photo Printed Photo Photo Light Original Text...
...Auto 8‰x11 Paper Select Auto 8‰x11 Plain Special Modes 2-Sided Copy Output File Quick File Preview SELECTING THE ORIGINAL TYPE AND MANUALLY ADJUSTING THE EXPOSURE If you wish to obtain a clear copy. l Original image type select keys 1 Mode Description Text Text/Prtd. ... TYPE The exposure and original image type can be selected to select the original type or manually adjust the exposure, touch the [Exposure] key in a magazine or catalogue. Exposure OK Auto Manual 1 3 5 Original Image Type Text Text/ Prtd.Photo Printed Photo Photo Light Original Text...

Operating Guide
Page 144
... a copy or printed page as an original When using "Copy Exposure Adjustment" in pencil or light colored text 3 Exposure OK Auto Manual 1 3 5 Copy of Copy Original Image Type Text Text/ Prtd.Photo Printed Photo Photo Light Original Color Tone Enhancement Text/Photo Map... Prtd.Photo Printed Photo Photo Light Original Color Tone Enhancement OK Text/Photo Map Scan Resolution Adjust the exposure level. COPIER 2 Exposure Auto Manual 1 3 5 Copy of Copy] checkbox so that can be changed. 2-22 Contents Touch the key to change the resolution... When making...
... a copy or printed page as an original When using "Copy Exposure Adjustment" in pencil or light colored text 3 Exposure OK Auto Manual 1 3 5 Copy of Copy Original Image Type Text Text/ Prtd.Photo Printed Photo Photo Light Original Color Tone Enhancement Text/Photo Map... Prtd.Photo Printed Photo Photo Light Original Color Tone Enhancement OK Text/Photo Map Scan Resolution Adjust the exposure level. COPIER 2 Exposure Auto Manual 1 3 5 Copy of Copy] checkbox so that can be changed. 2-22 Contents Touch the key to change the resolution... When making...


