
Operation Manual
Page 6
... : RISQUE D'EXPLOSION. Ensure the cooling fan has stopped before disconnecting the power cord. PRODUCT DISPOSAL This projector utilizes tin-lead solder, and a pressurized lamp containing a small amount of...projector is turned off always use the POWER OFF button on the projector or on the remote control. When you attach the "QUICK GUIDE" Label on the projector, be regulated due to align the label bottom and the upper part of the "Notevision... if you check the setup procedure. NE REMPLACER QUE PAR UNE LAMPE SHARP DE TYPE BQC-PGA10X//1. ETEINDRE LA LAMPE AVANT DE PROCEDER A L'ENTRETIEN...
... : RISQUE D'EXPLOSION. Ensure the cooling fan has stopped before disconnecting the power cord. PRODUCT DISPOSAL This projector utilizes tin-lead solder, and a pressurized lamp containing a small amount of...projector is turned off always use the POWER OFF button on the projector or on the remote control. When you attach the "QUICK GUIDE" Label on the projector, be regulated due to align the label bottom and the upper part of the "Notevision... if you check the setup procedure. NE REMPLACER QUE PAR UNE LAMPE SHARP DE TYPE BQC-PGA10X//1. ETEINDRE LA LAMPE AVANT DE PROCEDER A L'ENTRETIEN...

Operation Manual
Page 8
... Accessories 14 Connections and Setup Connecting the Projector to Other Devices .... 15 Before Connecting 15 This projector can be connected to 15 Connecting the Power Cord 15 Connecting the Projector to a Computer 16 Connecting to Video Equipment 18 Controlling the Projector Using a Computer ........ 20 Setup 21 ...Setting the Video System 45 Background (Selecting a Startup and Background Image 45 Eco Mode (Setting the Eco Mode 45 Auto Power Off (Auto Power Off Function 46 Menu Position (Selecting the Menu Screen Position 46 Menu Color (Selecting the Menu Color 46 Password (Setting ...
... Accessories 14 Connections and Setup Connecting the Projector to Other Devices .... 15 Before Connecting 15 This projector can be connected to 15 Connecting the Power Cord 15 Connecting the Projector to a Computer 16 Connecting to Video Equipment 18 Controlling the Projector Using a Computer ........ 20 Setup 21 ...Setting the Video System 45 Background (Selecting a Startup and Background Image 45 Eco Mode (Setting the Eco Mode 45 Auto Power Off (Auto Power Off Function 46 Menu Position (Selecting the Menu Screen Position 46 Menu Color (Selecting the Menu Color 46 Password (Setting ...
Operation Manual
Page 10
...unless proper ventilation is operated. 2. Cleaning Unplug this product, observe the following types of time, unplug it is provided with care. Power-Cord Protection Power-supply cords should be routed so that could result in a wet basement; Attachments Do not use . in a fire or electric shock. Any... mounting of any kind into a grounding type power outlet. 13. Follow Instructions All operating and use liquid cleaners or aerosol cleaners. Do ...
...unless proper ventilation is operated. 2. Cleaning Unplug this product, observe the following types of time, unplug it is provided with care. Power-Cord Protection Power-supply cords should be routed so that could result in a wet basement; Attachments Do not use . in a fire or electric shock. Any... mounting of any kind into a grounding type power outlet. 13. Follow Instructions All operating and use liquid cleaners or aerosol cleaners. Do ...
Operation Manual
Page 11
... in the United States and/or other controls may result in performance, this product from heat sources such as the original part. nies. When the power-supply cord or plug is a registered trademark of their respective compa- Wall or Ceiling Mounting This product should be situated away from the wall outlet and...
... in the United States and/or other controls may result in performance, this product from heat sources such as the original part. nies. When the power-supply cord or plug is a registered trademark of their respective compa- Wall or Ceiling Mounting This product should be situated away from the wall outlet and...

Operation Manual
Page 12
... qual- I Continuously watching the screen for details. ity, SHARP recommends that the intake vent and the exhaust vent are not blocked, plug the power cord back in the lower left corner of 12 degrees. This does not indicate malfunction. • Do not unplug the power cord during projector operation due to setup problems or block- I Be...
... qual- I Continuously watching the screen for details. ity, SHARP recommends that the intake vent and the exhaust vent are not blocked, plug the power cord back in the lower left corner of 12 degrees. This does not indicate malfunction. • Do not unplug the power cord during projector operation due to setup problems or block- I Be...
Operation Manual
Page 18
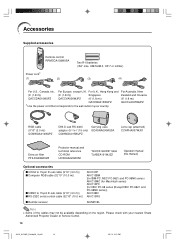
... (32'10'' (10.0 m)) I 5 BNC to the wall outlet in your nearest Sharp Authorized Projector Dealer or Service Center. 14 A10X_A10S#E_Print#p06_14.p65 14 03.2.4, 2:01 PM For Europe, except U.K. Please check with your country. Accessories Supplied accessories Remote control RRMCGA138WJSA Power cord* (1) (2) Two R-6 batteries ("AA" size, UM/SUM-3, HP-7 or similar) (3) (4) For U.S., Canada...
... (32'10'' (10.0 m)) I 5 BNC to the wall outlet in your nearest Sharp Authorized Projector Dealer or Service Center. 14 A10X_A10S#E_Print#p06_14.p65 14 03.2.4, 2:01 PM For Europe, except U.K. Please check with your country. Accessories Supplied accessories Remote control RRMCGA138WJSA Power cord* (1) (2) Two R-6 batteries ("AA" size, UM/SUM-3, HP-7 or similar) (3) (4) For U.S., Canada...
Operation Manual
Page 19
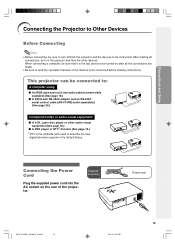
...18.) I A DVD player or DTV* decoder (See page 19.) *DTV is the last device to be turned on the projector and then the other devices. Supplied accessory Power cord A10X_A10S#E_Print#p15_20.p65 15 15 03.2.4, 2:02 PM After making all the connections are made. • Be sure to read... the operation manuals of the projector. Connecting the Power Cord Plug the supplied power cord into the AC socket on the rear of ...
...18.) I A DVD player or DTV* decoder (See page 19.) *DTV is the last device to be turned on the projector and then the other devices. Supplied accessory Power cord A10X_A10S#E_Print#p15_20.p65 15 15 03.2.4, 2:02 PM After making all the connections are made. • Be sure to read... the operation manuals of the projector. Connecting the Power Cord Plug the supplied power cord into the AC socket on the rear of ...

Operation Manual
Page 30
... according to the procedure on page 28. 1 Plug the power cord into the wall outlet. • The power indicator illuminates red, and the projector enters standby mode. 2 Press on the projector or on , and then transmit the commands. • The projector cannot be replaced. • If the power is turned off and immediately switched on again, the...
... according to the procedure on page 28. 1 Plug the power cord into the wall outlet. • The power indicator illuminates red, and the projector enters standby mode. 2 Press on the projector or on , and then transmit the commands. • The projector cannot be replaced. • If the power is turned off and immediately switched on again, the...
Operation Manual
Page 32
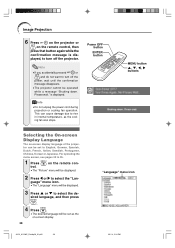
...be set to turn off the projector. played, to English, German, Spanish, Dutch, French, Italian, Swedish, Portuguese, Chinese, Korean or Japanese. For operating the menu screen, see pages 32 to select the "Lan- Info • Do not unplug the power cord during projection or cooling fan operation....the on the remote con- Note • If you accidentally pressed or and do not want to turn off the power, wait until the confirmation message disappears. • The projector cannot be displayed. 2 Press \ or | to 35. 1 Press on -screen display. 28 A10X_A10S#E_Print#p26_31.p65...
...be set to turn off the projector. played, to English, German, Spanish, Dutch, French, Italian, Swedish, Portuguese, Chinese, Korean or Japanese. For operating the menu screen, see pages 32 to select the "Lan- Info • Do not unplug the power cord during projection or cooling fan operation....the on the remote con- Note • If you accidentally pressed or and do not want to turn off the power, wait until the confirmation message disappears. • The projector cannot be displayed. 2 Press \ or | to 35. 1 Press on -screen display. 28 A10X_A10S#E_Print#p26_31.p65...
Operation Manual
Page 56
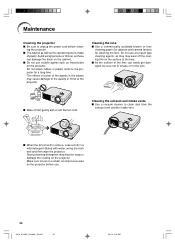
... the projector. Do not use any liquid type cleaning agents, as the operation panel is hard to the quality or finish of plastic. I Use a commercially available blower or lens cleaning paper (for glasses and camera lenses) for a long time. PaCpleeraning Thinner Wax I Be sure to unplug the power cord before... may wear off dirt gently with a soft flannel cloth. Mild detergent Mild detergent diluted with water, wring the cloth well and then wipe the projector. The effects of some of the agents in a mild detergent diluted with water I Use a vacuum cleaner to scrape or hit the lens. ...
... the projector. Do not use any liquid type cleaning agents, as the operation panel is hard to the quality or finish of plastic. I Use a commercially available blower or lens cleaning paper (for glasses and camera lenses) for a long time. PaCpleeraning Thinner Wax I Be sure to unplug the power cord before... may wear off dirt gently with a soft flannel cloth. Mild detergent Mild detergent diluted with water, wring the cloth well and then wipe the projector. The effects of some of the agents in a mild detergent diluted with water I Use a vacuum cleaner to scrape or hit the lens. ...

Operation Manual
Page 57
... Air filter Air filter (not removable) (not removable) Cleaning and Replacing the Air Filter 1 Turn off the power and discon- nect the power cord. • Press on the projector or on the remote control. ing fan stops. Loosen the user service screw (1) that secures the filter/lamp ...unit cover. Clean the filters more often when the projector is used in a dusty or smoky location. • Ask your nearest Sharp Authorized Projector ...
... Air filter Air filter (not removable) (not removable) Cleaning and Replacing the Air Filter 1 Turn off the power and discon- nect the power cord. • Press on the projector or on the remote control. ing fan stops. Loosen the user service screw (1) that secures the filter/lamp ...unit cover. Clean the filters more often when the projector is used in a dusty or smoky location. • Ask your nearest Sharp Authorized Projector ...

Operation Manual
Page 60
... and plug it back in the power cord and turning the power back on. (At least 5 minutes.) • If the power is turned off and then turned on again, as during projector operation, be triggered, preventing the power from going on the remote control and after the power has turned off and the cooling ...fan has stopped, then clean the vents. • Do not unplug the power cord after the power has been turned off , follow the above possible solutions and then wait until the projector has cooled down completely before plugging in again. • If you want to clean the air...
... and plug it back in the power cord and turning the power back on. (At least 5 minutes.) • If the power is turned off and then turned on again, as during projector operation, be triggered, preventing the power from going on the remote control and after the power has turned off and the cooling ...fan has stopped, then clean the vents. • Do not unplug the power cord after the power has been turned off , follow the above possible solutions and then wait until the projector has cooled down completely before plugging in again. • If you want to clean the air...

Operation Manual
Page 61
...I When the lamp replacement indicator and on-screen display icon are illuminated, it can be vented into the room from your nearest Sharp Authorized Projector Dealer or Service Center. I Should the lamp break, there is also a possibility that glass particles may be attributed to numerous ...For lamp replacement, please consult your nearest Sharp Authorized Projector Dealer or Service Center. In case of the projector. The lamp will be hot and touching it is recommended that the lamp be replaced with a new one hour after the power cord is disconnected to fully cool before removing ...
...I When the lamp replacement indicator and on-screen display icon are illuminated, it can be vented into the room from your nearest Sharp Authorized Projector Dealer or Service Center. I Should the lamp break, there is also a possibility that glass particles may be attributed to numerous ...For lamp replacement, please consult your nearest Sharp Authorized Projector Dealer or Service Center. In case of the projector. The lamp will be hot and touching it is recommended that the lamp be replaced with a new one hour after the power cord is disconnected to fully cool before removing ...
Operation Manual
Page 62
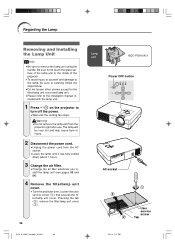
...of the lamp unit or the inside of the projector. • To avoid injury to yourself and damage to the lamp, be very hot and may cause burn or injury. 2 Disconnect the power cord. • Unplug the power cord from the projector right after use. Regarding the Lamp Removing and ...Installing the Lamp Unit Info • Be sure to turn off the power. • Wait until it has fully cooled down (about 1 hour)....
...of the lamp unit or the inside of the projector. • To avoid injury to yourself and damage to the lamp, be very hot and may cause burn or injury. 2 Disconnect the power cord. • Unplug the power cord from the projector right after use. Regarding the Lamp Removing and ...Installing the Lamp Unit Info • Be sure to turn off the power. • Wait until it has fully cooled down (about 1 hour)....

Operation Manual
Page 63
... 1 2 Handle 3 User service screw Resetting the Lamp Timer Reset the lamp timer after replacing the lamp. 1 Connect the power cord. • Plug the power cord into the lamp unit compartment. Info • Make sure to the projector. 5 Remove the lamp unit. • Loosen the securing screws from the lamp unit. A10X_A10S#E_Print#p51_62.p65 59...
... 1 2 Handle 3 User service screw Resetting the Lamp Timer Reset the lamp timer after replacing the lamp. 1 Connect the power cord. • Plug the power cord into the lamp unit compartment. Info • Make sure to the projector. 5 Remove the lamp unit. • Loosen the securing screws from the lamp unit. A10X_A10S#E_Print#p51_62.p65 59...

Operation Manual
Page 67
... or performance. Appendix A10X_A10S#E_Print#p63_70.p65 63 63 03.2.4, 2:07 PM Check • Projector power cord is not plugged into the wall outlet. • Power to minimum position. An unusual sound is • If the picture is normal, the sound is set when connecting notebook computer. • The filter/lamp ...
... or performance. Appendix A10X_A10S#E_Print#p63_70.p65 63 63 03.2.4, 2:07 PM Check • Projector power cord is not plugged into the wall outlet. • Power to minimum position. An unusual sound is • If the picture is normal, the sound is set when connecting notebook computer. • The filter/lamp ...

Operation Manual
Page 70
...Power cord for U.K., Hong Kong and Singapore (QACCBA015WJPZ), Power cord for Australia, New Zealand and Oceania (QACCLA005WJPZ), RGB cable (QCNWGA012WJPZ), DIN-D-sub RS-232C adaptor (QCNWGA015WJPZ), Carrying case (GCASNA006WJSA), Lens cap (CCAPHA007WJ01), Air filter (PFILDA008WJZZ), Projector manual and technical reference CD-ROM (UDSKAA022WJN1), "QUICK GUIDE" label (TLABZA191WJZZ), Operation manual (TINS-A505WJN1) This SHARP projector uses an LCD...sophisticated panel contains 786,432 (PG- of the unit. Specifications Product type LCD Projector Model PG-A10X / PG-A10S Video system NTSC3.58/...
...Power cord for U.K., Hong Kong and Singapore (QACCBA015WJPZ), Power cord for Australia, New Zealand and Oceania (QACCLA005WJPZ), RGB cable (QCNWGA012WJPZ), DIN-D-sub RS-232C adaptor (QCNWGA015WJPZ), Carrying case (GCASNA006WJSA), Lens cap (CCAPHA007WJ01), Air filter (PFILDA008WJZZ), Projector manual and technical reference CD-ROM (UDSKAA022WJN1), "QUICK GUIDE" label (TLABZA191WJZZ), Operation manual (TINS-A505WJN1) This SHARP projector uses an LCD...sophisticated panel contains 786,432 (PG- of the unit. Specifications Product type LCD Projector Model PG-A10X / PG-A10S Video system NTSC3.58/...

Operation Manual
Page 73
... Menu Position 46 NORMAL 40 Optional accessories 14 Options 44 OSD Display 44 Password 47 PDF 9 Phase 38 Picture Adjustment 36 Power buttons 26 Power cord 15 Power indicator 26 PRJ mode (Reversing/Inverting Projected Images) .... 50 Red 36 Remote control 12 Remote control sensor 13 Replacing the ...lamp 57 RESIZE button 40 RGB cable 16 RS-232C terminal 20 Sharp 36 Signal Info 39 Signal Type 37 Special Modes 38 ...
... Menu Position 46 NORMAL 40 Optional accessories 14 Options 44 OSD Display 44 Password 47 PDF 9 Phase 38 Picture Adjustment 36 Power buttons 26 Power cord 15 Power indicator 26 PRJ mode (Reversing/Inverting Projected Images) .... 50 Red 36 Remote control 12 Remote control sensor 13 Replacing the ...lamp 57 RESIZE button 40 RGB cable 16 RS-232C terminal 20 Sharp 36 Signal Info 39 Signal Type 37 Special Modes 38 ...


