
Operation Manual
Page 1
Introduction Connections and Setup Basic Operation SHARP CORPORATION OPERATION MANUAL MODEL PG-A10X PG-A10S Easy to Use Functions Appendix A10X_A10S#E_Print#H1+4.p65 1 LCD PROJECTOR Printed in Japan TINS-A505WJN1 03P02-JWM 03.2.4, 1:59 PM
Introduction Connections and Setup Basic Operation SHARP CORPORATION OPERATION MANUAL MODEL PG-A10X PG-A10S Easy to Use Functions Appendix A10X_A10S#E_Print#H1+4.p65 1 LCD PROJECTOR Printed in Japan TINS-A505WJN1 03P02-JWM 03.2.4, 1:59 PM
Operation Manual
Page 2
...; direktiivien 89/336/EEC ja 73/23/EEC vaatimukset, joita on page 14. IMPORTANT For your assistance in reporting the loss or theft of your Projector, please record the Serial Number located on the bottom of Directives 89/336/EEC and 73/23/EEC as amended by 93/68/ EEC. Dette.../336/CEE y 73/23/CEE, modificadas por medio de la 93/68/CEE. Model No.: Serial No.: This equipment complies with the requirements of the projector and retain this information. Dit apparaat voldoet aan de eisen van de richtlijnen 89/336/EEG en 73/23/EEG, gewijzigd door 93/68/EEG...
...; direktiivien 89/336/EEC ja 73/23/EEC vaatimukset, joita on page 14. IMPORTANT For your assistance in reporting the loss or theft of your Projector, please record the Serial Number located on the bottom of Directives 89/336/EEC and 73/23/EEC as amended by 93/68/ EEC. Dette.../336/CEE y 73/23/CEE, modificadas por medio de la 93/68/CEE. Model No.: Serial No.: This equipment complies with the requirements of the projector and retain this information. Dit apparaat voldoet aan de eisen van de richtlijnen 89/336/EEG en 73/23/EEG, gewijzigd door 93/68/EEG...

Operation Manual
Page 5
...instructions in accordance with the operation manual, may be of the parts, service and labor warranty applicable to your new SHARP Projector, using the projector, please read this equipment in a residential area is likely to cause harmful interference, in which case the user ... triangle is a Class A product. The lightning flash with arrowhead symbol, within an equilateral triangle, is provided to Part 15 of projector. The exclamation point within the product's enclosure that the device complies with FCC Class A verification. ONLY INFORMATION This equipment has been...
...instructions in accordance with the operation manual, may be of the parts, service and labor warranty applicable to your new SHARP Projector, using the projector, please read this equipment in a residential area is likely to cause harmful interference, in which case the user ... triangle is a Class A product. The lightning flash with arrowhead symbol, within an equilateral triangle, is provided to Part 15 of projector. The exclamation point within the product's enclosure that the device complies with FCC Class A verification. ONLY INFORMATION This equipment has been...

Operation Manual
Page 6
... operation, when turning the power off . HIGH PRESSURE LAMP : RISK OF EXPLOSION. NE REMPLACER QUE PAR UNE LAMPE SHARP DE TYPE BQC-PGA10X//1. PRODUCT DISPOSAL This projector utilizes tin-lead solder, and a pressurized lamp containing a small amount of these materials may be sure to align the... label bottom and the upper part of the "Notevision" logo on the top cabinet of America, the Electronic Industries Alliance: www.eiae.org . Caution Concerning Lamp Replacement See "Replacing the Lamp" on the projector will help you check the setup procedure. SEE OPERATION MANUAL....
... operation, when turning the power off . HIGH PRESSURE LAMP : RISK OF EXPLOSION. NE REMPLACER QUE PAR UNE LAMPE SHARP DE TYPE BQC-PGA10X//1. PRODUCT DISPOSAL This projector utilizes tin-lead solder, and a pressurized lamp containing a small amount of these materials may be sure to align the... label bottom and the upper part of the "Notevision" logo on the top cabinet of America, the Electronic Industries Alliance: www.eiae.org . Caution Concerning Lamp Replacement See "Replacing the Lamp" on the projector will help you check the setup procedure. SEE OPERATION MANUAL....

Operation Manual
Page 7
...Classroom and Meeting Room Friendly • Low fan noise and front directed exhaust outlet insure minimal disturbance to your audience seated adjacent to the projector. • Short throw lens allows for easy opera- tion. 4. Wide Input Signal Compatibility • Video systems compatible (NTSC3.58, PAL...SECAM, PAL-N, PAL-M, PAL-60 and NTSC4.43) • HD input compatible (1080I, 720P and 480P) • Computer input compatible (VGA, SVGA, XGA, SXGA and SXGA+) 6. High Brightness Despite Compact Size • Use of 100" at just 3.2 meters (10' 6"). 3. Simply and Easy Operation •...
...Classroom and Meeting Room Friendly • Low fan noise and front directed exhaust outlet insure minimal disturbance to your audience seated adjacent to the projector. • Short throw lens allows for easy opera- tion. 4. Wide Input Signal Compatibility • Video systems compatible (NTSC3.58, PAL...SECAM, PAL-N, PAL-M, PAL-60 and NTSC4.43) • HD input compatible (1080I, 720P and 480P) • Computer input compatible (VGA, SVGA, XGA, SXGA and SXGA+) 6. High Brightness Despite Compact Size • Use of 100" at just 3.2 meters (10' 6"). 3. Simply and Easy Operation •...

Operation Manual
Page 8
... Manuals ..... 9 Part Names 10 Projector (Front and Top View 10 Projector (Rear View 11 Remote Control (Front View 12 Using the Remote Control 13 Usable Range 13 Inserting the Batteries 13 Accessories 14 Connections and Setup Connecting the Projector to Other Devices .... 15 Before ...Connecting 15 This projector can be connected to 15 Connecting the Power Cord 15 Connecting the Projector to a Computer 16 Connecting to Video Equipment 18 Controlling the Projector Using a Computer ........ 20 Setup ...
... Manuals ..... 9 Part Names 10 Projector (Front and Top View 10 Projector (Rear View 11 Remote Control (Front View 12 Using the Remote Control 13 Usable Range 13 Inserting the Batteries 13 Accessories 14 Connections and Setup Connecting the Projector to Other Devices .... 15 Before ...Connecting 15 This projector can be connected to 15 Connecting the Power Cord 15 Connecting the Projector to a Computer 16 Connecting to Video Equipment 18 Controlling the Projector Using a Computer ........ 20 Setup ...
Operation Manual
Page 9
Introduction Appendix Carrying the Projector 51 How to Use the Carrying Case 51 Maintenance 52 Replacing the Air Filter 53 Cleaning and Replacing the Air Filter 53 Maintenance Indicators 55 ... Unit 58 Resetting the Lamp Timer 59 Connecting Pin Assignments 60 RS-232C Specifications and Command Settings 61 Computer Compatibility Chart 62 Troubleshooting 63 For SHARP Assistance 65 Specifications 66 Dimensions 67 Glossary 68 Index 69 This operation manual includes "Introduction", "IMPORTANT SAFEGUARDS" and "How to Access the PDF Operation Manuals...
Introduction Appendix Carrying the Projector 51 How to Use the Carrying Case 51 Maintenance 52 Replacing the Air Filter 53 Cleaning and Replacing the Air Filter 53 Maintenance Indicators 55 ... Unit 58 Resetting the Lamp Timer 59 Connecting Pin Assignments 60 RS-232C Specifications and Command Settings 61 Computer Compatibility Chart 62 Troubleshooting 63 For SHARP Assistance 65 Specifications 66 Dimensions 67 Glossary 68 Index 69 This operation manual includes "Introduction", "IMPORTANT SAFEGUARDS" and "How to Access the PDF Operation Manuals...

Operation Manual
Page 12
... use an appropriate power cord for the country you are not obstructed. Rest your nearest Sharp Authorized Projector Dealer or Service Center for a replacement. I Placement should only be performed by a Sharp Authorized Projector Dealer or Service Center. I Be sure that it is from -4°F to 140&#...176;F (-20°C to +60°C). This will automatically turn off the projector. Take extra care with extremes of the fan ...
... use an appropriate power cord for the country you are not obstructed. Rest your nearest Sharp Authorized Projector Dealer or Service Center for a replacement. I Placement should only be performed by a Sharp Authorized Projector Dealer or Service Center. I Be sure that it is from -4°F to 140&#...176;F (-20°C to +60°C). This will automatically turn off the projector. Take extra care with extremes of the fan ...
Operation Manual
Page 13
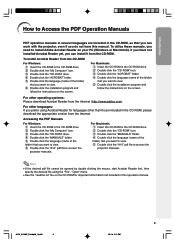
..." folder. 5 Double click the language (name of the folder) that you want to view. 6 Double click the "A10" pdf file to access the projector manuals. A10X_A10S#E_Print#p06_14.p65 9 9 03.2.4, 2:01 PM To install Acrobat Reader from the Internet. Note • If the desired pdf file cannot be... the "CD-ROM" drive. 4 Double click the "ACROBAT" folder. 5 Double click the language (name of the folder) that you can work with the projector, even if you do not have not installed Acrobat Reader yet, you can install it from the Internet (http://www.adobe.com). Introduction How to...
..." folder. 5 Double click the language (name of the folder) that you want to view. 6 Double click the "A10" pdf file to access the projector manuals. A10X_A10S#E_Print#p06_14.p65 9 9 03.2.4, 2:01 PM To install Acrobat Reader from the Internet. Note • If the desired pdf file cannot be... the "CD-ROM" drive. 4 Double click the "ACROBAT" folder. 5 Double click the language (name of the folder) that you can work with the projector, even if you do not have not installed Acrobat Reader yet, you can install it from the Internet (http://www.adobe.com). Introduction How to...
Operation Manual
Page 14
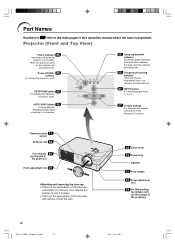
... normal function. Remote control 13 sensor Exhaust vent 52 Foot release 21 (on the side of the projector) Front adjustment foot 21 Attaching and removing the lens cap • Press on the bottom of the projector) 10 A10X_A10S#E_Print#p06_14.p65 10 03.2.4, 2:01 PM Part Names Numbers in refer to the... on or off. Replace the lamp when the indicator illuminates red. 55 Temperature warning indicator When the internal temperature rises, this indicator will illuminate green. Projector (Front and Top View) Power indicator 26 Illuminates red when the...
... normal function. Remote control 13 sensor Exhaust vent 52 Foot release 21 (on the side of the projector) Front adjustment foot 21 Attaching and removing the lens cap • Press on the bottom of the projector) 10 A10X_A10S#E_Print#p06_14.p65 10 03.2.4, 2:01 PM Part Names Numbers in refer to the... on or off. Replace the lamp when the indicator illuminates red. 55 Temperature warning indicator When the internal temperature rises, this indicator will illuminate green. Projector (Front and Top View) Power indicator 26 Illuminates red when the...
Operation Manual
Page 15
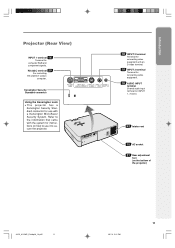
...terminal 16 Terminal for INPUT 1, 2 and 3. 52 Intake vent 15 AC socket 21 Rear adjustment foot (on how to secure the projector. 18 INPUT 2 terminal Terminal for connecting video equipment with an S-video terminal. 18 INPUT 3 terminal Terminal for connecting video equipment. ... that came with a Kensington MicroSaver Security System. RS-232C terminal 20 For controlling the projector using a computer. Kensington Security Standard connector Using the Kensington Lock • This projector has a Kensington Security Standard connector for use it to use with the system for instructions...
...terminal 16 Terminal for INPUT 1, 2 and 3. 52 Intake vent 15 AC socket 21 Rear adjustment foot (on how to secure the projector. 18 INPUT 2 terminal Terminal for connecting video equipment with an S-video terminal. 18 INPUT 3 terminal Terminal for connecting video equipment. ... that came with a Kensington MicroSaver Security System. RS-232C terminal 20 For controlling the projector using a computer. Kensington Security Standard connector Using the Kensington Lock • This projector has a Kensington Security Standard connector for use it to use with the system for instructions...

Operation Manual
Page 17
... once they are supplied in the direction of the batteries may run out, as leaving them as soon as possible with this case, move the projector away from the remote control can cause them to leak. Note • The signal from the fluorescent lamp. In this... a cloth. • The batteries included with new batteries. • Remove the batteries from leaked batteries is harmful to skin, therefore be used to control the projector within the ranges shown in can be using the remote control: • Be sure not to drop, expose to moisture or high temperature. • The...
... once they are supplied in the direction of the batteries may run out, as leaving them as soon as possible with this case, move the projector away from the remote control can cause them to leak. Note • The signal from the fluorescent lamp. In this... a cloth. • The batteries included with new batteries. • Remove the batteries from leaked batteries is harmful to skin, therefore be used to control the projector within the ranges shown in can be using the remote control: • Be sure not to drop, expose to moisture or high temperature. • The...
Operation Manual
Page 18
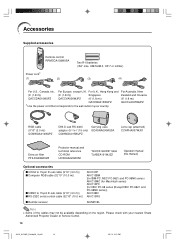
..." (3.0 m)) QCNWGA012WJPZ DIN-D-sub RS-232C Carrying case adaptor (5 57/64'' (15 cm)) GCASNA006WJSA QCNWGA015WJPZ Lens cap (attached) CCAPHA007WJ01 Extra air filter PFILDA008WJZZ Projector manual and technical reference CD-ROM UDSKAA022WJN1 "QUICK GUIDE" label TLABZA191WJZZ Operation manual (this manual) Optional accessories I 3 RCA to 15-pin D-sub cable ...(9'10'' (3.0 m)) I Computer RGB cable (32'10'' (10.0 m)) I 5 BNC to the wall outlet in your nearest Sharp Authorized Projector Dealer or Service Center. 14 A10X_A10S#E_Print#p06_14.p65 14 03.2.4, 2:01 PM
..." (3.0 m)) QCNWGA012WJPZ DIN-D-sub RS-232C Carrying case adaptor (5 57/64'' (15 cm)) GCASNA006WJSA QCNWGA015WJPZ Lens cap (attached) CCAPHA007WJ01 Extra air filter PFILDA008WJZZ Projector manual and technical reference CD-ROM UDSKAA022WJN1 "QUICK GUIDE" label TLABZA191WJZZ Operation manual (this manual) Optional accessories I 3 RCA to 15-pin D-sub cable ...(9'10'' (3.0 m)) I Computer RGB cable (32'10'' (10.0 m)) I 5 BNC to the wall outlet in your nearest Sharp Authorized Projector Dealer or Service Center. 14 A10X_A10S#E_Print#p06_14.p65 14 03.2.4, 2:01 PM
Operation Manual
Page 19
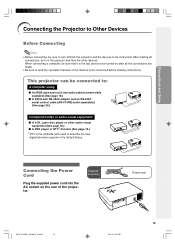
... making connections. Connecting the Power Cord Plug the supplied power cord into the AC socket on the rear of the devices to be connected. This projector can be connected to: A computer using: I An RGB cable and a ø3.5 mm audio cable (commercially available) (See page 16.) I A DIN-D-sub RS-232C adaptor ...equipment: I A DVD player or DTV* decoder (See page 19.) *DTV is the last device to be turned on after all connections, turn off both the projector and the devices to be connected before making all the connections are made. • Be sure to read the operation manuals of the...
... making connections. Connecting the Power Cord Plug the supplied power cord into the AC socket on the rear of the devices to be connected. This projector can be connected to: A computer using: I An RGB cable and a ø3.5 mm audio cable (commercially available) (See page 16.) I A DIN-D-sub RS-232C adaptor ...equipment: I A DVD player or DTV* decoder (See page 19.) *DTV is the last device to be turned on after all connections, turn off both the projector and the devices to be connected before making all the connections are made. • Be sure to read the operation manuals of the...
Operation Manual
Page 20
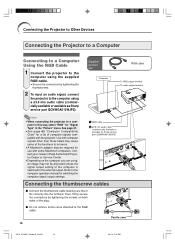
... setting of the plug. Use with computer signals other than those listed may cause some Macintosh computers. Contact your nearest Sharp Authorized Projector Dealer or Service Center. • Depending on both sides of the computer is switched to the external output. Connecting the... on the computer you are using, an image may not be required for use with the projector. Refer to the computer using a ø3.5 mm audio cable (commercially available or available as Sharp service part QCNWGA013WJPZ) Connecting the thumbscrew cables I Do not remove ferrite cores attached to a ...
... setting of the plug. Use with computer signals other than those listed may cause some Macintosh computers. Contact your nearest Sharp Authorized Projector Dealer or Service Center. • Depending on both sides of the computer is switched to the external output. Connecting the... on the computer you are using, an image may not be required for use with the projector. Refer to the computer using a ø3.5 mm audio cable (commercially available or available as Sharp service part QCNWGA013WJPZ) Connecting the thumbscrew cables I Do not remove ferrite cores attached to a ...
Operation Manual
Page 21
... setting requirements, allowing for quick and easy setup. Note • The DDC "Plug and Play" function of this projector operates only when used in conjunction with VESA-standard DDC 1/DDC 2B. I This projector is compatible with a VESA DDC compatible computer. Connections and Setup A10X_A10S#E_Print#p15_20.p65 17 17 03.2.4, 2:02 PM...
... setting requirements, allowing for quick and easy setup. Note • The DDC "Plug and Play" function of this projector operates only when used in conjunction with VESA-standard DDC 1/DDC 2B. I This projector is compatible with a VESA DDC compatible computer. Connections and Setup A10X_A10S#E_Print#p15_20.p65 17 17 03.2.4, 2:02 PM...
Operation Manual
Page 22
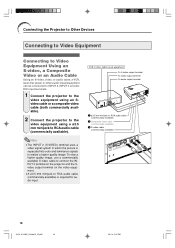
...which the picture is required for audio input. To view a higher-quality image, use a commercially available S-video cable to connect the INPUT 2 terminal on the projector and the Svideo output terminal on the video equipment. • A ø3.5 mm minijack to RCA audio cable (commercially available) 1 Composite video cable (commercially ...03.2.4, 2:02 PM VCR or other audio-visual equipment can be connected to INPUT 2, INPUT 3 and AUDIO input terminals. 1 Connect the projector to the video equipment using an Svideo cable or a composite video cable (both commercially available). 2 Connect the...
...which the picture is required for audio input. To view a higher-quality image, use a commercially available S-video cable to connect the INPUT 2 terminal on the projector and the Svideo output terminal on the video equipment. • A ø3.5 mm minijack to RCA audio cable (commercially available) 1 Composite video cable (commercially ...03.2.4, 2:02 PM VCR or other audio-visual equipment can be connected to INPUT 2, INPUT 3 and AUDIO input terminals. 1 Connect the projector to the video equipment using an Svideo cable or a composite video cable (both commercially available). 2 Connect the...

Operation Manual
Page 23
...3 RCA to 15-pin D-sub cable (sold separately) 2 ø3.5 mm minijack to RCA audio cable (commercially available) Note • When connecting the projector to RCA audio cable (commercially available). A10X_A10S#E_Print#p15_20.p65 19 19 03.2.4, 2:02 PM See page 37. • A ø3.5 mm minijack to...umbrella term used to describe the new digital television system in the United States. 1 Connect the projector to the video equipment using the 3 RCA to 15-pin D-sub cable. 2 Connect the projector to the video equipment using a ø3.5 mm minijack to the video equipment in the "Picture"...
...3 RCA to 15-pin D-sub cable (sold separately) 2 ø3.5 mm minijack to RCA audio cable (commercially available) Note • When connecting the projector to RCA audio cable (commercially available). A10X_A10S#E_Print#p15_20.p65 19 19 03.2.4, 2:02 PM See page 37. • A ø3.5 mm minijack to...umbrella term used to describe the new digital television system in the United States. 1 Connect the projector to the video equipment using the 3 RCA to 15-pin D-sub cable. 2 Connect the projector to the video equipment using a ø3.5 mm minijack to the video equipment in the "Picture"...
Operation Manual
Page 24
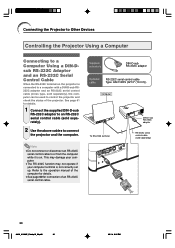
...not correctly set up. This may damage your computer. • The RS-232C function may not operate if your computer terminal is on the projector is connected to a computer with a DIN-D-sub RS232C adaptor and an RS-232C serial control cable (cross type, sold separately), the computer...-D-sub RS-232C adaptor RS-232C serial control cable (sold separately). 2 Use the above cables to connect the projector and the computer. Connecting the Projector to Other Devices Controlling the Projector Using a Computer Connecting to a Computer Using a DIN-Dsub RS-232C Adaptor and an RS-232C Serial Control...
...not correctly set up. This may damage your computer. • The RS-232C function may not operate if your computer terminal is on the projector is connected to a computer with a DIN-D-sub RS232C adaptor and an RS-232C serial control cable (cross type, sold separately), the computer...-D-sub RS-232C adaptor RS-232C serial control cable (sold separately). 2 Use the above cables to connect the projector and the computer. Connecting the Projector to Other Devices Controlling the Projector Using a Computer Connecting to a Computer Using a DIN-Dsub RS-232C Adaptor and an RS-232C Serial Control...
Operation Manual
Page 25
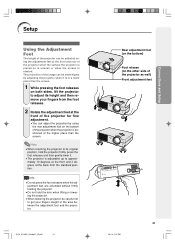
... A10X_A10S#E_Print#p21_25.p65 21 Rear adjustment foot (on the bottom) Foot release (on the bottom of the projector when the projector is positioned at the front of the projector when the surface the projector is placed on is uneven or when the screen is adjustable up to approximately 12 degrees at the front... place than the screen. The projection of the image can adjust the projection by using the adjustment feet at the front and rear of the projector for fine adjustment. • You can be careful not to adjust its original position, hold the lens when lifting or lowering the...
... A10X_A10S#E_Print#p21_25.p65 21 Rear adjustment foot (on the bottom) Foot release (on the bottom of the projector when the projector is positioned at the front of the projector when the surface the projector is placed on is uneven or when the screen is adjustable up to approximately 12 degrees at the front... place than the screen. The projection of the image can adjust the projection by using the adjustment feet at the front and rear of the projector for fine adjustment. • You can be careful not to adjust its original position, hold the lens when lifting or lowering the...


