
Operation Manual
Page 6
... turned off always use the POWER OFF button on the projector or on the remote control. Disposal of America, the Electronic Industries Alliance: www.eiae... NORMAL OPERATION, NEVER TURN THE PROJECTOR OFF BY DISCONNECTING THE POWER CORD. HOT SURFACE INSIDE. REPLACE WITH SAME SHARP LAMP UNIT TYPE BQC-PGA10X//1 ONLY. NE REMPLACER QUE PAR UNE LAMPE SHARP DE TYPE BQC-PGA10X//1. DANGER POTENTIEL...or, if you attach the "QUICK GUIDE" Label on the projector, be regulated due to align the label bottom and the upper part of the "Notevision" logo on the right. HIGH PRESSURE LAMP : RISK OF ...
... turned off always use the POWER OFF button on the projector or on the remote control. Disposal of America, the Electronic Industries Alliance: www.eiae... NORMAL OPERATION, NEVER TURN THE PROJECTOR OFF BY DISCONNECTING THE POWER CORD. HOT SURFACE INSIDE. REPLACE WITH SAME SHARP LAMP UNIT TYPE BQC-PGA10X//1 ONLY. NE REMPLACER QUE PAR UNE LAMPE SHARP DE TYPE BQC-PGA10X//1. DANGER POTENTIEL...or, if you attach the "QUICK GUIDE" Label on the projector, be regulated due to align the label bottom and the upper part of the "Notevision" logo on the right. HIGH PRESSURE LAMP : RISK OF ...

Operation Manual
Page 8
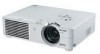
... PDF Operation Manuals ..... 9 Part Names 10 Projector (Front and Top View 10 Projector (Rear View 11 Remote Control (Front View 12 Using the Remote Control 13 Usable Range 13 Inserting the Batteries 13 Accessories 14 Connections and Setup Connecting the Projector to Other Devices .... 15 Before Connecting 15 This projector can be connected to 15 Connecting...
... PDF Operation Manuals ..... 9 Part Names 10 Projector (Front and Top View 10 Projector (Rear View 11 Remote Control (Front View 12 Using the Remote Control 13 Usable Range 13 Inserting the Batteries 13 Accessories 14 Connections and Setup Connecting the Projector to Other Devices .... 15 Before Connecting 15 This projector can be connected to 15 Connecting...
Operation Manual
Page 14
... rises, this operation manual where the topic is turned on the two buttons of the projector) 10 A10X_A10S#E_Print#p06_14.p65 10 03.2.4, 2:01 PM KEYSTONE button 29 For entering the Keystone Correction mode. Remote control 13 sensor Exhaust vent 52 Foot release 21 (on the side of the... projector) Front adjustment foot 21 Attaching and removing the lens cap • Press on the two buttons of...
... rises, this operation manual where the topic is turned on the two buttons of the projector) 10 A10X_A10S#E_Print#p06_14.p65 10 03.2.4, 2:01 PM KEYSTONE button 29 For entering the Keystone Correction mode. Remote control 13 sensor Exhaust vent 52 Foot release 21 (on the side of the... projector) Front adjustment foot 21 Attaching and removing the lens cap • Press on the two buttons of...
Operation Manual
Page 16
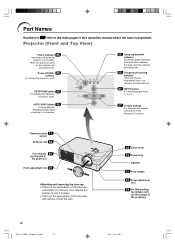
... For freezing images. 27 AV MUTE button For temporarily displaying the black screen and turning off . Remote Control (Front View) Power ON/OFF buttons 26 For turning the power on a computer keyboard when using the Remote Receiver (optional). INPUT buttons 27 For switching to a computer. ENLARGE (Enlarge/Reduce) 42 buttons For enlarging...
... For freezing images. 27 AV MUTE button For temporarily displaying the black screen and turning off . Remote Control (Front View) Power ON/OFF buttons 26 For turning the power on a computer keyboard when using the Remote Receiver (optional). INPUT buttons 27 For switching to a computer. ENLARGE (Enlarge/Reduce) 42 buttons For enlarging...

Operation Manual
Page 17
... to first wipe them and then remove them to leak. • Remove the batteries from the remote control once they are supplied in the illustration. In this projector may differ depending on the screen material. Incorrect use of new batteries or may cause old batteries to... of the signal may run out, as possible with this case, move the projector away from the remote control can be used to leak. Remote control sensor 45° 30° Remote control signal transmitters 30° 23' (7 m) Remote control Inserting the Batteries The batteries (two R-6 batteries ("AA" size, UM/...
... to first wipe them and then remove them to leak. • Remove the batteries from the remote control once they are supplied in the illustration. In this projector may differ depending on the screen material. Incorrect use of new batteries or may cause old batteries to... of the signal may run out, as possible with this case, move the projector away from the remote control can be used to leak. Remote control sensor 45° 30° Remote control signal transmitters 30° 23' (7 m) Remote control Inserting the Batteries The batteries (two R-6 batteries ("AA" size, UM/...
Operation Manual
Page 18
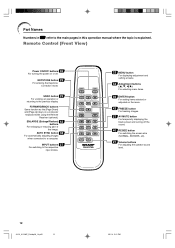
...I 3 RCA to 15-pin D-sub cable (9'10'' (3.0 m)) I Computer RGB cable (32'10'' (10.0 m)) I 5 BNC to the wall outlet in your nearest Sharp Authorized Projector Dealer or Service Center. 14 A10X_A10S#E_Print#p06_14.p65 14 03.2.4, 2:01 PM For U.K., Hong Kong and (6' (1.8 m)) (6' (1.8 m)) Singapore QACCDA016WJPZ QACCVA006WJPZ (6' (1.8 m)) QACCBA015WJPZ... series) AN-C10PC (for NEC PC-98 series (Except NEC PC-9821 and PC-98NX series)) AN-C3BN AN-C10RS I Remote receiver AN-MR1EL Note • Some of the cables may not be available depending on the region. Please check with your country...
...I 3 RCA to 15-pin D-sub cable (9'10'' (3.0 m)) I Computer RGB cable (32'10'' (10.0 m)) I 5 BNC to the wall outlet in your nearest Sharp Authorized Projector Dealer or Service Center. 14 A10X_A10S#E_Print#p06_14.p65 14 03.2.4, 2:01 PM For U.K., Hong Kong and (6' (1.8 m)) (6' (1.8 m)) Singapore QACCDA016WJPZ QACCVA006WJPZ (6' (1.8 m)) QACCBA015WJPZ... series) AN-C10PC (for NEC PC-98 series (Except NEC PC-9821 and PC-98NX series)) AN-C3BN AN-C10RS I Remote receiver AN-MR1EL Note • Some of the cables may not be available depending on the region. Please check with your country...

Operation Manual
Page 30
... may take some time to illuminate. • When controlling the projector using RS-232C commands from a computer, wait for at the factory is ready. Blinking in green: The lamp is set on the projector or the remote control. • For details about the Anti-Theft function, refer... to the projector before carrying out the following procedures. After the lamp replacement indicator illuminates and the warming up...
... may take some time to illuminate. • When controlling the projector using RS-232C commands from a computer, wait for at the factory is ready. Blinking in green: The lamp is set on the projector or the remote control. • For details about the Anti-Theft function, refer... to the projector before carrying out the following procedures. After the lamp replacement indicator illuminates and the warming up...
Operation Manual
Page 31
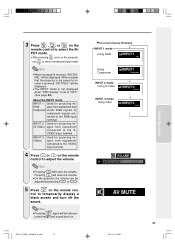
... not preset to receive is received, "NO SIGNAL" will be adjusted by pressing or . 5 Press on the remote con- will raise the volume. • On the projector, the volume can be displayed. When a signal that Component) sends RGB signals or component signals con- INPUT 2 Used ... image and sound back on the remote control to adjust the volume. "On-screen Display (Example) INPUT 1 mode Using RGB ➝ ➝ ➝ Note • When no signal is received, "NOT REG." Basic Operation 3 Press , or on the projector, use to select the desired input...
... not preset to receive is received, "NO SIGNAL" will be adjusted by pressing or . 5 Press on the remote con- will raise the volume. • On the projector, the volume can be displayed. When a signal that Component) sends RGB signals or component signals con- INPUT 2 Used ... image and sound back on the remote control to adjust the volume. "On-screen Display (Example) INPUT 1 mode Using RGB ➝ ➝ ➝ Note • When no signal is received, "NOT REG." Basic Operation 3 Press , or on the projector, use to select the desired input...
Operation Manual
Page 32
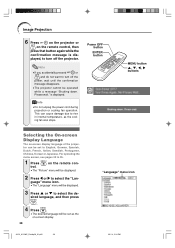
...• If you accidentally pressed or and do not want to turn off the power, wait until the confirmation message disappears. • The projector cannot be displayed. 3 Press ' or " to select the de- Please wait." Info • Do not unplug the power cord during ...Language The on -screen display. 28 A10X_A10S#E_Print#p26_31.p65 28 "Language" menu icon 03.2.4, 2:04 PM Image Projection 6 Press on the projector or on the remote con- For operating the menu screen, see pages 32 to English, German, Spanish, Dutch, French, Italian, Swedish, Portuguese, Chinese, Korean...
...• If you accidentally pressed or and do not want to turn off the power, wait until the confirmation message disappears. • The projector cannot be displayed. 3 Press ' or " to select the de- Please wait." Info • Do not unplug the power cord during ...Language The on -screen display. 28 A10X_A10S#E_Print#p26_31.p65 28 "Language" menu icon 03.2.4, 2:04 PM Image Projection 6 Press on the projector or on the remote con- For operating the menu screen, see pages 32 to English, German, Spanish, Dutch, French, Italian, Swedish, Portuguese, Chinese, Korean...
Operation Manual
Page 36
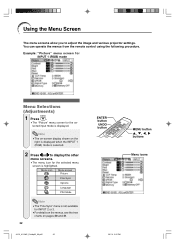
...the tree charts on the right is displayed when the INPUT 1 (RGB) mode is selected. 2 Press \ or | to adjust the image and various projector settings. Menu icon Menu screen Picture Fine Sync Options Language PRJ Mode Note • The "Fine Sync" menu is highlighted. You can operate the menus... from the remote control using the following procedure. Using the Menu Screen The menu screens allow you to display the other menu screens. • The menu icon...
...the tree charts on the right is displayed when the INPUT 1 (RGB) mode is selected. 2 Press \ or | to adjust the image and various projector settings. Menu icon Menu screen Picture Fine Sync Options Language PRJ Mode Note • The "Fine Sync" menu is highlighted. You can operate the menus... from the remote control using the following procedure. Using the Menu Screen The menu screens allow you to display the other menu screens. • The menu icon...
Operation Manual
Page 42
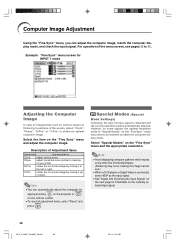
... making the image hard to see pages 32 to obtain an optimal computer image. V-Pos center the on-screen image by pressing on the projector or on the currently selected input signal. 38 A10X_A10S#E_Print#p32_39.p65 38 03.2.4, 2:05 PM Special Modes (Special Mode Settings) Ordinarily, the... is connected, select 480P as the input signal. • See "Signal Info (Checking the Input Signal)" on the next page for information on the remote control. • To reset all adjustment items, select "Reset" and press . Select the item on the "Fine Sync" menu and the appropriate resolution...
... making the image hard to see pages 32 to obtain an optimal computer image. V-Pos center the on-screen image by pressing on the projector or on the currently selected input signal. 38 A10X_A10S#E_Print#p32_39.p65 38 03.2.4, 2:05 PM Special Modes (Special Mode Settings) Ordinarily, the... is connected, select 480P as the input signal. • See "Signal Info (Checking the Input Signal)" on the next page for information on the remote control. • To reset all adjustment items, select "Reset" and press . Select the item on the "Fine Sync" menu and the appropriate resolution...

Operation Manual
Page 46
... of an Image 1 Press . • Pressing or enlarges or reduces the projected image. fresh rate (vertical frequency) change the location of an image with the remote control.
... of an Image 1 Press . • Pressing or enlarges or reduces the projected image. fresh rate (vertical frequency) change the location of an image with the remote control.

Operation Manual
Page 47
... operation buttons on the projector for about 3 seconds while the projector is in standby mode. Keylock Function Use this function to Use Functions A10X_A10S#E_Print#p40_50.p65 43 43 03.2.4, 2:06 PM Note • The keylock function does not affect the operation with the remote control buttons. •... You cannot use the keylock function while the projector is being turned on. • You can take the keylock off by holding down on . Power ON...
... operation buttons on the projector for about 3 seconds while the projector is in standby mode. Keylock Function Use this function to Use Functions A10X_A10S#E_Print#p40_50.p65 43 43 03.2.4, 2:06 PM Note • The keylock function does not affect the operation with the remote control buttons. •... You cannot use the keylock function while the projector is being turned on. • You can take the keylock off by holding down on . Power ON...
Operation Manual
Page 51
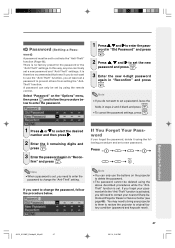
... the fields in "Recon- word in "Reconfirm" and press . If You Forget Your Password If you forget the password, delete it using the remote control. If you need to enter the password to prevent others from setting the "AntiTheft" function. firm" and press . Press Note • ...a new password and "Anti-Theft" settings. You may need to original factory condition (password and keycode reset). If you forget your nearest Sharp Authorized Projector Dealer or Service Center (see page 65). A password can only use the "Anti-Theft" function, you at least set , you want...
... the fields in "Recon- word in "Reconfirm" and press . If You Forget Your Password If you forget the password, delete it using the remote control. If you need to enter the password to prevent others from setting the "AntiTheft" function. firm" and press . Press Note • ...a new password and "Anti-Theft" settings. You may need to original factory condition (password and keycode reset). If you forget your nearest Sharp Authorized Projector Dealer or Service Center (see page 65). A password can only use the "Anti-Theft" function, you at least set , you want...

Operation Manual
Page 52
...remote control are used for setting the keycode. Using the "Options" Menu Example: "Options" menu screen for setting the keycode. You can choose to enter the correct keycode each time the projector is entered. Enter the keycode after the power is turned on the re- If you lose or forget your nearest Sharp... keycode in "Reconfirm". Theft) The anti-theft function prevents unauthorized use this function. The following buttons on the remote control and projector cannot be selected unless "Password" is set , the keycode inputting box appears after the right password is turned on...
...remote control are used for setting the keycode. Using the "Options" Menu Example: "Options" menu screen for setting the keycode. You can choose to enter the correct keycode each time the projector is entered. Enter the keycode after the power is turned on the re- If you lose or forget your nearest Sharp... keycode in "Reconfirm". Theft) The anti-theft function prevents unauthorized use this function. The following buttons on the remote control and projector cannot be selected unless "Password" is set , the keycode inputting box appears after the right password is turned on...

Operation Manual
Page 53
mote control or the projector to set a keycode, leave the keycode field blank in steps 2 and 3 and press . Note • When "Anti-Theft" is selected, the password in- After the ... change the keycode, follow the procedure below. Note • If you do not want to change the keycode. 1 Press the buttons on the remote control or the projector to enter the preset 4-digit keycode in "Old Code". 2 Press any button you like on the re- If you want to enter the new...
mote control or the projector to set a keycode, leave the keycode field blank in steps 2 and 3 and press . Note • When "Anti-Theft" is selected, the password in- After the ... change the keycode, follow the procedure below. Note • If you do not want to change the keycode. 1 Press the buttons on the remote control or the projector to enter the preset 4-digit keycode in "Old Code". 2 Press any button you like on the re- If you want to enter the new...

Operation Manual
Page 57
...secures the filter/lamp unit cover. Wait until the cool- Clean the filters more often when the projector is used in a dusty or smoky location. • Ask your nearest Sharp Authorized Projector Dealer or Service Center to exchange the filter (PFILDA008WJZZ) when it is equipped with your fingers and... of the projector. • The air filters should be cleaned every 100 hours of the filter/lamp unit cover. 3 2 1 User service screw Tab Appendix A10X_A10S#E_Print#p51_62.p65 53 53 03.2.4, 2:07 PM nect the power cord. • Press on the projector or on the remote control.
...secures the filter/lamp unit cover. Wait until the cool- Clean the filters more often when the projector is used in a dusty or smoky location. • Ask your nearest Sharp Authorized Projector Dealer or Service Center to exchange the filter (PFILDA008WJZZ) when it is equipped with your fingers and... of the projector. • The air filters should be cleaned every 100 hours of the filter/lamp unit cover. 3 2 1 User service screw Tab Appendix A10X_A10S#E_Print#p51_62.p65 53 53 03.2.4, 2:07 PM nect the power cord. • Press on the projector or on the remote control.

Operation Manual
Page 60
... illuminates, and the power turns off and then turned on again, as during projector operation, be sure to clean the air vents during a brief test, the lamp...in again. • If you want to first press on the projector or on the remote control and after the power has turned off and the cooling fan has... stopped, then clean the vents. • Do not unplug the power cord after the power has been turned off and while the cooling fan is turned off , follow the above possible solutions and then wait until the projector...
... illuminates, and the power turns off and then turned on again, as during projector operation, be sure to clean the air vents during a brief test, the lamp...in again. • If you want to first press on the projector or on the remote control and after the power has turned off and the cooling fan has... stopped, then clean the vents. • Do not unplug the power cord after the power has been turned off and while the cooling fan is turned off , follow the above possible solutions and then wait until the projector...
Operation Manual
Page 65
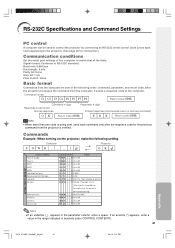
...R Return code (0DH) Info • When more than one code is verified. Computer P OWR _ _ _ 1 → ← Projector OK BUTTONS & REMOTE CONTROL KEY CONTROL CONTENTS Power Off (Standby) Power On INPUT1 INPUT2 INPUT3 Lamp Usage Time (hour) Remaining Lamp Life (Percentage) Lamp Status Unit ... N _ _ _ 1 0:Normal, 1:Temp High, 2:Fan Err, 4:Filter Cover Err, 8:Lamp 100 hours, 16:Lamp Burnt-out, 32:Lamp Not Lit, 64:Temp Abnormally High T N A M _ _ _ 1 PROJECTOR NAME I M B K _ _ _ 0 OK or ERR I M B K _ _ _ 1 OK or ERR A D J S _ _ _ 1 OK or ERR Note • If an underbar (_) appears ...
...R Return code (0DH) Info • When more than one code is verified. Computer P OWR _ _ _ 1 → ← Projector OK BUTTONS & REMOTE CONTROL KEY CONTROL CONTENTS Power Off (Standby) Power On INPUT1 INPUT2 INPUT3 Lamp Usage Time (hour) Remaining Lamp Life (Percentage) Lamp Status Unit ... N _ _ _ 1 0:Normal, 1:Temp High, 2:Fan Err, 4:Filter Cover Err, 8:Lamp 100 hours, 16:Lamp Burnt-out, 32:Lamp Not Lit, 64:Temp Abnormally High T N A M _ _ _ 1 PROJECTOR NAME I M B K _ _ _ 0 OK or ERR I M B K _ _ _ 1 OK or ERR A D J S _ _ _ 1 OK or ERR Note • If an underbar (_) appears ...

Operation Manual
Page 67
... The selected input mode is wrong. • The AV MUTE function is working. • Cables incorrectly connected to rear panel of the projector. • Remote control batteries have run out. • External output has not been set when connecting notebook computer. • The filter/lamp unit cover is... not installed correctly. • Cables incorrectly connected to the rear panel of the projector. • "Bright" is set to ON, all the ...
... The selected input mode is wrong. • The AV MUTE function is working. • Cables incorrectly connected to rear panel of the projector. • Remote control batteries have run out. • External output has not been set when connecting notebook computer. • The filter/lamp unit cover is... not installed correctly. • Cables incorrectly connected to the rear panel of the projector. • "Bright" is set to ON, all the ...


