

PG-M15S , PG-M15X Operation Manual
Page 1
OPERATION MANUAL MODEL DIGITAL MULTIMEDIA PROJECTOR Important Information Setup & Connections Operation Useful Features Maintenance & Troubleshooting Appendix
OPERATION MANUAL MODEL DIGITAL MULTIMEDIA PROJECTOR Important Information Setup & Connections Operation Useful Features Maintenance & Troubleshooting Appendix

PG-M15S , PG-M15X Operation Manual
Page 3
... the beam of your new SHARP Projector, using the projector, please read this equip- CAUTION: TO REDUCE THE RISK OF ELECTRIC SHOCK, DO NOT REMOVE COVER. U.S.A. This equipment generates, uses, and can be of sufficient magnitude to constitute a risk or electric shock to Part 15 of "Supplied Accessories" on , the user is intended to alert the user to operate this operation manual carefully. Before recycling...
... the beam of your new SHARP Projector, using the projector, please read this equip- CAUTION: TO REDUCE THE RISK OF ELECTRIC SHOCK, DO NOT REMOVE COVER. U.S.A. This equipment generates, uses, and can be of sufficient magnitude to constitute a risk or electric shock to Part 15 of "Supplied Accessories" on , the user is intended to alert the user to operate this operation manual carefully. Before recycling...
PG-M15S , PG-M15X Operation Manual
Page 4
... 90 seconds after the projector is a class A product. During normal operation, when turning the power off . DURING NORMAL OPERATION, NEVER TURN THE PROJECTOR OFF BY DISCONNECTING THE POWER CORD. REPLACE WITH SAME SHARP LAMP UNIT TYPE BQC- HANDLE WITH CARE. ETEINDRE LA LAMPE AVANT DE PROCEDER A L'ENTRETIEN. Disposal of mercury. Caution Concerning the Lamp Replacement See "Replacing the Projection Lamp" on the remote control. MEDIUM PRESSURE LAMP : RISK OF EXPLOSION. DEBRANCHER...
... 90 seconds after the projector is a class A product. During normal operation, when turning the power off . DURING NORMAL OPERATION, NEVER TURN THE PROJECTOR OFF BY DISCONNECTING THE POWER CORD. REPLACE WITH SAME SHARP LAMP UNIT TYPE BQC- HANDLE WITH CARE. ETEINDRE LA LAMPE AVANT DE PROCEDER A L'ENTRETIEN. Disposal of mercury. Caution Concerning the Lamp Replacement See "Replacing the Projection Lamp" on the remote control. MEDIUM PRESSURE LAMP : RISK OF EXPLOSION. DEBRANCHER...
PG-M15S , PG-M15X Operation Manual
Page 5
.... Damage Requiring Service Unplug this indicates a need for example, near a swimming pool; If the power-supply cord or plug is left unattended and unused for ventilation to . 11. c. e. Replacement Parts When replacement parts are not sure of the type of the product should follow the manufacturer's instructions, and should never be covered or blocked by following basic rules for this Projector, observe...
.... Damage Requiring Service Unplug this indicates a need for example, near a swimming pool; If the power-supply cord or plug is left unattended and unused for ventilation to . 11. c. e. Replacement Parts When replacement parts are not sure of the type of the product should follow the manufacturer's instructions, and should never be covered or blocked by following basic rules for this Projector, observe...

PG-M15S , PG-M15X Operation Manual
Page 6
... objects on . If something should fall into the product, immediately disconnect the power cable from falling into the lens while the product is orange and not flashing. • Handle the power cable carefully and avoid excessive bending. Important Information IMPORTANT SAFEGUARDS 22. IMPORTANT • DLP (Digital Light Processing) and DMD (Digital Micromirror Device) are trademarks of Texas Instruments, Inc. • Microsoft and...
... objects on . If something should fall into the product, immediately disconnect the power cable from falling into the lens while the product is orange and not flashing. • Handle the power cable carefully and avoid excessive bending. Important Information IMPORTANT SAFEGUARDS 22. IMPORTANT • DLP (Digital Light Processing) and DMD (Digital Micromirror Device) are trademarks of Texas Instruments, Inc. • Microsoft and...
PG-M15S , PG-M15X Operation Manual
Page 8
...18 Setting up the Screen 20 Operating the Wireless Mouse from the Remote Control 24 Using the GUI (Graphical User Interface) Menu Screens 26 Selecting the On-screen Display Language ... 30 Selecting the Video Input System Mode (INPUT 2 or 3 only 30 Picture Adjustments 31 Adjusting the Picture 31 Selecting the Color Temperature 32 Computer Image Adjustments (INPUT 1 (RGB) mode only 33 Auto Sync Adjustment 33 Adjusting the Computer Image 33 Maintenance & Troubleshooting Lamp/Maintenance Indicators 46 Replacing the Projection Lamp 47 Using the Kensington Lock 48 Troubleshooting 48...
...18 Setting up the Screen 20 Operating the Wireless Mouse from the Remote Control 24 Using the GUI (Graphical User Interface) Menu Screens 26 Selecting the On-screen Display Language ... 30 Selecting the Video Input System Mode (INPUT 2 or 3 only 30 Picture Adjustments 31 Adjusting the Picture 31 Selecting the Color Temperature 32 Computer Image Adjustments (INPUT 1 (RGB) mode only 33 Auto Sync Adjustment 33 Adjusting the Computer Image 33 Maintenance & Troubleshooting Lamp/Maintenance Indicators 46 Replacing the Projection Lamp 47 Using the Kensington Lock 48 Troubleshooting 48...

PG-M15S , PG-M15X Operation Manual
Page 9
... flash, and after the lamp has been used for details. • The cooling fan regulates the internal temperature, and its performance is automatically controlled. Then reconnect the power cord and restart the projector. When the projector is subjected to "Lamp/ Maintenance Indicators" on page 46, for 1,500 hours, the projector power will automatically turn off, the TEMPERATURE WARNING indicator on the projector that all internal cleaning must be extremely hot during projector operation...
... flash, and after the lamp has been used for details. • The cooling fan regulates the internal temperature, and its performance is automatically controlled. Then reconnect the power cord and restart the projector. When the projector is subjected to "Lamp/ Maintenance Indicators" on page 46, for 1,500 hours, the projector power will automatically turn off, the TEMPERATURE WARNING indicator on the projector that all internal cleaning must be extremely hot during projector operation...

PG-M15S , PG-M15X Operation Manual
Page 19
... image to RS-232C/MOUSE Port When the RS-232C/MOUSE port on the projector is not correctly set up /installing the correct mouse driver. • A Macintosh adaptor may damage your nearest Sharp Authorized Projector Dealer or Service Center. 3 RS-232C cable (null modem, cross type, sold separately) Projector 2 DIN-D-sub RS-232C cable DVI-Analog to VGA adaptor Model name AN-C10RS PC audio cable DVI digital cable...
... image to RS-232C/MOUSE Port When the RS-232C/MOUSE port on the projector is not correctly set up /installing the correct mouse driver. • A Macintosh adaptor may damage your nearest Sharp Authorized Projector Dealer or Service Center. 3 RS-232C cable (null modem, cross type, sold separately) Projector 2 DIN-D-sub RS-232C cable DVI-Analog to VGA adaptor Model name AN-C10RS PC audio cable DVI digital cable...
PG-M15S , PG-M15X Operation Manual
Page 20
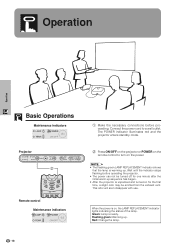
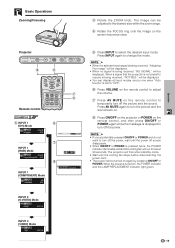
The POWER indicator illuminates red and the projector enters standby mode. 2 Press ON/OFF on the projector or POWER on the remote control to a wall outlet. When the power is on the power. • The flashing green LAMP REPLACEMENT indicator shows that the lamp is warming up. Flashing green: Warming up. Red: Change the lamp. 18 Operation Operation Basic Operations Maintenance indicators Projector 2 Remote control Maintenance indicators 1 Make the necessary connections before operating the projector. • The power can not be turned off for the first time, a slight...
The POWER indicator illuminates red and the projector enters standby mode. 2 Press ON/OFF on the projector or POWER on the remote control to a wall outlet. When the power is on the power. • The flashing green LAMP REPLACEMENT indicator shows that the lamp is warming up. Flashing green: Warming up. Red: Change the lamp. 18 Operation Operation Basic Operations Maintenance indicators Projector 2 Remote control Maintenance indicators 1 Make the necessary connections before operating the projector. • The power can not be turned off for the first time, a slight...
PG-M15S , PG-M15X Operation Manual
Page 21
... to temporarily turn off the power, wait until the image on , the POWER indicator and the LAMP REPLACEMENT indicator light green. When the power is pressed twice, the POWER indicator illuminates red and the cooling fan will then enter standby mode. • Wait until the cooling fan stops before disconnecting the power cord. • The power can be displayed. • When no signal is set to "OFF". 6 Press VOLUME on the remote control to adjust the volume...
... to temporarily turn off the power, wait until the image on , the POWER indicator and the LAMP REPLACEMENT indicator light green. When the power is pressed twice, the POWER indicator illuminates red and the cooling fan will then enter standby mode. • Wait until the cooling fan stops before disconnecting the power cord. • The power can be displayed. • When no signal is set to "OFF". 6 Press VOLUME on the remote control to adjust the volume...

PG-M15S , PG-M15X Operation Manual
Page 22
... the screen. Move the projector forward or backward if the edges of the image are distorted. • The projector lens should be used with a minus ( )מsign indicate the distance of the lens center below .) PG-M15X Throw distance ratio NORMAL Mode (4:3) x : Picture size (Diag.) (inches) L1: Maximum projection distance (feet) L2: Minimum projection distance (feet) H: Distance from the lens center to the bottom of the image (inches) Picture size Diag...
... the screen. Move the projector forward or backward if the edges of the image are distorted. • The projector lens should be used with a minus ( )מsign indicate the distance of the lens center below .) PG-M15X Throw distance ratio NORMAL Mode (4:3) x : Picture size (Diag.) (inches) L1: Maximum projection distance (feet) L2: Minimum projection distance (feet) H: Distance from the lens center to the bottom of the image (inches) Picture size Diag...
PG-M15S , PG-M15X Operation Manual
Page 25
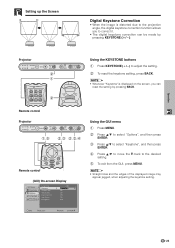
.... • The digital keystone correction can reset the setting by pressing KEYSTONE Projector 2 1 2 Using the KEYSTONE buttons 1 Press KEYSTONE to the desired setting. 5 To exit from the GUI, press MENU. • Straight lines and the edges of the displayed image may appear jagged, when adjusting the keystone setting. END SELECT BACK ENTER 23 Remote control Projector 1,5 2,3 2,3,4 Remote control (GUI) On-screen Display Picture Fine Sync Options Language PRJ Mode Lamp Timer Keystone AV Mute Disp. Operation Setting up the Screen Digital Keystone Correction • When...
.... • The digital keystone correction can reset the setting by pressing KEYSTONE Projector 2 1 2 Using the KEYSTONE buttons 1 Press KEYSTONE to the desired setting. 5 To exit from the GUI, press MENU. • Straight lines and the edges of the displayed image may appear jagged, when adjusting the keystone setting. END SELECT BACK ENTER 23 Remote control Projector 1,5 2,3 2,3,4 Remote control (GUI) On-screen Display Picture Fine Sync Options Language PRJ Mode Lamp Timer Keystone AV Mute Disp. Operation Setting up the Screen Digital Keystone Correction • When...

PG-M15S , PG-M15X Operation Manual
Page 27
Operation Operating the Wireless Mouse from the remote control can be reflected off a screen for about ten seconds while the buttons are lighting. • When MENU or ENLARGE is pressed, MOUSE mode is for easy operation. Refer to the computer's operation manual for approximately 10 seconds. However, the effective distance of setting up/installing the mouse driver. • For one-button mouse systems, use either LEFT-CLICK or RIGHT-CLICK...
Operation Operating the Wireless Mouse from the remote control can be reflected off a screen for about ten seconds while the buttons are lighting. • When MENU or ENLARGE is pressed, MOUSE mode is for easy operation. Refer to the computer's operation manual for approximately 10 seconds. However, the effective distance of setting up/installing the mouse driver. • For one-button mouse systems, use either LEFT-CLICK or RIGHT-CLICK...
PG-M15S , PG-M15X Operation Manual
Page 32
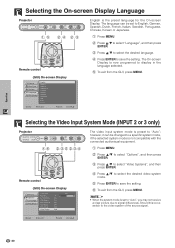
... select the desired video system mode. 5 Press ENTER to save the setting. The language can be set to "Auto", you may not receive a clear picture due to "Auto"; END SELECT BACK ENTER Selecting the Video Input System Mode (INPUT 2 or 3 only) Projector 1,6 2,3,5 2,3,4 Remote control (GUI) On-screen Display Lamp Timer 100 Picture Keystone 0 Options AV Mute Disp. Operation Selecting the On-screen Display Language Projector 1, 5 2, 4 2, 3 Remote control (GUI) On-screen Display Picture Fine Sync Options Language PRJ Mode English Deutsch Espa...
... select the desired video system mode. 5 Press ENTER to save the setting. The language can be set to "Auto", you may not receive a clear picture due to "Auto"; END SELECT BACK ENTER Selecting the Video Input System Mode (INPUT 2 or 3 only) Projector 1,6 2,3,5 2,3,4 Remote control (GUI) On-screen Display Lamp Timer 100 Picture Keystone 0 Options AV Mute Disp. Operation Selecting the On-screen Display Language Projector 1, 5 2, 4 2, 3 Remote control (GUI) On-screen Display Picture Fine Sync Options Language PRJ Mode English Deutsch Espa...
PG-M15S , PG-M15X Operation Manual
Page 48
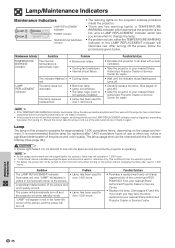
.... red. Condition Problem The LAMP REPLACEMENT indicator • Lamp has been used for over 1,400 hours. Possible Solution • Purchase a replacement lamp unit (lamp cage/module) of the current type BQCPGM15X//1 from the fourth time when turning on the power without changing the lamp after 1,400 cumulative hours of use for 1,500 hours. Maintenance & Troubleshooting 46 LAMP REPLACEMENT indicator The indicator flashes in again. Possible Solution • Relocate the projector to an area with the On-screen Display...
.... red. Condition Problem The LAMP REPLACEMENT indicator • Lamp has been used for over 1,400 hours. Possible Solution • Purchase a replacement lamp unit (lamp cage/module) of the current type BQCPGM15X//1 from the fourth time when turning on the power without changing the lamp after 1,400 cumulative hours of use for 1,500 hours. Maintenance & Troubleshooting 46 LAMP REPLACEMENT indicator The indicator flashes in again. Possible Solution • Relocate the projector to an area with the On-screen Display...

PG-M15S , PG-M15X Operation Manual
Page 49
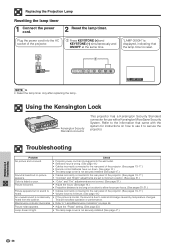
... damage to the lamp, be replaced after the power cord is disconnected to allow the surface of use or when you . Remove the lamp cage cover. or 4 Remove the lamp cage. 5 6 Insert the new lamp cage. Attach the lamp cage cover. Loosen the securing screws on the remote control. If you wish, you may be obtained through a Sharp Authorized Projector Dealer or Service Center. ONLY Removing and installing the lamp unit CAUTION •...
... damage to the lamp, be replaced after the power cord is disconnected to allow the surface of use or when you . Remove the lamp cage cover. or 4 Remove the lamp cage. 5 6 Insert the new lamp cage. Attach the lamp cage cover. Loosen the securing screws on the remote control. If you wish, you may be obtained through a Sharp Authorized Projector Dealer or Service Center. ONLY Removing and installing the lamp unit CAUTION •...
PG-M15S , PG-M15X Operation Manual
Page 50
Replacing the Projection Lamp Resetting the lamp timer 1 Connect the power cord. 2 Reset the lamp timer. Troubleshooting Problem Check No picture and no sound is • Cables incorrectly connected to the rear panel of the projector. (See pages 13-17.) heard. • Volume is set to minimum position. (See page 31.) Color is faded or poor. • "Color" and "Tint" adjustments are not correct. (See page 31.) Picture is blurred. • Adjust the focus. (See page 19.) • Projection distance is...
Replacing the Projection Lamp Resetting the lamp timer 1 Connect the power cord. 2 Reset the lamp timer. Troubleshooting Problem Check No picture and no sound is • Cables incorrectly connected to the rear panel of the projector. (See pages 13-17.) heard. • Volume is set to minimum position. (See page 31.) Color is faded or poor. • "Color" and "Tint" adjustments are not correct. (See page 31.) Picture is blurred. • Adjust the focus. (See page 19.) • Projection distance is...

PG-M15S , PG-M15X Operation Manual
Page 54
... code is being sent, send each adjustment menu and checking the status with the On-screen Display. Command format C1 C2 C3 C4 P1 P2 P3 P4 Return code (0DH) Command 4-digit Response code format Normal response Parameter 4-digit O K Return code (0DH) Problem response (Failure due to the computer. Computer I RGB _ _ _ 1 → ← Projector OK CONTROL ITEM POWER SETTING INPUT SWITCHING COMMAND PARAMETER C1 C2 C3 C4 P1 P2 P3 P4 CONTROL CONTENTS P O W R _ _ _ 0 POWER OFF (STANDBY) P O W R _ _ _ 1 POWER...
... code is being sent, send each adjustment menu and checking the status with the On-screen Display. Command format C1 C2 C3 C4 P1 P2 P3 P4 Return code (0DH) Command 4-digit Response code format Normal response Parameter 4-digit O K Return code (0DH) Problem response (Failure due to the computer. Computer I RGB _ _ _ 1 → ← Projector OK CONTROL ITEM POWER SETTING INPUT SWITCHING COMMAND PARAMETER C1 C2 C3 C4 P1 P2 P3 P4 CONTROL CONTENTS P O W R _ _ _ 0 POWER OFF (STANDBY) P O W R _ _ _ 1 POWER...
PG-M15S , PG-M15X Operation Manual
Page 56
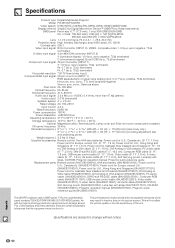
Specifications Product type Digital Multimedia Projector Model PG-M15X/PG-M15S Video system NTSC/NTSC 4.43/PAL/PAL-M/PAL-N/PAL 60/SECAM/DTV480i Display method Single Chip Digital Micromirror Device™ (DMD™) by Texas Instruments DMD panel Panel size: 0.7Љ (17.8 mm), 1 chip XGA DMD/SVGA DMD No. SIGNAL: Same as above Pixel clock 25-135 MHz Vertical frequency 56-85 Hz Horizontal frequency 31.5-80 kHz Audio input signal 3.5 ø MINIJACK: AUDIO, 0.4 Vrms, more...
Specifications Product type Digital Multimedia Projector Model PG-M15X/PG-M15S Video system NTSC/NTSC 4.43/PAL/PAL-M/PAL-N/PAL 60/SECAM/DTV480i Display method Single Chip Digital Micromirror Device™ (DMD™) by Texas Instruments DMD panel Panel size: 0.7Љ (17.8 mm), 1 chip XGA DMD/SVGA DMD No. SIGNAL: Same as above Pixel clock 25-135 MHz Vertical frequency 56-85 Hz Horizontal frequency 31.5-80 kHz Audio input signal 3.5 ø MINIJACK: AUDIO, 0.4 Vrms, more...
PG-M15S , PG-M15X Operation Manual
Page 59
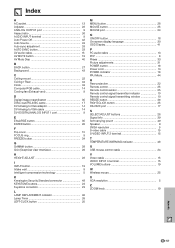
... On-screen display language 30 OSD Display 41 P PC audio cable 13 PDF 8 Phase 33 Picture adjustments 31 POWER button 18 Power cord 13 POWER indicator 18 PRJ Mode 44 R Rear projection 22 Remote control 25 Remote control sensor 25 Remote control signal transmitter indicator 10 Remote control signal transmitting window 10 RESIZE button 36 RIGHT-CLICK button 25 RS-232C port 17 S SELECT/ADJUST buttons 26 Signal Info 39 Soft carrying pouch 49 Speaker 9 SVGA resolution 5 S-video cable 15 S-VIDEO INPUT 2 terminal 15 T TEMPERATURE WARNING indicator 46 U USB mouse control cable...
... On-screen display language 30 OSD Display 41 P PC audio cable 13 PDF 8 Phase 33 Picture adjustments 31 POWER button 18 Power cord 13 POWER indicator 18 PRJ Mode 44 R Rear projection 22 Remote control 25 Remote control sensor 25 Remote control signal transmitter indicator 10 Remote control signal transmitting window 10 RESIZE button 36 RIGHT-CLICK button 25 RS-232C port 17 S SELECT/ADJUST buttons 26 Signal Info 39 Soft carrying pouch 49 Speaker 9 SVGA resolution 5 S-video cable 15 S-VIDEO INPUT 2 terminal 15 T TEMPERATURE WARNING indicator 46 U USB mouse control cable...


