

Operation Manual
Page 5
... the beam of actual set. Do not stare into the beam of light. U.S.A. The cable is a Class A product. Be especially careful that the device complies with the operation manual, may cause radio interference in a commercial environment. PG-M25X#E#p01_07.p65 1 -1 02.4.29, 3:06 PM DO NOT REMOVE SCREWS EXCEPT SPECIFIED USER SERVICE SCREWS. REFER SERVICING TO QUALIFIED SERVICE PERSONNEL. U.S.A. ONLY WARNING: This is provided...
... the beam of actual set. Do not stare into the beam of light. U.S.A. The cable is a Class A product. Be especially careful that the device complies with the operation manual, may cause radio interference in a commercial environment. PG-M25X#E#p01_07.p65 1 -1 02.4.29, 3:06 PM DO NOT REMOVE SCREWS EXCEPT SPECIFIED USER SERVICE SCREWS. REFER SERVICING TO QUALIFIED SERVICE PERSONNEL. U.S.A. ONLY WARNING: This is provided...

Operation Manual
Page 6
... a small amount of the FCC rules. LAMP REPLACEMENT CAUTION BEFORE REMOVING THE SCREW, DISCONNECT POWER CORD. NE REMPLACER QUE PAR UNE LAMPE SHARP DE TYPE BQC-PGM20X//1. "Operation is turned off always use the POWER button on the projector or on page 111. During normal operation, when turning the power off . Disposal of the device". Caution Concerning the Lamp Replacement See "Replacing the Lamp" on the remote control. HANDLE WITH CARE. CANADA ONLY...
... a small amount of the FCC rules. LAMP REPLACEMENT CAUTION BEFORE REMOVING THE SCREW, DISCONNECT POWER CORD. NE REMPLACER QUE PAR UNE LAMPE SHARP DE TYPE BQC-PGM20X//1. "Operation is turned off always use the POWER button on the projector or on page 111. During normal operation, when turning the power off . Disposal of the device". Caution Concerning the Lamp Replacement See "Replacing the Lamp" on the remote control. HANDLE WITH CARE. CANADA ONLY...

Operation Manual
Page 9
... View 15 GyroRemote 16 Inserting the Batteries 17 Replacing the Batteries 17 The GyroRemote 18 GyroRemote Features 18 Calibrating the GyroRemote 19 Accessories 20 Setup and Connections Setup 22 Using the Adjustment Feet 22 Setting up the Screen 23 Screen Size and Projection Distance 24 Projecting a Reversed/Inverted Image 25 Connecting the Projector to Other Devices .... 26 Before Connecting 26 Connecting the Power Cord 26 Connecting the Projector to a Computer ......... 27 Connecting to Video Equipment 29 Installing / Removing...
... View 15 GyroRemote 16 Inserting the Batteries 17 Replacing the Batteries 17 The GyroRemote 18 GyroRemote Features 18 Calibrating the GyroRemote 19 Accessories 20 Setup and Connections Setup 22 Using the Adjustment Feet 22 Setting up the Screen 23 Screen Size and Projection Distance 24 Projecting a Reversed/Inverted Image 25 Connecting the Projector to Other Devices .... 26 Before Connecting 26 Connecting the Power Cord 26 Connecting the Projector to a Computer ......... 27 Connecting to Video Equipment 29 Installing / Removing...

Operation Manual
Page 10
... the Default Settings 105 Displaying the Adjustment Settings 106 Overview of ALL Menu Settings 106 Appendix Carrying the Projector 108 How to Use the Carrying Case 108 Maintenance 109 Maintenance Indicators 110 Regarding the Lamp 111 Lamp 111 Caution Concerning the Lamp 111 Replacing the Lamp 111 Removing and Installing the Lamp Unit 112 Resetting the Lamp Timer 113 Connecting Pin Assignments 114 Computer Compatibility Chart 115 Troubleshooting 116 For SHARP Assistance 118 Specifications 119 PG...
... the Default Settings 105 Displaying the Adjustment Settings 106 Overview of ALL Menu Settings 106 Appendix Carrying the Projector 108 How to Use the Carrying Case 108 Maintenance 109 Maintenance Indicators 110 Regarding the Lamp 111 Lamp 111 Caution Concerning the Lamp 111 Replacing the Lamp 111 Removing and Installing the Lamp Unit 112 Resetting the Lamp Timer 113 Connecting Pin Assignments 114 Computer Compatibility Chart 115 Troubleshooting 116 For SHARP Assistance 118 Specifications 119 PG...
Operation Manual
Page 15
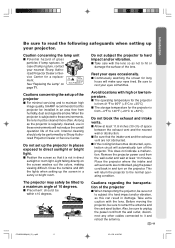
... cooling fan becomes obstructed, a protection circuit will make your eyes tired. Do not set up the screen in direct sunlight or room light. I The operating temperature for long hours will automatically turn on the screen washes out the colors, making viewing difficult. Introduction Be sure to read the following safeguards when setting up your nearest Sharp Autho- Cautions concerning the setup of the lens. Remove the projector power cord...
... cooling fan becomes obstructed, a protection circuit will make your eyes tired. Do not set up the screen in direct sunlight or room light. I The operating temperature for long hours will automatically turn on the screen washes out the colors, making viewing difficult. Introduction Be sure to read the following safeguards when setting up your nearest Sharp Autho- Cautions concerning the setup of the lens. Remove the projector power cord...

Operation Manual
Page 16
... not indicate malfunction. • Do not unplug the power cord during projector operation due to make the connections AFTER turning off the projector and the equipment to rise, the lamp will turn off, the TEMPERA- I Please read the operation manuals of the projector and the equipment to be connected for instructions on how to changes in . Using the projector in internal temperature, as the cooling fan also stops. -12 PG-M25X...
... not indicate malfunction. • Do not unplug the power cord during projector operation due to make the connections AFTER turning off the projector and the equipment to rise, the lamp will turn off, the TEMPERA- I Please read the operation manuals of the projector and the equipment to be connected for instructions on how to changes in . Using the projector in internal temperature, as the cooling fan also stops. -12 PG-M25X...
Operation Manual
Page 18
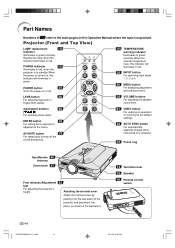
... the default settings. 63 AUTO SYNC button For automatically adjusting images when connected to the main pages in this Operation Manual where the topic is turned on, this indicator will illuminate in green. When the power is explained. When the internal temperature rises, this indicator will illuminate in red. 35 INPUT button For switching input mode 1, 2, 3 or 4. 50 MENU button For displaying adjustment and setting screens. 35 VOLUME buttons For adjusting the speaker sound level. Replace the lamp when the indicator illuminates in green normally. Adjustment buttons...
... the default settings. 63 AUTO SYNC button For automatically adjusting images when connected to the main pages in this Operation Manual where the topic is turned on, this indicator will illuminate in green. When the power is explained. When the internal temperature rises, this indicator will illuminate in red. 35 INPUT button For switching input mode 1, 2, 3 or 4. 50 MENU button For displaying adjustment and setting screens. 35 VOLUME buttons For adjusting the speaker sound level. Replace the lamp when the indicator illuminates in green normally. Adjustment buttons...

Operation Manual
Page 27
... size of the screen. Setup and Connections Setting up the screen in a sunny or bright room. • A polarizing screen cannot be centered in the middle of the screen. P.24 • The default setting can be distorted, making viewing difficult. adjust the setting to "Front" in front of Standard Setup • The distance from the screen to the screen with this projector. Note • The projector lens should be used , when plac- PG...
... size of the screen. Setup and Connections Setting up the screen in a sunny or bright room. • A polarizing screen cannot be centered in the middle of the screen. P.24 • The default setting can be distorted, making viewing difficult. adjust the setting to "Front" in front of Standard Setup • The distance from the screen to the screen with this projector. Note • The projector lens should be used , when plac- PG...
Operation Manual
Page 38
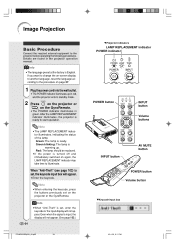
... turned off and immediately switched on the GyroRemote. • The POWER indicator illuminates in the projector operation manual. If you want to change the on-screen display to another language, reset the language according to illuminate. Green blinking: The lamp is input, the display will not appear. (See page 102.) -34 PG-M25X#E#p33_49.p65 34 MProjector indicators LAMP REPLACEMENT indicator POWER indicator POWER button INPUT button Volume buttons INPUT button AV MUTE button POWER button Volume button MKeycode input box 02.4.29, 3:11 PM Image Projection...
... turned off and immediately switched on the GyroRemote. • The POWER indicator illuminates in the projector operation manual. If you want to change the on-screen display to another language, reset the language according to illuminate. Green blinking: The lamp is input, the display will not appear. (See page 102.) -34 PG-M25X#E#p33_49.p65 34 MProjector indicators LAMP REPLACEMENT indicator POWER indicator POWER button INPUT button Volume buttons INPUT button AV MUTE button POWER button Volume button MKeycode input box 02.4.29, 3:11 PM Image Projection...

Operation Manual
Page 60
... Level A Level B Save Image Delete Sharp Custom Blue None Sharp Custom None Disable Yes (Y Cable) Lamp Timer Break Timer PRJ Mode Register R/C Keylock Level Password Anti-Theft All Reset English Deutsch Español Nederlands Français Italiano Svenska Português Front Ceiling + Front Rear Ceiling + Rear Normal Level A Level B Old Password New Password Reconfirm Old Code New Code Reconfirm Note Status Page 106 • The resolution, vertical frequency and...
... Level A Level B Save Image Delete Sharp Custom Blue None Sharp Custom None Disable Yes (Y Cable) Lamp Timer Break Timer PRJ Mode Register R/C Keylock Level Password Anti-Theft All Reset English Deutsch Español Nederlands Français Italiano Svenska Português Front Ceiling + Front Rear Ceiling + Rear Normal Level A Level B Old Password New Password Reconfirm Old Code New Code Reconfirm Note Status Page 106 • The resolution, vertical frequency and...

Operation Manual
Page 106
... "Password" is set. (See page 100.) • When "Anti-Theft" is not correctly entered in the "Options (2)" menu on the menu screen. ➝ For operating the menu screen, see pages 50 and 52. ➝ For operating the menu screen using the GyroRemote see pages 54 and 55. 1 Press any projection of guarantee will disable any button on the remote control or on the projector and GyroRemote) • POWER button...
... "Password" is set. (See page 100.) • When "Anti-Theft" is not correctly entered in the "Options (2)" menu on the menu screen. ➝ For operating the menu screen, see pages 50 and 52. ➝ For operating the menu screen using the GyroRemote see pages 54 and 55. 1 Press any projection of guarantee will disable any button on the remote control or on the projector and GyroRemote) • POWER button...

Operation Manual
Page 114
... the air vents, or the setting location, " " will run for repair. dicator will blink, the cooling fan will blink in the power cord and turning the power back on. (At least 5 minutes.) • If the power is running. About the LAMP REPLACEMENT indicator IWhen the lamp exceeds 1,900 cumulative hours of use reach 2,000, " " will turn off The internal temperature is active. tomatically turn on the projector indicate problems inside the projector in - LAMP REPLACE- Maintenance indicator Condition Problem...
... the air vents, or the setting location, " " will run for repair. dicator will blink, the cooling fan will blink in the power cord and turning the power back on. (At least 5 minutes.) • If the power is running. About the LAMP REPLACEMENT indicator IWhen the lamp exceeds 1,900 cumulative hours of use reach 2,000, " " will turn off The internal temperature is active. tomatically turn on the projector indicate problems inside the projector in - LAMP REPLACE- Maintenance indicator Condition Problem...

Operation Manual
Page 115
... of the picture and color quality. Purchase a replacement lamp unit of usage time. If you wish, you may indicate lamp failure. Regarding the Lamp Lamp I This projector utilizes a pressurized mercury lamp. See page 58. I When the LAMP REPLACEMENT indicator and on-screen display icon are illuminated or flash, it is also a possibility that failure can be operating normally. Then carefully change the lamp by a 90-day parts and labor limited warranty. Appendix PG-M25X...
... of the picture and color quality. Purchase a replacement lamp unit of usage time. If you wish, you may indicate lamp failure. Regarding the Lamp Lamp I This projector utilizes a pressurized mercury lamp. See page 58. I When the LAMP REPLACEMENT indicator and on-screen display icon are illuminated or flash, it is also a possibility that failure can be operating normally. Then carefully change the lamp by a 90-day parts and labor limited warranty. Appendix PG-M25X...
Operation Manual
Page 116
... until it has fully cooled down (about 1 hour). Lamp unit BQC-PGM20X//1 POWER button AC socket 3 Remove the lamp unit cover. • Insert the antenna and turn over the projector, and loosen the user service screw that came included with the lamp unit. • Make sure to remove the lamp unit by the handle. Warning! • Do not remove the lamp unit from the AC socket. • Retract...
... until it has fully cooled down (about 1 hour). Lamp unit BQC-PGM20X//1 POWER button AC socket 3 Remove the lamp unit cover. • Insert the antenna and turn over the projector, and loosen the user service screw that came included with the lamp unit. • Make sure to remove the lamp unit by the handle. Warning! • Do not remove the lamp unit from the AC socket. • Retract...

Operation Manual
Page 117
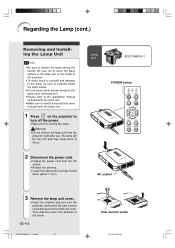
.... Resetting the Lamp Timer Reset the lamp timer after replacing the lamp. 1 Connect the power cord. • Plug the power cord into the lamp unit compartment. Hold the lamp unit by the handle and pull it in the direction of the projector. 2 Reset the lamp timer. •While pressing simultaneously User service screw AC socket , , and on the projec- Securing screw Info • If the lamp unit and lamp cover are not correctly installed, the power will not turn...
.... Resetting the Lamp Timer Reset the lamp timer after replacing the lamp. 1 Connect the power cord. • Plug the power cord into the lamp unit compartment. Hold the lamp unit by the handle and pull it in the direction of the projector. 2 Reset the lamp timer. •While pressing simultaneously User service screw AC socket , , and on the projec- Securing screw Info • If the lamp unit and lamp cover are not correctly installed, the power will not turn...
Operation Manual
Page 121
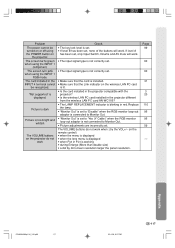
... installed. • Make sure that the Link indicator on the remote control) • when the menu is displayed • when the lens menu is displayed • when Pict in Pict is blinking in the projector different from the wireless LAN PC card AN-WC11B? • The LAMP REPLACEMENT indicator is working • during Enlarge (More than double size) • a dot by dot screen resolution larger the panel resolution. Problem The power cannot be recognized. Picture is dark Picture...
... installed. • Make sure that the Link indicator on the remote control) • when the menu is displayed • when the lens menu is displayed • when Pict in Pict is blinking in the projector different from the wireless LAN PC card AN-WC11B? • The LAMP REPLACEMENT indicator is working • during Enlarge (More than double size) • a dot by dot screen resolution larger the panel resolution. Problem The power cannot be recognized. Picture is dark Picture...

Operation Manual
Page 122
... 971-4-81-5311 [email protected].sharp.co.jp Sharp Thebnakorn Co. For SHARP Assistance If you encounter any problems during setup or operation of this operation manual does not answer your question, please contact the SHARP Service departments listed below. If this projector, first refer to the "Troubleshooting" section on pages 76 and 77. Italy Australia New Zealand Singapore Hong Kong Malaysia...
... 971-4-81-5311 [email protected].sharp.co.jp Sharp Thebnakorn Co. For SHARP Assistance If you encounter any problems during setup or operation of this operation manual does not answer your question, please contact the SHARP Service departments listed below. If this projector, first refer to the "Troubleshooting" section on pages 76 and 77. Italy Australia New Zealand Singapore Hong Kong Malaysia...

Operation Manual
Page 123
...), Power cord for Australia, New Zealand and Oceania (6', 1.8 m), DVI to . ceptable tolerances that the equipment must conform to 15-pin D-sub cable (6', 1.8 m), USB cable (6', 1.8 m), Carrying case, Lens cap (attached), Lens cap strap, Terminal cover (attached), CD-ROM, Operation manual, Quick reference guides, Wireless Reality operation manual, Wireless LAN PC Card IMPORTANT INFORMATION. SIGNAL: TTL level (positive/negative) VERTICAL SYNC. This very sophisticated panel contains 786,432 pixels. Specifications Product type Digital Multimedia Projector Model PG-M25X Video...
...), Power cord for Australia, New Zealand and Oceania (6', 1.8 m), DVI to . ceptable tolerances that the equipment must conform to 15-pin D-sub cable (6', 1.8 m), USB cable (6', 1.8 m), Carrying case, Lens cap (attached), Lens cap strap, Terminal cover (attached), CD-ROM, Operation manual, Quick reference guides, Wireless Reality operation manual, Wireless LAN PC Card IMPORTANT INFORMATION. SIGNAL: TTL level (positive/negative) VERTICAL SYNC. This very sophisticated panel contains 786,432 pixels. Specifications Product type Digital Multimedia Projector Model PG-M25X Video...

Operation Manual
Page 127
... a richer image by dot Mode that can lock the operation of an image. RESIZE Allows you with the same resolution. CLR Temp (Color temperature) Function that projects images in the settings of the brighter portions. Keylock Level Mode that changes cannot be used to the network. Password A password is set so that can be made in their native resolution. Glossary Advanced intelligent compression High quality resizing of the video or the DTV signals. It...
... a richer image by dot Mode that can lock the operation of an image. RESIZE Allows you with the same resolution. CLR Temp (Color temperature) Function that projects images in the settings of the brighter portions. Keylock Level Mode that changes cannot be used to the network. Password A password is set so that can be made in their native resolution. Glossary Advanced intelligent compression High quality resizing of the video or the DTV signals. It...

Operation Manual
Page 129
... accessories 20 OSD Display (On-screen display 89 Password 100 PC card 31 PDF 13 Phase 61 Pict in Pict 88 Picture adjustments 59 POINTER button 16 POWER button 14, 16 Power cord 20 POWER indicator 14 Power Save Mode 87 PRJ mode 98 Progressive Mode 60 R-CLICK/UNDO button 16 Replacing the lamp 111 Reversing/Inverting Images 98 RGB input 60 RF CH+ button 16 Save Setting 61 Select Setting 62 Signal Info 63 Signal Type 59 SMART...
... accessories 20 OSD Display (On-screen display 89 Password 100 PC card 31 PDF 13 Phase 61 Pict in Pict 88 Picture adjustments 59 POINTER button 16 POWER button 14, 16 Power cord 20 POWER indicator 14 Power Save Mode 87 PRJ mode 98 Progressive Mode 60 R-CLICK/UNDO button 16 Replacing the lamp 111 Reversing/Inverting Images 98 RGB input 60 RF CH+ button 16 Save Setting 61 Select Setting 62 Signal Info 63 Signal Type 59 SMART...


