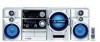

Operation Manual
Page 12
... timer mode or remote control. When the ON/STAND-BY button is harmful to the eyes, do not expose this appliance to do so. z Use of controls, adjustments or performance of the copyright. DO NOT STARE INTO BEAM OR VIEW DIRECTLY WITH OPTICAL INSTRUMENTS. CD-SW330H ENG - This unit contains dangerous voltages, always remove mains plug from the socket before any service operation and...
... timer mode or remote control. When the ON/STAND-BY button is harmful to the eyes, do not expose this appliance to do so. z Use of controls, adjustments or performance of the copyright. DO NOT STARE INTO BEAM OR VIEW DIRECTLY WITH OPTICAL INSTRUMENTS. CD-SW330H ENG - This unit contains dangerous voltages, always remove mains plug from the socket before any service operation and...
Operation Manual
Page 14
..., cable and/or other distribution channels), revenue-generating streaming applications (via Internet, intranets and/or other networks), other revenue-generating content distribution systems (pay-audio or audio-on-demand applications and the like) or on a cassette tape 26 - 28 „ Advanced Features Using the Radio Data System (RDS 29 - 34 Timer and sleep operation (Remote control only) . . . . . 35 - 38 Enhancing your SHARP...
..., cable and/or other distribution channels), revenue-generating streaming applications (via Internet, intranets and/or other networks), other revenue-generating content distribution systems (pay-audio or audio-on-demand applications and the like) or on a cassette tape 26 - 28 „ Advanced Features Using the Radio Data System (RDS 29 - 34 Timer and sleep operation (Remote control only) . . . . . 35 - 38 Enhancing your SHARP...
Operation Manual
Page 15
... readily operable. z This unit should be used as newspapers, tablecloths, curtains, etc. z The AC power plug is dangerous and may result in , and then turn the volume on to full at switch on a firm, level surface free from vibration. 10 cm (4") z Keep the unit away from the wall socket. It is advisable to avoid exposure to your system does not work...
... readily operable. z This unit should be used as newspapers, tablecloths, curtains, etc. z The AC power plug is dangerous and may result in , and then turn the volume on to full at switch on a firm, level surface free from vibration. 10 cm (4") z Keep the unit away from the wall socket. It is advisable to avoid exposure to your system does not work...
Operation Manual
Page 16
... ENGLISH „ Front panel Reference page 1. Tuner (Band) Button 23 4. CD Button 13 5. Tape (1 2) Button 25 7. Disc Tray Open/Close Button 13 12. Headphone Socket 40 10. Tape 2 Cassette Compartment 25 19. Timer Indicator 36 3. Tape 1 Cassette Compartment 25 9. Disc Number Select Buttons 13 13. Disc or Tape Stop Button 15, 26 15. Disc Track Up or Fast Forward, Tape 2 Fast Forward, Tuner Preset Up, Time Up...
... ENGLISH „ Front panel Reference page 1. Tuner (Band) Button 23 4. CD Button 13 5. Tape (1 2) Button 25 7. Disc Tray Open/Close Button 13 12. Headphone Socket 40 10. Tape 2 Cassette Compartment 25 19. Timer Indicator 36 3. Tape 1 Cassette Compartment 25 9. Disc Number Select Buttons 13 13. Disc or Tape Stop Button 15, 26 15. Disc Track Up or Fast Forward, Tape 2 Fast Forward, Tuner Preset Up, Time Up...

Operation Manual
Page 17
... Information „ Rear panel Reference page 1. Subwoofer Light-up Sockets 8 8. Dynamic PTY Indicator 29 9. Extra Bass Indicator 11 21. Timer Recording Indicator 36 13. FM Stereo Receiving Indicator 23 18. Disc Repeat Play Indicator 17 22. AC Power lead 9 3. 12 1 2 3 4 5 6 7 8 9 10 11 12 13 20 21 15 16 17 14 18 22 23 19 3 4 5 6 7 8 9 10 AC INPUT „ Display Reference page 1. WMA...
... Information „ Rear panel Reference page 1. Subwoofer Light-up Sockets 8 8. Dynamic PTY Indicator 29 9. Extra Bass Indicator 11 21. Timer Recording Indicator 36 13. FM Stereo Receiving Indicator 23 18. Disc Repeat Play Indicator 17 22. AC Power lead 9 3. 12 1 2 3 4 5 6 7 8 9 10 11 12 13 20 21 15 16 17 14 18 22 23 19 3 4 5 6 7 8 9 10 AC INPUT „ Display Reference page 1. WMA...

Operation Manual
Page 19
... 25. Disc Random Button 17 15. Tuning Down, Cursor Down Button 23 26. RDS ASPM Button 29 31. Disc Play or Repeat Button 13 20. Tuning Up, Cursor Up Button 23 5 23. Character Input/Disc Direct Search Buttons 16, 21 8 15 19 5. Tape Stop Button 26 3 24 25 17. Remote Control Transmitter 10 1 13 17 2. Extra Bass (Surround)/Demo Button 11 2 9 10 16 20 7. Equaliser Mode Select Button 11 6. Tape 2 Record Pause Button 27...
... 25. Disc Random Button 17 15. Tuning Down, Cursor Down Button 23 26. RDS ASPM Button 29 31. Disc Play or Repeat Button 13 20. Tuning Up, Cursor Up Button 23 5 23. Character Input/Disc Direct Search Buttons 16, 21 8 15 19 5. Tape Stop Button 26 3 24 25 17. Remote Control Transmitter 10 1 13 17 2. Extra Bass (Surround)/Demo Button 11 2 9 10 16 20 7. Equaliser Mode Select Button 11 6. Tape 2 Record Pause Button 27...
Operation Manual
Page 21
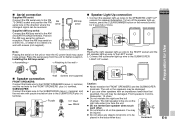
... for Use Wall Screws (not supplied) „ Speaker connection FRONT SPEAKERS: Connect the black wire to the FRONT SPEAKERS minus (-) terminal, and the red wire to the wall > „ Speaker Light-Up connection 1. The right speaker is the one on the speakers. Position the AM loop aerial for better reception. To turn off the speaker light-up wire to the RIGHT socket and the left channels. Purple Red Black AC INPUT AC INPUT Caution...
... for Use Wall Screws (not supplied) „ Speaker connection FRONT SPEAKERS: Connect the black wire to the FRONT SPEAKERS minus (-) terminal, and the red wire to the wall > „ Speaker Light-Up connection 1. The right speaker is the one on the speakers. Position the AM loop aerial for better reception. To turn off the speaker light-up wire to the RIGHT socket and the left channels. Purple Red Black AC INPUT AC INPUT Caution...
Operation Manual
Page 22
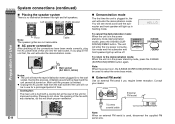
... in the power stand-by mode, press the X-BASS (SURROUND)/DEMO button again. CD-SW330H ENGLISH System connections (continued) „ Placing the speaker system There is used to select the extra bass mode. „ External FM aerial Use an external FM aerial if you plug in the unit first, the unit will enter the low power consumption mode and the subwoofer and front speaker light up in flashing mode. Wait until...
... in the power stand-by mode, press the X-BASS (SURROUND)/DEMO button again. CD-SW330H ENGLISH System connections (continued) „ Placing the speaker system There is used to select the extra bass mode. „ External FM aerial Use an external FM aerial if you plug in the unit first, the unit will enter the low power consumption mode and the subwoofer and front speaker light up in flashing mode. Wait until...
Operation Manual
Page 24
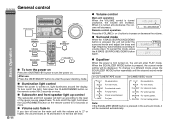
... change to the level of the music source played back. In CD/TUNER/TAPE mode In GAME/VIDEO mode FLAT No equalisation. ROCK For rock music. To turn on/off and on the main unit with the volume set level. „ Volume control Main unit operation: When the VOLUME control is turned anti-clockwise, the vol- When the EQUALIZER MODE button is first turned on, the unit will enter the surround mode and adjust low bass and high frequency...
... change to the level of the music source played back. In CD/TUNER/TAPE mode In GAME/VIDEO mode FLAT No equalisation. ROCK For rock music. To turn on/off and on the main unit with the volume set level. „ Volume control Main unit operation: When the VOLUME control is turned anti-clockwise, the vol- When the EQUALIZER MODE button is first turned on, the unit will enter the surround mode and adjust low bass and high frequency...
Operation Manual
Page 25
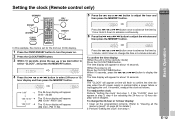
... "CLOCK" will appear or time will appear for the 24-hour (0:00) display. 1 Press the ON/STAND-BY button to adjust the minutes and then press the MEMORY button. Hold it down to advance continuously. 6 Press the or button to turn the power on ] Press the CLOCK/TIMER button. play when the AC power supply is set for about 10 seconds.
... "CLOCK" will appear or time will appear for the 24-hour (0:00) display. 1 Press the ON/STAND-BY button to adjust the minutes and then press the MEMORY button. Hold it down to advance continuously. 6 Press the or button to turn the power on ] Press the CLOCK/TIMER button. play when the AC power supply is set for about 10 seconds.
Operation Manual
Page 26
... remote control): The unit turns on . It is 32 ~ 320 kbps. E-13 Auto power off function: In the stop mode of audio code which is supported by WMA is processed by Microsoft as an audio format file for recording. CD-SW330H ENGLISH Listening to the state of inactivity. Auto power on them. WMA: WMA files are Advanced System Format files that was used for Windows Media Player...
... remote control): The unit turns on . It is 32 ~ 320 kbps. E-13 Auto power off function: In the stop mode of audio code which is supported by WMA is processed by Microsoft as an audio format file for recording. CD-SW330H ENGLISH Listening to the state of inactivity. Auto power on them. WMA: WMA files are Advanced System Format files that was used for Windows Media Player...
Operation Manual
Page 29
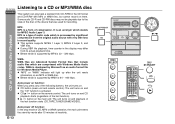
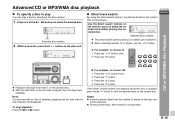
... "0" button. Use the direct search buttons on the current disc can be selected. A. CD or MP3/WMA disc Playback z Playback will disappear. z During random play a disc by specifying the disc number. 1 Press one of tracks on the chosen disc. E-16 z When selecting number 10 or higher, use the "+10" button. For example, to select the desired disc. „ Direct track search By using the direct search buttons, the desired tracks on the remote control...
... "0" button. Use the direct search buttons on the current disc can be selected. A. CD or MP3/WMA disc Playback z Playback will disappear. z During random play a disc by specifying the disc number. 1 Press one of tracks on the chosen disc. E-16 z When selecting number 10 or higher, use the "+10" button. For example, to select the desired disc. „ Direct track search By using the direct search buttons, the desired tracks on the remote control...
Operation Manual
Page 36
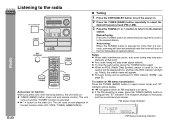
... weak signal stations. z If the FM reception is in stereo. z Auto scan tuning will appear. To receive an FM stereo transmission: Press the TUNER (BAND) button to select stereo mode and "ST" indicator will light up. The reception changes to extinguish the "ST" indicator. Radio Listening to the radio CD-SW330H ENGLISH Auto power on function: When you press any of the last function starts (CD, TAPE, TUNER, GAME/VIDEO). „ Tuning 1 Press...
... weak signal stations. z If the FM reception is in stereo. z Auto scan tuning will appear. To receive an FM stereo transmission: Press the TUNER (BAND) button to select stereo mode and "ST" indicator will light up. The reception changes to extinguish the "ST" indicator. Radio Listening to the radio CD-SW330H ENGLISH Auto power on function: When you press any of the last function starts (CD, TAPE, TUNER, GAME/VIDEO). „ Tuning 1 Press...
Operation Manual
Page 37
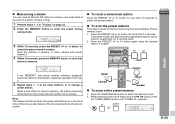
... the ON/STAND-BY button to change a preset station. Radio If the "MEMORY" and preset number indicators disappear before the station is memorised, repeat the operation from step 2. 5 Repeat steps 1 - 4 to set other stations, or to enter the stand-by mode. 2 Whilst pressing down the button and the button, press the TUNER (BAND) button until "TUNER CL" appears. The preset number will flash and the programmed stations will be tuned in memory can...
... the ON/STAND-BY button to change a preset station. Radio If the "MEMORY" and preset number indicators disappear before the station is memorised, repeat the operation from step 2. 5 Repeat steps 1 - 4 to set other stations, or to enter the stand-by mode. 2 Whilst pressing down the button and the button, press the TUNER (BAND) button until "TUNER CL" appears. The preset number will flash and the programmed stations will be tuned in memory can...

Operation Manual
Page 38
... of the last function starts (CD, TAPE, TUNER, GAME/VIDEO). Auto power off function: In the stop mode of the last function). z TAPE button (main unit and remote control): The unit turns on and play indicator Auto power on function: When you want to listen to turn the power on. 2 Open the cassette com- CD-SW330H ENGLISH Listening to start playback. z TAPE button on the remote control: The unit turns on and the...
... of the last function starts (CD, TAPE, TUNER, GAME/VIDEO). Auto power off function: In the stop mode of the last function). z TAPE button (main unit and remote control): The unit turns on and play indicator Auto power on function: When you want to listen to turn the power on. 2 Open the cassette com- CD-SW330H ENGLISH Listening to start playback. z TAPE button on the remote control: The unit turns on and the...
Operation Manual
Page 48
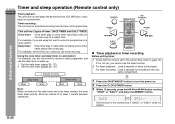
... button to be played. Set the clock to record a programme on a radio station. This unit has 2 types of at a preset time. CD-SW330H ENGLISH Timer and sleep operation (Remote control only) Timer playback: The unit turns on and plays the desired source (CD, MP3 disc, tuner, tape) at the preset time. Daily timer: Daily timer play or once timer recording works for recording in combination: For example, use...
... button to be played. Set the clock to record a programme on a radio station. This unit has 2 types of at a preset time. CD-SW330H ENGLISH Timer and sleep operation (Remote control only) Timer playback: The unit turns on and plays the desired source (CD, MP3 disc, tuner, tape) at the preset time. Daily timer: Daily timer play or once timer recording works for recording in combination: For example, use...

Operation Manual
Page 49
... playback source: CD, TUNER, TAPE 1 or TAPE 2. Continued to adjust the hour and then press the MEMORY button. 9 Switch input with the or press the MEMORY button. Do not turn the volume up and the unit is ready for timer playback or timer recording. z If a station has not been programmed, "NO PRESET" will be displayed and timer setting will be cancelled. 10 Adjust the volume using the VOLUME control...
... playback source: CD, TUNER, TAPE 1 or TAPE 2. Continued to adjust the hour and then press the MEMORY button. 9 Switch input with the or press the MEMORY button. Do not turn the volume up and the unit is ready for timer playback or timer recording. z If a station has not been programmed, "NO PRESET" will be displayed and timer setting will be cancelled. 10 Adjust the volume using the VOLUME control...

Operation Manual
Page 52
.../VIDEO button (main unit and remote control): The unit turns on and the "GAME" function is not included. Note: To prevent noise interference, place the unit away from the supplied speakers and images on . 4 Press the GAME/VIDEO button. 5 Play the connected equipment. You can enjoy sounds from the television. GAME or VCR, DVD, etc. To the line output sockets White Red Yellow Yellow White Red Video cable...
.../VIDEO button (main unit and remote control): The unit turns on and the "GAME" function is not included. Note: To prevent noise interference, place the unit away from the supplied speakers and images on . 4 Press the GAME/VIDEO button. 5 Play the connected equipment. You can enjoy sounds from the television. GAME or VCR, DVD, etc. To the line output sockets White Red Yellow Yellow White Red Video cable...
Operation Manual
Page 53
... the disc distorted or scratched? properly. Adjust the volume using the VOLUME control. dle or is pressed, z Set the unit to page 12.) z When a button is not performed dards? CD-SW330H ENGLISH „ General Symptom Possible cause z The clock is 32 ohms. z Plugging in or unplugging the headphones, reduce the volume. z Are the speaker wires disconnected? by the owner without calling a service technician. E-40...
... the disc distorted or scratched? properly. Adjust the volume using the VOLUME control. dle or is pressed, z Set the unit to page 12.) z When a button is not performed dards? CD-SW330H ENGLISH „ General Symptom Possible cause z The clock is 32 ohms. z Plugging in or unplugging the headphones, reduce the volume. z Are the speaker wires disconnected? by the owner without calling a service technician. E-40...
Operation Manual
Page 55
... including clock, timer settings, tuner preset, and CD programme. Note: If neither operation above restores the unit, clear all the memory by mode and turn the power on. CD-SW330H ENGLISH „ Care of dirt on again. 2 If the unit is operated incorrectly, it . „ Clearing all the memory (reset) 1 Press the ON/STAND-BY button to the stand-by...
... including clock, timer settings, tuner preset, and CD programme. Note: If neither operation above restores the unit, clear all the memory by mode and turn the power on. CD-SW330H ENGLISH „ Care of dirt on again. 2 If the unit is operated incorrectly, it . „ Clearing all the memory (reset) 1 Press the ON/STAND-BY button to the stand-by...


