
XG-MB70X Operation Manual
Page 5
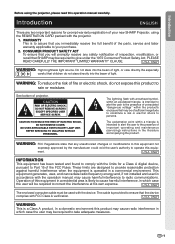
... user will promptly receive any unauthorized changes or modifications to this operation manual carefully. REFER SERVICING TO QUALIFIED SERVICE PERSONNEL. Operation of inspection, modification, or recall that children do not expose this equipment in a residential area is operated in a commercial environment. DO NOT REMOVE SCREWS EXCEPT SPECIFIED USER SERVICE SCREW. WARNING: FCC Regulations state that you will be of light, or view directly. This equipment generates, uses...
... user will promptly receive any unauthorized changes or modifications to this operation manual carefully. REFER SERVICING TO QUALIFIED SERVICE PERSONNEL. Operation of inspection, modification, or recall that children do not expose this equipment in a residential area is operated in a commercial environment. DO NOT REMOVE SCREWS EXCEPT SPECIFIED USER SERVICE SCREW. WARNING: FCC Regulations state that you will be of light, or view directly. This equipment generates, uses...
XG-MB70X Operation Manual
Page 6
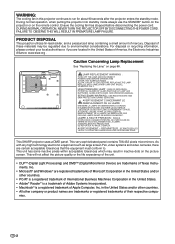
.... SERVICEMAN-WARNING : USE RADIATION EYE AND SKIN PROTECTION DURING SERVICING. This SHARP projector uses a DMD panel. As with any high technology electronic equipment such as large screen TVs, video systems and video cameras, there are trademarks or registered trademarks of their respective compa- During normal operation, when putting the projector into standby mode always use the STANDBY button on the projector or on page 66. DURING NORMAL OPERATION, NEVER TURN THE PROJECTOR OFF...
.... SERVICEMAN-WARNING : USE RADIATION EYE AND SKIN PROTECTION DURING SERVICING. This SHARP projector uses a DMD panel. As with any high technology electronic equipment such as large screen TVs, video systems and video cameras, there are trademarks or registered trademarks of their respective compa- During normal operation, when putting the projector into standby mode always use the STANDBY button on the projector or on page 66. DURING NORMAL OPERATION, NEVER TURN THE PROJECTOR OFF...
XG-MB70X Operation Manual
Page 8
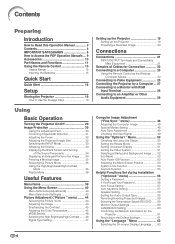
... 23 Using the Remote Control as the Wireless Computer Mouse 24 Connecting to Video Equipment 25 Controlling the Projector by a Computer ... 27 Connecting to a Monitor with RGB Input Terminal 28 Connecting to an Amplifier or Other Audio Equipment 28 Computer Image Adjustment ("Fine Sync " menu 48 Adjusting the Computer Image 48 Special Modes Setting 48 Auto Sync Adjustment 49 Checking the Input Signal 49 Using the "Options1 " Menu 50 Checking the Lamp Life Status 50 Setting the Resize Mode 50 Setting On-screen Display 51 Setting the Video System...
... 23 Using the Remote Control as the Wireless Computer Mouse 24 Connecting to Video Equipment 25 Controlling the Projector by a Computer ... 27 Connecting to a Monitor with RGB Input Terminal 28 Connecting to an Amplifier or Other Audio Equipment 28 Computer Image Adjustment ("Fine Sync " menu 48 Adjusting the Computer Image 48 Special Modes Setting 48 Auto Sync Adjustment 49 Checking the Input Signal 49 Using the "Options1 " Menu 50 Checking the Lamp Life Status 50 Setting the Resize Mode 50 Setting On-screen Display 51 Setting the Video System...

XG-MB70X Operation Manual
Page 11
...; For minimal servicing and to the normal operating condition. As long as not to these environments will cause eye strain. Internal cleaning should be installed in and turn on the screen washes out the colors, making viewing difficult. Close the curtains and dim the lights when setting up the projector in direct sunlight or room light. Rest your eyes. Remove the projector power cord from humidity...
...; For minimal servicing and to the normal operating condition. As long as not to these environments will cause eye strain. Internal cleaning should be installed in and turn on the screen washes out the colors, making viewing difficult. Close the curtains and dim the lights when setting up the projector in direct sunlight or room light. Rest your eyes. Remove the projector power cord from humidity...
XG-MB70X Operation Manual
Page 12
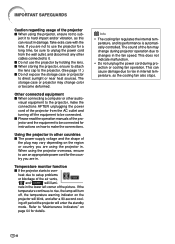
..., the lamp will turn off period the projector will enter the standby mode. Temperature monitor function ■ If the projector starts to the projector, make the connections. If the temperature continues to direct sunlight or near heat sources. Refer to changes in damage. This can result in the fan speed. This does not indicate malfunction. • Do not unplug the power cord during projector operation due to "Maintenance Indicators" on...
..., the lamp will turn off period the projector will enter the standby mode. Temperature monitor function ■ If the projector starts to the projector, make the connections. If the temperature continues to direct sunlight or near heat sources. Refer to changes in damage. This can result in the fan speed. This does not indicate malfunction. • Do not unplug the power cord during projector operation due to "Maintenance Indicators" on...
XG-MB70X Operation Manual
Page 15
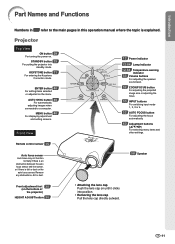
... Part Names and Functions Numbers in this operation manual where the topic is dirt or dust on the menu. Front View 12 Power indicator 12·64 Lamp indicator 12·64 Temperature warning indicator 33 Volume buttons For adjusting the speaker sound level. 32 ZOOM/FOCUS button For adjusting the projected image size or adjusting the focus. 33 INPUT buttons For switching input mode 1, 2, 3 or 4. 32 AUTO FOCUS button For adjusting the focus automatically. 40 Adjustment buttons ('/"/\/|) For selecting menu items and other settings. Remote control sensor 15 Auto focus sensor Auto focus...
... Part Names and Functions Numbers in this operation manual where the topic is dirt or dust on the menu. Front View 12 Power indicator 12·64 Lamp indicator 12·64 Temperature warning indicator 33 Volume buttons For adjusting the speaker sound level. 32 ZOOM/FOCUS button For adjusting the projected image size or adjusting the focus. 33 INPUT buttons For switching input mode 1, 2, 3 or 4. 32 AUTO FOCUS button For adjusting the focus automatically. 40 Adjustment buttons ('/"/\/|) For selecting menu items and other settings. Remote control sensor 15 Auto focus sensor Auto focus...
XG-MB70X Operation Manual
Page 21
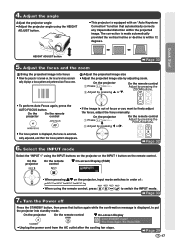
...out of : INPUT 1 INPUT 2 INPUT 3 INPUT 4 • When using the INPUT buttons on the projector or the INPUT 1 button on the remote control. Adjust the angle Adjust the projector angle • Adjust the projector angle using the HEIGHT ADJUST button. • This projector is within the projected image. cally displays a focus pattern and performs Auto Focus once. 2 Adjust the projected image size • Adjust the projected image size by pressing \ or |. • The focus pattern is displayed, the focus is turned on the projector, input mode switches in order of focus or you...
...out of : INPUT 1 INPUT 2 INPUT 3 INPUT 4 • When using the INPUT buttons on the projector or the INPUT 1 button on the remote control. Adjust the angle Adjust the projector angle • Adjust the projector angle using the HEIGHT ADJUST button. • This projector is within the projected image. cally displays a focus pattern and performs Auto Focus once. 2 Adjust the projected image size • Adjust the projected image size by pressing \ or |. • The focus pattern is displayed, the focus is turned on the projector, input mode switches in order of focus or you...

XG-MB70X Operation Manual
Page 33
... lamp indicator illuminates or blinks, indicating the status of the projector. ON button STANDBY button Turning the Power off (Putting the Projector into standby mode and immediately turned on again, the lamp may be replaced. • When switching on the projector, a slight flickering of the image may take some time to rise in this projector continues to put into Standby Mode) ▼On-screen Display 1 Press on the projector or on the remote control, then press that you want to change...
... lamp indicator illuminates or blinks, indicating the status of the projector. ON button STANDBY button Turning the Power off (Putting the Projector into standby mode and immediately turned on again, the lamp may be replaced. • When switching on the projector, a slight flickering of the image may take some time to rise in this projector continues to put into Standby Mode) ▼On-screen Display 1 Press on the projector or on the remote control, then press that you want to change...
XG-MB70X Operation Manual
Page 48
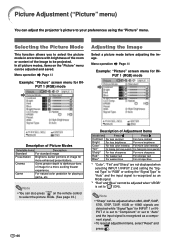
...) mode Adjusting the Image Select a picture mode before adjusting the image. Note • "Sharp" can be projected. Menu operation Page 42 Example: "Picture" screen menu for more enhanced presentations. In all adjustment items, select "Reset" and press . Game For natural color gradation for a more exciting theater experience. Picture Adjustment ("Picture" menu) You can also press on the "Picture" menu can be adjusted when "sRGB" is recognized as a component signal. • To reset all picture modes, items on the remote control...
...) mode Adjusting the Image Select a picture mode before adjusting the image. Note • "Sharp" can be projected. Menu operation Page 42 Example: "Picture" screen menu for more enhanced presentations. In all adjustment items, select "Reset" and press . Game For natural color gradation for a more exciting theater experience. Picture Adjustment ("Picture" menu) You can also press on the "Picture" menu can be adjusted when "sRGB" is recognized as a component signal. • To reset all picture modes, items on the remote control...

XG-MB70X Operation Manual
Page 55
... On-screen Displays are locked." Menu operation Page 42 Example: "Options1" screen menu for INPUT 3 (Video) mode Useful Features Description of the source signal. -51 are not (OFF) displayed. • "All buttons on Projector are displayed. • INPUT/VOLUME/AV MUTE/FREEZE/ AUTO SYNC/ENLARGE/ "An invalid button has been pressed." Note • The video signal can only be received, depending on or off. NTSC3.58 When connected to SECAM video equipment. Setting On-screen Display This function...
... On-screen Displays are locked." Menu operation Page 42 Example: "Options1" screen menu for INPUT 3 (Video) mode Useful Features Description of the source signal. -51 are not (OFF) displayed. • "All buttons on Projector are displayed. • INPUT/VOLUME/AV MUTE/FREEZE/ AUTO SYNC/ENLARGE/ "An invalid button has been pressed." Note • The video signal can only be received, depending on or off. NTSC3.58 When connected to SECAM video equipment. Setting On-screen Display This function...
XG-MB70X Operation Manual
Page 58
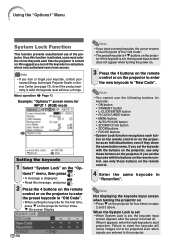
... a charge. Menu operation Page 42 Example: "Options1" screen menu for keycode: • ON button • STANDBY button • L-CLICK/ENTER button • R-CLICK/UNDO button • MENU button • AUTO FOCUS button • ZOOM/FOCUS button • ZOOM buttons • FOCUS buttons • System Lock function recognizes each time the projector is activated, users must enter the correct keycode each button on the remote control or on the projector for four times in "New Code". Note Not displaying the keycode input screen when turning the projector on...
... a charge. Menu operation Page 42 Example: "Options1" screen menu for keycode: • ON button • STANDBY button • L-CLICK/ENTER button • R-CLICK/UNDO button • MENU button • AUTO FOCUS button • ZOOM/FOCUS button • ZOOM buttons • FOCUS buttons • System Lock function recognizes each time the projector is activated, users must enter the correct keycode each button on the remote control or on the projector for four times in "New Code". Note Not displaying the keycode input screen when turning the projector on...

XG-MB70X Operation Manual
Page 72
... ", and on the projector, press on , even if the power cord is reset. -68 Handle Securing screws User service screw (for lamp unit cover) AC socket ON button ENTER button " button MENU button If you reset the lamp timer and continue to become damaged or explode. 1 Connect the power cord. • Plug the power cord into the lamp unit compartment. At this may cause the lamp to use the same lamp, this time, keep the lamp unit horizontal and do...
... ", and on the projector, press on , even if the power cord is reset. -68 Handle Securing screws User service screw (for lamp unit cover) AC socket ON button ENTER button " button MENU button If you reset the lamp timer and continue to become damaged or explode. 1 Connect the power cord. • Plug the power cord into the lamp unit compartment. At this may cause the lamp to use the same lamp, this time, keep the lamp unit horizontal and do...

XG-MB70X Operation Manual
Page 74
...; The lamp unit cover is not installed correctly. 67,68 • Cables incorrectly connected to the rear panel of the projector. • Volume is set to minimum. 44 51 47 32 19 48 48 - 23,25-28 33 Picture appears but no picture appears. noise appears. • Image adjustments are locked. operation or performance. occasionally heard caused by room temperature changes. Troubleshooting Problem No picture and no sound is heard...
...; The lamp unit cover is not installed correctly. 67,68 • Cables incorrectly connected to the rear panel of the projector. • Volume is set to minimum. 44 51 47 32 19 48 48 - 23,25-28 33 Picture appears but no picture appears. noise appears. • Image adjustments are locked. operation or performance. occasionally heard caused by room temperature changes. Troubleshooting Problem No picture and no sound is heard...
XG-MB70X Operation Manual
Page 75
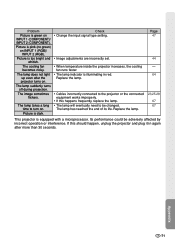
... and whitish. Picture is equipped with a microprocessor. Check • Change the input signal type setting. • Image adjustments are incorrectly set. • When temperature inside the projector increases, the cooling fan runs faster. • The lamp indicator is dark. Its performance could be changed. The lamp takes a long time to be adversely affected by incorrect operation or interference. Replace the lamp. • Cables incorrectly connected to the projector or the connected equipment works improperly. •...
... and whitish. Picture is equipped with a microprocessor. Check • Change the input signal type setting. • Image adjustments are incorrectly set. • When temperature inside the projector increases, the cooling fan runs faster. • The lamp indicator is dark. Its performance could be changed. The lamp takes a long time to be adversely affected by incorrect operation or interference. Replace the lamp. • Cables incorrectly connected to the projector or the connected equipment works improperly. •...

XG-MB70X Operation Manual
Page 76
... http://www.sharp.lu Sharp Corporation of this operation manual does not answer your question, please contact the SHARP Service departments listed below. For SHARP Assistance If you encounter any problems during setup or operation of Australia Pty. Ltd. 02-236-0170 [email protected].sharp.co.jp http://www.sharp-th.com Sharp Electronics Incorporated of Korea (82) 2-3660-2002 lcd@sharp-korea.co...
... http://www.sharp.lu Sharp Corporation of this operation manual does not answer your question, please contact the SHARP Service departments listed below. For SHARP Assistance If you encounter any problems during setup or operation of Australia Pty. Ltd. 02-236-0170 [email protected].sharp.co.jp http://www.sharp-th.com Sharp Electronics Incorporated of Korea (82) 2-3660-2002 lcd@sharp-korea.co...

Setup Guide
Page 1
...Accept All IP Addr 25 Setting of Search Port (ADVANCED[0]Search Port 26 Return to Default Settings (ADVANCED[!]Restore Default Setting 26 Return to Main Menu (ADVANCED[Q]Return to be Sent when an Error Occurs (Mail - Setting up the Projector Network Environment ... 6 1. Connecting the Projector to a Computer 7 2. MULTIMEDIA PROJECTOR MODEL XG-MB70X SETUP GUIDE Screen Size and Projection Distance 2 Connecting Pin Assignments 3 RS-232C Specifications and Commands .......... 4 Setting up a Network Connection for the Network (Network - Setting an IP Address for Sending E-mail when...
...Accept All IP Addr 25 Setting of Search Port (ADVANCED[0]Search Port 26 Return to Default Settings (ADVANCED[!]Restore Default Setting 26 Return to Main Menu (ADVANCED[Q]Return to be Sent when an Error Occurs (Mail - Setting up the Projector Network Environment ... 6 1. Connecting the Projector to a Computer 7 2. MULTIMEDIA PROJECTOR MODEL XG-MB70X SETUP GUIDE Screen Size and Projection Distance 2 Connecting Pin Assignments 3 RS-232C Specifications and Commands .......... 4 Setting up a Network Connection for the Network (Network - Setting an IP Address for Sending E-mail when...
Setup Guide
Page 4
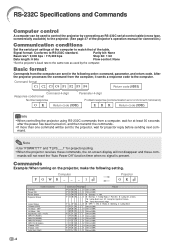
... connection.) Communication conditions Set the serial port settings of the computer to control the projector by the computer. Commands Example: When turning on -screen display will be used by connecting an RS-232C serial control cable (cross type, commercially available) to the projector. (See page 27 of the projector's operation manual for projector polling. • When the projector receives these com- mands will not reset the "Auto Power Off" function timer when no signal is present. Signal format...
... connection.) Communication conditions Set the serial port settings of the computer to control the projector by the computer. Commands Example: When turning on -screen display will be used by connecting an RS-232C serial control cable (cross type, commercially available) to the projector. (See page 27 of the projector's operation manual for projector polling. • When the projector receives these com- mands will not reset the "Auto Power Off" function timer when no signal is present. Signal format...

Setup Guide
Page 19
... IP Addr(3) [9]Accept All IP Addr [0]Search Port [!]Restore Default Setting [Q]Return to Main Menu advanced> [1]Auto Logout Time (Factory default setting : 5 minutes) Setting of time until automatic disconnection of network connection. (Page 24) [2] Data Port (Factory default setting : 10002) Setting the TCP port number used with ADVANCED SETUP MENU. [S] Save & Quit Save set up to three IP addresses allowing connection to the projector. cept All) For improved security, it is working normally. (Page 25) [6] Accept IP Addr(1) [7]Accept...
... IP Addr(3) [9]Accept All IP Addr [0]Search Port [!]Restore Default Setting [Q]Return to Main Menu advanced> [1]Auto Logout Time (Factory default setting : 5 minutes) Setting of time until automatic disconnection of network connection. (Page 24) [2] Data Port (Factory default setting : 10002) Setting the TCP port number used with ADVANCED SETUP MENU. [S] Save & Quit Save set up to three IP addresses allowing connection to the projector. cept All) For improved security, it is working normally. (Page 25) [6] Accept IP Addr(1) [7]Accept...

Setup Guide
Page 20
... : 9600 bps * Password : Not Required **********(Advanced Status)********** Data Port : 10002 Accept IP Address : Accept All Auto Logout Time : 5 minutes Search Port : 5006 1 Enter "v" and press the "Enter" key. Display IP address after change ) -> 192.168.150.3 *2 SETUP MENU [1]IP Address [2]Subnet Mask [3]Default Gateway [4]User Name [5]Password [6]RS-232C Baud Rate [7]Projector Name [A]Advanced Setup [D]Disconnect All [V]View All Setting [S]Save & Quit [Q]Quit Unchanged setup>v 3 Model Name : XG-MB70X Projector Name : XG-MB70X MAC Address : 08:00:1f...
... : 9600 bps * Password : Not Required **********(Advanced Status)********** Data Port : 10002 Accept IP Address : Accept All Auto Logout Time : 5 minutes Search Port : 5006 1 Enter "v" and press the "Enter" key. Display IP address after change ) -> 192.168.150.3 *2 SETUP MENU [1]IP Address [2]Subnet Mask [3]Default Gateway [4]User Name [5]Password [6]RS-232C Baud Rate [7]Projector Name [A]Advanced Setup [D]Disconnect All [V]View All Setting [S]Save & Quit [Q]Quit Unchanged setup>v 3 Model Name : XG-MB70X Projector Name : XG-MB70X MAC Address : 08:00:1f...
Setup Guide
Page 24
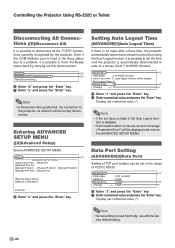
... is disabled. • If an invalid number is no input after a fixed time, the projector automatically disconnects network connection using the Auto Logout function. Note • If the set in the Busy status due to a problem, it is possible to force the Ready status back by the projector. Entering ADVANCED SETUP MENU ([A]Advanced Setup) Enters ADVANCED SETUP MENU. Normally, use with the factory default setting. -24 Controlling the Projector Using RS-232C or Telnet Disconnecting All...
... is disabled. • If an invalid number is no input after a fixed time, the projector automatically disconnects network connection using the Auto Logout function. Note • If the set in the Busy status due to a problem, it is possible to force the Ready status back by the projector. Entering ADVANCED SETUP MENU ([A]Advanced Setup) Enters ADVANCED SETUP MENU. Normally, use with the factory default setting. -24 Controlling the Projector Using RS-232C or Telnet Disconnecting All...


