
XG-NV5XU Operation Manual
Page 1
OPERATION MANUAL MODEL XG-NV5XU LCD PROJECTOR
OPERATION MANUAL MODEL XG-NV5XU LCD PROJECTOR

XG-NV5XU Operation Manual
Page 2
...SERVICEABLE PARTS EXCEPT LAMP UNIT. These limits are designed to provide reasonable protection against the list of your new SHARP LCD Projector, using the LCD projector, please read this information. This equipment generates, uses, and can radiate radio frequency energy and, if not ...REGISTRATION CARD packed with the operation manual, may cause harmful interference to radio communications. Model No.: XG-NV5XU Serial No.: There are provided to your Color LCD Projector, please record the Serial Number located on page 7. REFER SERVICING TO QUALIFIED SERVICE PERSONNEL. ONLY ...
...SERVICEABLE PARTS EXCEPT LAMP UNIT. These limits are designed to provide reasonable protection against the list of your new SHARP LCD Projector, using the LCD projector, please read this information. This equipment generates, uses, and can radiate radio frequency energy and, if not ...REGISTRATION CARD packed with the operation manual, may cause harmful interference to radio communications. Model No.: XG-NV5XU Serial No.: There are provided to your Color LCD Projector, please record the Serial Number located on page 7. REFER SERVICING TO QUALIFIED SERVICE PERSONNEL. ONLY ...

XG-NV5XU Operation Manual
Page 3
...from the "Power" Remote Control 11 Setup & Connections Setting Up the Projector and Screen 12 Standard Setup (Front Projection 12 Reversed Image Setup 12 Ceiling... Foot 14 Digital Keystone Correction 14 Connecting the Projector 15 Connecting the Projector to a Computer ...... 15 "Plug and Play" Function ...Mouse Receiver and RS-232C Port 17 Connecting the Projector to Video Equipment 17 Operation Basic Operations 18 Connect ...39 Using the Kensington Lock 40 Troubleshooting 40 Appendix Transporting the Projector 41 Connection Pin Assignments 42 RS-232C Port Specifications 42 Input ...
...from the "Power" Remote Control 11 Setup & Connections Setting Up the Projector and Screen 12 Standard Setup (Front Projection 12 Reversed Image Setup 12 Ceiling... Foot 14 Digital Keystone Correction 14 Connecting the Projector 15 Connecting the Projector to a Computer ...... 15 "Plug and Play" Function ...Mouse Receiver and RS-232C Port 17 Connecting the Projector to Video Equipment 17 Operation Basic Operations 18 Connect ...39 Using the Kensington Lock 40 Troubleshooting 40 Appendix Transporting the Projector 41 Connection Pin Assignments 42 RS-232C Port Specifications 42 Input ...
XG-NV5XU Operation Manual
Page 4
...require extensive work by the manufacturer. 22. Retain Instructions-The safety and operating instructions should never be sure to replace your LCD Projector, please be covered or blocked by following conditions: a. Use only with a cart, stand, tripod, bracket, or table ...convenience receptacles as radiators, heat registers, stoves, or other hazards. d. in fire, electric shock, or other sources, refer to this LCD Projector, observe the following basic rules for service. 19. Quick stops, excessive force, and uneven surfaces may result in proper operating condition. 21...
...require extensive work by the manufacturer. 22. Retain Instructions-The safety and operating instructions should never be sure to replace your LCD Projector, please be covered or blocked by following conditions: a. Use only with a cart, stand, tripod, bracket, or table ...convenience receptacles as radiators, heat registers, stoves, or other hazards. d. in fire, electric shock, or other sources, refer to this LCD Projector, observe the following basic rules for service. 19. Quick stops, excessive force, and uneven surfaces may result in proper operating condition. 21...

XG-NV5XU Operation Manual
Page 5
... shine the laser beam on Operation • The exhaust vent, the lamp cage cover and adjacent areas may be extremely hot during projector operation due to maintain high image quality, SHARP recommends that all internal cleaning must be installed in hazardous radiation exposure. 104˚F (ם40˚C) 41˚...
... shine the laser beam on Operation • The exhaust vent, the lamp cage cover and adjacent areas may be extremely hot during projector operation due to maintain high image quality, SHARP recommends that all internal cleaning must be installed in hazardous radiation exposure. 104˚F (ם40˚C) 41˚...

XG-NV5XU Operation Manual
Page 6
... synced computer images. 9. XGA RESOLUTION FOR HIGH RESOLUTION PRESENTATIONS With XGA (1,024 ן768) resolution, this projector can display higher and lower resolution images in detail without compromising quality. 5. These include "Stamp" functions, "Break Timer", and.... 8. CUSTOMIZABLE STARTUP SCREEN Allows you to enhance presentations. INTELLIGENT COMPRESSION AND EXPANSION By using intelligent resizing technology, this projector can display compressed UXGA (1,600 ן1,200) images. 6. DIGITAL KEYSTONE CORRECTION Digitally adjusts an image...
... synced computer images. 9. XGA RESOLUTION FOR HIGH RESOLUTION PRESENTATIONS With XGA (1,024 ן768) resolution, this projector can display higher and lower resolution images in detail without compromising quality. 5. These include "Stamp" functions, "Break Timer", and.... 8. CUSTOMIZABLE STARTUP SCREEN Allows you to enhance presentations. INTELLIGENT COMPRESSION AND EXPANSION By using intelligent resizing technology, this projector can display compressed UXGA (1,600 ן1,200) images. 6. DIGITAL KEYSTONE CORRECTION Digitally adjusts an image...

XG-NV5XU Operation Manual
Page 7
.... 7 Double click on the installation program and follow the instructions on your own language. Double click on the "saps" folder to access the Sharp Advanced Presentation Software manual. 6 Double click on the language (name of the folder) that you do not have to have not installed Acrobat Reader...Internet. (Please note that you can read any pdf file using the English version of the folder) that you need to access the projector manuals. CD-ROM Structure Root CD-ROM First folder Second folder/programs manuals nv5 saps saps acrobat saps programs nv5demo Third folder PDF ...
.... 7 Double click on the installation program and follow the instructions on your own language. Double click on the "saps" folder to access the Sharp Advanced Presentation Software manual. 6 Double click on the language (name of the folder) that you do not have to have not installed Acrobat Reader...Internet. (Please note that you can read any pdf file using the English version of the folder) that you need to access the projector manuals. CD-ROM Structure Root CD-ROM First folder Second folder/programs manuals nv5 saps saps acrobat saps programs nv5demo Third folder PDF ...

XG-NV5XU Operation Manual
Page 8
... "Troubleshooting" section on page 40. E-7 If this projector, first refer to XG-NV5X Carrying bag GCASN0001CESA CD-ROM UDSKA0001CE01 LCD projector operation manual TINS-6583CEZZ LCD projector quick reference TINS-6598CEZZ Sharp Advanced Presentation Software operation manual TINS-6601CEZZ Sharp Advanced Presentation Software quick reference TINS-6676CEZZ For SHARP Assistance (U.S.A. Or, send us an e-mail at lcdsupport...
... "Troubleshooting" section on page 40. E-7 If this projector, first refer to XG-NV5X Carrying bag GCASN0001CESA CD-ROM UDSKA0001CE01 LCD projector operation manual TINS-6583CEZZ LCD projector quick reference TINS-6598CEZZ Sharp Advanced Presentation Software operation manual TINS-6601CEZZ Sharp Advanced Presentation Software quick reference TINS-6676CEZZ For SHARP Assistance (U.S.A. Or, send us an e-mail at lcdsupport...

XG-NV5XU Operation Manual
Page 9
... button [p. 14] 7 ADJUSTMENT buttons (∂/ƒ/ ß / ©) [pp. 14, 20-36, 40] 8 LAMP REPLACEMENT indicator [pp. 18, 19, 38] 9 TEMPERATURE WARNING indi- Part Names Projector Front View 8 1 9 2 0 3 q w 4 e 5 r 6 t 7 y u i o p Side and Rear View f l : a ;
... button [p. 14] 7 ADJUSTMENT buttons (∂/ƒ/ ß / ©) [pp. 14, 20-36, 40] 8 LAMP REPLACEMENT indicator [pp. 18, 19, 38] 9 TEMPERATURE WARNING indi- Part Names Projector Front View 8 1 9 2 0 3 q w 4 e 5 r 6 t 7 y u i o p Side and Rear View f l : a ;
XG-NV5XU Operation Manual
Page 10
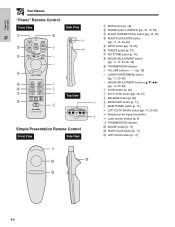
... VOL MUTE OFF BLACK SCREEN LASER TOOLS MENU 9 0 q w R/C OFF ON Side View u i 4 5 6 7 8 R-CLICK ENTER INPUT IrCOM FREEZE AUTO SYNC KEYSTONE ENLARGE MOUSE ADJ. LIGHT LCD PROJECTOR e r t y Top View Simple Presentation Remote Control Front View Side View 1 MUTE button [p. 19] 2 POWER buttons (ON/OFF) [pp. 18, 19, 39] 3 BLACK SCREEN/TOOLS button...
... VOL MUTE OFF BLACK SCREEN LASER TOOLS MENU 9 0 q w R/C OFF ON Side View u i 4 5 6 7 8 R-CLICK ENTER INPUT IrCOM FREEZE AUTO SYNC KEYSTONE ENLARGE MOUSE ADJ. LIGHT LCD PROJECTOR e r t y Top View Simple Presentation Remote Control Front View Side View 1 MUTE button [p. 19] 2 POWER buttons (ON/OFF) [pp. 18, 19, 39] 3 BLACK SCREEN/TOOLS button...
XG-NV5XU Operation Manual
Page 11
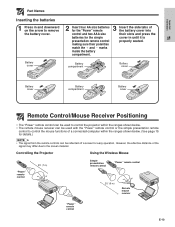
Controlling the Projector Using the Wireless Mouse 30˚ "Power" remote control 23Ј (7 m) 30˚ 45˚ 45˚ 30˚ Simple presentation remote control "Power" remote ... compartment Battery cover Battery cover Battery compartment Battery cover Remote Control/Mouse Receiver Positioning • The "Power" remote control can be used to control the projector within the ranges shown below. • The remote mouse receiver can be used with the "Power" remote control or the simple presentation remote control to...
Controlling the Projector Using the Wireless Mouse 30˚ "Power" remote control 23Ј (7 m) 30˚ 45˚ 45˚ 30˚ Simple presentation remote control "Power" remote ... compartment Battery cover Battery cover Battery compartment Battery cover Remote Control/Mouse Receiver Positioning • The "Power" remote control can be used to control the projector within the ranges shown below. • The remote mouse receiver can be used with the "Power" remote control or the simple presentation remote control to...
XG-NV5XU Operation Manual
Page 12
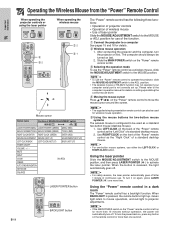
... port is not correctly set up /installing the correct mouse driver. 4 Moving the mouse cursor Press on setting up . LIGHT LCD PROJECTOR MOUSE ADJ. position for use . Using the laser pointer Slide the MOUSE/ADJUSTMENT switch to the MOUSE position, and then press LASER...For safety reasons, the laser pointer automatically goes off . Operating the Wireless Mouse from the "Power" Remote Control Important Information When operating the projector controls or using the laser pointer MOUSE ADJ. LASER POINTER/MENU LASER POINTER (GREEN) MENU (RED) BLACK SCREEN/TOOLS BLACK SCREEN (GREEN...
... port is not correctly set up /installing the correct mouse driver. 4 Moving the mouse cursor Press on setting up . LIGHT LCD PROJECTOR MOUSE ADJ. position for use . Using the laser pointer Slide the MOUSE/ADJUSTMENT switch to the MOUSE position, and then press LASER...For safety reasons, the laser pointer automatically goes off . Operating the Wireless Mouse from the "Power" Remote Control Important Information When operating the projector controls or using the laser pointer MOUSE ADJ. LASER POINTER/MENU LASER POINTER (GREEN) MENU (RED) BLACK SCREEN/TOOLS BLACK SCREEN (GREEN...

XG-NV5XU Operation Manual
Page 13
...mirror, be centered in the formula above. Setup & Connections Setting Up the Projector and Screen Position the projector perpendicular to the screen with this projector. Standard Setup (Front Projection) Place the projector at the required distance from the mirror is not perpendicular to achieve optimal ...image. Reversed Image Setup Rear projection • Place a translucent screen between the projector and the audience. • Use the projector's menu system to reverse the projected image. (See page 34 for use of this function.) • The...
...mirror, be centered in the formula above. Setup & Connections Setting Up the Projector and Screen Position the projector perpendicular to the screen with this projector. Standard Setup (Front Projection) Place the projector at the required distance from the mirror is not perpendicular to achieve optimal ...image. Reversed Image Setup Rear projection • Place a translucent screen between the projector and the audience. • Use the projector's menu system to reverse the projected image. (See page 34 for use of this function.) • The...
XG-NV5XU Operation Manual
Page 14
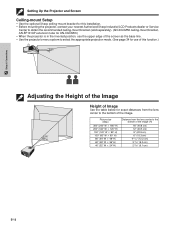
... lens center to the bottom of the image. Setup & Connections Setting Up the Projector and Screen Ceiling-mount Setup • Use the optional Sharp ceiling-mount bracket for this installation. • Before mounting the projector, contact your nearest Authorized Sharp Industrial LCD Products dealer or Service Center to obtain the recommended ceiling-mount bracket...
... lens center to the bottom of the image. Setup & Connections Setting Up the Projector and Screen Ceiling-mount Setup • Use the optional Sharp ceiling-mount bracket for this installation. • Before mounting the projector, contact your nearest Authorized Sharp Industrial LCD Products dealer or Service Center to obtain the recommended ceiling-mount bracket...
XG-NV5XU Operation Manual
Page 15
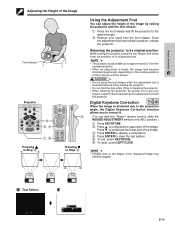
..., the Digital Keystone Correction function allows you to correct it. (For use with the foot release. 1 Press the foot release and lift the projector to the desired angle. 2 Remove your fingers caught in Step 2 ON Using the Adjustment Foot You can adjust the height of the image by... raising the projector with the "Power" remote control, slide the MOUSE/ADJUSTMENT switch to approximately 5° from the foot release. When the image is adjustable up to...
..., the Digital Keystone Correction function allows you to correct it. (For use with the foot release. 1 Press the foot release and lift the projector to the desired angle. 2 Remove your fingers caught in Step 2 ON Using the Adjustment Foot You can adjust the height of the image by... raising the projector with the "Power" remote control, slide the MOUSE/ADJUSTMENT switch to approximately 5° from the foot release. When the image is adjustable up to...

XG-NV5XU Operation Manual
Page 16
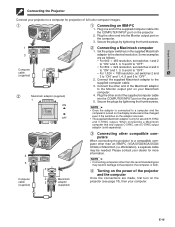
... to connect the supplied mouse control cable to a Macintosh computer, use the supplied Macintosh adaptor. Use with the projector. After making all connections, turn both the projector and the computer off. E-15 Rear terminals Connecting the Projector Setup & Connections Connecting the Projector to a Computer You can connect your projector to turn the projector on the connections.
... to connect the supplied mouse control cable to a Macintosh computer, use the supplied Macintosh adaptor. Use with the projector. After making all connections, turn both the projector and the computer off. E-15 Rear terminals Connecting the Projector Setup & Connections Connecting the Projector to a Computer You can connect your projector to turn the projector on the connections.
XG-NV5XU Operation Manual
Page 17
...Workstation), a separate cable may result in damage to "OFF". 2. Secure the plugs by tightening the thumb screws. • Once the adaptor is turned on the projector. 5. Some examples are as follows: • For 640 ן480 resolution, set switches 1 and 2 to "ON" and 3, 4, ... When connecting a Macintosh computer that only outputs C-SYNC, use with H-SYNC and V-SYNC output. Connect the other end of the projector and the computer Once the connections are reset. • The supplied Macintosh adaptor is only for projection of the supplied computer cable into...
...Workstation), a separate cable may result in damage to "OFF". 2. Secure the plugs by tightening the thumb screws. • Once the adaptor is turned on the projector. 5. Some examples are as follows: • For 640 ן480 resolution, set switches 1 and 2 to "ON" and 3, 4, ... When connecting a Macintosh computer that only outputs C-SYNC, use with H-SYNC and V-SYNC output. Connect the other end of the projector and the computer Once the connections are reset. • The supplied Macintosh adaptor is only for projection of the supplied computer cable into...
XG-NV5XU Operation Manual
Page 18
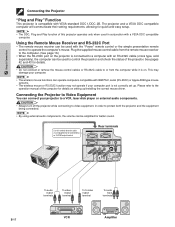
...quick and easy setup. • The DDC, Plug and Play function of this terminal when the audiovisual equipment to be used to control the projector and check the status of the computer for details. Rear terminals E-17 To audio output terminals To video output terminal To S-video output terminal...; By using external audio components, the volume can be connected has an S-VIDEO output terminal. See pages 42 and 43 for details on the projector is compatible with VESA-standard DDC 1/DDC 2B. Using the Remote Mouse Receiver and RS-232C Port • The remote mouse receiver can be ...
...quick and easy setup. • The DDC, Plug and Play function of this terminal when the audiovisual equipment to be used to control the projector and check the status of the computer for details. Rear terminals E-17 To audio output terminals To video output terminal To S-video output terminal...; By using external audio components, the volume can be connected has an S-VIDEO output terminal. See pages 42 and 43 for details on the projector is compatible with VESA-standard DDC 1/DDC 2B. Using the Remote Mouse Receiver and RS-232C Port • The remote mouse receiver can be ...

XG-NV5XU Operation Manual
Page 19
...on again, it may be emitted from the exhaust vent. The image can be used. Wait until the image on . • After the projector is ready. Red: Change the lamp. 4 Adjusting Focus Slide the focus knob until the indicator stops flashing before the lamp turns on the ... with use. When the power is not on , the LAMP REPLACEMENT indicator lights indicating the status of the lamp. E-18 Operation Basic Operations 1 2 Projector 3 ON VOL MUTE OFF BLACK SCREEN LASER TOOLS MENU R-CLICK ENTER INPUT IrCOM FREEZE AUTO SYNC 5 4 1 Connect the Power Cord Plug the supplied...
...on again, it may be emitted from the exhaust vent. The image can be used. Wait until the image on . • After the projector is ready. Red: Change the lamp. 4 Adjusting Focus Slide the focus knob until the indicator stops flashing before the lamp turns on the ... with use. When the power is not on , the LAMP REPLACEMENT indicator lights indicating the status of the lamp. E-18 Operation Basic Operations 1 2 Projector 3 ON VOL MUTE OFF BLACK SCREEN LASER TOOLS MENU R-CLICK ENTER INPUT IrCOM FREEZE AUTO SYNC 5 4 1 Connect the Power Cord Plug the supplied...

XG-NV5XU Operation Manual
Page 20
...1 f COMPUTER INPUT 2 6 Selecting and Checking the Input Mode Press INPUT SELECT on the projector or INPUT on the "Power" remote control to adjust the volume. will be turned on again by pressing POWER... ON on the projector or the "Power" remote control. Press VOLUME ם/VOLUME מ... screen is being received, "No Signal" will run for about 90 seconds. When a signal that the projector is not preset to receive is displayed. • If you accidentally pressed POWER OFF and do not want...
...1 f COMPUTER INPUT 2 6 Selecting and Checking the Input Mode Press INPUT SELECT on the projector or INPUT on the "Power" remote control to adjust the volume. will be turned on again by pressing POWER... ON on the projector or the "Power" remote control. Press VOLUME ם/VOLUME מ... screen is being received, "No Signal" will run for about 90 seconds. When a signal that the projector is not preset to receive is displayed. • If you accidentally pressed POWER OFF and do not want...


