
Setup Manual
Page 1
... URL 21 Resetting the Lamp Timer of the Projector via LAN 17 Controlling the Projector Using Internet Explorer 17 Confirming the Projector Status (Status 18 Controlling the Projector (Control 18 Setting and Adjusting the Projector (Settings & Adjustments 19 Setting the Security (Network - DATA PROJECTOR MODEL XG-SV100W XG-SV200X SETUP MANUAL Connecting Pin Assignments 2 RS-232C Speci...
... URL 21 Resetting the Lamp Timer of the Projector via LAN 17 Controlling the Projector Using Internet Explorer 17 Confirming the Projector Status (Status 18 Controlling the Projector (Control 18 Setting and Adjusting the Projector (Settings & Adjustments 19 Setting the Security (Network - DATA PROJECTOR MODEL XG-SV100W XG-SV200X SETUP MANUAL Connecting Pin Assignments 2 RS-232C Speci...
Setup Manual
Page 3
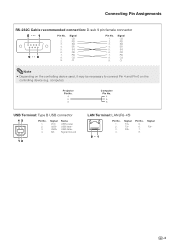
... CD RD SD ER SG DR RS CS CI Pin No. 1. 2. 3. 4. 5. 6. 7. 8. 9. USB data+ Signal Ground 12 LAN Terminal: LAN (RJ-45) 8 ... 1 Pin No. 1. 2. 3. 4. Signal RX- -3 Projector Pin No. 4 5 6 Computer Pin No. 4 5 6 USB Terminal: Type B USB connector 43 Pin No. 1. 2. 3. 4. RX+ Pin No. 5. 6. 7. 8. Signal TX+ TX- Signal CD RD SD ER SG...
... CD RD SD ER SG DR RS CS CI Pin No. 1. 2. 3. 4. 5. 6. 7. 8. 9. USB data+ Signal Ground 12 LAN Terminal: LAN (RJ-45) 8 ... 1 Pin No. 1. 2. 3. 4. Signal RX- -3 Projector Pin No. 4 5 6 Computer Pin No. 4 5 6 USB Terminal: Type B USB connector 43 Pin No. 1. 2. 3. 4. RX+ Pin No. 5. 6. 7. 8. Signal TX+ TX- Signal CD RD SD ER SG...

Setup Manual
Page 4
...(0DH) Problem response (communication error or incorrect command) ERR Return code (0DH) Info • When controlling the projector using RS-232C commands from the projector is still processing the first command, you may take some time to match that require continuous polling. If this...on , and then transmit the commands. • After sending an input selection or picture adjustment command and then receiving an "OK" response code, the projector may receive an "ERR" response code. Note • If an underbar (_) appears in the parameter column, enter a space. • If an ...
...(0DH) Problem response (communication error or incorrect command) ERR Return code (0DH) Info • When controlling the projector using RS-232C commands from the projector is still processing the first command, you may take some time to match that require continuous polling. If this...on , and then transmit the commands. • After sending an input selection or picture adjustment command and then receiving an "OK" response code, the projector may receive an "ERR" response code. Note • If an underbar (_) appears in the parameter column, enter a space. • If an ...

Setup Manual
Page 5
..., 2: Retry 3: Waiting, 4: Lamp Error 0: Off, 4: Lamp Error T P O W _ _ _ 1 1: On, 2: Cooling 0: Standby T L P N _ _ _ 11 T L T T _ _ _ 1 0 - 9999(Integer) T L T M _ _ _ 1 0, 15, 30, 45 T L T L _ _ _ 1 0% - 100%(Integer) T N A M _ _ _ 1 XGSV100W/XGSV200X M N R D _ _ _ 1 XG-SV100W/XG-SV200X P J N 1 * * * * OK or ERR P J N 2 * * * * OK or ERR P J N 3 * * * * OK or ERR P J N 0 _ _ _ 1 Projector Name I R G B _ _ _ 1 OK or ERR ERR I R G B _ _ _ 2 OK or ERR ERR I R G B _ _ _ 3 OK or ERR ERR I V E D _ _ _ 1 OK or ERR ERR I V E D _ _ _ 2 OK or ERR...
..., 2: Retry 3: Waiting, 4: Lamp Error 0: Off, 4: Lamp Error T P O W _ _ _ 1 1: On, 2: Cooling 0: Standby T L P N _ _ _ 11 T L T T _ _ _ 1 0 - 9999(Integer) T L T M _ _ _ 1 0, 15, 30, 45 T L T L _ _ _ 1 0% - 100%(Integer) T N A M _ _ _ 1 XGSV100W/XGSV200X M N R D _ _ _ 1 XG-SV100W/XG-SV200X P J N 1 * * * * OK or ERR P J N 2 * * * * OK or ERR P J N 3 * * * * OK or ERR P J N 0 _ _ _ 1 Projector Name I R G B _ _ _ 1 OK or ERR ERR I R G B _ _ _ 2 OK or ERR ERR I R G B _ _ _ 3 OK or ERR ERR I V E D _ _ _ 1 OK or ERR ERR I V E D _ _ _ 2 OK or ERR...

Setup Manual
Page 9
... ERR ERR ERR ERR ERR ERR ERR ERR ERR ERR ERR ERR ERR OK or ERR OK or ERR OK or ERR *1 For setting the projector name, send the commands in the order of PJN1, PJN2 and PJN3. *2 When "COMPUTER2 Select" is set to "Monitor Output", you may receive an "ERR..." cannot be set to "Monitor Output". *4 This command can send only when the ceiling-mount rotating module (AN-SV100T: commercially available) is connected to the projector. *5 The Lamp Timer Reset command is available only in standby mode. *6 If the lens cover is not correctly attached, you may receive an "ERR" response...
... ERR ERR ERR ERR ERR ERR ERR ERR ERR ERR ERR ERR ERR OK or ERR OK or ERR OK or ERR *1 For setting the projector name, send the commands in the order of PJN1, PJN2 and PJN3. *2 When "COMPUTER2 Select" is set to "Monitor Output", you may receive an "ERR..." cannot be set to "Monitor Output". *4 This command can send only when the ceiling-mount rotating module (AN-SV100T: commercially available) is connected to the projector. *5 The Lamp Timer Reset command is available only in standby mode. *6 If the lens cover is not correctly attached, you may receive an "ERR" response...

Setup Manual
Page 10
...4th Byte: Cover Open Status 5th Byte: Not Used, Return 0 6th Byte: Other Error Status 0: No Error Detected 1: Warning 2: Error Detected Projector Name SHARP XG-SV100W/XG-SV200X Not used for the Network (Network-General)" on 1st Byte: Fan Error Status 2nd Byte: Lamp Error Status 3rd Byte: Temp. When operating ...without authentication, do not set "Projector Name" at "Making General Setting for PJLinkTM is the same as shown below....
...4th Byte: Cover Open Status 5th Byte: Not Used, Return 0 6th Byte: Other Error Status 0: No Error Detected 1: Warning 2: Error Detected Projector Name SHARP XG-SV100W/XG-SV200X Not used for the Network (Network-General)" on 1st Byte: Fan Error Status 2nd Byte: Lamp Error Status 3rd Byte: Temp. When operating ...without authentication, do not set "Projector Name" at "Making General Setting for PJLinkTM is the same as shown below....
Setup Manual
Page 11
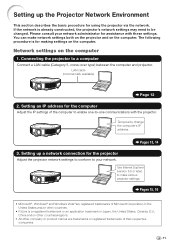
...cross-over type) between the computer and projector. Setting an IP address for assistance with the projector. Use Internet Explorer (version 6.0 or later) to be changed. You can make various projector settings. Setting up the Projector Network Environment This section describes the basic procedure...trademark in the United States and/or other countries. • PJLink is already constructed, the projector's network settings may need to make network settings both on the projector and on the computer 1. LAN cable (commercially available) Page 12 2. Please consult your network...
...cross-over type) between the computer and projector. Setting an IP address for assistance with the projector. Use Internet Explorer (version 6.0 or later) to be changed. You can make various projector settings. Setting up the Projector Network Environment This section describes the basic procedure...trademark in the United States and/or other countries. • PJLink is already constructed, the projector's network settings may need to make network settings both on the projector and on the computer 1. LAN cable (commercially available) Page 12 2. Please consult your network...
Setup Manual
Page 12
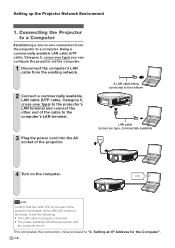
... terminal and connect the other end of the cable to the computer's LAN terminal. 3 Plug the power cord into the AC socket of the projector illuminates. Setting an IP Address for the Computer". -12 A LAN cable being connected to the network LAN cable (cross-over type) you can ...configure the projector via the computer. 1 Disconnect the computer's LAN cable from the projector to "2. If the LINK LED does not illuminate, check the following: • The LAN cable is properly connected. •...
... terminal and connect the other end of the cable to the computer's LAN terminal. 3 Plug the power cord into the AC socket of the projector illuminates. Setting an IP Address for the Computer". -12 A LAN cable being connected to the network LAN cable (cross-over type) you can ...configure the projector via the computer. 1 Disconnect the computer's LAN cable from the projector to "2. If the LINK LED does not illuminate, check the following: • The LAN cable is properly connected. •...

Setup Manual
Page 13
Setting up the Projector Network Environment 2. If you are using the administrator's account for the computer. 2 Click "start", and click "Control Panel". 2 1 3 Click "View network status and tasks" of "...
Setting up the Projector Network Environment 2. If you are using the administrator's account for the computer. 2 Click "start", and click "Control Panel". 2 1 3 Click "View network status and tasks" of "...

Setup Manual
Page 14
...: 192.168.150.3 Subnet mask: 255.255.255.0 Default gateway: (Do not input any values.) Note • The factory default settings for the projector are as follows: DHCP Client: OFF IP address: 192.168.150.2 Subnet mask: 255.255.255.0 Default gateway: 0.0.0.0 7 After setting, click the... "OK" button, and then restart the computer. Setting up the Projector Network Environment 5 Click "Internet Protocol Version 4 (TCP/IPv4)", and click the "Properties" button. 1 2 6 Confirm or change an IP address ...
...: 192.168.150.3 Subnet mask: 255.255.255.0 Default gateway: (Do not input any values.) Note • The factory default settings for the projector are as follows: DHCP Client: OFF IP address: 192.168.150.2 Subnet mask: 255.255.255.0 Default gateway: 0.0.0.0 7 After setting, click the... "OK" button, and then restart the computer. Setting up the Projector Network Environment 5 Click "Internet Protocol Version 4 (TCP/IPv4)", and click the "Properties" button. 1 2 6 Confirm or change an IP address ...

Setup Manual
Page 15
... manual for the setup screen. 3 When the screen as the projector's IP address and subnet mask are using Internet Explorer 7 or later, other setup screen may be displayed. • When you are compatible with the existing ...: 255.255.255.000 1 Start Internet Explorer (version 6.0 or later) on the right appears, click "TCP/IP". -15 Setting up the Projector Network Environment 3. Setting up a Network Connection for the Projector Settings for such items as shown on the computer, and enter "http://192.168.150.2/" in "Address", and then press the...
... manual for the setup screen. 3 When the screen as the projector's IP address and subnet mask are using Internet Explorer 7 or later, other setup screen may be displayed. • When you are compatible with the existing ...: 255.255.255.000 1 Start Internet Explorer (version 6.0 or later) on the right appears, click "TCP/IP". -15 Setting up the Projector Network Environment 3. Setting up a Network Connection for the Projector Settings for such items as shown on the computer, and enter "http://192.168.150.2/" in "Address", and then press the...
Setup Manual
Page 16
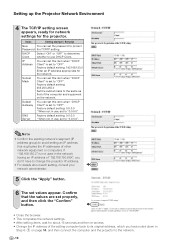
... default setting: 0.0.0.0 * When not in use, set to "OFF". Factory default setting: 192.168.150.2 Enter an IP address appropriate for the projector. Subnet Mask You can set this item when "DHCP Client" is set this item when "DHCP Client" is not used in the network having an... Click the "Apply" button. 6 The set to the network. -16 Confirm that of other network equipment or computers. Setting up the Projector Network Environment 4 The TCP/IP setting screen appears, ready for network settings for the network. Default Gateway You can set to avoid setting an IP...
... default setting: 0.0.0.0 * When not in use, set to "OFF". Factory default setting: 192.168.150.2 Enter an IP address appropriate for the projector. Subnet Mask You can set this item when "DHCP Client" is set this item when "DHCP Client" is not used in the network having an... Click the "Apply" button. 6 The set to the network. -16 Confirm that of other network equipment or computers. Setting up the Projector Network Environment 4 The TCP/IP setting screen appears, ready for network settings for the network. Default Gateway You can set to avoid setting an IP...

Setup Manual
Page 17
... commercially available LAN cable (UTP cable, Category 5, cross-over type). Controlling the Projector via LAN After connecting the projector to your network, enter the projector IP address in "Address" on Internet Explorer (version 6.0 or later) using a computer on the projector, IP address is set to "Off" on the network to start a setup screen... the LAN, use a straight-through cable. 1 Start Internet Explorer on the computer. 2 Enter "http://" followed by the projector IP address set by the procedure on page 16 followed by "/" in "3. If you did not change the IP address in "Address", ...
... commercially available LAN cable (UTP cable, Category 5, cross-over type). Controlling the Projector via LAN After connecting the projector to your network, enter the projector IP address in "Address" on Internet Explorer (version 6.0 or later) using a computer on the projector, IP address is set to "Off" on the network to start a setup screen... the LAN, use a straight-through cable. 1 Start Internet Explorer on the computer. 2 Enter "http://" followed by the projector IP address set by the procedure on page 16 followed by "/" in "3. If you did not change the IP address in "Address", ...
Setup Manual
Page 18
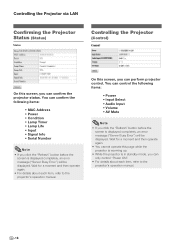
...18 Wait for a moment and then operate again. • You cannot operate this page while the projector is warming up. • While the projector is in standby mode, you can perform projector control. You can control the following items: • MAC Address • Power • Condition..., an error message ("Server Busy Error") will be displayed. You can confirm the projector status. Controlling the Projector via LAN Confirming the Projector Status (Status) Controlling the Projector (Control) 2 30 1 On this screen, you can confirm the following items: ...
...18 Wait for a moment and then operate again. • You cannot operate this page while the projector is warming up. • While the projector is in standby mode, you can perform projector control. You can control the following items: • MAC Address • Power • Condition..., an error message ("Server Busy Error") will be displayed. You can confirm the projector status. Controlling the Projector via LAN Confirming the Projector Status (Status) Controlling the Projector (Control) 2 30 1 On this screen, you can confirm the following items: ...

Setup Manual
Page 19
...improvement, only an IP address set by "Address 1-3" can input the characters below: a-z, A-Z, 0-9, -, _ -19 Controlling the Projector via LAN Setting and Adjusting the Projector (Settings & Adjustments) Example: "Picture" screen display for a moment and then operate again. • You cannot operate this ... make settings relating to 8 characters. • You can be displayed. No limits are set to IP addresses connecting to the projector. Wait for COMPUTER1 Setting the Security (Network - Security) On these screens, you click the "Refresh" button before the screen is...
...improvement, only an IP address set by "Address 1-3" can input the characters below: a-z, A-Z, 0-9, -, _ -19 Controlling the Projector via LAN Setting and Adjusting the Projector (Settings & Adjustments) Example: "Picture" screen display for a moment and then operate again. • You cannot operate this ... make settings relating to 8 characters. • You can be displayed. No limits are set to IP addresses connecting to the projector. Wait for COMPUTER1 Setting the Security (Network - Security) On these screens, you click the "Refresh" button before the screen is...

Setup Manual
Page 20
... function is disabled. Items SMTP Server Originator Email Address Originator Name Setting example / Remarks Setting an SMTP server address for the projector (from 1 to 65535 minutes). e.g.1: 192.168.150.253 e.g.2: smtp123.sharp.co.jp * When using a domain name, make general settings relating to 65535). The name set properly, and then click the...
... function is disabled. Items SMTP Server Originator Email Address Originator Name Setting example / Remarks Setting an SMTP server address for the projector (from 1 to 65535 minutes). e.g.1: 192.168.150.253 e.g.2: smtp123.sharp.co.jp * When using a domain name, make general settings relating to 65535). The name set properly, and then click the...

Setup Manual
Page 21
...when an Error Occurs (Service & Support - You can input "@" only one time.) • For details about error items, refer to the projector's operation manual. This allows you can set URL site is displayed when an error checked in their check boxes occurs. The set up to fi...Error e-mail is sent. Items Description E-mail Address Set addresses to which E-mail is to be displayed when an error occurs. Controlling the Projector via LAN Setting Error Items and Destination Addresses to which error notification e-mail is sent on the error items (Lamp, Temp, ...
...when an Error Occurs (Service & Support - You can input "@" only one time.) • For details about error items, refer to the projector's operation manual. This allows you can set URL site is displayed when an error checked in their check boxes occurs. The set up to fi...Error e-mail is sent. Items Description E-mail Address Set addresses to which E-mail is to be displayed when an error occurs. Controlling the Projector via LAN Setting Error Items and Destination Addresses to which error notification e-mail is sent on the error items (Lamp, Temp, ...
Setup Manual
Page 22
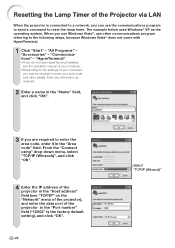
...referring to the following steps, because Windows Vista® does not come with HyperTerminal. 1 Click "Start" - Resetting the Lamp Timer of the Projector via LAN When the projector is the factory default setting), and click "OK". -22 Select "TCP/IP (Winsock)" The example below uses Windows® XP as required.... "Host address" field (see the operation manual of your computer. • Depending on the "Network" menu of the projector), and enter the data port of the projector in the "Area code" field. When you are required to enter the area code, enter it in the "Port number...
...referring to the following steps, because Windows Vista® does not come with HyperTerminal. 1 Click "Start" - Resetting the Lamp Timer of the Projector via LAN When the projector is the factory default setting), and click "OK". -22 Select "TCP/IP (Winsock)" The example below uses Windows® XP as required.... "Host address" field (see the operation manual of your computer. • Depending on the "Network" menu of the projector), and enter the data port of the projector in the "Area code" field. When you are required to enter the area code, enter it in the "Port number...
Setup Manual
Page 23
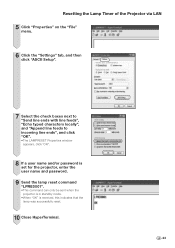
Resetting the Lamp Timer of the Projector via LAN 5 Click "Properties" on the "File" menu. 6 Click the "Settings" tab, and then click "ASCII Setup". 7 Select the check boxes next to "Send line ... to incoming line ends", and click "OK". • The LAMPRESET Properties window appears, click "OK". 8 If a user name and/or password is set for the projector, enter the user name and password. 9 Send the lamp reset command "LPRE0001". • This command can only be sent when the...
Resetting the Lamp Timer of the Projector via LAN 5 Click "Properties" on the "File" menu. 6 Click the "Settings" tab, and then click "ASCII Setup". 7 Select the check boxes next to "Send line ... to incoming line ends", and click "OK". • The LAMPRESET Properties window appears, click "OK". 8 If a user name and/or password is set for the projector, enter the user name and password. 9 Send the lamp reset command "LPRE0001". • This command can only be sent when the...

Setup Manual
Page 24
... computer should be the same. (Example) When the IP address is "192.168.150.2" and the subnet mask is "255.255.255.0" for the projector, the IP address for the computer should be "192.168.150.X" (X=3-254) and the subnet mask should be "255.255.255.0". • Gateway ...(See page 62 of the above are connected correctly. ? Note • When "DHCP Client" is firmly inserted in the LAN terminal of the projector and a computer or the commercially available controller are unsuccessful, restart the network function using network (LAN)connection ? Check that the RS-232C port setting for...
... computer should be the same. (Example) When the IP address is "192.168.150.2" and the subnet mask is "255.255.255.0" for the projector, the IP address for the computer should be "192.168.150.X" (X=3-254) and the subnet mask should be "255.255.255.0". • Gateway ...(See page 62 of the above are connected correctly. ? Note • When "DHCP Client" is firmly inserted in the LAN terminal of the projector and a computer or the commercially available controller are unsuccessful, restart the network function using network (LAN)connection ? Check that the RS-232C port setting for...


