

XV-Z3000 Operation Manual
Page 2
... USER-SERVICEABLE PARTS EXCEPT LAMP UNIT. WARNING: To reduce the risk of fire or electric shock, do not stare directly into the beam of light, or view directly. U.S.A. Model No.: XV-Z3000U Serial No.: WARNING: High brightness light source. See bottom of the projector and retain this information. • Before recycling the packaging, please ensure that any unauthorized changes or modifications to this operation manual carefully. ENGLISH Before using the projector...
... USER-SERVICEABLE PARTS EXCEPT LAMP UNIT. WARNING: To reduce the risk of fire or electric shock, do not stare directly into the beam of light, or view directly. U.S.A. Model No.: XV-Z3000U Serial No.: WARNING: High brightness light source. See bottom of the projector and retain this information. • Before recycling the packaging, please ensure that any unauthorized changes or modifications to this operation manual carefully. ENGLISH Before using the projector...

XV-Z3000 Operation Manual
Page 3
... OPERATION, NEVER TURN THE PROJECTOR OFF BY DISCONNECTING THE POWER CORD. ONLY Declaration of conformity SHARP PROJECTOR, MODEL XV-Z3000U This device complies with the limits for help. This SHARP projector uses a DMD panel. U.S.A. INFORMATION This equipment has been tested and found to comply with Part 15 of mercury. If this projector continues to provide reasonable protection against harmful interference in a particular installation. Responsible Party: SHARP ELECTRONICS CORPORATION Sharp Plaza, Mahwah, New...
... OPERATION, NEVER TURN THE PROJECTOR OFF BY DISCONNECTING THE POWER CORD. ONLY Declaration of conformity SHARP PROJECTOR, MODEL XV-Z3000U This device complies with the limits for help. This SHARP projector uses a DMD panel. U.S.A. INFORMATION This equipment has been tested and found to comply with Part 15 of mercury. If this projector continues to provide reasonable protection against harmful interference in a particular installation. Responsible Party: SHARP ELECTRONICS CORPORATION Sharp Plaza, Mahwah, New...

XV-Z3000 Operation Manual
Page 4
... screen when the menu is displayed. Menu icon Menu screen Picture Fine Sync Options1 Options2 Example: "Picture" screen menu for INPUT 1 mode Selected input mode Menu icons Picture Picture Mode Contrast Bright Color Tint Sharp Red Blue INPUT 1 Standard 0 0 0 0 0 0 0 Note • The "Fine Sync" menu is highlighted. However, you can also be performed by using the projector. Note .........Indicates additional information for using the buttons on the model. SEL./ADJ. Using the Menu Screen ENTER button Adjustment buttons (P/R/O/Q) MENU button Adjustment buttons (P/R/O/Q) MENU button...
... screen when the menu is displayed. Menu icon Menu screen Picture Fine Sync Options1 Options2 Example: "Picture" screen menu for INPUT 1 mode Selected input mode Menu icons Picture Picture Mode Contrast Bright Color Tint Sharp Red Blue INPUT 1 Standard 0 0 0 0 0 0 0 Note • The "Fine Sync" menu is highlighted. However, you can also be performed by using the projector. Note .........Indicates additional information for using the buttons on the model. SEL./ADJ. Using the Menu Screen ENTER button Adjustment buttons (P/R/O/Q) MENU button Adjustment buttons (P/R/O/Q) MENU button...

XV-Z3000 Operation Manual
Page 5
... the Projector 18 Standard Setup (Front Projection) ....... 18 Ceiling-mount Setup 18 Projection (PRJ) Mode 19 Picture (Screen) Size and Projection Distance 20 Connections Samples of Cables for Connection ..... 22 Connecting to Video Equipment ......... 23 Connecting to a Computer 26 Controlling the Projector by a Computer 27 Using Basic Operation Turning the Projector On/Off 28 Connecting the Power Cord 28 Turning the Projector on 28 Turning the Power off (Putting the Projector into Standby Mode 29 Image Projection 29 Switching the Input Mode 29 Adjusting the Projected Image 30...
... the Projector 18 Standard Setup (Front Projection) ....... 18 Ceiling-mount Setup 18 Projection (PRJ) Mode 19 Picture (Screen) Size and Projection Distance 20 Connections Samples of Cables for Connection ..... 22 Connecting to Video Equipment ......... 23 Connecting to a Computer 26 Controlling the Projector by a Computer 27 Using Basic Operation Turning the Projector On/Off 28 Connecting the Power Cord 28 Turning the Projector on 28 Turning the Power off (Putting the Projector into Standby Mode 29 Image Projection 29 Switching the Input Mode 29 Adjusting the Projected Image 30...
XV-Z3000 Operation Manual
Page 8
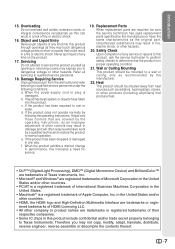
... require extensive work by the manufacturer. 22. Safety Check Upon completion of any service or repairs to this product, ask the service technician to perform safety checks to normal operation. When the power-supply cord or plug is in fire, electric shock, or other hazards. If liquid has been spilled, or objects have the same characteristics as opening or removing covers may expose...
... require extensive work by the manufacturer. 22. Safety Check Upon completion of any service or repairs to this product, ask the service technician to perform safety checks to normal operation. When the power-supply cord or plug is in fire, electric shock, or other hazards. If liquid has been spilled, or objects have the same characteristics as opening or removing covers may expose...

XV-Z3000 Operation Manual
Page 9
... of the optical system. Light falling directly on a level site within the adjustment range (8 degrees) of the unit. When using the projector in a sunny or bright room. Caution concerning the lamp unit I For minimal servicing and to maintain high image quality, SHARP recommends that it is first turned on. I Allow at least 10 minutes. Do not set "Fan Mode" to avoid personal injury...
... of the optical system. Light falling directly on a level site within the adjustment range (8 degrees) of the unit. When using the projector in a sunny or bright room. Caution concerning the lamp unit I For minimal servicing and to maintain high image quality, SHARP recommends that it is first turned on. I Allow at least 10 minutes. Do not set "Fan Mode" to avoid personal injury...

XV-Z3000 Operation Manual
Page 10
... equipment to the projector, make the connections. Temperature monitor function I If the projector starts to overheat due to setup problems or blockage of the fan may vary depending on the projector will blink, and after the cooling fan stops. dicators" on the circumstances and the internal temperature. This does not indicate malfunction. • Do not unplug the power cord during projector operation due to changes in . Before moving...
... equipment to the projector, make the connections. Temperature monitor function I If the projector starts to overheat due to setup problems or blockage of the fan may vary depending on the projector will blink, and after the cooling fan stops. dicators" on the circumstances and the internal temperature. This does not indicate malfunction. • Do not unplug the power cord during projector operation due to changes in . Before moving...
XV-Z3000 Operation Manual
Page 14
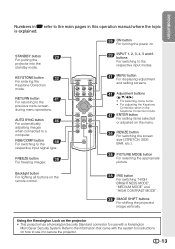
.... AUTO SYNC button 46 For automatically adjusting images when connected to the information that came with the system for use it to secure the projector. 13 Backlight button For lighting all buttons on how to the respective input modes. 41 MENU button For displaying adjustment and setting screens. 41 Adjustment buttons (P/R/O/Q) • For selecting menu items. • For adjusting the Keystone Correction when in this operation manual where the topic is explained. 28 ON button For turning the power...
.... AUTO SYNC button 46 For automatically adjusting images when connected to the information that came with the system for use it to secure the projector. 13 Backlight button For lighting all buttons on how to the respective input modes. 41 MENU button For displaying adjustment and setting screens. 41 Adjustment buttons (P/R/O/Q) • For selecting menu items. • For adjusting the Keystone Correction when in this operation manual where the topic is explained. 28 ON button For turning the power...

XV-Z3000 Operation Manual
Page 18
...-right, and lower-left positions of the projected image. • When you to put the projector into standby mode. Press P/R/O/Q on the remote control, and then press the button again while the confirmation message is displayed, to switch the input mode. 6. On the On the remote projector control On-screen Display • Unplug the power cord from the AC outlet after the cooling fan stops. 17 Adjust the projection image size by turning the focus ring. 2. Quick...
...-right, and lower-left positions of the projected image. • When you to put the projector into standby mode. Press P/R/O/Q on the remote control, and then press the button again while the confirmation message is displayed, to switch the input mode. 6. On the On the remote projector control On-screen Display • Unplug the power cord from the AC outlet after the cooling fan stops. 17 Adjust the projection image size by turning the focus ring. 2. Quick...

XV-Z3000 Operation Manual
Page 29
... Power cord AC socket Turning the Projector on the remote control. Green: The lamp is stabilising the lamp output characteristics. Lamp indicator Power indicator Note • About the Lamp Indicator The lamp indicator illuminates to indicate the status of the projector. Red:The lamp is shut down . Turning the Projector On/Off Connecting the Power Cord Plug the supplied power cord into standby mode and immediately turned on again, the lamp may be done before performing the operations written below. (See pages 23 to 28.) Remove the lens...
... Power cord AC socket Turning the Projector on the remote control. Green: The lamp is stabilising the lamp output characteristics. Lamp indicator Power indicator Note • About the Lamp Indicator The lamp indicator illuminates to indicate the status of the projector. Red:The lamp is shut down . Turning the Projector On/Off Connecting the Power Cord Plug the supplied power cord into standby mode and immediately turned on again, the lamp may be done before performing the operations written below. (See pages 23 to 28.) Remove the lens...
XV-Z3000 Operation Manual
Page 41
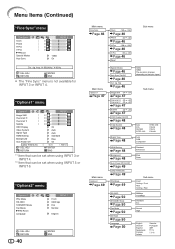
... Video System Page 48 *1 Auto PAL SECAM NTSC 4.43 NTSC 3.58 PAL-M PAL-N PAL-60 Signal Type Page 48 *2 Auto RGB Component HDMI Setting Page 48 Background Page 48 Auto Power Off [On/Off] Page 49 Lamp Timer(Life) Page 49 PRJ Mode Page 49 Standard Enhanced Blue None Sub menu Front Ceiling + Front Rear Ceiling + Rear RS-232C Page 50 STANDBY Mode Page 50 Fan Mode Page 50 All Reset...
... Video System Page 48 *1 Auto PAL SECAM NTSC 4.43 NTSC 3.58 PAL-M PAL-N PAL-60 Signal Type Page 48 *2 Auto RGB Component HDMI Setting Page 48 Background Page 48 Auto Power Off [On/Off] Page 49 Lamp Timer(Life) Page 49 PRJ Mode Page 49 Standard Enhanced Blue None Sub menu Front Ceiling + Front Rear Ceiling + Rear RS-232C Page 50 STANDBY Mode Page 50 Fan Mode Page 50 All Reset...
XV-Z3000 Operation Manual
Page 44
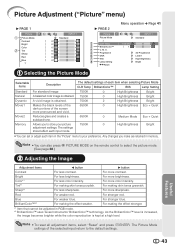
Progressive DNR IRIS Lamp Setting Reset Menu operation n Page 41 7500K 1 INPUT 1 Standard 3D Progressive Level 1 High Brightness Bright 1 Selecting the Picture Mode Selectable items Standard Natural Dynamic Movie1 Movie2 Memory Description For standard image A balanced color image is obtained. For more brightness. Red For weaker red. For making skin tones purplish. Picture Adjustment ("Picture" menu) Q PAGE 1 Picture Picture Mode Contrast Bright Color Tint Sharp Red Blue INPUT 1 Standard 0 0 0 0 0 0 0 Q PAGE 2 Picture Picture Mode CLR Temp BrilliantColor™ ...
Progressive DNR IRIS Lamp Setting Reset Menu operation n Page 41 7500K 1 INPUT 1 Standard 3D Progressive Level 1 High Brightness Bright 1 Selecting the Picture Mode Selectable items Standard Natural Dynamic Movie1 Movie2 Memory Description For standard image A balanced color image is obtained. For more brightness. Red For weaker red. For making skin tones purplish. Picture Adjustment ("Picture" menu) Q PAGE 1 Picture Picture Mode Contrast Bright Color Tint Sharp Red Blue INPUT 1 Standard 0 0 0 0 0 0 0 Q PAGE 2 Picture Picture Mode CLR Temp BrilliantColor™ ...
XV-Z3000 Operation Manual
Page 49
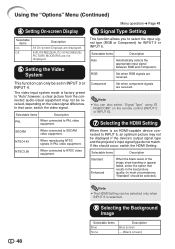
..., switch the HDMI Setting. When connected to PAL video equipment. Using the "Options" Menu (Continued) Menu operation n Page 41 4 Setting On-screen Display 6 Signal Type Setting Selectable items On Off Description All On-screen Displays are received. Selectable items Description PAL When connected to NTSC video equipment. When there is factory preset to "Auto";however, a clear picture from the connected audio-visual equipment may not be received, depending on the remote control (INPUT 5 or INPUT 6). 7 Selecting the HDMI Setting...
..., switch the HDMI Setting. When connected to PAL video equipment. Using the "Options" Menu (Continued) Menu operation n Page 41 4 Setting On-screen Display 6 Signal Type Setting Selectable items On Off Description All On-screen Displays are received. Selectable items Description PAL When connected to NTSC video equipment. When there is factory preset to "Auto";however, a clear picture from the connected audio-visual equipment may not be received, depending on the remote control (INPUT 5 or INPUT 6). 7 Selecting the HDMI Setting...
XV-Z3000 Operation Manual
Page 50
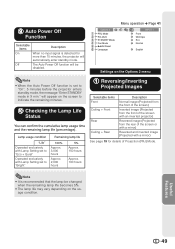
The Auto Power Off function will appear on the screen to indicate the remaining minutes. 0 Checking the Lamp Life Status You can confirm the cumulative lamp usage time and the remaining lamp life (percentage). Lamp usage condition "Life" Operated exclusively with Lamp Setting set to "Eco + Quiet" Operated exclusively with Lamp Setting set to "Bright" Remaining lamp life 100% Approx. 3,000 hours Approx. 2,000 hours 5% Approx. 150 hours Approx. 100 hours 1 Reversing/Inverting Projected Images Selectable items Front Ceiling + Front Rear Ceiling + Rear Description...
The Auto Power Off function will appear on the screen to indicate the remaining minutes. 0 Checking the Lamp Life Status You can confirm the cumulative lamp usage time and the remaining lamp life (percentage). Lamp usage condition "Life" Operated exclusively with Lamp Setting set to "Eco + Quiet" Operated exclusively with Lamp Setting set to "Bright" Remaining lamp life 100% Approx. 3,000 hours Approx. 2,000 hours 5% Approx. 150 hours Approx. 100 hours 1 Reversing/Inverting Projected Images Selectable items Front Ceiling + Front Rear Ceiling + Rear Description...

XV-Z3000 Operation Manual
Page 54
... the projector has entered standby mode and while the cooling fan is securely installed, contact your nearest Authorized SharpVision Service Center or Dealer for repair. • Please exercise care when replacing the lamp. • Securely install the cover. • If the power indicator blinks in the power cord and turning the power back on. (At least 10 minutes.) • If the power is turned off .) Red on Red on (Standby) Power indicator Green on/ Red on Green blinks (Cooling) Red blinks Problem...
... the projector has entered standby mode and while the cooling fan is securely installed, contact your nearest Authorized SharpVision Service Center or Dealer for repair. • Please exercise care when replacing the lamp. • Securely install the cover. • If the power indicator blinks in the power cord and turning the power back on. (At least 10 minutes.) • If the power is turned off .) Red on Red on (Standby) Power indicator Green on/ Red on Green blinks (Cooling) Red blinks Problem...
XV-Z3000 Operation Manual
Page 57
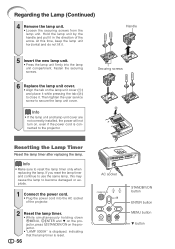
.... 1 Connect the power cord. • Plug the power cord into the lamp unit compartment. At this may cause the lamp to close it. Fasten the securing screws. 6 Replace the lamp unit cover. • Align the tab on , even if the power cord is reset. 56 AC socket STANDBY/ON button ENTER button MENU button R button Securing screws 2 1 Resetting the Lamp Timer Reset the lamp timer after replacing the lamp. If you reset the lamp timer and continue to the projector. Handle 5 Insert the new lamp...
.... 1 Connect the power cord. • Plug the power cord into the lamp unit compartment. At this may cause the lamp to close it. Fasten the securing screws. 6 Replace the lamp unit cover. • Align the tab on , even if the power cord is reset. 56 AC socket STANDBY/ON button ENTER button MENU button R button Securing screws 2 1 Resetting the Lamp Timer Reset the lamp timer after replacing the lamp. If you reset the lamp timer and continue to the projector. Handle 5 Insert the new lamp...
XV-Z3000 Operation Manual
Page 61
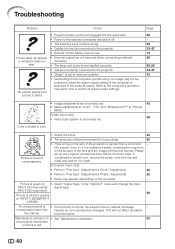
... lamp unit cover is not installed correctly. • Cables incorrectly connected to the projector. • "Bright" is carried from caused by room temperature changes. Please set . INPUT 6 (Component). 48 Picture is green on • Select "Signal Type" in the "Options1" menu and change the input INPUT 5 (Component)/ signal type. An unusual sound is • If the picture is normal, the sound is due to "Color", "Tint" and "BrilliantColor™" in red. 60 Troubleshooting Problem Check Picure...
... lamp unit cover is not installed correctly. • Cables incorrectly connected to the projector. • "Bright" is carried from caused by room temperature changes. Please set . INPUT 6 (Component). 48 Picture is green on • Select "Signal Type" in the "Options1" menu and change the input INPUT 5 (Component)/ signal type. An unusual sound is • If the picture is normal, the sound is due to "Color", "Tint" and "BrilliantColor™" in red. 60 Troubleshooting Problem Check Picure...

XV-Z3000 Operation Manual
Page 62
..., replace the lamp. Service Information (For the U.S.) For the location of the image show banding or appear faded when INPUT 6 is selected. • Select the HDMI Setting ("Standard" or "Enhanced") that results in again after the Replace the lamp. runs faster. While the remaining lamp life draws to the projector or the connected flickers. Problem Check Page Picture is too bright and • Image adjustments are inserted correctly or insert new...
..., replace the lamp. Service Information (For the U.S.) For the location of the image show banding or appear faded when INPUT 6 is selected. • Select the HDMI Setting ("Standard" or "Enhanced") that results in again after the Replace the lamp. runs faster. While the remaining lamp life draws to the projector or the connected flickers. Problem Check Page Picture is too bright and • Image adjustments are inserted correctly or insert new...

XV-Z3000 Operation Manual
Page 63
...;C) Storage temperature -4°F to 140°F (-20°C to make design and specification changes for U.K. Specifications Product type Projector Model XV-Z3000 Video system NTSC3.58/NTSC4.43/PAL/PAL-M/PAL-N/PAL-60/SECAM/DTV480I/DTV480P/ DTV540P/DTV576I/DTV576P/DTV720P/DTV1035I/DTV1080I/DTV1080I-50 Display method Single Chip Digital Micromirror DeviceTM (DMDTM) by Texas Instruments DMD panel Panel size: 0.65", 1chip DMD Drive method: Digital Light Processing (DLP™...
...;C) Storage temperature -4°F to 140°F (-20°C to make design and specification changes for U.K. Specifications Product type Projector Model XV-Z3000 Video system NTSC3.58/NTSC4.43/PAL/PAL-M/PAL-N/PAL-60/SECAM/DTV480I/DTV480P/ DTV540P/DTV576I/DTV576P/DTV720P/DTV1035I/DTV1080I/DTV1080I-50 Display method Single Chip Digital Micromirror DeviceTM (DMDTM) by Texas Instruments DMD panel Panel size: 0.65", 1chip DMD Drive method: Digital Light Processing (DLP™...
XV-Z3000 Operation Manual
Page 65
... button 13 Blue 43 Bright 43 BrilliantColor 43 Checking the Input Signal 46 CINEMA ZOOM 36, 37 Clock 46 CLR Temp (Color Temperature 44 C.M.S 44 Color 43 Contrast 43 DOT BY DOT 37 DNR 45 ENTER button 41 Exhaust vent 12, 51 Fan Mode 50 Fine Sync 46 Focus ring 30 FREEZE button 38 GEOMETRIC ADJUSTMENT 34 H & V KEYSTONE 35 HDMI Setting 48 H-Pos 46 HEIGHT ADJUST lever 30 Hue 44 Image Shift 47 IMAGE SHIFT buttons...
... button 13 Blue 43 Bright 43 BrilliantColor 43 Checking the Input Signal 46 CINEMA ZOOM 36, 37 Clock 46 CLR Temp (Color Temperature 44 C.M.S 44 Color 43 Contrast 43 DOT BY DOT 37 DNR 45 ENTER button 41 Exhaust vent 12, 51 Fan Mode 50 Fine Sync 46 Focus ring 30 FREEZE button 38 GEOMETRIC ADJUSTMENT 34 H & V KEYSTONE 35 HDMI Setting 48 H-Pos 46 HEIGHT ADJUST lever 30 Hue 44 Image Shift 47 IMAGE SHIFT buttons...


