
XVZ7000U Operation Manual
Page 1
... Accessories" on the bottom of important operating and maintenance (servicing) instructions in the literature accompanying the product. Model No.: XV-Z7000U Serial No.: There are two important reasons for prompt warranty registration of sufficient magnitude to constitute a risk or electric shock to... REDUCE THE RISK OF ELECTRIC SHOCK, DO NOT REMOVE COVER. For disposal or recycling information, please contact your new SHARP LCD Projector, using the LCD projector, please read this equip- DO NOT REMOVE SCREWS EXCEPT SPECIFIED USER SERVICE SCREW. OPERATION MANUAL ENGLISH IMPORTANT...
... Accessories" on the bottom of important operating and maintenance (servicing) instructions in the literature accompanying the product. Model No.: XV-Z7000U Serial No.: There are two important reasons for prompt warranty registration of sufficient magnitude to constitute a risk or electric shock to... REDUCE THE RISK OF ELECTRIC SHOCK, DO NOT REMOVE COVER. For disposal or recycling information, please contact your new SHARP LCD Projector, using the LCD projector, please read this equip- DO NOT REMOVE SCREWS EXCEPT SPECIFIED USER SERVICE SCREW. OPERATION MANUAL ENGLISH IMPORTANT...
XVZ7000U Operation Manual
Page 2
...this equipment does cause harmful interference to radio or television reception, which can radiate radio frequency energy and, if not installed and used in a particular installation. During normal operation, when turning the power off and on a circuit different from that may not cause...REMPLACEMENT DE LA LAMPE. DANGER POTENTIEL DE PARTICULES DE VERRE EN CAS D'ECLATEMENT DE LA LAMPE. ONLY Declaration of Conformity SHARP LCD PROJECTOR, MODEL XV-Z7000U This device complies with the limits for help. FAILURE TO OBSERVE THIS WILL RESULT IN PREMATURE LAMP FAILURE. NE REMPLACER ...
...this equipment does cause harmful interference to radio or television reception, which can radiate radio frequency energy and, if not installed and used in a particular installation. During normal operation, when turning the power off and on a circuit different from that may not cause...REMPLACEMENT DE LA LAMPE. DANGER POTENTIEL DE PARTICULES DE VERRE EN CAS D'ECLATEMENT DE LA LAMPE. ONLY Declaration of Conformity SHARP LCD PROJECTOR, MODEL XV-Z7000U This device complies with the limits for help. FAILURE TO OBSERVE THIS WILL RESULT IN PREMATURE LAMP FAILURE. NE REMPLACER ...

XVZ7000U Operation Manual
Page 3
...not likely to be operated only from the type of other hazards. 20. In order not to the operating instructions. 12. Attachments Do not use attachments not recommended by following the operating instructions. or near a bathtub, wash bowl, kitchen sink, or laundry tub; Quick stops, excessive force...be routed so that produce heat. Refer all servicing to rain or water. Damage Requiring Service Unplug this product near water-for its installation, use this product from the wall outlet and refer servicing to . 4. c. f. For your own protection and reliable usage of power supply to ...
...not likely to be operated only from the type of other hazards. 20. In order not to the operating instructions. 12. Attachments Do not use attachments not recommended by following the operating instructions. or near a bathtub, wash bowl, kitchen sink, or laundry tub; Quick stops, excessive force...be routed so that produce heat. Refer all servicing to rain or water. Damage Requiring Service Unplug this product near water-for its installation, use this product from the wall outlet and refer servicing to . 4. c. f. For your own protection and reliable usage of power supply to ...
XVZ7000U Operation Manual
Page 4
...be adjusted according to the projector. (Page 29) 8. The video signal is http://www.sharp-usa.com/ . If this projector, first take a look at [email protected] . FOR USE WITH DTV Allows projection of DTV images and 16:9 wide-screen images when connected to control... the quantity of DVD, DTV and other anamorphic images recorded in widescreen format with a 16:9 aspect ratio. (Page 31) 10. For SHARP Assistance (U.S.A. Important Information ...
...be adjusted according to the projector. (Page 29) 8. The video signal is http://www.sharp-usa.com/ . If this projector, first take a look at [email protected] . FOR USE WITH DTV Allows projection of DTV images and 16:9 wide-screen images when connected to control... the quantity of DVD, DTV and other anamorphic images recorded in widescreen format with a 16:9 aspect ratio. (Page 31) 10. For SHARP Assistance (U.S.A. Important Information ...
XVZ7000U Operation Manual
Page 5
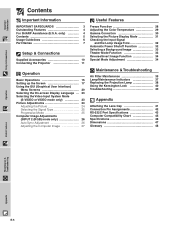
... Supplied Accessories 10 Connecting the Projector 11 Operation Basic Operations 15 Setting up the Screen 17 Using the GUI (Graphical User Interface) Menu Screens 20 Selecting the On-screen Display Language ... ...(RGB) mode only 26 Auto Sync Adjustment 26 Adjusting the Computer Image 27 Useful Features Freeze Function 28 Adjusting the Color Temperature 29 Gamma Correction 30 Selecting the ... Air Filter Maintenance 35 Lamp/Maintenance Indicators 37 Replacing the Projection Lamp 38 Using the Kensington Lock 40 Troubleshooting 40 Appendix Attaching the Lens Cap 41 Connection ...
... Supplied Accessories 10 Connecting the Projector 11 Operation Basic Operations 15 Setting up the Screen 17 Using the GUI (Graphical User Interface) Menu Screens 20 Selecting the On-screen Display Language ... ...(RGB) mode only 26 Auto Sync Adjustment 26 Adjusting the Computer Image 27 Useful Features Freeze Function 28 Adjusting the Color Temperature 29 Gamma Correction 30 Selecting the ... Air Filter Maintenance 35 Lamp/Maintenance Indicators 37 Replacing the Projection Lamp 38 Using the Kensington Lock 40 Troubleshooting 40 Appendix Attaching the Lens Cap 41 Connection ...
XVZ7000U Operation Manual
Page 6
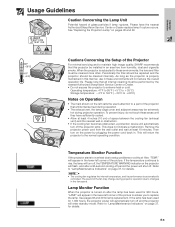
...SharpVision Service Center or Dealer. • Do not expose the projector to extreme heat or cold. If the lamp has been used for lamp replacement. Important Information Usage Guidelines Caution Concerning the Lamp Unit Potential hazard of the Projector For minimal servicing and to... maintain high image quality, SHARP recommends that emits intense heat during operation. • The exhaust vent, the lamp cage cover and adjacent areas may change during ...
...SharpVision Service Center or Dealer. • Do not expose the projector to extreme heat or cold. If the lamp has been used for lamp replacement. Important Information Usage Guidelines Caution Concerning the Lamp Unit Potential hazard of the Projector For minimal servicing and to... maintain high image quality, SHARP recommends that emits intense heat during operation. • The exhaust vent, the lamp cage cover and adjacent areas may change during ...
XVZ7000U Operation Manual
Page 8
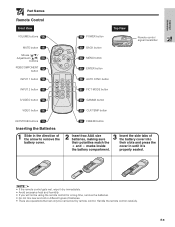
... button KEYSTONE buttons 19 Inserting the Batteries 1 Slide in until it dry immediately. • Avoid excessive heat and humidity. • If you will not be using the remote control for a long time, remove the batteries. • Do not mix new and old or different types of the battery cover into their...
... button KEYSTONE buttons 19 Inserting the Batteries 1 Slide in until it dry immediately. • Avoid excessive heat and humidity. • If you will not be using the remote control for a long time, remove the batteries. • Do not mix new and old or different types of the battery cover into their...
XVZ7000U Operation Manual
Page 9
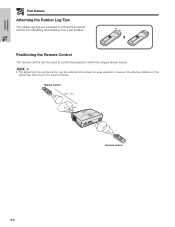
Positioning the Remote Control The remote control can be reflected off a screen for easy operation. Remote control 23Ј (7 m) 30˚ 30˚ 45˚ 45˚ 30˚ Remote control E-9 Important Information Part Names Attaching the Rubber Leg Tips The rubber leg tips are provided to prevent the remote control from the remote control can be used to control the projector within the ranges shown below. • The signal from skidding and shaking over a flat surface. However, the effective distance of the signal may differ due to the screen material.
Positioning the Remote Control The remote control can be reflected off a screen for easy operation. Remote control 23Ј (7 m) 30˚ 30˚ 45˚ 45˚ 30˚ Remote control E-9 Important Information Part Names Attaching the Rubber Leg Tips The rubber leg tips are provided to prevent the remote control from the remote control can be used to control the projector within the ranges shown below. • The signal from skidding and shaking over a flat surface. However, the effective distance of the signal may differ due to the screen material.
XVZ7000U Operation Manual
Page 11
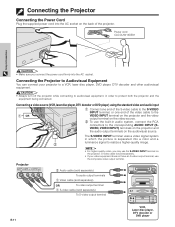
... to protect both the projector and the equipment being connected. Connecting a video source (VCR, laser disc player, DTV decoder or DVD player) using the standard video and audio input 1 Connect one end of the S-video cable to the S-VIDEO INPUT terminal, or one end of the projector...Projector Connecting the Power Cord Plug the supplied power cord into a color and a luminance signal to realize a higher-quality image. The S-VIDEO INPUT terminal uses a video signal system in which the picture is sold separately. • If your projector to a VCR, laser disc player, DVD player, DTV ...
... to protect both the projector and the equipment being connected. Connecting a video source (VCR, laser disc player, DTV decoder or DVD player) using the standard video and audio input 1 Connect one end of the S-video cable to the S-VIDEO INPUT terminal, or one end of the projector...Projector Connecting the Power Cord Plug the supplied power cord into a color and a luminance signal to realize a higher-quality image. The S-VIDEO INPUT terminal uses a video signal system in which the picture is sold separately. • If your projector to a VCR, laser disc player, DVD player, DTV ...

XVZ7000U Operation Manual
Page 12
...the audio output terminal on the projector. Setup & Connections Connecting the Projector Connecting an audiovisual source (DTV decoder or DVD player) using the RCA input 1 Connect each RCA connector to the corresponding INPUT 1/COMPONENT terminals on the projector. 2 Connect the other end ... minijack to RCA audio cable adaptor may be necessary. When connecting this projector to a DVD player or a DTV decoder, select "Component" by using RGB/COMPONENT on the projector. Connect the other end to the audio output terminal on the audiovisual equipment. • A 3.5 mm minijack to ...
...the audio output terminal on the projector. Setup & Connections Connecting the Projector Connecting an audiovisual source (DTV decoder or DVD player) using the RCA input 1 Connect each RCA connector to the corresponding INPUT 1/COMPONENT terminals on the projector. 2 Connect the other end ... minijack to RCA audio cable adaptor may be necessary. When connecting this projector to a DVD player or a DTV decoder, select "Component" by using RGB/COMPONENT on the projector. Connect the other end to the audio output terminal on the audiovisual equipment. • A 3.5 mm minijack to ...

XVZ7000U Operation Manual
Page 13
... needed. CAUTION • Before connecting, be required for more information. When connecting this projector to a computer, select "RGB" by using the standard 15-pin video and audio input 1 Connect one end of full color computer images. E-13 Setup & Connections Connecting the ... Connecting other compatible computers When connecting the projector to a compatible computer other end to the Monitor output port on the computer. Use with computer signals other end to the Audio output terminal on the computer. Secure the connector by tightening the thumb screws. ...
... needed. CAUTION • Before connecting, be required for more information. When connecting this projector to a computer, select "RGB" by using the standard 15-pin video and audio input 1 Connect one end of full color computer images. E-13 Setup & Connections Connecting the ... Connecting other compatible computers When connecting the projector to a compatible computer other end to the Monitor output port on the computer. Use with computer signals other end to the Audio output terminal on the computer. Secure the connector by tightening the thumb screws. ...

XVZ7000U Operation Manual
Page 14
...) to the operation manual of the computer for details on . Please refer to the other end of the projector. See pages 43 and 44 for use with an RS-232C cable (null modem, cross type, sold separately), the computer can be required for details. This may damage your computer. • ...The RS-232C function may be used to control the projector and check the status of DIN-D-sub RS-232C cable and to the serial port on the computer. Contact your computer...
...) to the operation manual of the computer for details on . Please refer to the other end of the projector. See pages 43 and 44 for use with an RS-232C cable (null modem, cross type, sold separately), the computer can be required for details. This may damage your computer. • ...The RS-232C function may be used to control the projector and check the status of DIN-D-sub RS-232C cable and to the serial port on the computer. Contact your computer...
XVZ7000U Operation Manual
Page 15
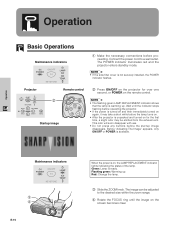
... may take a short while before the lamp turns on. • After the projector is on the screen becomes clear. This odor will soon disappear with use. • Do not press any buttons before proceeding. Operation Basic Operations Maintenance indicators ON/OFF POWER LAMP TEMP. KEYSTONE Projector Remote control ON/OFF POWER...
... may take a short while before the lamp turns on. • After the projector is on the screen becomes clear. This odor will soon disappear with use. • Do not press any buttons before proceeding. Operation Basic Operations Maintenance indicators ON/OFF POWER LAMP TEMP. KEYSTONE Projector Remote control ON/OFF POWER...
XVZ7000U Operation Manual
Page 16
... screen disappears. • When ON/OFF or POWER is being received, "NO SIGNAL" will then enter standby mode. • Wait until the power off always use the ON/ OFF button on the projector or the POWER button on the remote control. DURING NORMAL OPERATION, NEVER TURN THE 8 PROJECTOR OFF BY DISCONNECTING...
... screen disappears. • When ON/OFF or POWER is being received, "NO SIGNAL" will then enter standby mode. • Wait until the power off always use the ON/ OFF button on the projector or the POWER button on the remote control. DURING NORMAL OPERATION, NEVER TURN THE 8 PROJECTOR OFF BY DISCONNECTING...
XVZ7000U Operation Manual
Page 17
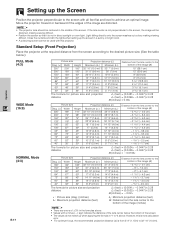
... that it is from the lens center to the bottom of the image (inches) E-17 • There are distorted. • The projector lens should be used with this is not a calculation error. • For optimum focus, the recommended projection distance (L) is not in *1 to *4 above . • Values with all feet flat...
... that it is from the lens center to the bottom of the image (inches) E-17 • There are distorted. • The projector lens should be used with this is not a calculation error. • For optimum focus, the recommended projection distance (L) is not in *1 to *4 above . • Values with all feet flat...

XVZ7000U Operation Manual
Page 18
...caught in the area between the projector and screen is not sufficient for use a mirror to approximately 7° from the standard position.) 2 Remove your hands from the mirror is recommended that you use the optional Sharp ceiling-mount bracket for this function.) E-18 Ceiling-mount Setup •... It is projected onto the translucent screen. Once the adjustment feet have locked in the inverted position, use the upper edge of the screen as ...
...caught in the area between the projector and screen is not sufficient for use a mirror to approximately 7° from the standard position.) 2 Remove your hands from the mirror is recommended that you use the optional Sharp ceiling-mount bracket for this function.) E-18 Ceiling-mount Setup •... It is projected onto the translucent screen. Once the adjustment feet have locked in the inverted position, use the upper edge of the screen as ...
XVZ7000U Operation Manual
Page 19
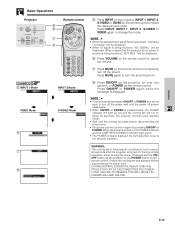
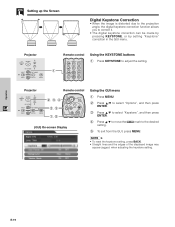
...the setting. Operation E-19 KEYSTONE INPUT PICT MODE BACK ENTER MENU 2, 3, 4 2, 3 1, 5 VOL MUTE POWER BACK MENU ENTER (GUI) On-screen Display Using the GUI menu 1 Press MENU. 2 Press ∂/ƒ to select "Options", and then press ENTER. 3 Press ∂/ƒ to select "Keystone", and... Remote control ON/OFF POWER LAMP TEMP. Projector ON/OFF POWER LAMP TEMP. KEYSTONE INPUT PICT MODE BACK ENTER MENU Remote control Using the KEYSTONE buttons RGB/ INPUT 1 COMPONENT PICT MODE 1 Press KEYSTONE to correct it. • The digital keystone correction can be...
...the setting. Operation E-19 KEYSTONE INPUT PICT MODE BACK ENTER MENU 2, 3, 4 2, 3 1, 5 VOL MUTE POWER BACK MENU ENTER (GUI) On-screen Display Using the GUI menu 1 Press MENU. 2 Press ∂/ƒ to select "Options", and then press ENTER. 3 Press ∂/ƒ to select "Keystone", and... Remote control ON/OFF POWER LAMP TEMP. Projector ON/OFF POWER LAMP TEMP. KEYSTONE INPUT PICT MODE BACK ENTER MENU Remote control Using the KEYSTONE buttons RGB/ INPUT 1 COMPONENT PICT MODE 1 Press KEYSTONE to correct it. • The digital keystone correction can be...

XVZ7000U Operation Manual
Page 20
... allow you to exit from the GUI. • For details on items on the menu screen, see the tree charts on pages 21 and 22. Using the GUI (Graphical User Interface) Menu Screens Projector ON/OFF POWER LAMP TEMP. These menu screens can be operated from the projector or the remote...
... allow you to exit from the GUI. • For details on items on the menu screen, see the tree charts on pages 21 and 22. Using the GUI (Graphical User Interface) Menu Screens Projector ON/OFF POWER LAMP TEMP. These menu screens can be operated from the projector or the remote...
XVZ7000U Operation Manual
Page 21
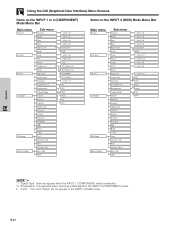
Operation Using the GUI (Graphical User Interface) Menu Screens Items on the INPUT 1 or 2 (COMPONENT) Mode Menu Bar Main menu Picture1 Picture2 Options Language Sub menu Contrast Bright Red Blue Signal Type *1 Reset Color Tint Sharp Progressive *2 Reset Signal Info Lamp Timer Keystone Auto Power Off Background Theater Mode English Deutsch ...appear when the INPUT 1 (COMPONENT) mode is selected. *2 "Progressive" only appears when receiving a 480i signal in the INPUT 2 (COMPONENT) mode. • "Color", "Tint" and "Sharp" do not appear in the INPUT 2 (RGB) mode. E-21
Operation Using the GUI (Graphical User Interface) Menu Screens Items on the INPUT 1 or 2 (COMPONENT) Mode Menu Bar Main menu Picture1 Picture2 Options Language Sub menu Contrast Bright Red Blue Signal Type *1 Reset Color Tint Sharp Progressive *2 Reset Signal Info Lamp Timer Keystone Auto Power Off Background Theater Mode English Deutsch ...appear when the INPUT 1 (COMPONENT) mode is selected. *2 "Progressive" only appears when receiving a 480i signal in the INPUT 2 (COMPONENT) mode. • "Color", "Tint" and "Sharp" do not appear in the INPUT 2 (RGB) mode. E-21

XVZ7000U Operation Manual
Page 22
Operation Using the GUI (Graphical User Interface) Menu Screens Items on the S-VIDEO or VIDEO Mode Menu Bar Main menu Picture1 Picture2 Options Language Sub menu Contrast Bright Red Blue Reset Color Tint *3 Sharp Progressive Reset Signal Info Lamp Timer Keystone Auto Power Off Background Theater Mode English Deutsch Español Nederlands...
Operation Using the GUI (Graphical User Interface) Menu Screens Items on the S-VIDEO or VIDEO Mode Menu Bar Main menu Picture1 Picture2 Options Language Sub menu Contrast Bright Red Blue Reset Color Tint *3 Sharp Progressive Reset Signal Info Lamp Timer Keystone Auto Power Off Background Theater Mode English Deutsch Español Nederlands...


