Instruction Manual
Page 2
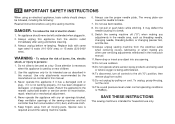
..., such as a toy. Do not pull or push fabric while stitching. An appliance should always be used as threading needle, changing needle, threading bobbin, or changing presser foot, and the like. 10.Always unplug sewing machine from all moving parts. Do not allow to be followed, including the...appliance with same type rated 10 watts (110-120V area) or 15 watts (220-240V area). Special care is 75dB(A). Use this sewing machine. Switch the sewing machine off ("O") position, then remove plug from outlet. 15.Do not unplug by or near children. 2. Always unplug before using this ...
..., such as a toy. Do not pull or push fabric while stitching. An appliance should always be used as threading needle, changing needle, threading bobbin, or changing presser foot, and the like. 10.Always unplug sewing machine from all moving parts. Do not allow to be followed, including the...appliance with same type rated 10 watts (110-120V area) or 15 watts (220-240V area). Special care is 75dB(A). Use this sewing machine. Switch the sewing machine off ("O") position, then remove plug from outlet. 15.Do not unplug by or near children. 2. Always unplug before using this ...
Instruction Manual
Page 6
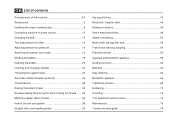
GB List of contents Principal parts of the machine 2/4 Accessories 6 Installing the snap-in sewing table 8 Connecting machine to power source 10 Changing the bulb 12 Two-step presser foot lifter 14 Adjusting presser foot pressure 14 Attaching the presser ... the thread.........32 Matching needle/ fabric/ thread 34 How to choose your pattern 38 Straight stitch and needle position 40 Zig-zag stitching 42 Blind hem/ Lingerie stitch 44 Sewing on buttons 46 Sew 4-step buttonholes 48 Zippers and piping 50 Mutlti-stitch zig-zag/ Bar tack 52 Free motion darning, stippling 54 Practical...
GB List of contents Principal parts of the machine 2/4 Accessories 6 Installing the snap-in sewing table 8 Connecting machine to power source 10 Changing the bulb 12 Two-step presser foot lifter 14 Adjusting presser foot pressure 14 Attaching the presser ... the thread.........32 Matching needle/ fabric/ thread 34 How to choose your pattern 38 Straight stitch and needle position 40 Zig-zag stitching 42 Blind hem/ Lingerie stitch 44 Sewing on buttons 46 Sew 4-step buttonholes 48 Zippers and piping 50 Mutlti-stitch zig-zag/ Bar tack 52 Free motion darning, stippling 54 Practical...
Instruction Manual
Page 9
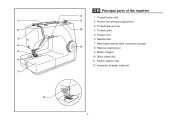
Presser foot pressure adjustment 3. Pattern selector dial 12. Thread tension dial 9 2. Thread cutter 5. Stitch length dial 11. Needle plate 7. Bobbin stopper 10. Presser foot 6. 1 2 3 4 5 6 7 12 GB Principal parts of the machine 8 1. Removable sewing table/ accessory storage 11 8. Thread take-up lever 10 4. Reverse sewing lever 9. Automatic threader (optional) 2
Presser foot pressure adjustment 3. Pattern selector dial 12. Thread tension dial 9 2. Thread cutter 5. Stitch length dial 11. Needle plate 7. Bobbin stopper 10. Presser foot 6. 1 2 3 4 5 6 7 12 GB Principal parts of the machine 8 1. Removable sewing table/ accessory storage 11 8. Thread take-up lever 10 4. Reverse sewing lever 9. Automatic threader (optional) 2

Instruction Manual
Page 13
...d. Button sewing foot e. All purpose foot b. L-screwdriver f. Overcasting foot o. Zipper foot c. Spool holder Optional accessories (2) (These 6 accessories are however available as special accessories from your local dealer.) m.Satin stitch foot n.... Hemmer foot p. Seam guide k. Bobbin (3x) j. Darning foot 6 Oil bottle h. 1 a b c 006806008 006905008 e f 006909008 g i j k 2 m 006804008 p 006812008 n 006803008 q 006810008 d 006914008 h l o 006800008 r 006016008 GB Accessories Standard accessories (1) a. they are not supplied with this machine...
...d. Button sewing foot e. All purpose foot b. L-screwdriver f. Overcasting foot o. Zipper foot c. Spool holder Optional accessories (2) (These 6 accessories are however available as special accessories from your local dealer.) m.Satin stitch foot n.... Hemmer foot p. Seam guide k. Bobbin (3x) j. Darning foot 6 Oil bottle h. 1 a b c 006806008 006905008 e f 006909008 g i j k 2 m 006804008 p 006812008 n 006803008 q 006810008 d 006914008 h l o 006800008 r 006016008 GB Accessories Standard accessories (1) a. they are not supplied with this machine...

Instruction Manual
Page 39
Pull threads down to the side of a seam, press down the reverse sewing lever (A). Guide the threads to cut. (3) 32 Release the lever and the machine will sew forwards again. (1) Removing the work Turn the handwheel counterclockwise to bring the thread take up lever to its highest position, raise the presser foot and remove work behind the needle and presser foot. (2) Cutting the thread Pull the threads behind the presser foot. Sew a few reverse stitches. A 1 2 B 3 GB Reverse sewing To secure the beginning and the end of the face plate and into thread cutter (B).
Pull threads down to the side of a seam, press down the reverse sewing lever (A). Guide the threads to cut. (3) 32 Release the lever and the machine will sew forwards again. (1) Removing the work Turn the handwheel counterclockwise to bring the thread take up lever to its highest position, raise the presser foot and remove work behind the needle and presser foot. (2) Cutting the thread Pull the threads behind the presser foot. Sew a few reverse stitches. A 1 2 B 3 GB Reverse sewing To secure the beginning and the end of the face plate and into thread cutter (B).
Instruction Manual
Page 47
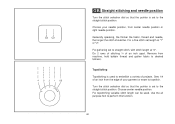
...3 2 1 0.5 321 0 GB Straight stitching and needle position Turn the stitch selection dial so that the pointer is set to the straight stitch position. Turn the stitch selection dial so that the pointer is set to the straight stitch position. Remove from machine, hold bobbin thread and gather fabric to perform... this function. 40 Use the all purpose foot to desired fullness. For gathering set length at "4". Do 2 rows of stitching ¼ of your needle position, from the edge of an inch apart. Sew...
...3 2 1 0.5 321 0 GB Straight stitching and needle position Turn the stitch selection dial so that the pointer is set to the straight stitch position. Turn the stitch selection dial so that the pointer is set to the straight stitch position. Remove from machine, hold bobbin thread and gather fabric to perform... this function. 40 Use the all purpose foot to desired fullness. For gathering set length at "4". Do 2 rows of stitching ¼ of your needle position, from the edge of an inch apart. Sew...
Instruction Manual
Page 57
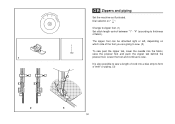
...GB Zippers and piping Set the machine as illustrated. It is also possible to sew a length of fabric). Lower the foot and continue to form a "welt" or piping. (3) 2 3 50 The zipper foot can be attached right or left, depending on " ". "4" (according to sew. (2) To sew past the zipper tab, lower ...the needle into a bias strip to sew. Change to zipper foot. (1) Set stitch length control between "1" - Dial selector on which side of the foot you are going to...
...GB Zippers and piping Set the machine as illustrated. It is also possible to sew a length of fabric). Lower the foot and continue to form a "welt" or piping. (3) 2 3 50 The zipper foot can be attached right or left, depending on " ". "4" (according to sew. (2) To sew past the zipper tab, lower ...the needle into a bias strip to sew. Change to zipper foot. (1) Set stitch length control between "1" - Dial selector on which side of the foot you are going to...
Instruction Manual
Page 61
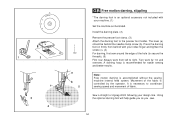
...to secure the threads). (5) First row: Always work by the operator. Sew a straight or zigzag stitch following your index finger and tighten the screw (c). (4) For darning, first sew around the edge of the hole (to coordinate sewing speed and movement of the fabric is controlled by 1/4 and oversew. ... (2) Remove the presser foot clamp. (3) Attach the darning foot to right. The lever (a) should be behind with your machine. (1) Set the machine as you sew. 54 Press the darning foot on firmly from left to the presser foot holder. Movement of fabric. Turn work from behind ...
...to secure the threads). (5) First row: Always work by the operator. Sew a straight or zigzag stitch following your index finger and tighten the screw (c). (4) For darning, first sew around the edge of the hole (to coordinate sewing speed and movement of the fabric is controlled by 1/4 and oversew. ... (2) Remove the presser foot clamp. (3) Attach the darning foot to right. The lever (a) should be behind with your machine. (1) Set the machine as you sew. 54 Press the darning foot on firmly from left to the presser foot holder. Movement of fabric. Turn work from behind ...

Instruction Manual
Page 69
Stitch length: Fine (0.5 - 1.0) Sewing Instructions: Position a piece of the tear. Pattern: Multi - Align the center of the foot with the center of fabric directly beneath the tear in your fabric. 43 10 2 GB Mending Machine Preparation: - stitch Zigzag - Stitchacross, backstitching at the start and at the end of the seam. 62 Stitch width: Largest 4.5mm -
Stitch length: Fine (0.5 - 1.0) Sewing Instructions: Position a piece of the tear. Pattern: Multi - Align the center of the foot with the center of fabric directly beneath the tear in your fabric. 43 10 2 GB Mending Machine Preparation: - stitch Zigzag - Stitchacross, backstitching at the start and at the end of the seam. 62 Stitch width: Largest 4.5mm -

Instruction Manual
Page 71
Stitch Width: Straight - Stitch length: 1.5mm (fine) Sewing Instructions: Stay-stitching is used to reinforce curves such as armholes, seams in stretch fabrics and other areas to prevent stretching. Stay stitch along the edge of the area 1/4 of an inch from the edge of the seam. 64 Pattern: Straight Stitch - 4 3 0 GB Stay-stitching 21 Machine Preparation: -
Stitch Width: Straight - Stitch length: 1.5mm (fine) Sewing Instructions: Stay-stitching is used to reinforce curves such as armholes, seams in stretch fabrics and other areas to prevent stretching. Stay stitch along the edge of the area 1/4 of an inch from the edge of the seam. 64 Pattern: Straight Stitch - 4 3 0 GB Stay-stitching 21 Machine Preparation: -

Instruction Manual
Page 75
Fold and press wrong sides together on pulled thread line or marked lines. Repeat, sewing in your fabric, either pull a thread to mark the fold or mark with chalk or marking pencil. Pattern: Straight - Stitch Length: 2 - 3 Sewing Instructions: To mark pintucks in the same direction for each tuck. 4 32 1 0 GB Traditional pintucks Machine Preparation: - Stitch 1/8 of an inch from fold line. Press flat. 68 Stitch Width: Straight -
Fold and press wrong sides together on pulled thread line or marked lines. Repeat, sewing in your fabric, either pull a thread to mark the fold or mark with chalk or marking pencil. Pattern: Straight - Stitch Length: 2 - 3 Sewing Instructions: To mark pintucks in the same direction for each tuck. 4 32 1 0 GB Traditional pintucks Machine Preparation: - Stitch 1/8 of an inch from fold line. Press flat. 68 Stitch Width: Straight -

Instruction Manual
Page 77
...Gathering 43 21 0 Machine Preparation: - Stitch Width: Straight - Pattern: Straight Stitch - At 1/4 of an inch from your first row of the seam, begin by pulling on the bobbin thread. Repeat this technique for gathering waistbands, sleeve caps etc. Stitch Length: Longest Sewing Instructons: Use this ...procedure once again at 1/4 of an inch from the edge of stitching. Secure thread ends. 70 When seam is complete, raise the needle to ...
...Gathering 43 21 0 Machine Preparation: - Stitch Width: Straight - Pattern: Straight Stitch - At 1/4 of an inch from your first row of the seam, begin by pulling on the bobbin thread. Repeat this technique for gathering waistbands, sleeve caps etc. Stitch Length: Longest Sewing Instructons: Use this ...procedure once again at 1/4 of an inch from the edge of stitching. Secure thread ends. 70 When seam is complete, raise the needle to ...

Instruction Manual
Page 79
... fabric. Foot: Zigzag or optional Satin foot Sewing Instructions: Couching is simply the technique of zigzagging over the cord so that the needle falls just to width of your design. 72 Stitch length: Variable - 4 321 0 GB Couching Machine Preparation: - Use as a decorative touch on... your foot and zigzag over a fine cord. With a marking pencil, draw a design on jackets and other sewing projects. As you sew, follow the lines of cord) -...
... fabric. Foot: Zigzag or optional Satin foot Sewing Instructions: Couching is simply the technique of zigzagging over the cord so that the needle falls just to width of your design. 72 Stitch length: Variable - 4 321 0 GB Couching Machine Preparation: - Use as a decorative touch on... your foot and zigzag over a fine cord. With a marking pencil, draw a design on jackets and other sewing projects. As you sew, follow the lines of cord) -...
Instruction Manual
Page 85
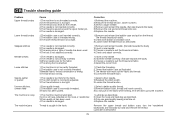
... quality sewing machine oil. 4.Replace the needle. Remove the upper thread and bobbin case, turn the handwheel backwards and forwards by the machine. 1.Lubricate as described. 2.Clean the hook and feed dog as described. Thread is caught in the hook. 78 Correction 1.Rethread the machine. .... GB Trouble shooting guide Problem Upper thread breaks Lower thread breaks Skipped stitches Needle breaks Loose stitches Seams gather or pucker Uneven stitches, uneven feed The machine is noisy The machine jams Cause 1.The machine is not threaded correctly. 2.The thread tension is too tight. 3.The...
... quality sewing machine oil. 4.Replace the needle. Remove the upper thread and bobbin case, turn the handwheel backwards and forwards by the machine. 1.Lubricate as described. 2.Clean the hook and feed dog as described. Thread is caught in the hook. 78 Correction 1.Rethread the machine. .... GB Trouble shooting guide Problem Upper thread breaks Lower thread breaks Skipped stitches Needle breaks Loose stitches Seams gather or pucker Uneven stitches, uneven feed The machine is noisy The machine jams Cause 1.The machine is not threaded correctly. 2.The thread tension is too tight. 3.The...


