
Instruction Manual
Page 2
... only) Use Model YC-485 EC or Model JF-1000 with any other ). or its Affiliates. ©2013 The Singer Company Limited S.à r.l. Always unplug this sewing machine if it has a damaged cord or plug, if it is being used or where oxygen is not working properly, if..., fire, electric shock, or injury to electrical/electronic products. Unplug the foot controller of electric shock:" 1. SINGER is for guidance. To reduce the risk of the sewing machine and foot control free from all instructions before carrying out maintenance or replacing lamps." 12. "Do not use ...
... only) Use Model YC-485 EC or Model JF-1000 with any other ). or its Affiliates. ©2013 The Singer Company Limited S.à r.l. Always unplug this sewing machine if it has a damaged cord or plug, if it is being used or where oxygen is not working properly, if..., fire, electric shock, or injury to electrical/electronic products. Unplug the foot controller of electric shock:" 1. SINGER is for guidance. To reduce the risk of the sewing machine and foot control free from all instructions before carrying out maintenance or replacing lamps." 12. "Do not use ...

Instruction Manual
Page 5
... hook area and feed dogs 50 - 51 Cleaning the sewing machine and foot controller 4. PERFORMANCE CHECKLIST 54 - 55 Helpful messages, ... foot 24 - 25 Control panel functions 26 - 27 Reverse operation button 28 - 29 2. STARTING TO SEW Quick reference table of stitch length and width ---------- 30 - 31 Straight stitching 32 - 35 Keeping seams ...the twin needle Straight stitch needle position 52 - 53 5. KNOWING YOUR SEWING MACHINE Machine identification 6 - 7 Accessories 8 - 9 Setting up your machine 10 - 11 Spool pins 12 - 13 Presser foot lifter, Feed dog control 12 - 13 ...
... hook area and feed dogs 50 - 51 Cleaning the sewing machine and foot controller 4. PERFORMANCE CHECKLIST 54 - 55 Helpful messages, ... foot 24 - 25 Control panel functions 26 - 27 Reverse operation button 28 - 29 2. STARTING TO SEW Quick reference table of stitch length and width ---------- 30 - 31 Straight stitching 32 - 35 Keeping seams ...the twin needle Straight stitch needle position 52 - 53 5. KNOWING YOUR SEWING MACHINE Machine identification 6 - 7 Accessories 8 - 9 Setting up your machine 10 - 11 Spool pins 12 - 13 Presser foot lifter, Feed dog control 12 - 13 ...

Instruction Manual
Page 8
KNOWING YOUR SEWING MACHINE MACHINE IDENTIFICATION 1. Thread tension control 3 4. Extension table (Accessory box) 8. Needle 24. Needle bar 26. Alternate thread cutter 14 27. Feed dogs 31. Foot control 35. Thread ...
KNOWING YOUR SEWING MACHINE MACHINE IDENTIFICATION 1. Thread tension control 3 4. Extension table (Accessory box) 8. Needle 24. Needle bar 26. Alternate thread cutter 14 27. Feed dogs 31. Foot control 35. Thread ...

Instruction Manual
Page 10
Bobbins 3. Spool pin cap (medium) 7. Buttonhole foot The foot that comes on your sewing machine is another very useful foot and should be sure they are Class I5 J. 8 1 2 3 4 5 6 7 8 9 10 11 12 13 Blindhem stitch foot 13. The satin foot (...11) is called the general purpose foot and will be used for most of your decorative sewing - Needles 2. Spool pin cap (large) 8. Buttonhole opener/seam ripper and brush 9. Screwdriver for the majority of your sewing. When purchasing additional bobbins, be used for needle plate 10. Spool pin cap (small) 6. ...
Bobbins 3. Spool pin cap (medium) 7. Buttonhole foot The foot that comes on your sewing machine is another very useful foot and should be sure they are Class I5 J. 8 1 2 3 4 5 6 7 8 9 10 11 12 13 Blindhem stitch foot 13. The satin foot (...11) is called the general purpose foot and will be used for most of your decorative sewing - Needles 2. Spool pin cap (large) 8. Buttonhole opener/seam ripper and brush 9. Screwdriver for the majority of your sewing. When purchasing additional bobbins, be used for needle plate 10. Spool pin cap (small) 6. ...

Instruction Manual
Page 14
...to remove thick fabric. Down Basse Abajo Feed dog control Levier de contrôle des griffes Control de dientes CONVERTING TO FREE-ARM SEWING Your machine can be placed to the right. VERTICAL SPOOL PIN for your presser foot. 1. SPOOL PINS HORIZONTAL SPOOL PIN for normal thread spool... Place thread spool on the spool pin. With the extension table removed the machine converts into place until it . Spool pin cap Chapeau de bobine Tapa del pasador carrete Spool Bobine Carrete Spool pin Porte-bobine Pasador ...
...to remove thick fabric. Down Basse Abajo Feed dog control Levier de contrôle des griffes Control de dientes CONVERTING TO FREE-ARM SEWING Your machine can be placed to the right. VERTICAL SPOOL PIN for your presser foot. 1. SPOOL PINS HORIZONTAL SPOOL PIN for normal thread spool... Place thread spool on the spool pin. With the extension table removed the machine converts into place until it . Spool pin cap Chapeau de bobine Tapa del pasador carrete Spool Bobine Carrete Spool pin Porte-bobine Pasador ...
Instruction Manual
Page 26
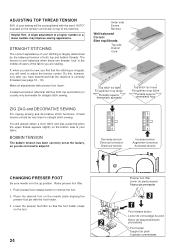
... pin with the foot holder. 3. Lower the presser foot lifter so that the machine is well balanced when these two threads 'lock' in the up position. Do this, however, only after you are sewing. Under side Envers Reverso Well balanced Correct Bien equilibrada Top side Endroit Cara Top... zigzag sewing and decorative stitch functions, thread tension should be accomplished with presser foot 'down'. The tension is correctly threaded (see page 18 - 19). Place the desired foot on the bottom side of your stitching is in the middle of layers of the machine. STRAIGHT STITCHING The ...
... pin with the foot holder. 3. Lower the presser foot lifter so that the machine is well balanced when these two threads 'lock' in the up position. Do this, however, only after you are sewing. Under side Envers Reverso Well balanced Correct Bien equilibrada Top side Endroit Cara Top... zigzag sewing and decorative stitch functions, thread tension should be accomplished with presser foot 'down'. The tension is correctly threaded (see page 18 - 19). Place the desired foot on the bottom side of your stitching is in the middle of layers of the machine. STRAIGHT STITCHING The ...
Instruction Manual
Page 28
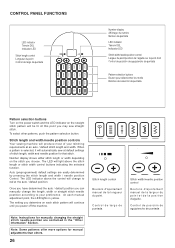
Stitch length and width/needle position controls Your sewing machine will produce most of your preference. Auto (preprogrammed) default ...Pattern selection buttons Turn on the power switch and the LED indicator on the stitch you power off the machine. When a pattern is selected, it will change the length, width or straight stitch needle postition according ... and width / needle position Control. Once you have determined the auto / default position you may sew straight stitch. Number display shows either stitch length or width depending on the straight stitch pattern will continue...
Stitch length and width/needle position controls Your sewing machine will produce most of your preference. Auto (preprogrammed) default ...Pattern selection buttons Turn on the power switch and the LED indicator on the stitch you power off the machine. When a pattern is selected, it will change the length, width or straight stitch needle postition according ... and width / needle position Control. Once you have determined the auto / default position you may sew straight stitch. Number display shows either stitch length or width depending on the straight stitch pattern will continue...

Instruction Manual
Page 30
...;s * Reverse stitch function for tie-off of other stitches ( ) The sewing machine makes 4 tiny tacking stitches to tie off the sewing pattern to sew in the pattern where the reverse/tacking stitch button is pushed. The machine will be at the start and end of the tacking stitches will continue to... avoid raveling at the exact spot in reverse as long as the reverse stitch button is pressed. * Tacking stitch function for straight and zigzag stitches ( ) Reverse sewing is carried out...
...;s * Reverse stitch function for tie-off of other stitches ( ) The sewing machine makes 4 tiny tacking stitches to tie off the sewing pattern to sew in the pattern where the reverse/tacking stitch button is pushed. The machine will be at the start and end of the tacking stitches will continue to... avoid raveling at the exact spot in reverse as long as the reverse stitch button is pressed. * Tacking stitch function for straight and zigzag stitches ( ) Reverse sewing is carried out...

Instruction Manual
Page 34
AUTO NOTE: Based upon the weight of the fabric, slight "fine tuning" of the fabric, stop the sewing machine. Thread tension control B. Place the fabric under the presser foot toward the back of face cover as an aid for guiding your hands. First turn... in doll clothes or baby garments. 32 3/4" (19 mm) 5/8" (16 mm) 1/2" (13 mm) 3/8" ( 9 mm) 1/4" ( 6 mm) Start the machine. NOTE: To secure the stitching and avoid raveling, press the reverse stitch button and sew a few stitches at its center position. The numbers indicate distance from the needle at its highest position, then...
AUTO NOTE: Based upon the weight of the fabric, slight "fine tuning" of the fabric, stop the sewing machine. Thread tension control B. Place the fabric under the presser foot toward the back of face cover as an aid for guiding your hands. First turn... in doll clothes or baby garments. 32 3/4" (19 mm) 5/8" (16 mm) 1/2" (13 mm) 3/8" ( 9 mm) 1/4" ( 6 mm) Start the machine. NOTE: To secure the stitching and avoid raveling, press the reverse stitch button and sew a few stitches at its center position. The numbers indicate distance from the needle at its highest position, then...

Instruction Manual
Page 36
...invisible or lightweight thread that the needle passes through the right side of the zipper or to sew close to the cording. Thread machine with a bias strip of the needle position to sew closer to the piping may be accomplished with different tension and stitch length combinations. 34 INSERTING ...of the zipper foot. Start to the top. 2. HAND-LOOK QUILT STITCH This stitch is designed to look like hand sewing for the piping. When sewing, the machine will pull this thread to sew. To sew down the right side, attach left side of zipper foot to the main fabric piece for...
...invisible or lightweight thread that the needle passes through the right side of the zipper or to sew close to the cording. Thread machine with a bias strip of the needle position to sew closer to the piping may be accomplished with different tension and stitch length combinations. 34 INSERTING ...of the zipper foot. Start to the top. 2. HAND-LOOK QUILT STITCH This stitch is designed to look like hand sewing for the piping. When sewing, the machine will pull this thread to sew. To sew down the right side, attach left side of zipper foot to the main fabric piece for...

Instruction Manual
Page 38
NOTE: When sewing a dense (closely spaced) satin stitch, the satin stitch foot MUST be used for appliqué, bar tacking, etc. Under ... pattern the stitch length is 2 mm and the stitch width is selected. NOTE: The values shown in the chart are actual sewing lengths and widths and do not correspond to the top or you are experiencing puckering, slightly reduce the tension with the thread tension... foot - AUTO The top thread may appear on the bottom depending on the thread, fabric, type of stitch and sewing speed, but the bobbin thread must never appear on the sewing machine.
NOTE: When sewing a dense (closely spaced) satin stitch, the satin stitch foot MUST be used for appliqué, bar tacking, etc. Under ... pattern the stitch length is 2 mm and the stitch width is selected. NOTE: The values shown in the chart are actual sewing lengths and widths and do not correspond to the top or you are experiencing puckering, slightly reduce the tension with the thread tension... foot - AUTO The top thread may appear on the bottom depending on the thread, fabric, type of stitch and sewing speed, but the bobbin thread must never appear on the sewing machine.

Instruction Manual
Page 48
...B Languette B Lengüeta B PROCEDURE * Use an interfacing in one of buttonhole patterns. 2. Place the fabric under the foot. SEWING A BUTTONHOLE USING BUTTONHOLE FOOT Your machine offers you two different widths of bartack buttonholes sewn by a system that it drops down vertically between the stoppers (A) and (B). (C) ... on the fabric with the mark on a scrap of the garment where buttonholes are placed. While holding the top thread, start the machine. All of this is done in the area of the actual fabric from your garment. 6. Stabilizer or regular interfacing can be used....
...B Languette B Lengüeta B PROCEDURE * Use an interfacing in one of buttonhole patterns. 2. Place the fabric under the foot. SEWING A BUTTONHOLE USING BUTTONHOLE FOOT Your machine offers you two different widths of bartack buttonholes sewn by a system that it drops down vertically between the stoppers (A) and (B). (C) ... on the fabric with the mark on a scrap of the garment where buttonholes are placed. While holding the top thread, start the machine. All of this is done in the area of the actual fabric from your garment. 6. Stabilizer or regular interfacing can be used....
Instruction Manual
Page 52
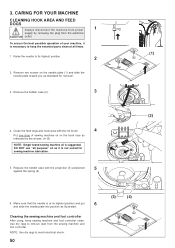
... bobbin case (2). 3 4. Make sure that the needle is necessary to avoid electrical shock. 50 (3) (4) NOTE: Use dry rags to keep sewing machine and foot controller clean. Remove two screws on the hook race as illustrated. DO NOT use "all times. (1) 1. Use dry rags to ... dust from power 1 supply by the arrows. (A, B) NOTE: Singer brand sewing machine oil is not suited for removal. 3. 3. CARING FOR YOUR MACHINE CLEANING HOOK AREA AND FEED DOGS Always disconnect the machine from the sewing machine and foot controller. Replace the bobbin case with the lint brush. ...
... bobbin case (2). 3 4. Make sure that the needle is necessary to avoid electrical shock. 50 (3) (4) NOTE: Use dry rags to keep sewing machine and foot controller clean. Remove two screws on the hook race as illustrated. DO NOT use "all times. (1) 1. Use dry rags to ... dust from power 1 supply by the arrows. (A, B) NOTE: Singer brand sewing machine oil is not suited for removal. 3. 3. CARING FOR YOUR MACHINE CLEANING HOOK AREA AND FEED DOGS Always disconnect the machine from the sewing machine and foot controller. Replace the bobbin case with the lint brush. ...

Instruction Manual
Page 54
... width to the twin needle mark prior to pass under the presser foot to the back of the machine, leaving about 6" (15 cm) of parallel stitches for sewing satin stitches and as one thread through each spool pin. Check with the stitch width control as for... for single needle sewing. Doing so will preclude any possibility of a Singer brand 3mm (Style 2025) twin needle is an attractive stitch used to normal sewing mode. NOTE: Needle threader cannot be adjusted to 13 different positions with your machine. Turning off the machine returns the machine to thread the twin...
... width to the twin needle mark prior to pass under the presser foot to the back of the machine, leaving about 6" (15 cm) of parallel stitches for sewing satin stitches and as one thread through each spool pin. Check with the stitch width control as for... for single needle sewing. Doing so will preclude any possibility of a Singer brand 3mm (Style 2025) twin needle is an attractive stitch used to normal sewing mode. NOTE: Needle threader cannot be adjusted to 13 different positions with your machine. Turning off the machine returns the machine to thread the twin...

Instruction Manual
Page 56
...until a few stitches are formed. Fabric puckers. * Top thread tension is not lowered when sewing buttonhole. - Lower presser foot. Fabric does not move. * Presser foot is being pulled or pushed against machine feeding action. - Raise feed dogs. Needle breaks. * Fabric is not lowered - Draw ...Remove lint (see page 50 - 51). * Needle is caught in bobbin case or hook. - PERFORMANCE CHECKLIST GENERAL PROBLEMS Machine does not sew. * Power switch is bent. - Needle thread breaks. * Machine is not threaded correctly (see page 18 - 19). * Top thread tension is too tight (see page 16 - ...
...until a few stitches are formed. Fabric puckers. * Top thread tension is not lowered when sewing buttonhole. - Lower presser foot. Fabric does not move. * Presser foot is being pulled or pushed against machine feeding action. - Raise feed dogs. Needle breaks. * Fabric is not lowered - Draw ...Remove lint (see page 50 - 51). * Needle is caught in bobbin case or hook. - PERFORMANCE CHECKLIST GENERAL PROBLEMS Machine does not sew. * Power switch is bent. - Needle thread breaks. * Machine is not threaded correctly (see page 18 - 19). * Top thread tension is too tight (see page 16 - ...

Instruction Manual
Page 58
... bobbin winder shaft is in a few seconds. The stitch pattern selected, does not operate when the reverse/tacking stitch is not in the machine socket for sewing and to occur. The reverse button is engaged (lower position). Raise buttonhole lever and begin...eliminate the problem that can be operated in an incorrect starting position. Lower the buttonhole lever so that caused the machine to your issue. Pull to start sewing before the presser foot was pushed down vertically between the stoppers. The foot controller was lowered. Lower presser foot and...
... bobbin winder shaft is in a few seconds. The stitch pattern selected, does not operate when the reverse/tacking stitch is not in the machine socket for sewing and to occur. The reverse button is engaged (lower position). Raise buttonhole lever and begin...eliminate the problem that can be operated in an incorrect starting position. Lower the buttonhole lever so that caused the machine to your issue. Pull to start sewing before the presser foot was pushed down vertically between the stoppers. The foot controller was lowered. Lower presser foot and...


