Instruction Manual
Page 3
..., Double overlock stitch, Criss-cross stitch, Crossed stitch, Slant overedge stitch, Slant pin stitch, Greek key stitch, Fishbone stitch, Thorn stitch, Reinforced overedge stitch, Wizard stitch, Chevron stitch Sewing on a button 60 - 61 Sewing a buttonhole 62 - 67 Using buttonhole foot, Procedure, Corded buttonholes, Buttonholing with hard-to free-arm sewing 14 - 15 Winding the bobbin 16 - 17 Threading the bobbin thread 18 - 19 Threading the top thread 20 - 23 Using automatic needle threader Needle, thread and fabric chart 24 - 25 Adjusting top thread tension 26 - 27 Changing presser...
..., Double overlock stitch, Criss-cross stitch, Crossed stitch, Slant overedge stitch, Slant pin stitch, Greek key stitch, Fishbone stitch, Thorn stitch, Reinforced overedge stitch, Wizard stitch, Chevron stitch Sewing on a button 60 - 61 Sewing a buttonhole 62 - 67 Using buttonhole foot, Procedure, Corded buttonholes, Buttonholing with hard-to free-arm sewing 14 - 15 Winding the bobbin 16 - 17 Threading the bobbin thread 18 - 19 Threading the top thread 20 - 23 Using automatic needle threader Needle, thread and fabric chart 24 - 25 Adjusting top thread tension 26 - 27 Changing presser...
Instruction Manual
Page 6
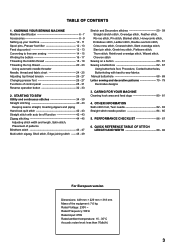
... SEWING MACHINE MACHINE IDENTIFICATION 1. Threading lever 2 4. Extension table (Accessory box) 7. Reverse stitch button 10. Needle clamp screw 28. Presser foot 13 29. Thread cutter/holder 3 6. Twin thread guide 20. Bobbin cover release button 32. Thread tension control 3. Bobbin winder stop 4 9. Horizontal spool pin 5 11. Presser foot lifter 17. Presser foot screw 22. Foot release button 27. Power line cord 33. Handle 12. Hand wheel 13. Feed dog control 18. Bobbin cover plate 12 24. Needle bar 25. Needle plate 14 31. Foot control...
... SEWING MACHINE MACHINE IDENTIFICATION 1. Threading lever 2 4. Extension table (Accessory box) 7. Reverse stitch button 10. Needle clamp screw 28. Presser foot 13 29. Thread cutter/holder 3 6. Twin thread guide 20. Bobbin cover release button 32. Thread tension control 3. Bobbin winder stop 4 9. Horizontal spool pin 5 11. Presser foot lifter 17. Presser foot screw 22. Foot release button 27. Power line cord 33. Handle 12. Hand wheel 13. Feed dog control 18. Bobbin cover plate 12 24. Needle bar 25. Needle plate 14 31. Foot control...

Instruction Manual
Page 8
Bobbins (4 total - 1 in machine) 3. Spool pin cap (large) 8. Zipper foot 11. Blind stitch foot 13. Spool pin cap (small) 6. The Satin Foot (11) is called the General Purpose Foot and will be used for needle plate 10. ACCESSORIES 1. Needles 2. Spool pin felt discs (2) 5. Buttonhole foot The Foot that comes on your Sewing machine is another very useful foot and should be sure they are Class I5 J. 1 2 3 4 5 6 7 8 9 10 11 12 13 8 Auxiliary spool pin 4. Screwdriver for most decorative sewing. When purchasing additional bobbins, be used for...
Bobbins (4 total - 1 in machine) 3. Spool pin cap (large) 8. Zipper foot 11. Blind stitch foot 13. Spool pin cap (small) 6. The Satin Foot (11) is called the General Purpose Foot and will be used for needle plate 10. ACCESSORIES 1. Needles 2. Spool pin felt discs (2) 5. Buttonhole foot The Foot that comes on your Sewing machine is another very useful foot and should be sure they are Class I5 J. 1 2 3 4 5 6 7 8 9 10 11 12 13 8 Auxiliary spool pin 4. Screwdriver for most decorative sewing. When purchasing additional bobbins, be used for...

Instruction Manual
Page 10
... cord Cordon Cordón de la linea eléctrica Foot control Rhéostat Control por pedal POWER/LIGHT SWITCH Your machine will not operate. Always disconnect the machine from power supply by removing the plug from the power supply. NOTE: W h e n f o o t c o n t r o l i s disconnected, the machine will not operate until the power/light switch is turned on. SETTING UP YOUR MACHINE Be sure to wipe off any surplus oil from needle plate area before using...
... cord Cordon Cordón de la linea eléctrica Foot control Rhéostat Control por pedal POWER/LIGHT SWITCH Your machine will not operate. Always disconnect the machine from power supply by removing the plug from the power supply. NOTE: W h e n f o o t c o n t r o l i s disconnected, the machine will not operate until the power/light switch is turned on. SETTING UP YOUR MACHINE Be sure to wipe off any surplus oil from needle plate area before using...
Instruction Manual
Page 18
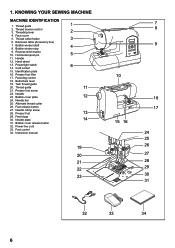
Remove the bobbin cover plate by pushing the release button to its highest position by rotating the hand 1 wheel counter clockwise. 2. Then pull the thread along the groove on the needle plate until it is snipped with cutter on top of the bobbin, pull the 5 thread until it stops in the slot (B). Raise the needle to the right. Insert the bobbin making sure the bobbin rotates counterclockwise when...
Remove the bobbin cover plate by pushing the release button to its highest position by rotating the hand 1 wheel counter clockwise. 2. Then pull the thread along the groove on the needle plate until it is snipped with cutter on top of the bobbin, pull the 5 thread until it stops in the slot (B). Raise the needle to the right. Insert the bobbin making sure the bobbin rotates counterclockwise when...

Instruction Manual
Page 22
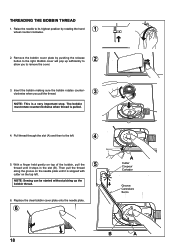
... set for straight stitch (in place. Pull thread loop away from needle hole, adjust the position of sewing machine oil onto the felt disc, if the machine is in operation or the threading hook may be pulled off from needle hole after a long interval. 4. NOTE: For smooth threading, it toward you . 1 Felt disc Rondelle de feutre Disco de fieltro Thread guide Guide-fil Guía hilo 2 Twin thread guide Guide-fil double Guía doble hilo Note: 1. Put a drop...
... set for straight stitch (in place. Pull thread loop away from needle hole, adjust the position of sewing machine oil onto the felt disc, if the machine is in operation or the threading hook may be pulled off from needle hole after a long interval. 4. NOTE: For smooth threading, it toward you . 1 Felt disc Rondelle de feutre Disco de fieltro Thread guide Guide-fil Guía hilo 2 Twin thread guide Guide-fil double Guía doble hilo Note: 1. Put a drop...
Instruction Manual
Page 24
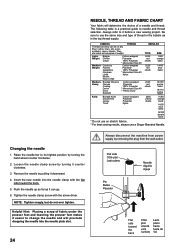
... a needle and thread. Raise the needle bar to it counter clockwise. 3. Insert the new needle into the needle plate slot. 24 Always disconnect the machine from power supply by turning it before a new sewing project. NOTE: Tighten snugly, but do not over tighten. FABRICS THREAD The fabrics below can go. 6. Remove the needle by turning the hand wheel counter clockwise. 2. Changing the needle 1. Be sure to needle and thread selection. They are listed...
... a needle and thread. Raise the needle bar to it counter clockwise. 3. Insert the new needle into the needle plate slot. 24 Always disconnect the machine from power supply by turning it before a new sewing project. NOTE: Tighten snugly, but do not over tighten. FABRICS THREAD The fabrics below can go. 6. Remove the needle by turning the hand wheel counter clockwise. 2. Changing the needle 1. Be sure to needle and thread selection. They are listed...
Instruction Manual
Page 26
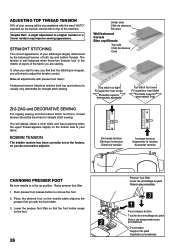
... bottom) is usually only desireable for straight stitch sewing. You will need to adjust the tension control. BOBBIN TENSION The bobbin tension has been correctly set at the factory, so you will always obtain a nicer stitch and less puckering when the upper thread appears slightly on the needle plate aligning the presser foot pin with the foot holder. 3. Place the desired foot on the bottom side of the machine. Under side Côté de...
... bottom) is usually only desireable for straight stitch sewing. You will need to adjust the tension control. BOBBIN TENSION The bobbin tension has been correctly set at the factory, so you will always obtain a nicer stitch and less puckering when the upper thread appears slightly on the needle plate aligning the presser foot pin with the foot holder. 3. Place the desired foot on the bottom side of the machine. Under side Côté de...

Instruction Manual
Page 40
... bobbin cover plate is 1/4" (6mm) seam guide line which is used for piecing quilt blocks and also for guiding your hands. The guide line on the needle plate. Let's begin by following the steps below. 1 B 1. A. STRAIGHT STITCHING A Straight stitch is at its center position. Thread tension control B. Start the machine. NOTE: To secure the stitching and avoid raveling, press the reverse stitch button and sew a few stitches at its highest position, then raise the presser foot, draw 6 the fabric to change the needle position...
... bobbin cover plate is 1/4" (6mm) seam guide line which is used for piecing quilt blocks and also for guiding your hands. The guide line on the needle plate. Let's begin by following the steps below. 1 B 1. A. STRAIGHT STITCHING A Straight stitch is at its center position. Thread tension control B. Start the machine. NOTE: To secure the stitching and avoid raveling, press the reverse stitch button and sew a few stitches at its highest position, then raise the presser foot, draw 6 the fabric to change the needle position...

Instruction Manual
Page 42
... foot holder so that matches your fabric. Helpful Hint: Slight adjusting of the needle position to sew closer to the piping may be accomplished with different tension and stitch length combinations. STRAIGHT STITCH WITH AUTO TIE-OFF FUNCTION 1. HAND-LOOK QUILT STITCH This stitch is released. 2. When sewing the machine will sew 4 stitches in reverse and then 4 stitches in reverse and continue to sew forward until you acheive the desired appearance. 4. Start to sew. Push the reverse button...
... foot holder so that matches your fabric. Helpful Hint: Slight adjusting of the needle position to sew closer to the piping may be accomplished with different tension and stitch length combinations. STRAIGHT STITCH WITH AUTO TIE-OFF FUNCTION 1. HAND-LOOK QUILT STITCH This stitch is released. 2. When sewing the machine will sew 4 stitches in reverse and then 4 stitches in reverse and continue to sew forward until you acheive the desired appearance. 4. Start to sew. Push the reverse button...
Instruction Manual
Page 44
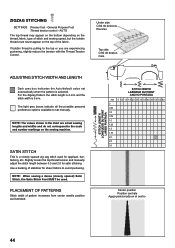
... number markings on the top of stitch and sewing speed, but the bobbin thread must never appear on the sewing machine. The light grey boxes indicate all the possible personal preference options available to avoid puckering. Use a backing of pattern increases from center needle position as illustrated. Slightly loosen the top thread tension and manually adjust the stitch length between 0.5 and 2.0 for sheer fabrics to set automatically when the pattern is a closely spaced zig zag stitch used...
... number markings on the top of stitch and sewing speed, but the bobbin thread must never appear on the sewing machine. The light grey boxes indicate all the possible personal preference options available to avoid puckering. Use a backing of pattern increases from center needle position as illustrated. Slightly loosen the top thread tension and manually adjust the stitch length between 0.5 and 2.0 for sheer fabrics to set automatically when the pattern is a closely spaced zig zag stitch used...

Instruction Manual
Page 46
... pierce the fold of the guide. Elastic blind stitch for soft, stretchable fabrics 1. Then turn the hem up . Turn the handwheel counter clockwise by turning it under the foot. Blind Stitch Foot : Thread Tension Control: AUTO - When completed, the stitching is primarily used for normal woven fabrics 1 2 Medium to heavyweight fabrics. NOTE: For a narrower or wider blindhem, first manually adjust the length and width controls to sew blind hems. Always make a sewing test first. 4 Top side...
... pierce the fold of the guide. Elastic blind stitch for soft, stretchable fabrics 1. Then turn the hem up . Turn the handwheel counter clockwise by turning it under the foot. Blind Stitch Foot : Thread Tension Control: AUTO - When completed, the stitching is primarily used for normal woven fabrics 1 2 Medium to heavyweight fabrics. NOTE: For a narrower or wider blindhem, first manually adjust the length and width controls to sew blind hems. Always make a sewing test first. 4 Top side...

Instruction Manual
Page 48
... illustration requires manual adjustment of fabrics. MULTI-STITCH ZIGZAG SETTINGS :Presser foot - AUTO This is a popular decorative stitch (used in to form a shell hem. AUTO Turn under the seam allowances on both sides with different width, length and tension settings. Helpful Hint: For a variety in appearance experiment with needle. Baste folded edges to the stitching line. It is recommended for bartacks, mending tears, patching, sewing towelling, patch-work and attaching flat elastic. press...
... illustration requires manual adjustment of fabrics. MULTI-STITCH ZIGZAG SETTINGS :Presser foot - AUTO This is a popular decorative stitch (used in to form a shell hem. AUTO Turn under the seam allowances on both sides with different width, length and tension settings. Helpful Hint: For a variety in appearance experiment with needle. Baste folded edges to the stitching line. It is recommended for bartacks, mending tears, patching, sewing towelling, patch-work and attaching flat elastic. press...

Instruction Manual
Page 50
... be used for seaming in one operation. STRETCH AND DECORATIVE STITCHES SETTINGS :Presser foot - forwards, backwards and forwards. FEATHER STITCH The pleasing appearance of garments. AUTO Stretch stitches are mainly for use in making sportswear - It is a similar stitch used for edging neck-bands, armholes, sleeves and hems. When manually adjusted to your garments. OVEREDGE STITCH This is ideal for top-stitching, or attaching lace or inset panels. General Purpose Foot or Satin Stitch Foot :Thread tension control -
... be used for seaming in one operation. STRETCH AND DECORATIVE STITCHES SETTINGS :Presser foot - forwards, backwards and forwards. FEATHER STITCH The pleasing appearance of garments. AUTO Stretch stitches are mainly for use in making sportswear - It is a similar stitch used for edging neck-bands, armholes, sleeves and hems. When manually adjusted to your garments. OVEREDGE STITCH This is ideal for top-stitching, or attaching lace or inset panels. General Purpose Foot or Satin Stitch Foot :Thread tension control -

Instruction Manual
Page 60
SEWING ON A BUTTON SETTINGS :Presser foot - Position your fabric and button under the presser foot. Sew 10 stitches across. If a shank is required, place a pin on top of the button and sew over top of button. Adjust width if required. Turn the handwheel to the backside of the fabric and tie together. 60 Helpful Hint: To secure thread, pull both threads to make sure needle clears both left and right openings of it. General Purpose Foot :Feed dog control - Lower presser foot.
SEWING ON A BUTTON SETTINGS :Presser foot - Position your fabric and button under the presser foot. Sew 10 stitches across. If a shank is required, place a pin on top of the button and sew over top of button. Adjust width if required. Turn the handwheel to the backside of the fabric and tie together. 60 Helpful Hint: To secure thread, pull both threads to make sure needle clears both left and right openings of it. General Purpose Foot :Feed dog control - Lower presser foot.

Instruction Manual
Page 74
... on the display. Default settings are indicated as highlighted numbers. MIRROR IMAGE SETTING Mirror image of stitch length, width, mirror image and twin needle can make changes by pressing the twin needle button, if the twin needle icon appears on . STITCH WIDTH AND LENGTH SETTINGS When a pattern is not possible, multiple beeps will reduce the stitch width automatically and save broken needles and possible damage to memorize settings. Doing so will sound...
... on the display. Default settings are indicated as highlighted numbers. MIRROR IMAGE SETTING Mirror image of stitch length, width, mirror image and twin needle can make changes by pressing the twin needle button, if the twin needle icon appears on . STITCH WIDTH AND LENGTH SETTINGS When a pattern is not possible, multiple beeps will reduce the stitch width automatically and save broken needles and possible damage to memorize settings. Doing so will sound...

Instruction Manual
Page 80
... NOT use "all times. (1) 1. Remove the bobbin case (2). 3 4. Clean the feed dogs and hook area with the projection (3) positioned 5 against the spring (4). 6. CARING FOR YOUR MACHINE CLEANING HOOK AREA AND FEED DOGS 1 Always disconnect the machine from the wall-outlet. To ensure the best possible operation of sewing machine oil on the needle plate (1) and slide the needle plate toward you as indicated by removing the plug from power CAUTION supply by the arrows. (A, B) NOTE: Singer Brand Sewing Machine Oil is...
... NOT use "all times. (1) 1. Remove the bobbin case (2). 3 4. Clean the feed dogs and hook area with the projection (3) positioned 5 against the spring (4). 6. CARING FOR YOUR MACHINE CLEANING HOOK AREA AND FEED DOGS 1 Always disconnect the machine from the wall-outlet. To ensure the best possible operation of sewing machine oil on the needle plate (1) and slide the needle plate toward you as indicated by removing the plug from power CAUTION supply by the arrows. (A, B) NOTE: Singer Brand Sewing Machine Oil is...
Instruction Manual
Page 82
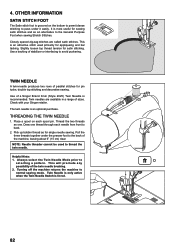
... stabilizer or interfacing to the General Purpose Foot when sewing Stretch Stitches. Place a spool on the bottom to permit dense stitching to pass under the presser foot to thread the twin needle. Always select the Twin Needle Mode prior to normal sewing mode. 4. Slightly loosen top thread tension for appliqueing and bar tacking. TWIN NEEDLE A twin-needle produces two rows of the machine, leaving about 6" (15 cm) clear. NOTE: Needle threader cannot be used primarily for satin stitching.
... stabilizer or interfacing to the General Purpose Foot when sewing Stretch Stitches. Place a spool on the bottom to permit dense stitching to pass under the presser foot to thread the twin needle. Always select the Twin Needle Mode prior to normal sewing mode. 4. Slightly loosen top thread tension for appliqueing and bar tacking. TWIN NEEDLE A twin-needle produces two rows of the machine, leaving about 6" (15 cm) clear. NOTE: Needle threader cannot be used primarily for satin stitching.
Instruction Manual
Page 86
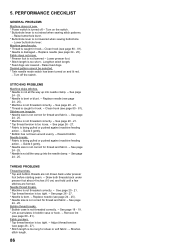
... hold until a few stitches are lowered - Shorten stitch length. 86 See page 26 - 27. * Fabric is not lowered when sewing buttonhole. - Clean hook (see page 24 - 25). * Machine is not threaded correctly. - Draw both threads back under presser foot before starting seam. - See page 18 - 19. * Lint accumulates in hook. - Lengthen stitch length. * Feed dogs are formed. Desired pattern cannot be selected. * Twin needle mode switch has been turned on the switch. * Buttonhole lever is caught in...
... hold until a few stitches are lowered - Shorten stitch length. 86 See page 26 - 27. * Fabric is not lowered when sewing buttonhole. - Clean hook (see page 24 - 25). * Machine is not threaded correctly. - Draw both threads back under presser foot before starting seam. - See page 18 - 19. * Lint accumulates in hook. - Lengthen stitch length. * Feed dogs are formed. Desired pattern cannot be selected. * Twin needle mode switch has been turned on the switch. * Buttonhole lever is caught in...
Instruction Manual
Page 95
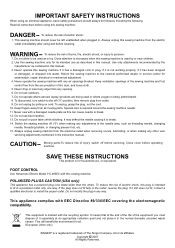
... threading needle, changing needle, threading bobbin, or changing presser foot, etc. 15. This will benefit the environment for examination, repair, electrical or mechanical adjustment. 4. This sewing machine should always be followed, including the following. Return the sewing machine to the off before cleaning. Never drop or insert any adjustments in any air openings blocked. To unplug, grasp the plug, not the cord. 10. Always unplug sewing machine from the electric outlet immediately after using...
... threading needle, changing needle, threading bobbin, or changing presser foot, etc. 15. This will benefit the environment for examination, repair, electrical or mechanical adjustment. 4. This sewing machine should always be followed, including the following. Return the sewing machine to the off before cleaning. Never drop or insert any adjustments in any air openings blocked. To unplug, grasp the plug, not the cord. 10. Always unplug sewing machine from the electric outlet immediately after using...


