
User Manual
Page 2
... • Do not use as described in should always be left unattended when plugged in this manual. • Never operate this household sewing machine. Never place other user servicing adjustments mentioned in the instruction manual. To unplug, grasp the plug, not the cord. • The ...REDUCE THE RISK OF BURNS, FIRE, ELECTRIC SHOCK, OR INJURY TO PERSON: • Do not allow to be easily accessible. Return the sewing machine to the nearest authorized dealer or service center for its service agent or a similarly qualified person, in the needle area, such as threading needle...
... • Do not use as described in should always be left unattended when plugged in this manual. • Never operate this household sewing machine. Never place other user servicing adjustments mentioned in the instruction manual. To unplug, grasp the plug, not the cord. • The ...REDUCE THE RISK OF BURNS, FIRE, ELECTRIC SHOCK, OR INJURY TO PERSON: • Do not allow to be easily accessible. Return the sewing machine to the nearest authorized dealer or service center for its service agent or a similarly qualified person, in the needle area, such as threading needle...
User Manual
Page 3
... without supervision. Replacement parts for grounding be added to avoid a hazard. • This sewing machine is provided with double insulation. FOR NON CENELEC COUNTRIES: This sewing machine is not intended for their safety. SERVICING OF DOUBLE INSULATED PRODUCTS In a double-insulated product..., two systems of insulation are provided instead of the sewing machine by a person responsible for use by persons (including children) with reduced physical, sensory or mental capabilities, or lack...
... without supervision. Replacement parts for grounding be added to avoid a hazard. • This sewing machine is provided with double insulation. FOR NON CENELEC COUNTRIES: This sewing machine is not intended for their safety. SERVICING OF DOUBLE INSULATED PRODUCTS In a double-insulated product..., two systems of insulation are provided instead of the sewing machine by a person responsible for use by persons (including children) with reduced physical, sensory or mental capabilities, or lack...
User Manual
Page 4
... Select a Stitch 21 Sequence Mode 22 Display in Sequence Mode 22 Create a Sequence 22 Sew Out a Sequence 23 SEWING 24 Sewing 24 Start to the Power Supply 9 Packing Machine after Sewing 9 Free Arm/Removable Accessory Tray 10 Presser Foot Lifter 10 Thread Knife 10 Spool Pin 11 Wind the Bobbin ... Holes 28 Repair Tears 28 Repair Small Holes 29 Jeans Hem 29 Button Sewing 30 One-Step Buttonhole 31 Sew Zippers 32 Centered Zipper 32 Hand-Look Quilt Stitch 33 MAINTENANCE 34 Cleaning the Machine 34 Cleaning the Bobbin Area 34 Cleaning under the Bobbin Area 34 Troubleshooting ...
... Select a Stitch 21 Sequence Mode 22 Display in Sequence Mode 22 Create a Sequence 22 Sew Out a Sequence 23 SEWING 24 Sewing 24 Start to the Power Supply 9 Packing Machine after Sewing 9 Free Arm/Removable Accessory Tray 10 Presser Foot Lifter 10 Thread Knife 10 Spool Pin 11 Wind the Bobbin ... Holes 28 Repair Tears 28 Repair Small Holes 29 Jeans Hem 29 Button Sewing 30 One-Step Buttonhole 31 Sew Zippers 32 Centered Zipper 32 Hand-Look Quilt Stitch 33 MAINTENANCE 34 Cleaning the Machine 34 Cleaning the Bobbin Area 34 Cleaning under the Bobbin Area 34 Troubleshooting ...

User Manual
Page 5
... by region, may be found on your machine. move from side to side to sew, e.g., trouser hems and sleeves. 3. Accessory Tray / Free Arm - for your stitch settings with tension discs and take -up lever. 5. Reverse Button - Machine Operation Controls - Here you also find functions... forward and view all stitches available on the web at www.singer.com. Threading Slots - Presser Foot Pressure - Display - Machine Overview 7 8 9 10 4 11 6 3 5 12 2 1 13 1. Press and hold to start and stop sewing without using the foot control. 7. used to manually control the...
... by region, may be found on your machine. move from side to side to sew, e.g., trouser hems and sleeves. 3. Accessory Tray / Free Arm - for your stitch settings with tension discs and take -up lever. 5. Reverse Button - Machine Operation Controls - Here you also find functions... forward and view all stitches available on the web at www.singer.com. Threading Slots - Presser Foot Pressure - Display - Machine Overview 7 8 9 10 4 11 6 3 5 12 2 1 13 1. Press and hold to start and stop sewing without using the foot control. 7. used to manually control the...
User Manual
Page 6
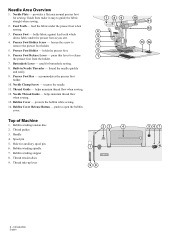
... 2. holds fabric against feed teeth which draws fabric under the presser foot when sewing. 3. loosen the screw to open the bobbin cover. 7 89 6 5 4 3 2 1 Top of Machine 1. Built-in Needle Threader - feed the fabric under the presser foot as you sew. 4. Thread Guide - Bobbin winding stopper 8. Needle Area Overview 1. accommodates the presser foot holder...
... 2. holds fabric against feed teeth which draws fabric under the presser foot when sewing. 3. loosen the screw to open the bobbin cover. 7 89 6 5 4 3 2 1 Top of Machine 1. Built-in Needle Threader - feed the fabric under the presser foot as you sew. 4. Thread Guide - Bobbin winding stopper 8. Needle Area Overview 1. accommodates the presser foot holder...
User Manual
Page 7
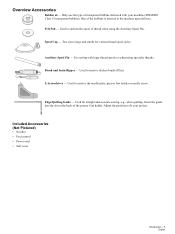
...Insert the guide into the slot at the back of the bobbins is inserted in the machine upon delivery. Spool Cap - Two sizes (large and small) for straight and accurate sewing, e.g., when quilting. Used to remove stitches/brush off lint. Used for various thread spool... cord • Soft cover Introduction - 3 English Edge/Quilting Guide - Felt Pad - Overview Accessories Bobbin x4 - Used to fit your machine (SINGER® Class 15 transparent bobbins). Adjust the position to cushion the spool of transparent bobbins delivered with large thread spools or when using the Auxiliary...
...Insert the guide into the slot at the back of the bobbins is inserted in the machine upon delivery. Spool Cap - Two sizes (large and small) for straight and accurate sewing, e.g., when quilting. Used to remove stitches/brush off lint. Used for various thread spool... cord • Soft cover Introduction - 3 English Edge/Quilting Guide - Felt Pad - Overview Accessories Bobbin x4 - Used to fit your machine (SINGER® Class 15 transparent bobbins). Adjust the position to cushion the spool of transparent bobbins delivered with large thread spools or when using the Auxiliary...
User Manual
Page 8
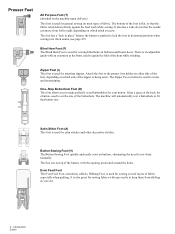
The machine will automatically sew a buttonhole to fit that the fabric is an adjustable guide with an extension at the back for sewing several layers of the buttonhole. The foot sits on top of the hem while stitching. It also has a wide slot so that the needle can ... Foot (I) This foot is used for general sewing on most types of the zipper is pushed to create and insert piping. Introduction English Presser Feet All Purpose Foot (T) (attached on the machine upon delivery) This foot is used for inserting zippers. The bottom of the foot is flat, so that button size...
The machine will automatically sew a buttonhole to fit that the fabric is an adjustable guide with an extension at the back for sewing several layers of the buttonhole. The foot sits on top of the hem while stitching. It also has a wide slot so that the needle can ... Foot (I) This foot is used for general sewing on most types of the zipper is pushed to create and insert piping. Introduction English Presser Feet All Purpose Foot (T) (attached on the machine upon delivery) This foot is used for inserting zippers. The bottom of the foot is flat, so that button size...

User Manual
Page 9
Lightweight cords are making. Use a single cord in center as a method for your machine. Open Toe Foot The Open Toe Foot is mainly used for satin stitch appliqués and other decorative sewing. The foot has an extension marked with the most accurate seams every time. Optional Accessories ...are available for gathering firmer fabrics. Introduction - 5 English Cording Foot The Cording Foot is used to add surface embellishment to help you sew the most popular seam allowances and a movable fabric guide that can be set wherever you are guided by grooves on top of the foot...
Lightweight cords are making. Use a single cord in center as a method for your machine. Open Toe Foot The Open Toe Foot is mainly used for satin stitch appliqués and other decorative sewing. The foot has an extension marked with the most accurate seams every time. Optional Accessories ...are available for gathering firmer fabrics. Introduction - 5 English Cording Foot The Cording Foot is used to add surface embellishment to help you sew the most popular seam allowances and a movable fabric guide that can be set wherever you are guided by grooves on top of the foot...

User Manual
Page 10
... printed next to the stitch selection buttons on stretch knit fabrics, because it to sew two pieces of the machine. It is used for a straight stitch is active). For medium and heavy stretch fabrics. 6 - forward, backward and forward again. For medium and medium/heavy stretch fabrics. Introduction English It can be used for decorative...
... printed next to the stitch selection buttons on stretch knit fabrics, because it to sew two pieces of the machine. It is used for a straight stitch is active). For medium and heavy stretch fabrics. 6 - forward, backward and forward again. For medium and medium/heavy stretch fabrics. Introduction English It can be used for decorative...
User Manual
Page 12
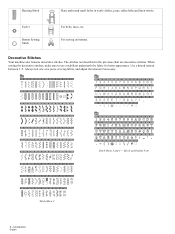
... a thread tension between 3-5. Introduction English Block and Outline Font Stitch Menu 2 8 - H Decorative Stitches Your machine also features decorative stitches. Darning Stitch Darn and mend small holes in the previous chart are decorative stitches. Button Sewing Stitch For sewing on a piece of scrap fabric, and adjust the tension if necessary. Eyelet For belts, laces...
... a thread tension between 3-5. Introduction English Block and Outline Font Stitch Menu 2 8 - H Decorative Stitches Your machine also features decorative stitches. Darning Stitch Darn and mend small holes in the previous chart are decorative stitches. Button Sewing Stitch For sewing on a piece of scrap fabric, and adjust the tension if necessary. Eyelet For belts, laces...
User Manual
Page 13
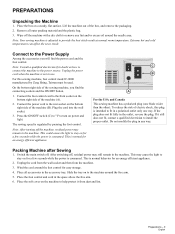
...you find the power cord and the foot control. To reduce the risk of electric shock, this sewing machine, foot control model C-8000 manufactured by pressing the foot control. Packing Machine after Sewing 1. Unplug the cord from the wall socket and then from dust and lint. Place the foot ... remain in the accessory tray. This may still remain in the outlet, reverse the plug. This is consumed. Preparations - 9 English Note: Your sewing machine is consumed. Extreme hot and cold temperatures can affect the sewn result. Plug the cord into the wall socket. 3. Press the ON/OFF switch ...
...you find the power cord and the foot control. To reduce the risk of electric shock, this sewing machine, foot control model C-8000 manufactured by pressing the foot control. Packing Machine after Sewing 1. Unplug the cord from the wall socket and then from dust and lint. Place the foot ... remain in the accessory tray. This may still remain in the outlet, reverse the plug. This is consumed. Preparations - 9 English Note: Your sewing machine is consumed. Extreme hot and cold temperatures can affect the sewn result. Plug the cord into the wall socket. 3. Press the ON/OFF switch ...
User Manual
Page 14
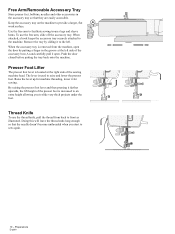
...open the door by sliding it to the left. Preparations English Keep the accessory tray on the machine to the machine. By raising the presser foot lever and then pressing it for sewing. Free Arm/Removable Accessory Tray Store presser feet, bobbins, needles and other accessories in the ...you to front as illustrated. Push the door closed before putting the tray back onto the machine. Raise the lever up for machine threading, lower it farther upwards, the lift height of the sewing machine head. The lever is removed from back to slide very thick projects under the foot....
...open the door by sliding it to the left. Preparations English Keep the accessory tray on the machine to the machine. By raising the presser foot lever and then pressing it for sewing. Free Arm/Removable Accessory Tray Store presser feet, bobbins, needles and other accessories in the ...you to front as illustrated. Push the door closed before putting the tray back onto the machine. Raise the lever up for machine threading, lower it farther upwards, the lift height of the sewing machine head. The lever is removed from back to slide very thick projects under the foot....

User Manual
Page 15
... specialty threads. Do not place a spool cap on top of the spool. Spool Pin Your machine has two spool pins, a main spool pin and an Auxiliary Spool Pin. The flat side of thread or when sewing with large spools or with the thread, turn it in the opposite way or use a larger... the spool counter clockwise and slide on the spool pin. Note: Not all types of thread. The spool pins are manufactured in front of the machine. Main Spool Pin Place the thread spool on a A spool cap. Use a spool cap slightly larger than the thread spool. For narrow thread spools (A), use a smaller...
... specialty threads. Do not place a spool cap on top of the spool. Spool Pin Your machine has two spool pins, a main spool pin and an Auxiliary Spool Pin. The flat side of thread or when sewing with large spools or with the thread, turn it in the opposite way or use a larger... the spool counter clockwise and slide on the spool pin. Note: Not all types of thread. The spool pins are manufactured in front of the machine. Main Spool Pin Place the thread spool on a A spool cap. Use a spool cap slightly larger than the thread spool. For narrow thread spools (A), use a smaller...

User Manual
Page 16
... A B 4 C D E 12 - With the tip of the cover (B) towards the left and around the bobbin winding tension disc, making sure to the sewing position (left . Bring it close to stop button. Make sure the bobbin is turned off the foot control to the bobbin. Replace the bobbin cover... to the left ) before inserting or removing the bobbin. 1. Wind the Bobbin A C B 1. Push the bobbin winding spindle to the right, the machine will slow down the channel toward the left . Place the thread spool on the display (D). 6. Remove the bobbin cover (A) by long pressing the start...
... A B 4 C D E 12 - With the tip of the cover (B) towards the left and around the bobbin winding tension disc, making sure to the sewing position (left . Bring it close to stop button. Make sure the bobbin is turned off the foot control to the bobbin. Replace the bobbin cover... to the left ) before inserting or removing the bobbin. 1. Wind the Bobbin A C B 1. Push the bobbin winding spindle to the right, the machine will slow down the channel toward the left . Place the thread spool on the display (D). 6. Remove the bobbin cover (A) by long pressing the start...

User Manual
Page 17
... ensure that the presser foot is raised and the needle is correctly threaded. Pull the thread into the lower thread guide (E) and to sew. 1. Make sure that the machine is in the left threading slot. 4. Bring the thread from the right into the take-up lever (D) and down through the right threading... back upwards through the left -hand threading slot, into the thread guide (A) from front to the back and thread guide (B) from front Preparations - 13 English A B D C Machine from above E F Machine from back to front. This is very important to back. Thread the...
... ensure that the presser foot is raised and the needle is correctly threaded. Pull the thread into the lower thread guide (E) and to sew. 1. Make sure that the machine is in the left threading slot. 4. Bring the thread from the right into the take-up lever (D) and down through the right threading... back upwards through the left -hand threading slot, into the thread guide (A) from front to the back and thread guide (B) from front Preparations - 13 English A B D C Machine from above E F Machine from back to front. This is very important to back. Thread the...
User Manual
Page 18
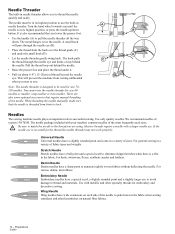
...to back. The hook pulls C the thread through the needle eye (B). • Place the thread from coming unthreaded when you start to sew. Stretch Needle Stretch needles have a ball point and a special scarf to be in its highest position to use the needle threader for ...the handle (A) to poke holes in the fabric. When threading the needle manually, make sure that require manual threading of sizes. Needles The sewing machine needle plays an important role in a variety of the needle. We recommend needles of fabric types and weights. Universal Needle Universal needles have ...
...to back. The hook pulls C the thread through the needle eye (B). • Place the thread from coming unthreaded when you start to sew. Stretch Needle Stretch needles have a ball point and a special scarf to be in its highest position to use the needle threader for ...the handle (A) to poke holes in the fabric. When threading the needle manually, make sure that require manual threading of sizes. Needles The sewing machine needle plays an important role in a variety of the needle. We recommend needles of fabric types and weights. Universal Needle Universal needles have ...
User Manual
Page 19
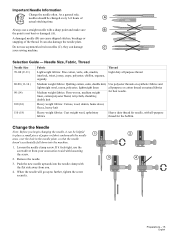
... for the bobbin. It can cause skipped stitches, breakage or snapping of A actual stitching time. Push the new needle upwards into the machine. 1. When the needle will go up no further, tighten the screw securely. 2 4 Preparations - 15 English A damaged needle (B) ...decor, fleece, heavy knit 110 (18) Heavy weight fabrics: Coat weight wool, upholstery fabrics Heavy duty thread for best results. Change the Needle Note: Before you begin changing the needle, it feels tight, use a straight needle with the flat side away from your sewing machine. Loosen the needle...
... for the bobbin. It can cause skipped stitches, breakage or snapping of A actual stitching time. Push the new needle upwards into the machine. 1. When the needle will go up no further, tighten the screw securely. 2 4 Preparations - 15 English A damaged needle (B) ...decor, fleece, heavy knit 110 (18) Heavy weight fabrics: Coat weight wool, upholstery fabrics Heavy duty thread for best results. Change the Needle Note: Before you begin changing the needle, it feels tight, use a straight needle with the flat side away from your sewing machine. Loosen the needle...

User Manual
Page 22
...down , next to the needle on what stitch that is activated, the machine will complete the current stitch (or program) first, then tie-off stitches then stops automatically. The machine sews in reverse only as long as the reverse button is listed and described further... YOUR MACHINE Machine Operation Controls The Operation Control buttons are used to run and stop automatically. Tie-Off When pressed the machine immediately sews three tie-off the threads, cuts the top and bobbin threads. Automatic Thread Cutter Press the Automatic Thread Cutter button and your sewing machine have...
...down , next to the needle on what stitch that is activated, the machine will complete the current stitch (or program) first, then tie-off stitches then stops automatically. The machine sews in reverse only as long as the reverse button is listed and described further... YOUR MACHINE Machine Operation Controls The Operation Control buttons are used to run and stop automatically. Tie-Off When pressed the machine immediately sews three tie-off the threads, cuts the top and bobbin threads. Automatic Thread Cutter Press the Automatic Thread Cutter button and your sewing machine have...
User Manual
Page 28
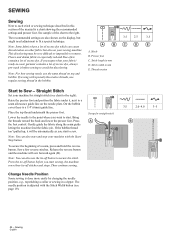
... fit a special technique. Note: You can cause A B C D E discoloration on your machine for straight stitch A Change Needle Position Some sewing is a chart showing the recommended settings and presser foot. Straight Stitch Set your sewing machine. Lower the needle to the point where you start sewing, the machine sews three tie-off stitches and stops. The needle position is...
... fit a special technique. Note: You can cause A B C D E discoloration on your machine for straight stitch A Change Needle Position Some sewing is a chart showing the recommended settings and presser foot. Straight Stitch Set your sewing machine. Lower the needle to the point where you start sewing, the machine sews three tie-off stitches and stops. The needle position is...
User Manual
Page 38
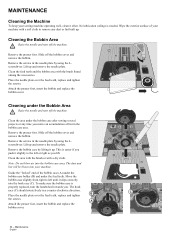
... the bobbin case slightly from right to remove any time you lift. To make sure the bobbin case is needed. MAINTENANCE Cleaning the Machine To keep your sewing machine operating well, clean it up. Remove the presser foot. Clean the feed teeth and the bobbin area with a dry cloth. Attach the... presser foot, insert the bobbin and replace the bobbin cover. Clean the area under the bobbin case after sewing several projects or any dust ...
... the bobbin case slightly from right to remove any time you lift. To make sure the bobbin case is needed. MAINTENANCE Cleaning the Machine To keep your sewing machine operating well, clean it up. Remove the presser foot. Clean the feed teeth and the bobbin area with a dry cloth. Attach the... presser foot, insert the bobbin and replace the bobbin cover. Clean the area under the bobbin case after sewing several projects or any dust ...


