User Manual
Page 24
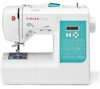
...lever and pull thread away from you (counter-clockwise). 1. USING AUTOMATIC NEEDLE THREADER Raise the needle to the rear of thread. 3. Guide thread into thread guide as illustrated. 2. Pull down lever while holding the end of the machine. 4. NOTE: For smooth threading it is recommended you set... the machine for straight stitch when using the needle threader. 1 2 3 4 5 6 22 Hook thread into hooked end and pull the thread upward. 5. ...
...lever and pull thread away from you (counter-clockwise). 1. USING AUTOMATIC NEEDLE THREADER Raise the needle to the rear of thread. 3. Guide thread into thread guide as illustrated. 2. Pull down lever while holding the end of the machine. 4. NOTE: For smooth threading it is recommended you set... the machine for straight stitch when using the needle threader. 1 2 3 4 5 6 22 Hook thread into hooked end and pull the thread upward. 5. ...

User Manual
Page 32
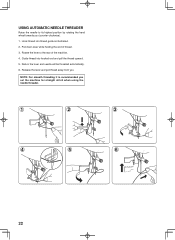
...selection Boutons pour sélectionner le numéro du point motif Botones para elegir número de puntada Manual adjustment buttons for stitch length Boutons d'ajustement manuel de la longueur du point Ajuste manual botones para largo de puntada Manual adjustment buttons for pattern number selection ...Boutons pour sélectionner le numéro du point motif Botones para elegir número de puntada Pattern number reference guide Guide de référence du numéro des motifs Guía de referencia del número de puntada FUNCTIONS OF CONTROL PANEL...
...selection Boutons pour sélectionner le numéro du point motif Botones para elegir número de puntada Manual adjustment buttons for stitch length Boutons d'ajustement manuel de la longueur du point Ajuste manual botones para largo de puntada Manual adjustment buttons for pattern number selection ...Boutons pour sélectionner le numéro du point motif Botones para elegir número de puntada Pattern number reference guide Guide de référence du numéro des motifs Guía de referencia del número de puntada FUNCTIONS OF CONTROL PANEL...
User Manual
Page 44
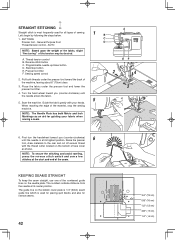
.... KEEPING SEAMS STRAIGHT To keep the seam straight, use one of the numbered guide lines on the bottom of face cover as an aid for all types of sewing. STRAIGHT STITCHING A Straight stitch is most frequently used for piecing quilt blocks and also for narrow seams. 42... Metric and Inch Markings as shown. Start the machine. Reverse stitch button C. The guide line on the bobbin cover plate is 1/4" (6mm) seam guide line which is used for guiding your hands. Programmable needle up/down button D. Guide the fabric gently with the thread cutter located on the needle plate...
.... KEEPING SEAMS STRAIGHT To keep the seam straight, use one of the numbered guide lines on the bottom of face cover as an aid for all types of sewing. STRAIGHT STITCHING A Straight stitch is most frequently used for piecing quilt blocks and also for narrow seams. 42... Metric and Inch Markings as shown. Start the machine. Reverse stitch button C. The guide line on the bobbin cover plate is 1/4" (6mm) seam guide line which is used for guiding your hands. Programmable needle up/down button D. Guide the fabric gently with the thread cutter located on the needle plate...
User Manual
Page 50
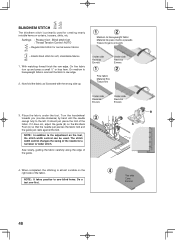
... under the foot. Settings : Presser foot - The stitch width control changes the swing of the fabric. With matching thread finish the raw edge. Sew slowly, guiding the fabric carefully along the edge of the fabric. Elastic blind stitch for creating nearly invisible hems on the foot, the... stitch width control can be used for soft, stretchable fabrics 1. NOTE: In ...
... under the foot. Settings : Presser foot - The stitch width control changes the swing of the fabric. With matching thread finish the raw edge. Sew slowly, guiding the fabric carefully along the edge of the fabric. Elastic blind stitch for creating nearly invisible hems on the foot, the... stitch width control can be used for soft, stretchable fabrics 1. NOTE: In ...
User Manual
Page 78
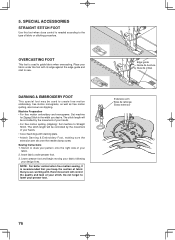
... controlled by the movement of your design lines. Sewing Instructions 1. The stitch length will control the quality and look of your presser foot. Insert fabric under the foot with its edge against the edge guide and start to the type of fabric that you desire. Hand movement...needle clamp screw. Lower presser foot and begin moving your fabric following your stitch. Do not forget to guide fabric when overcasting. Stencil or draw your pattern onto the right side of your fabric. 2. Edge guide Guide de bordure Guía de orillas Extension arm Bras de rallonge Brazo extensor...
... controlled by the movement of your design lines. Sewing Instructions 1. The stitch length will control the quality and look of your presser foot. Insert fabric under the foot with its edge against the edge guide and start to the type of fabric that you desire. Hand movement...needle clamp screw. Lower presser foot and begin moving your fabric following your stitch. Do not forget to guide fabric when overcasting. Stencil or draw your pattern onto the right side of your fabric. 2. Edge guide Guide de bordure Guía de orillas Extension arm Bras de rallonge Brazo extensor...
User Manual
Page 80
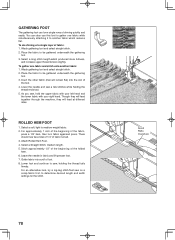
...easily. For an alternative look, try a zig-zag stitch.Test sew on a scrap fabric first, to medium weight fabric. 2. You can form single rows of the folded hem. 6. There should now be a total of 1/4" of foot. 8. Guide fabric into the slot of the foot. 4. Attach ...gathering foot and select straight stitch. 2. Select a soft, light to determine desired length and width settings for the stitch. 78 Scroll Rollo Ouverture For approximately 1 inch of the beginning of fabric...
...easily. For an alternative look, try a zig-zag stitch.Test sew on a scrap fabric first, to medium weight fabric. 2. You can form single rows of the folded hem. 6. There should now be a total of 1/4" of foot. 8. Guide fabric into the slot of the foot. 4. Attach ...gathering foot and select straight stitch. 2. Select a soft, light to determine desired length and width settings for the stitch. 78 Scroll Rollo Ouverture For approximately 1 inch of the beginning of fabric...
User Manual
Page 82
... tension is not threaded correctly (see page 28 - 29). * Needle is damaged.- Machine jams/knocks. * Thread is not raised when sewing stitch patterns. - Stitches are irregular. * Needle size is being pulled or pushed against machine feeding action. - Draw both threads back under presser foot about 6 inches ...or soft fabric. - Fabric does not move. * Presser foot is bent or blunt. - Guide it gently. * Needle size is set too wide (see page 26 - 27). * Needle is not lowered - Rewind bobbin. Guide it gently. * Bobbin has not been wound evenly. - Replace needle (see page 26 -...
... tension is not threaded correctly (see page 28 - 29). * Needle is damaged.- Machine jams/knocks. * Thread is not raised when sewing stitch patterns. - Stitches are irregular. * Needle size is being pulled or pushed against machine feeding action. - Draw both threads back under presser foot about 6 inches ...or soft fabric. - Fabric does not move. * Presser foot is bent or blunt. - Guide it gently. * Needle size is set too wide (see page 26 - 27). * Needle is not lowered - Rewind bobbin. Guide it gently. * Bobbin has not been wound evenly. - Replace needle (see page 26 -...


