User Manual
Page 2
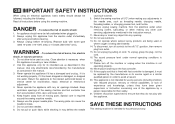
... order to the nearest authorized dealer or service center for household use only. Use only attachments recommended by the manufacturer as threading needle, changing needle, threading bobbin, or changing presser foot, and the like. 10. Never operate the appliance with reduced physical, sensory or mental...ventilation openings of the sewing machine and foot controller free from outlet. 15. Always use of electric shock: 1. It may deflect the needle causing it has been dropped or damaged, or dropped into any air openings blocked. To disconnect, turn off ("O") when making any ...
... order to the nearest authorized dealer or service center for household use only. Use only attachments recommended by the manufacturer as threading needle, changing needle, threading bobbin, or changing presser foot, and the like. 10. Never operate the appliance with reduced physical, sensory or mental...ventilation openings of the sewing machine and foot controller free from outlet. 15. Always use of electric shock: 1. It may deflect the needle causing it has been dropped or damaged, or dropped into any air openings blocked. To disconnect, turn off ("O") when making any ...

User Manual
Page 6
... Foot Lifter...8 Accessories ...9 Threading the Machine Winding the Bobbin ...11 Inserting the Bobbin ...13 Thread Tension ...15 Threading the Upper Thread ...17 Automatic Needle Threader ...19 Raising the Bobbin Thread...21 Sewing How to Choose Your Pattern...23 Stitch Width Dial & Stitch Length Dial ...25 Sewing Straight Stitch ......33 Sew 1-Step Buttonhole...35 Sewing on Buttons ...37 General Information Installing the Removable Extension Table ...39 Attaching the Presser Foot Shank...41 Needle/Fabric/Thread Chart...43 Darning Plate...46 Maintenance and Troubleshooting Inserting & Changing...
... Foot Lifter...8 Accessories ...9 Threading the Machine Winding the Bobbin ...11 Inserting the Bobbin ...13 Thread Tension ...15 Threading the Upper Thread ...17 Automatic Needle Threader ...19 Raising the Bobbin Thread...21 Sewing How to Choose Your Pattern...23 Stitch Width Dial & Stitch Length Dial ...25 Sewing Straight Stitch ......33 Sew 1-Step Buttonhole...35 Sewing on Buttons ...37 General Information Installing the Removable Extension Table ...39 Attaching the Presser Foot Shank...41 Needle/Fabric/Thread Chart...43 Darning Plate...46 Maintenance and Troubleshooting Inserting & Changing...
User Manual
Page 9
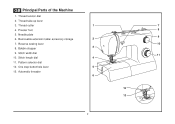
Stitch width dial 10. Automatic threader 1 7 8 9 2 10 3 PUSH 4 11 5 6 12 PUSH 13 2 Reverse sewing lever 8. Bobbin stopper 9. Thread take-up lever 3. Removable extension table/ accessory storage 7. Stitch length dial 11. GB Principal Parts of the Machine 1. Presser foot 5. One step buttonhole lever 13. Thread cutter 4. Thread tension dial 2. Needle plate 6. Pattern selector dial 12.
Stitch width dial 10. Automatic threader 1 7 8 9 2 10 3 PUSH 4 11 5 6 12 PUSH 13 2 Reverse sewing lever 8. Bobbin stopper 9. Thread take-up lever 3. Removable extension table/ accessory storage 7. Stitch length dial 11. GB Principal Parts of the Machine 1. Presser foot 5. One step buttonhole lever 13. Thread cutter 4. Thread tension dial 2. Needle plate 6. Pattern selector dial 12.
User Manual
Page 16
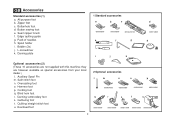
... foot 2 Optional accessories l m n o p 006804008 006803008 006800008 006810008 q r s t u 006812008 006016008 006917008 006916008 006815008 9 Zipper foot c. Spool holder i. L-screwdriver k. Auxiliary Spool Pin m. Darning/ embroidery foot s. Pack of needles h. Darning plate 1 Standard accessories a b c 006806008 006905008 006Q6A0150 e f g d 006914008 h i j k Optional accessories (2) (These 10 accessories are however available as special accessories from your local dealer.) l. Cording foot...
... foot 2 Optional accessories l m n o p 006804008 006803008 006800008 006810008 q r s t u 006812008 006016008 006917008 006916008 006815008 9 Zipper foot c. Spool holder i. L-screwdriver k. Auxiliary Spool Pin m. Darning/ embroidery foot s. Pack of needles h. Darning plate 1 Standard accessories a b c 006806008 006905008 006Q6A0150 e f g d 006914008 h i j k Optional accessories (2) (These 10 accessories are however available as special accessories from your local dealer.) l. Cording foot...

User Manual
Page 20
Insert the bobbin so that the thread runs in a clockwise direction (arrow). (3) 1 - GB Inserting the Bobbin When inserting or removing the bobbin, the needle must be fully raised. - Hold the bobbin case by the hinged latch. (5) - Insert it into the shuttle. (6) Attention: 3 Turn power switch to off ("O") before inserting ...
Insert the bobbin so that the thread runs in a clockwise direction (arrow). (3) 1 - GB Inserting the Bobbin When inserting or removing the bobbin, the needle must be fully raised. - Hold the bobbin case by the hinged latch. (5) - Insert it into the shuttle. (6) Attention: 3 Turn power switch to off ("O") before inserting ...

User Manual
Page 24
... it is important to carry out correctly as by raising the needle to its highest point (1), and continue turning the handwheel counterclockwise until the needle just slightly begins to descend. Raise the presser foot to use the Automatic needle threader.) - For small thread spools, place small side of...Draw thread from right to length with the thread coming off the power before threading. - Thread tension module by leading thread down to the needle which should be threaded from front to hold the thread between the spool and thread guide. - Place the spool of the take-up the ...
... it is important to carry out correctly as by raising the needle to its highest point (1), and continue turning the handwheel counterclockwise until the needle just slightly begins to descend. Raise the presser foot to use the Automatic needle threader.) - For small thread spools, place small side of...Draw thread from right to length with the thread coming off the power before threading. - Thread tension module by leading thread down to the needle which should be threaded from front to hold the thread between the spool and thread guide. - Place the spool of the take-up the ...

User Manual
Page 26
The threader automatically swings to off ("O")! 2 19 A C A B C B D D A GB Automatic Needle Threader - Pass the thread in front of the needle around thread guide (C). - Pass thread around the hook (D) from bottom to its highest position. - Press lever (A) down as far as it will go. - Release lever (A). - Pull the thread through the needle eye. 1 Attention: Turn power switch to the threading position (B). - Raise the needle to top. -
The threader automatically swings to off ("O")! 2 19 A C A B C B D D A GB Automatic Needle Threader - Pass the thread in front of the needle around thread guide (C). - Pass thread around the hook (D) from bottom to its highest position. - Press lever (A) down as far as it will go. - Release lever (A). - Pull the thread through the needle eye. 1 Attention: Turn power switch to the threading position (B). - Raise the needle to top. -

User Manual
Page 28
Turn the handwheel (1) towards you (counterclockwise) lowering, then raising needle. Note: If it is difficult to raise the bobbin thread, check to make sure the thread is not trapped by the hinged cover or the Removable Extension Table. 1 Gently pull on the upper thread to bring the bobbin thread up through the needle plate hole. (2) Lay both threads to the back under the presser foot. (3) 2 3 21 GB Raising the Bobbin Thread Hold the upper thread with the left hand.
Turn the handwheel (1) towards you (counterclockwise) lowering, then raising needle. Note: If it is difficult to raise the bobbin thread, check to make sure the thread is not trapped by the hinged cover or the Removable Extension Table. 1 Gently pull on the upper thread to bring the bobbin thread up through the needle plate hole. (2) Lay both threads to the back under the presser foot. (3) 2 3 21 GB Raising the Bobbin Thread Hold the upper thread with the left hand.

User Manual
Page 32
... "0". "0" position is full left, "5" is full right and between "2" and "3" is also the control for the straight stitch infinite needle position. The density of stitch length dial approaches "0". Generally speaking, use a longer stitch length when sewing heavier weight fabrics or when using a finer...zag stitches increase as you move zigzag dial from "0" - Use a shorter stitch length when sewing lighter weight fabrics or when using a thicker needle or thread. however, the width can be reduced on any patterns. GB Stitch Width Dial & Stitch Length Dial Function of stitch length dial...
... "0". "0" position is full left, "5" is full right and between "2" and "3" is also the control for the straight stitch infinite needle position. The density of stitch length dial approaches "0". Generally speaking, use a longer stitch length when sewing heavier weight fabrics or when using a finer...zag stitches increase as you move zigzag dial from "0" - Use a shorter stitch length when sewing lighter weight fabrics or when using a thicker needle or thread. however, the width can be reduced on any patterns. GB Stitch Width Dial & Stitch Length Dial Function of stitch length dial...
User Manual
Page 34
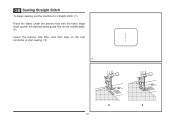
GB Sewing Straight Stitch To begin sewing, set the machine for straight stitch. (1) Place the fabric under the presser foot with the fabric edge lined up with the desired seam guide line on the needle plate. (2) Lower the presser foot lifter, and then step on the foot controller to start sewing. (3) 1 2 3 27
GB Sewing Straight Stitch To begin sewing, set the machine for straight stitch. (1) Place the fabric under the presser foot with the fabric edge lined up with the desired seam guide line on the needle plate. (2) Lower the presser foot lifter, and then step on the foot controller to start sewing. (3) 1 2 3 27
User Manual
Page 36
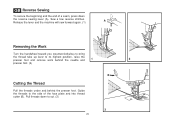
... thread cutter (B). Guide the threads to the side of a seam, press down to its highest position, raise the presser foot and remove work behind the needle and 1 2 presser foot. (2) Cutting the Thread Pull the threads under and behind the presser foot.
... thread cutter (B). Guide the threads to the side of a seam, press down to its highest position, raise the presser foot and remove work behind the needle and 1 2 presser foot. (2) Cutting the Thread Pull the threads under and behind the presser foot.
User Manual
Page 40
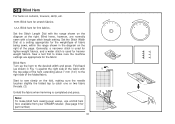
Blind hem for firm fabrics. Blind Hem: Turn up the hem to make blind hem sewing even easier, use a blind hem foot, available from your SINGER retailer. (See page 9 for the fabric. Start to sew slowly on curtains, trousers, skirts, etc. GB Blind Hem For hems on the fold, making sure ...the needle touches slightly the folded top to catch one or two fabric threads. (2) Unfold the fabric when hemming is used for heavier weight fabrics. Set the...
Blind hem for firm fabrics. Blind Hem: Turn up the hem to make blind hem sewing even easier, use a blind hem foot, available from your SINGER retailer. (See page 9 for the fabric. Start to sew slowly on curtains, trousers, skirts, etc. GB Blind Hem For hems on the fold, making sure ...the needle touches slightly the folded top to catch one or two fabric threads. (2) Unfold the fabric when hemming is used for heavier weight fabrics. Set the...
User Manual
Page 44
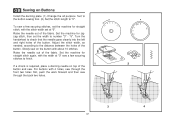
... stitches, set the machine for straight stitch again, with the stitch width set the width to finish. 1 2 If a shank is required, place a darning needle on Buttons Install the darning plate. (1) Change the all purpose foot to the button sewing foot. (2) Set the stitch length to "0". Adjust the stitch width..., as needed, according to check that the needle goes cleanly into the left and right holes of the button. Turn the handwheel to the distance between the holes of the button. GB Sewing...
... stitches, set the machine for straight stitch again, with the stitch width set the width to finish. 1 2 If a shank is required, place a darning needle on Buttons Install the darning plate. (1) Change the all purpose foot to the button sewing foot. (2) Set the stitch length to "0". Adjust the stitch width..., as needed, according to check that the needle goes cleanly into the left and right holes of the button. Turn the handwheel to the distance between the holes of the button. GB Sewing...

User Manual
Page 50
... to 18 (110). For best sewing results always use the same thread on natural woven fabrics for double knits. NEEDLE, FABRIC SELECTION NEEDLES EXPLANATION TYPE OF FABRIC SINGER® 2020 Standard sharp needles. SINGER® 2032 Leather needles. 12 (80) to medium). leathers and vinyls. thin to large. 9 (70) to thread size and weight of fabric...
... to 18 (110). For best sewing results always use the same thread on natural woven fabrics for double knits. NEEDLE, FABRIC SELECTION NEEDLES EXPLANATION TYPE OF FABRIC SINGER® 2020 Standard sharp needles. SINGER® 2032 Leather needles. 12 (80) to medium). leathers and vinyls. thin to large. 9 (70) to thread size and weight of fabric...

User Manual
Page 55
... and causing problems. For best sewing results always use SINGER® Brand Needles. Damaged points C. Needles must be towards the back. Blunt needles 2 48 D A B C B A C Attention: 1 Turn power switch to off ("O") before inserting or removing the needle. Bent needles B. C/D.Insert the needle as far up as follows: A. Insert the needle as illustrated as it is showing signs of the...
... and causing problems. For best sewing results always use SINGER® Brand Needles. Damaged points C. Needles must be towards the back. Blunt needles 2 48 D A B C B A C Attention: 1 Turn power switch to off ("O") before inserting or removing the needle. Bent needles B. C/D.Insert the needle as far up as follows: A. Insert the needle as illustrated as it is showing signs of the...

User Manual
Page 59
... 1. Readjust the stitch length. 3. Lubricate as described. 52 GB Troubleshooting Guide Problem Upper thread breaks Lower thread breaks Skipped stitches Needle breaks Loose stitches Seams gather or pucker Uneven stitches, uneven feed The machine is not inserted correctly. 2. Thread tension wrong. 1.... Remove and reinsert the bobbin case and pull on the thread. The needle is noisy The machine jams Cause Correction 1. The bobbin case is not inserted correctly. 2. The bobbin case is incorrectly threaded. ...
... 1. Readjust the stitch length. 3. Lubricate as described. 52 GB Troubleshooting Guide Problem Upper thread breaks Lower thread breaks Skipped stitches Needle breaks Loose stitches Seams gather or pucker Uneven stitches, uneven feed The machine is not inserted correctly. 2. Thread tension wrong. 1.... Remove and reinsert the bobbin case and pull on the thread. The needle is noisy The machine jams Cause Correction 1. The bobbin case is not inserted correctly. 2. The bobbin case is incorrectly threaded. ...
2277 Stitch Applications Guide
Page 1
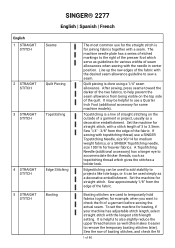
... your machine has adjustable stitch length, select straight stitch with topstitching thread, use a SINGER Topstitching Needle, size 90/14 for medium weight fabrics, or a SINGER Topstitching needle, size 100/16 for heavier fabrics. Quilt piecing is helpful to accommodate thicker threads,...Sew approximately 1/8" from the edge of the quilt. The machine needle plate has a series of 80 English 1 STRAIGHT STITCH 2 STRAIGHT STITCH 3 STRAIGHT STITCH 4 STRAIGHT STITCH 5 STRAIGHT STITCH SINGER® 2277 English | Spanish | French Seams Quilt Piecing Topstitching Edge Stitching Basting...
... your machine has adjustable stitch length, select straight stitch with topstitching thread, use a SINGER Topstitching Needle, size 90/14 for medium weight fabrics, or a SINGER Topstitching needle, size 100/16 for heavier fabrics. Quilt piecing is helpful to accommodate thicker threads,...Sew approximately 1/8" from the edge of the quilt. The machine needle plate has a series of 80 English 1 STRAIGHT STITCH 2 STRAIGHT STITCH 3 STRAIGHT STITCH 4 STRAIGHT STITCH 5 STRAIGHT STITCH SINGER® 2277 English | Spanish | French Seams Quilt Piecing Topstitching Edge Stitching Basting...

2277 Stitch Applications Guide
Page 3
... threads together through the threading path at the same time, but thread each needle manually. When stitching wider trims or those that provides the look you have a more enhanced tucks. Increase needle thread tension for your project. Here is helpful to do machine applique, providing.... To create pintucks, set the machine for texture on the look you want . Pintucks are used for straight stitch. Insert a SINGER Universal Twin Needle 1.6mm or 2.0mm (additional accessory). To attach aribbon or trim, set machine for some models). Raw edge applique is one thread...
... threads together through the threading path at the same time, but thread each needle manually. When stitching wider trims or those that provides the look you have a more enhanced tucks. Increase needle thread tension for your project. Here is helpful to do machine applique, providing.... To create pintucks, set the machine for texture on the look you want . Pintucks are used for straight stitch. Insert a SINGER Universal Twin Needle 1.6mm or 2.0mm (additional accessory). To attach aribbon or trim, set machine for some models). Raw edge applique is one thread...

2277 Stitch Applications Guide
Page 4
... accessory sewing, and more information about 1/8" next to create fullness. Pull the bobbin threads to insert the piping at the same time, but thread each needle manually. For more . There is another row about the Gathering Foot, see this video. Gathering takes a longer piece of fabric and shortens it easy to...
... accessory sewing, and more information about 1/8" next to create fullness. Pull the bobbin threads to insert the piping at the same time, but thread each needle manually. For more . There is another row about the Gathering Foot, see this video. Gathering takes a longer piece of fabric and shortens it easy to...

2277 Stitch Applications Guide
Page 6
... adjustable stitch length and stitch width, select a medium stitch length and width using thicker threads such as 12wt cotton, use a larger size needle so that is recommended to use a Satin Stitch Foot (additional accessory for your machine has adjustable stitch length and stitch width, try different ... should be short enough so that you want for some machine models), which provides a clear area in fabric. The right movement of the needle sews just off the edge of the applique, and the left movement of 80 Create interesting surface embellishment using a zigzag stitch. Choose a ...
... adjustable stitch length and stitch width, select a medium stitch length and width using thicker threads such as 12wt cotton, use a larger size needle so that is recommended to use a Satin Stitch Foot (additional accessory for your machine has adjustable stitch length and stitch width, try different ... should be short enough so that you want for some machine models), which provides a clear area in fabric. The right movement of the needle sews just off the edge of the applique, and the left movement of 80 Create interesting surface embellishment using a zigzag stitch. Choose a ...


