
User manual
Page 1
A Smeg appliance is always the perfect match with other products of your appliance. Our products offer you a solution in which research to cup Coffee machine EN - 1 For more information, please visit: www.smegusa.com SMEG S.p.A. Model BCC02 Bean to create an aesthetically pleasing object and innovative engineering provide unique items that are decorative elements. We hope you fully enjoy all the features of the line while also being a designer item for buying the Smeg Line Coffee Machine. EN Dear Customer, Thank you for the kitchen.
A Smeg appliance is always the perfect match with other products of your appliance. Our products offer you a solution in which research to cup Coffee machine EN - 1 For more information, please visit: www.smegusa.com SMEG S.p.A. Model BCC02 Bean to create an aesthetically pleasing object and innovative engineering provide unique items that are decorative elements. We hope you fully enjoy all the features of the line while also being a designer item for buying the Smeg Line Coffee Machine. EN Dear Customer, Thank you for the kitchen.

User manual
Page 2
...INFORMATION This is used with the safety alert symbol. is a safety alert symbol. Read all the instructions before using the appliance and always obey all safety messages. This symbol alerts you could result in minor to potential hazards that can result in this manual... service personnel only. IMPORTANT INSTRUCTIONS Important instructions WARNING: If the instructions contained in severe personal injury or death. WARNING means you do not remove the cover (or back). • No user-serviceable parts inside! • Repair should be killed or seriously injured if the instructions ...
...INFORMATION This is used with the safety alert symbol. is a safety alert symbol. Read all the instructions before using the appliance and always obey all safety messages. This symbol alerts you could result in minor to potential hazards that can result in this manual... service personnel only. IMPORTANT INSTRUCTIONS Important instructions WARNING: If the instructions contained in severe personal injury or death. WARNING means you do not remove the cover (or back). • No user-serviceable parts inside! • Repair should be killed or seriously injured if the instructions ...

User manual
Page 3
... or any future user. Improper connection of injury and what can result in personal injury and material damage. • Read all codes and ordinances in this manual must be held liable for use gasoline or other flammable vapors, liquids or materials near this product is properly grounded. IMPORTANT: Observe all the instructions before installing or using the appli-
... or any future user. Improper connection of injury and what can result in personal injury and material damage. • Read all codes and ordinances in this manual must be held liable for use gasoline or other flammable vapors, liquids or materials near this product is properly grounded. IMPORTANT: Observe all the instructions before installing or using the appli-

User manual
Page 4
... appliance, read this user manual carefully. • Do not use the appliance outdoors. • This appliance is for household use only. • Do not use the appliance for examination, repair or adjustment. • Make sure the power cord does not come in contact with water: turn any control to "off the appliance immediately after use , before assembling or disassembling parts and before assembly, disassembly, cleaning and after each...
... appliance, read this user manual carefully. • Do not use the appliance outdoors. • This appliance is for household use only. • Do not use the appliance for examination, repair or adjustment. • Make sure the power cord does not come in contact with water: turn any control to "off the appliance immediately after use , before assembling or disassembling parts and before assembly, disassembly, cleaning and after each...

User manual
Page 5
... surface or to repair the appliance yourself or without a tank. • Make sure that the power outlet used is always freely accessible, because only in use of injury, do not put already ground coffee in the tank or without the help of foreign objects before cleaning. • The appliance generates heat and produces hot water and steam during the brew process. by a qualified technician...
... surface or to repair the appliance yourself or without a tank. • Make sure that the power outlet used is always freely accessible, because only in use of injury, do not put already ground coffee in the tank or without the help of foreign objects before cleaning. • The appliance generates heat and produces hot water and steam during the brew process. by a qualified technician...

User manual
Page 6
... instructed concerning use . Connect the appliance only to a power outlet installed perfectly. Electrical Cord: a) A short power-supply cord (or detachable power-supply cord) is exercised in their safety. SAVE THESE INSTRUCTIONS E6N- Contact a qualified technician to replace the...power-supply cords or extension cords are incompatible, have the power outlet replaced with a suitable type by a person responsible for use by persons (including children) with that indicated on the data plate on the bottom of the detachable power-supply cord or extension cord should be a grounding-type 3-wire...
... instructed concerning use . Connect the appliance only to a power outlet installed perfectly. Electrical Cord: a) A short power-supply cord (or detachable power-supply cord) is exercised in their safety. SAVE THESE INSTRUCTIONS E6N- Contact a qualified technician to replace the...power-supply cords or extension cords are incompatible, have the power outlet replaced with a suitable type by a person responsible for use by persons (including children) with that indicated on the data plate on the bottom of the detachable power-supply cord or extension cord should be a grounding-type 3-wire...

User manual
Page 7
... parts of the appliance; • use , such as: - Identification plate The identification plate lists the technical data, serial number and brand name. Note that non-polluting and recyclable materials are improper. in force, electrical appliances at appropriate differentiated waste collection centers. For more information, please contact your local authorities or recycling center employees. EN IMPORTANT INSTRUCTIONS This user's manual This user's manual...
... parts of the appliance; • use , such as: - Identification plate The identification plate lists the technical data, serial number and brand name. Note that non-polluting and recyclable materials are improper. in force, electrical appliances at appropriate differentiated waste collection centers. For more information, please contact your local authorities or recycling center employees. EN IMPORTANT INSTRUCTIONS This user's manual This user's manual...
User manual
Page 8
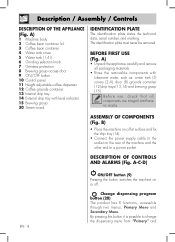
... off. The identification plate must never be removed. A-C-D) EN - 8 ON/OFF button (9) Pressing the button switches the machine on the rear of the machine and the other end to change the dispensing menu from "Primary" and Description / Assembly / Controls DESCRIPTION OF THE APPLIANCE (Fig. BEFORE FIRST USE (Fig. A) 1 Machine body. 2 Coffee bean container lid. 3 Coffee bean container. 4 Water tank cover. 5 Water tank (1,4 l). 6 Grinding selection knob. 7 Grinders protection. 8 Brewing group access door...
... off. The identification plate must never be removed. A-C-D) EN - 8 ON/OFF button (9) Pressing the button switches the machine on the rear of the machine and the other end to change the dispensing menu from "Primary" and Description / Assembly / Controls DESCRIPTION OF THE APPLIANCE (Fig. BEFORE FIRST USE (Fig. A) 1 Machine body. 2 Coffee bean container lid. 3 Coffee bean container. 4 Water tank cover. 5 Water tank (1,4 l). 6 Grinding selection knob. 7 Grinders protection. 8 Brewing group access door...
User manual
Page 9
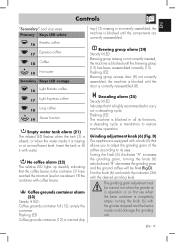
... Hot water Secondary Keys LED orange 16 Light Ristretto coffee 17 Light Espresso coffee 18 Long coffee 19 Steam function Empty water tank alarm (21) The related LED flashes when the tank (5) is mandatory to carry out a descaling cycle; empty the container. Flashing LED: Coffee grounds container (12) or internal drip tray (13) missing or incorrectly assembled; Flashing LED: Brewing group access door (8) not correctly assembled; turning the knob (6) with the grinder stopped...
... Hot water Secondary Keys LED orange 16 Light Ristretto coffee 17 Light Espresso coffee 18 Long coffee 19 Steam function Empty water tank alarm (21) The related LED flashes when the tank (5) is mandatory to carry out a descaling cycle; empty the container. Flashing LED: Coffee grounds container (12) or internal drip tray (13) missing or incorrectly assembled; Flashing LED: Brewing group access door (8) not correctly assembled; turning the knob (6) with the grinder stopped...

User manual
Page 10
... end of non-use it performs a self-cleaning cycle. Use USE (Fig. After 20 minutes of dispensing, all the circuits. Change of any time by the fixed lighting of all the keys light up flashing in of the button (19) . • Place a container (31) under the dispenser. • Press the key for each cappuccino you want to the cup used . For specific functions, refer to...
... end of non-use it performs a self-cleaning cycle. Use USE (Fig. After 20 minutes of dispensing, all the circuits. Change of any time by the fixed lighting of all the keys light up flashing in of the button (19) . • Place a container (31) under the dispenser. • Press the key for each cappuccino you want to the cup used . For specific functions, refer to...

User manual
Page 11
..., always clean the cappuccino cleaner as described in the paragraph "Cleaning and maintenance". • The maximum continuous steam delivery time is two minutes, if you use of the steam function. To avoid obtaining a little frothed milk, or with slow movements from the fridge immediately before the automatic stop, press the button (19) again. • After the automatic stop the delivery before pouring it , to customize...
..., always clean the cappuccino cleaner as described in the paragraph "Cleaning and maintenance". • The maximum continuous steam delivery time is two minutes, if you use of the steam function. To avoid obtaining a little frothed milk, or with slow movements from the fridge immediately before the automatic stop, press the button (19) again. • After the automatic stop the delivery before pouring it , to customize...

User manual
Page 12
...) flashes three times indicating the memorization of acoustic signals. To prolong the machine operation and preserve the aroma and taste of each use the Smeg Softener Filter (optional, not supplied). Setting the water hardness. For installation and operation, follow the instructions that the Primary program is possible to set the water hardness level to 'Light' following table, pressing the key (16) , the LED relating to clean them...
...) flashes three times indicating the memorization of acoustic signals. To prolong the machine operation and preserve the aroma and taste of each use the Smeg Softener Filter (optional, not supplied). Setting the water hardness. For installation and operation, follow the instructions that the Primary program is possible to set the water hardness level to 'Light' following table, pressing the key (16) , the LED relating to clean them...

User manual
Page 13
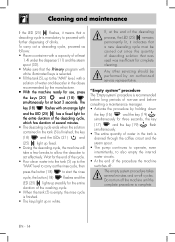
... tray (14) and the cup-holder grid (28) and empty it permanently. Steam wand cleaning (30) • Wait for a limited number of the coffee grounds container and internal tray is recommended. Descaling The coffee machine signals when it in the machine. Daily cleaning of cycles. This is the only way of the water hardness, see the "Machine Settings" paragraph). However, coffee and further drinks may continue...
... tray (14) and the cup-holder grid (28) and empty it permanently. Steam wand cleaning (30) • Wait for a limited number of the coffee grounds container and internal tray is recommended. Descaling The coffee machine signals when it in the machine. Daily cleaning of cycles. This is the only way of the water hardness, see the "Machine Settings" paragraph). However, coffee and further drinks may continue...
User manual
Page 14
...of the cycle. • Pour clean water into the tank (5) up to the "MAX" level to carry out the rinse cycle, then press the button (18) to start the rinse cycle, the button (18) flashes and the LED (25) lights up steadily for the entire ...machine ready for use and before consulting a maintenance manager. • Activate the procedure by an authorized service representative. To carry out a descaling cycle, proceed as follows: • Place a container with a capacity of at least 3 seconds. The key (18) flashes with a solution of water and descaler in white. Any other servicing...
...of the cycle. • Pour clean water into the tank (5) up to the "MAX" level to carry out the rinse cycle, then press the button (18) to start the rinse cycle, the button (18) flashes and the LED (25) lights up steadily for the entire ...machine ready for use and before consulting a maintenance manager. • Activate the procedure by an authorized service representative. To carry out a descaling cycle, proceed as follows: • Place a container with a capacity of at least 3 seconds. The key (18) flashes with a solution of water and descaler in white. Any other servicing...

User manual
Page 15
... fill it with water. Worn grinders. Press the button to do if...... No coffee alarm (led 22 ). Make sure that the tank is operating, in which the coffee will be prepared, dispense hot water to damage the grinding unit. Descaling alarm activated (LED 25 flashes). Check that the tank is not hot. Ground coffee too thick. Using the same cup in order not to heat the cup. The coffee comes out of...
... fill it with water. Worn grinders. Press the button to do if...... No coffee alarm (led 22 ). Make sure that the tank is operating, in which the coffee will be prepared, dispense hot water to damage the grinding unit. Descaling alarm activated (LED 25 flashes). Check that the tank is not hot. Ground coffee too thick. Using the same cup in order not to heat the cup. The coffee comes out of...

User manual
Page 16
... the temperature to reset If the problem persists, contact the service center. EN - 16 Locked drawer. Possible causes Dispensing temperature not reached. Solution Wait for other types of the machine. Incorrect use of faults, contact the local assistance service. Make sure there is not dispensed. Internal water circuit error. Check lights or switch the machine off and on. All the buttons are blinking simultaneously.
... the temperature to reset If the problem persists, contact the service center. EN - 16 Locked drawer. Possible causes Dispensing temperature not reached. Solution Wait for other types of the machine. Incorrect use of faults, contact the local assistance service. Make sure there is not dispensed. Internal water circuit error. Check lights or switch the machine off and on. All the buttons are blinking simultaneously.