User manual
Page 1
... may result causing property damage, personal injury or death. Read all the instructions before using the appliance and always obey all safety messages. 3 EN Contents 1 Instructions 7 1.1 Introduction 7 1.2 This user manual 7 1.3 Intended use 13 3.2 Using the stand mixer 14 3.3 Using the pouring shield 19 3.4 Functions 20 3.5 Speed setting suggestions 21 4 Cleaning and Care 25 4.1 Instructions 25 4.2 Maintenance 25 4.3 Ordinary daily cleaning 25 4.4 What to do if... 26...
... may result causing property damage, personal injury or death. Read all the instructions before using the appliance and always obey all safety messages. 3 EN Contents 1 Instructions 7 1.1 Introduction 7 1.2 This user manual 7 1.3 Intended use 13 3.2 Using the stand mixer 14 3.3 Using the pouring shield 19 3.4 Functions 20 3.5 Speed setting suggestions 21 4 Cleaning and Care 25 4.1 Instructions 25 4.2 Maintenance 25 4.3 Ordinary daily cleaning 25 4.4 What to do if... 26...
User manual
Page 3
... when not in use, before assembling or disassembling parts and before using the appliance. • To protect against electric shock, do not immerse the appliance, the power cord or the plug in water or any manner. Return appliance to the nearest authorized service facility for examination, repair or adjustment. • If the supply cord is damaged, it is operating. • Turn the appliance OFF...
... when not in use, before assembling or disassembling parts and before using the appliance. • To protect against electric shock, do not immerse the appliance, the power cord or the plug in water or any manner. Return appliance to the nearest authorized service facility for examination, repair or adjustment. • If the supply cord is damaged, it is operating. • Turn the appliance OFF...
User manual
Page 4
... any appliance is used to mix, whip, whisk and knead solid and liquid ingredients to speed up the preparation time for various recipes. SAVE THESE INSTRUCTIONS 6 To unplug, grasp the plug and pull from the power cord. With the addition of optional accessories it is left unattended and before assembling, disassembling or cleaning. • Remove beaters from mixer before putting on top of attachments not recommended...
... any appliance is used to mix, whip, whisk and knead solid and liquid ingredients to speed up the preparation time for various recipes. SAVE THESE INSTRUCTIONS 6 To unplug, grasp the plug and pull from the power cord. With the addition of optional accessories it is left unattended and before assembling, disassembling or cleaning. • Remove beaters from mixer before putting on top of attachments not recommended...

User manual
Page 5
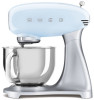
... final disposal. Safety instructions Information 1.2 This user manual This user manual is designed exclusively for home use. • Do not use outdoors. • The stand mixer can be used to mix, whip, whisk and knead solid and liquid ingredients to speed up the preparation time for various recipes. EN Important Safeguards 1 Instructions 1.1 Introduction Key information for the user: Instructions General information on this user manual, on preparing recipes with remotecontrol systems...
... final disposal. Safety instructions Information 1.2 This user manual This user manual is designed exclusively for home use. • Do not use outdoors. • The stand mixer can be used to mix, whip, whisk and knead solid and liquid ingredients to speed up the preparation time for various recipes. EN Important Safeguards 1 Instructions 1.1 Introduction Key information for the user: Instructions General information on this user manual, on preparing recipes with remotecontrol systems...
User manual
Page 6
... operators can provide further information. Plastic packaging Danger of suffocation • Do not leave the packaging or any part of the appliance; • Use of non-original spare parts; • Not following the safety instructions. 1.6 Disposal Power voltage Danger of electrocution • Turn ...of the packing materials at an appropriate disposal facility. 1.5 Identification plate The identification plate bears the technical data, serial number and brand name of the appliance. To comply with the plastic bags. 8 Important Safeguards Warning • This product contains a ...
... operators can provide further information. Plastic packaging Danger of suffocation • Do not leave the packaging or any part of the appliance; • Use of non-original spare parts; • Not following the safety instructions. 1.6 Disposal Power voltage Danger of electrocution • Turn ...of the packing materials at an appropriate disposal facility. 1.5 Identification plate The identification plate bears the technical data, serial number and brand name of the appliance. To comply with the plastic bags. 8 Important Safeguards Warning • This product contains a ...
User manual
Page 7
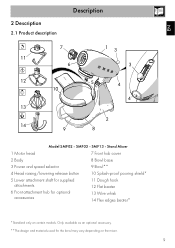
... - Stand Mixer 1 Motor head 7 Front hub cover 2 Body 8 Bowl base 3 Power and speed selector 9 Bowl** 4 Head raising/lowering release button 10 Splash-proof pouring shield* 5 Lower attachment shaft for supplied attachments 6 Front attachment hub for the bowl may vary depending on certain models. EN 2 Description 2.1 Product description Description 7 13 11 6 3 12 10 13 5 4 4 2 14 9 8 Model SMF02 - SMF03 - Only available as an optional accessory. **The design and materials used for optional accessories 11 Dough hook 12 Flat beater 13 Wire whisk...
... - Stand Mixer 1 Motor head 7 Front hub cover 2 Body 8 Bowl base 3 Power and speed selector 9 Bowl** 4 Head raising/lowering release button 10 Splash-proof pouring shield* 5 Lower attachment shaft for supplied attachments 6 Front attachment hub for the bowl may vary depending on certain models. EN 2 Description 2.1 Product description Description 7 13 11 6 3 12 10 13 5 4 4 2 14 9 8 Model SMF02 - SMF03 - Only available as an optional accessory. **The design and materials used for optional accessories 11 Dough hook 12 Flat beater 13 Wire whisk...
User manual
Page 8
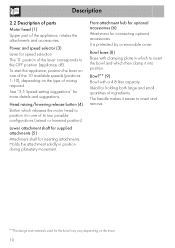
... the lever on the mixer. 10 Lower attachment shaft for supplied attachments (5) Attachment shaft for connecting optional accessories. It is protected by a removable cover. Ideal for the bowl may vary depending on one of its two possible configurations (raised or lowered position). Description 2.2 Description of parts Motor head (1) Upper part of ingredients. Front attachment hub for optional accessories (6) Attachment for inserting attachments. Bowl base (8) Base with a 4.8 liter capacity. The handle makes it in...
... the lever on the mixer. 10 Lower attachment shaft for supplied attachments (5) Attachment shaft for connecting optional accessories. It is protected by a removable cover. Ideal for the bowl may vary depending on one of its two possible configurations (raised or lowered position). Description 2.2 Description of parts Motor head (1) Upper part of ingredients. Front attachment hub for optional accessories (6) Attachment for inserting attachments. Bowl base (8) Base with a 4.8 liter capacity. The handle makes it in...
User manual
Page 9
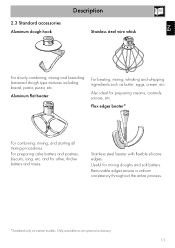
Only available as butter, eggs, cream, etc. For preparing cake batters and pastries, biscuits, icing, etc. and for mixing doughs and soft batters. Aluminum flat beater For beating, mixing, whisking and whipping ingredients such as an optional accessory. 11 EN 2.3 Standard accessories Aluminum dough hook Description Stainless steel wire whisk For slowly combining, mixing and kneading leavened dough type mixtures including bread, pasta, pizza, etc. Stainless steel beater with flexible silicone edges. Removable edges ensure a uniform consistency...
Only available as butter, eggs, cream, etc. For preparing cake batters and pastries, biscuits, icing, etc. and for mixing doughs and soft batters. Aluminum flat beater For beating, mixing, whisking and whipping ingredients such as an optional accessory. 11 EN 2.3 Standard accessories Aluminum dough hook Description Stainless steel wire whisk For slowly combining, mixing and kneading leavened dough type mixtures including bread, pasta, pizza, etc. Stainless steel beater with flexible silicone edges. Removable edges ensure a uniform consistency...
User manual
Page 10
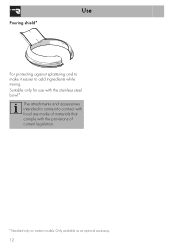
Only available as an optional accessory. 12 The attachments and accessories intended to add ingredients while mixing. Suitable only for use with the provisions of current legislation. *Standard only on certain models. Pouring shield* Use For protecting against splattering and to make it easier to come into contact with food are made of materials that comply with the stainless steel bowl*.
Only available as an optional accessory. 12 The attachments and accessories intended to add ingredients while mixing. Suitable only for use with the provisions of current legislation. *Standard only on certain models. Pouring shield* Use For protecting against splattering and to make it easier to come into contact with food are made of materials that comply with the stainless steel bowl*.
User manual
Page 11
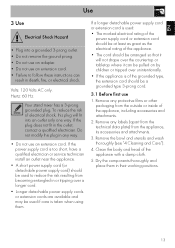
... great as the electrical rating of the appliance with a damp cloth. 5. Volts: 120 Volts AC only. If the power supply cord is too short, have a qualified electrician or service technician install an outlet near the appliance. • A short power supply cord (or detachable power supply cord) should be a grounded type 3-prong cord. 3.1 Before first use an extension cord. Hertz: 60 Hz Your stand mixer has a 3-prong...
... great as the electrical rating of the appliance with a damp cloth. 5. Volts: 120 Volts AC only. If the power supply cord is too short, have a qualified electrician or service technician install an outlet near the appliance. • A short power supply cord (or detachable power supply cord) should be a grounded type 3-prong cord. 3.1 Before first use an extension cord. Hertz: 60 Hz Your stand mixer has a 3-prong...
User manual
Page 12
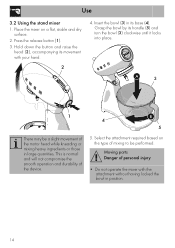
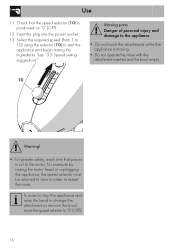
Use 3.2 Using the stand mixer 1. Place the mixer on the type of personal injury • Do not operate the mixer with your hand. 2 4. Insert the bowl (3) in large quantities. Select the attachment required based on a flat, stable and dry surface. 2. Hold down the button and raise the head (2), accompanying its handle (5) and turn the bowl (3) clockwise until it locks into place. Moving parts Danger of mixing to be a slight movement...
Use 3.2 Using the stand mixer 1. Place the mixer on the type of personal injury • Do not operate the mixer with your hand. 2 4. Insert the bowl (3) in large quantities. Select the attachment required based on a flat, stable and dry surface. 2. Hold down the button and raise the head (2), accompanying its handle (5) and turn the bowl (3) clockwise until it locks into place. Moving parts Danger of mixing to be a slight movement...
User manual
Page 13
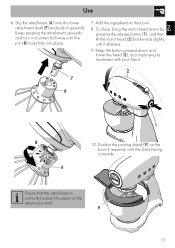
... to the bowl. 8. Ensure that the attachment is correctly locked into place. 7. EN Use 6. Position the pouring shield (9) on the attachment shaft. 9 15 Keep the button pressed down by pressing the release button (1), and then tilt the motor head (2) backwards slightly until the pin (8) locks fully into place on the bowl if required, with your hand. 2 7 6 8 6 1 10. Keep pressing the attachment upwards and turn it counterclockwise...
... to the bowl. 8. Ensure that the attachment is correctly locked into place. 7. EN Use 6. Position the pouring shield (9) on the attachment shaft. 9 15 Keep the button pressed down by pressing the release button (1), and then tilt the motor head (2) backwards slightly until the pin (8) locks fully into place on the bowl if required, with your hand. 2 7 6 8 6 1 10. Keep pressing the attachment upwards and turn it counterclockwise...
User manual
Page 14
...power socket. 13. In order to stop the appliance and raise the head to change the attachment or remove the bowl, move the speed selector to start the appliance and begin mixing the ingredients. See "3.5 Speed setting suggestions". Check that power is positioned on '0' (OFF). 12. Select the required speed (from 1 to 10) using...not operate the mixer with the attachment inserted and the bowl empty. 10 Warning! • For greater safety, each time that the speed selector (10) is cut to the motor, for example by raising the motor head or unplugging the appliance, the speed ...
...power socket. 13. In order to stop the appliance and raise the head to change the attachment or remove the bowl, move the speed selector to start the appliance and begin mixing the ingredients. See "3.5 Speed setting suggestions". Check that power is positioned on '0' (OFF). 12. Select the required speed (from 1 to 10) using...not operate the mixer with the attachment inserted and the bowl empty. 10 Warning! • For greater safety, each time that the speed selector (10) is cut to the motor, for example by raising the motor head or unplugging the appliance, the speed ...
User manual
Page 17
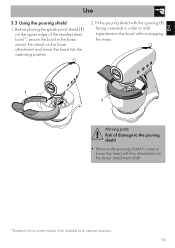
... optional accessory. 19 Fit the pouring shield with the attachment on the lower attachment shaft. *Standard only on the lower attachment and lower the head into the operating position. 2. Before placing the splash-proof shield (1) on the upper edge of the stainless steel bowl*, secure the bowl in order to add ingredients to the bowl without stopping the mixer. 1 1 Moving parts Risk of damage to the pouring shield • Remove the pouring shield to...
... optional accessory. 19 Fit the pouring shield with the attachment on the lower attachment shaft. *Standard only on the lower attachment and lower the head into the operating position. 2. Before placing the splash-proof shield (1) on the upper edge of the stainless steel bowl*, secure the bowl in order to add ingredients to the bowl without stopping the mixer. 1 1 Moving parts Risk of damage to the pouring shield • Remove the pouring shield to...

User manual
Page 19
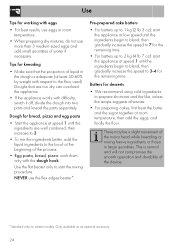
... Kneading - MIXING Mixing and beating dense batters. Beating eggs and butter, cake mixes such as sponge cake mixes, whipping cream, egg whites or sauces. preparing leavened dough (bread, pizza, pastries, egg pasta), see " Dough for bread, pizza and egg pasta". Accessory 21 The speeds indicated in the table are approximate and can vary depending on the recipe and the interaction of the different ingredients used. WHIPPING AND WHISKING Whisking light or...
... Kneading - MIXING Mixing and beating dense batters. Beating eggs and butter, cake mixes such as sponge cake mixes, whipping cream, egg whites or sauces. preparing leavened dough (bread, pizza, pastries, egg pasta), see " Dough for bread, pizza and egg pasta". Accessory 21 The speeds indicated in the table are approximate and can vary depending on the recipe and the interaction of the different ingredients used. WHIPPING AND WHISKING Whisking light or...

User manual
Page 21
...stand mixer allows you add dry or liquid ingredients to beat egg whites very quickly. Then switch the speed to 10 for whipping egg whites • For best results, use cold whipping cream. • To avoid spills, gradually increase to the maximum recommended speed and beat until the desired consistency is in operation and to prevent splashing. • Keep the bowl and attachments...beating the egg whites, make sure that the attachment and the bowl are not wet, greasy or soiled with a damp cloth if they are well blended, increase the speed. • Use the pouring shield* for liquid ...
...stand mixer allows you add dry or liquid ingredients to beat egg whites very quickly. Then switch the speed to 10 for whipping egg whites • For best results, use cold whipping cream. • To avoid spills, gradually increase to the maximum recommended speed and beat until the desired consistency is in operation and to prevent splashing. • Keep the bowl and attachments...beating the egg whites, make sure that the attachment and the bowl are not wet, greasy or soiled with a damp cloth if they are well blended, increase the speed. • Use the pouring shield* for liquid ...
User manual
Page 22
... the recipe suggests otherwise. • For preparing cakes, first beat the butter and the sugar together at the beginning of the motor head while kneading or mixing heavy ingredients or those in the dough is normal and will not compromise the smooth operation and durability of water if necessary. Tips for desserts • We recommend using cold ingredients to the bowl...
... the recipe suggests otherwise. • For preparing cakes, first beat the butter and the sugar together at the beginning of the motor head while kneading or mixing heavy ingredients or those in the dough is normal and will not compromise the smooth operation and durability of water if necessary. Tips for desserts • We recommend using cold ingredients to the bowl...
User manual
Page 23
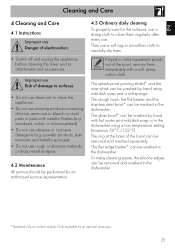
... splash out of the bowl, remove them regularly after every use. The ring at the base of electrocution • Switch off and unplug the appliance before cleaning the mixer and its attachments and accessories. anodized, nickel- The dough hook, the flat beater and the stainless steel bowl* can be washed in the dishwasher. *Standard only on steel parts or parts with metallic finishes (e.g. To make cleaning easier, the silicone...
... splash out of the bowl, remove them regularly after every use. The ring at the base of electrocution • Switch off and unplug the appliance before cleaning the mixer and its attachments and accessories. anodized, nickel- The dough hook, the flat beater and the stainless steel bowl* can be washed in the dishwasher. *Standard only on steel parts or parts with metallic finishes (e.g. To make cleaning easier, the silicone...

User manual
Page 25
.... Set a lower speed and ensure the bowl has not been overfilled. Check that the bowl is correctly locked into its base. Have them replaced at an Authorized Service Center. The attachments hit the walls of the bowl Turn the speed selector to The attachment or the bowl is not check that the bowl is inserted correctly in the lower attachment shaft and that the attachment is excessive. The bowl...
.... Set a lower speed and ensure the bowl has not been overfilled. Check that the bowl is correctly locked into its base. Have them replaced at an Authorized Service Center. The attachments hit the walls of the bowl Turn the speed selector to The attachment or the bowl is not check that the bowl is inserted correctly in the lower attachment shaft and that the attachment is excessive. The bowl...
User manual
Page 26
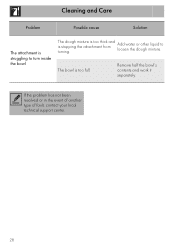
Cleaning and Care Problem Possible cause Solution The attachment is struggling to loosen the dough mixture. The bowl is stopping the attachment from turning. Remove half the bowl's contents and work it separately. If the problem has not been resolved or in the event of another type of fault, contact your local technical support center. 28 Add water or other liquid to turn inside the bowl The dough mixture is too thick and is too full.
Cleaning and Care Problem Possible cause Solution The attachment is struggling to loosen the dough mixture. The bowl is stopping the attachment from turning. Remove half the bowl's contents and work it separately. If the problem has not been resolved or in the event of another type of fault, contact your local technical support center. 28 Add water or other liquid to turn inside the bowl The dough mixture is too thick and is too full.