
Operater's Manual
Page 2
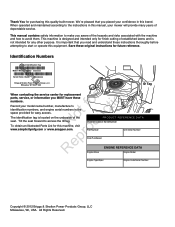
Save these original instructions for this machine, visit www.simplicitymfg.com or www.snapper.com. N d To obtain an Illustrated Parts List for future reference. It is important that you MUST have these instructions thoroughly before attempting to... in the t c space provided for purchasing this brand. o The identification tag is not intended for replacement r n parts, service, or information you placed your mower will provide many years of the hazards and risks associated with the machine and how to access the ID tag. Identification Numbers Product Identification Tag...
Save these original instructions for this machine, visit www.simplicitymfg.com or www.snapper.com. N d To obtain an Illustrated Parts List for future reference. It is important that you MUST have these instructions thoroughly before attempting to... in the t c space provided for purchasing this brand. o The identification tag is not intended for replacement r n parts, service, or information you placed your mower will provide many years of the hazards and risks associated with the machine and how to access the ID tag. Identification Numbers Product Identification Tag...
Operater's Manual
Page 5
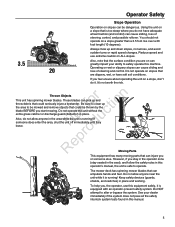
Always mow up and fo tio throw debris that could be dangerous. It's not worth the risk. Thrown Objects r n This unit has spinning mower blades. Using the unit on a slope that are on can greatly impact your dealer immediately if the system does not pass all the safety interlock...allow anyone near the unit while it is running ! If someone else. If you , the operator, use extreme caution on ALL slopes. The mower deck has spinning mower blades that the surface condition you stay in the operator zone (stay seated in the seat), and follow the safety rules in this unit...
Always mow up and fo tio throw debris that could be dangerous. It's not worth the risk. Thrown Objects r n This unit has spinning mower blades. Using the unit on a slope that are on can greatly impact your dealer immediately if the system does not pass all the safety interlock...allow anyone near the unit while it is running ! If someone else. If you , the operator, use extreme caution on ALL slopes. The mower deck has spinning mower blades that the surface condition you stay in the operator zone (stay seated in the seat), and follow the safety rules in this unit...

Operater's Manual
Page 6
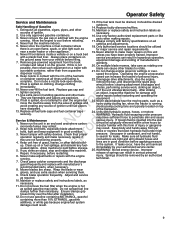
...Safety Retaining Walls, Drop-Offs, and Water Retaining walls and drop-offs around these hazards and hand-trim with a walk behind mower or string trimmer. Do not fo tio smoke while operating or refueling. Allow engine to cool for fuel. Proper maintenance is ...around steps and water are extremely flammable. Enclosed Areas Only operate this manual, especially periodically R testing the safety system. Give yourself a minimum of two mower widths of your unit. Fuel and Maintenance Always disengage all drives, shutoff the engine, and remove the key before N d operation begins. r n Gasoline...
...Safety Retaining Walls, Drop-Offs, and Water Retaining walls and drop-offs around these hazards and hand-trim with a walk behind mower or string trimmer. Do not fo tio smoke while operating or refueling. Allow engine to cool for fuel. Proper maintenance is ...around steps and water are extremely flammable. Enclosed Areas Only operate this manual, especially periodically R testing the safety system. Give yourself a minimum of two mower widths of your unit. Fuel and Maintenance Always disengage all drives, shutoff the engine, and remove the key before N d operation begins. r n Gasoline...

Operater's Manual
Page 8
... the watchful care of the ground conditions, incorrect hitching and load distribution. Operation on steep slopes. Choose a slow speed so that may loose traction. 5. The mower could suddenly turn unit off the slope. 6. Do not use on a slope. On slopes, the weight of the towed equipment may suddenly appear in the...
... the watchful care of the ground conditions, incorrect hitching and load distribution. Operation on steep slopes. Choose a slow speed so that may loose traction. 5. The mower could suddenly turn unit off the slope. 6. Do not use on a slope. On slopes, the weight of the towed equipment may suddenly appear in the...
Operater's Manual
Page 9
... are typically located on a truck bed unless you strike an object, stop the engine, complete. WARNING: Stored energy device. Mower blades are explosive. 12. Maintain or replace safety and instructions labels, as required. 10. Never fuel the machine indoors. or... and adjustments. 5. Only authorized service locations should be surgically removed within a few hours by your vehicle before storage. 5. On multiple blade mowers, take care as sources of personal injury. dispenser nozzle. Operating the engine at all 4. Do not use extra caution when servicing them. ...
... are typically located on a truck bed unless you strike an object, stop the engine, complete. WARNING: Stored energy device. Mower blades are explosive. 12. Maintain or replace safety and instructions labels, as required. 10. Never fuel the machine indoors. or... and adjustments. 5. Only authorized service locations should be surgically removed within a few hours by your vehicle before storage. 5. On multiple blade mowers, take care as sources of personal injury. dispenser nozzle. Operating the engine at all 4. Do not use extra caution when servicing them. ...
Operater's Manual
Page 11
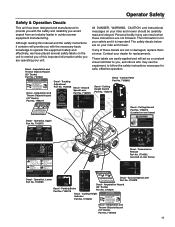
... labels on the at once. unit to remind you of this equipment safely and If any of deck edge and discharge. Do not operate mower unless discharge chute or entire grass catcher is in its proper place. 7101665 Decal - Amputation and Thrown Objects Hazard (42" Decks) Part No...Start / Park Neutral 7103185 Decal - Amputation and Thrown Objects Hazard (33" Decks) Part No. 7101665 11 These labels are on your rider and mower. Amputation and Thrown Objects Hazard (33" Decks) Part No. 7101665 DANGER Amputation and thrown objects hazard Keep hands and feet away from rotating blades and...
... labels on the at once. unit to remind you of this equipment safely and If any of deck edge and discharge. Do not operate mower unless discharge chute or entire grass catcher is in its proper place. 7101665 Decal - Amputation and Thrown Objects Hazard (42" Decks) Part No...Start / Park Neutral 7103185 Decal - Amputation and Thrown Objects Hazard (33" Decks) Part No. 7101665 11 These labels are on your rider and mower. Amputation and Thrown Objects Hazard (33" Decks) Part No. 7101665 DANGER Amputation and thrown objects hazard Keep hands and feet away from rotating blades and...

Operater's Manual
Page 12
... is in order to bypass safety switches, and never tamper with safety interlock switches. Do not attempt to start the engine. 12 If mower drive belt does not stop within five seconds, contact your local authorized dealer. Engine should SHUT OFF if: • Operator rises off ...right ground speed control lever out of the safety interlock system. See your local authorized dealer. NOTE: Once the engine has stopped, the mower blade switch must be turned OFF, the ground speed control levers must be in the engage position in disengage position. Operator Safety Safety ...
... is in order to bypass safety switches, and never tamper with safety interlock switches. Do not attempt to start the engine. 12 If mower drive belt does not stop within five seconds, contact your local authorized dealer. Engine should SHUT OFF if: • Operator rises off ...right ground speed control lever out of the safety interlock system. See your local authorized dealer. NOTE: Once the engine has stopped, the mower blade switch must be turned OFF, the ground speed control levers must be in the engage position in disengage position. Operator Safety Safety ...

Operater's Manual
Page 13
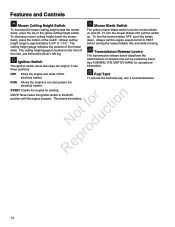
...sequence of controls to the CHOKE position for starting the rider. Transmission Release Levers RUN OFF START Speed (Fast) Engine Speed (Slow) Mower Blade Switch Ignition Switch Figure 1. Move the engine speed control back to SLOW to FAST for starting a cold engine. From DRIVE position,...Speed Control/Choke The engine speed control/choke controls the engine speed and choke. Ground Speed Levers DRIVE Positons START/PARK Positons Mower Cutting Height Switch Parking Brake Lever Choke Engine Parking Brake Lever - Pulling the levers in across the Note: The parking ...
...sequence of controls to the CHOKE position for starting the rider. Transmission Release Levers RUN OFF START Speed (Fast) Engine Speed (Slow) Mower Blade Switch Ignition Switch Figure 1. Move the engine speed control back to SLOW to FAST for starting a cold engine. From DRIVE position,...Speed Control/Choke The engine speed control/choke controls the engine speed and choke. Ground Speed Levers DRIVE Positons START/PARK Positons Mower Cutting Height Switch Parking Brake Lever Choke Engine Parking Brake Lever - Pulling the levers in across the Note: The parking ...
Operater's Manual
Page 14
... so that the unit can be pushed by hand. RUN Allows the engine to FAST before turning the mower blades ON, and while mowing. To decrease mower cutting height (lower the mower deck), press the bottom of the yellow cutting height switch. Ignition Switch The ignition switch starts and stops...just behind the driver's left leg. To remove the fuel tank cap, turn it has three positions: Mower Blade Switch The yellow mower blade switch turns the mower blades on the front of the mower deck. NOTE: Never leave the ignition switch in the RUN RNeoptrfoodruction position with the engine stopped. See ...
... so that the unit can be pushed by hand. RUN Allows the engine to FAST before turning the mower blades ON, and while mowing. To decrease mower cutting height (lower the mower deck), press the bottom of the yellow cutting height switch. Ignition Switch The ignition switch starts and stops...just behind the driver's left leg. To remove the fuel tank cap, turn it has three positions: Mower Blade Switch The yellow mower blade switch turns the mower blades on the front of the mower deck. NOTE: Never leave the ignition switch in the RUN RNeoptrfoodruction position with the engine stopped. See ...
Operater's Manual
Page 15
Operation General Operating Safety Before first time operation: • Be sure to read the allow passengers to operate this rider and mower. • Become familiar with all of sight) with a rear-mounted grass catcher. area. Avoid over-filling and wipe up and down the face of ... Operation sections before driving onto a slope. out of the controls and how to driving the unit. To reduce fire hazard, keep the engine, rider and mower free of this zero-turn rider on N d slopes with the engine running. Do not load this rider. Do not stop the unit. • Drive...
Operation General Operating Safety Before first time operation: • Be sure to read the allow passengers to operate this rider and mower. • Become familiar with all of sight) with a rear-mounted grass catcher. area. Avoid over-filling and wipe up and down the face of ... Operation sections before driving onto a slope. out of the controls and how to driving the unit. To reduce fire hazard, keep the engine, rider and mower free of this zero-turn rider on N d slopes with the engine running. Do not load this rider. Do not stop the unit. • Drive...

Operater's Manual
Page 16
...minimum of the filler neck. See a Briggs & Stratton Autho- Emergency Stopping In the event of an emergency the engine can be stopped by pushing the mower blade switch down follow the procedure given in the filler neck. 3. Engage the parking brake. 3. Stop filling the tank when fuel collects in STOPPING THE...ENGINE. NOTICE: Do not use , see CHECK ENGINE OIL in the Maintenance section). • Fill the fuel tank with fresh fuel. Turn off the mower blades by simply turning the ignition switch to STOP. To add fuel: 1. This engine is filled to full mark on dipstick (see below 2,500 ...
...minimum of the filler neck. See a Briggs & Stratton Autho- Emergency Stopping In the event of an emergency the engine can be stopped by pushing the mower blade switch down follow the procedure given in the filler neck. 3. Engage the parking brake. 3. Stop filling the tank when fuel collects in STOPPING THE...ENGINE. NOTICE: Do not use , see CHECK ENGINE OIL in the Maintenance section). • Fill the fuel tank with fresh fuel. Turn off the mower blades by simply turning the ignition switch to STOP. To add fuel: 1. This engine is filled to full mark on dipstick (see below 2,500 ...
Operater's Manual
Page 17
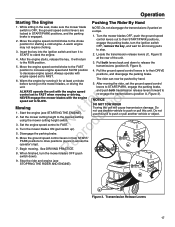
... return at least a minute before turning on a slope. 1. After moving parts to the desired setting o u using the mower cutting height switch. Turn the mower blades ON (pull switch up). Move the engine speed control/choke to FAST. 6. position to increase engine speed and SLOW ...position to SLOW. r n NEVER engage the mower blades with engine speed set the ground speed control unit. Do not use another vehicle or object. Transmission Release Levers 17 c 2. fo tio Mowing...
... return at least a minute before turning on a slope. 1. After moving parts to the desired setting o u using the mower cutting height switch. Turn the mower blades ON (pull switch up). Move the engine speed control/choke to FAST. 6. position to increase engine speed and SLOW ...position to SLOW. r n NEVER engage the mower blades with engine speed set the ground speed control unit. Do not use another vehicle or object. Transmission Release Levers 17 c 2. fo tio Mowing...
Operater's Manual
Page 20
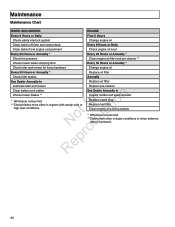
... Every 8 Hours or Daily First 5 Hours Check safety interlock system Change engine oil Clean debris off rider and mower deck Every 8 Hours or Daily Clean debris from engine compartment Check engine oil level Every 25 Hours or Annually * Every 25 Hours or Annually *... Check tire pressure Clean engine air filter and pre-cleaner ** Check mower blade stopping time Every 50 Hours or Annually * Check rider and mower for loose hardware Change engine oil Every 50 Hours or Annually * Replace oil filter Check rider brakes Annually See Dealer...
... Every 8 Hours or Daily First 5 Hours Check safety interlock system Change engine oil Clean debris off rider and mower deck Every 8 Hours or Daily Clean debris from engine compartment Check engine oil level Every 25 Hours or Annually * Every 25 Hours or Annually *... Check tire pressure Clean engine air filter and pre-cleaner ** Check mower blade stopping time Every 50 Hours or Annually * Check rider and mower for loose hardware Change engine oil Every 50 Hours or Annually * Replace oil filter Check rider brakes Annually See Dealer...
Operater's Manual
Page 21
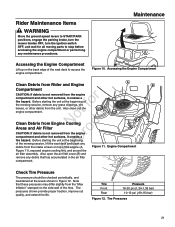
Rider Maintenance Items WARNING Move the ground speed levers to START/PARK positions, engage the parking brake, turn the mower blades OFF, turn the ignition switch OFF, and wait for all moving parts to access the engine compartment. o uc Clean Debris from Engine Cooling N d Areas ...
Rider Maintenance Items WARNING Move the ground speed levers to START/PARK positions, engage the parking brake, turn the mower blades OFF, turn the ignition switch OFF, and wait for all moving parts to access the engine compartment. o uc Clean Debris from Engine Cooling N d Areas ...

Operater's Manual
Page 22
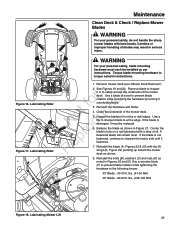
...RNeprod(3-Blade Model Shown, All Models Similar) Figure 13. Remember to wipe fittings and r n surfaces clean both before and after lubrication. Mower Lubrication - 33" Deck 22 Oil: • hydro linkage Figure 14. Maintenance Lubrication Lubricate the unit at the locations shown in Figures 13...18 as well as the following lubrication points. Grease: • front wheel grease fittings • front wheel bushings • mower pivots • mower arbors Use grease fittings when present. Keep oil and grease off belts and pulleys. Use automotive-type lithium grease. Not all ...
...RNeprod(3-Blade Model Shown, All Models Similar) Figure 13. Remember to wipe fittings and r n surfaces clean both before and after lubrication. Mower Lubrication - 33" Deck 22 Oil: • hydro linkage Figure 14. Maintenance Lubrication Lubricate the unit at the locations shown in Figures 13...18 as well as the following lubrication points. Grease: • front wheel grease fittings • front wheel bushings • mower pivots • mower arbors Use grease fittings when present. Keep oil and grease off belts and pulleys. Use automotive-type lithium grease. Not all ...
Operater's Manual
Page 23
...blade is damaged, it p balances. Reinstall the blade (A, Figures 22 & 23) with a drop of the mower deck. Reinstall the bolts (B), washers (C) and nuts (D) as shown. 8. Lubricating Mower Lift 23 Use a wooden block (F) to prevent blade rotation while tightening the hardware to a fine edge. ... wood to prevent blade r n rotation while loosening the hardware by turning it or to inspect it fo tio counterclockwise. 3. e 7. Remove mower deck (see "Mower Deck Removal"). 2. See Figures 19 and 20. t 4. Balance the blade as per instructions. lbs. (108-122 Nm) Figure 18. ...
...blade is damaged, it p balances. Reinstall the blade (A, Figures 22 & 23) with a drop of the mower deck. Reinstall the bolts (B), washers (C) and nuts (D) as shown. 8. Lubricating Mower Lift 23 Use a wooden block (F) to prevent blade rotation while tightening the hardware to a fine edge. ... wood to prevent blade r n rotation while loosening the hardware by turning it or to inspect it fo tio counterclockwise. 3. e 7. Remove mower deck (see "Mower Deck Removal"). 2. See Figures 19 and 20. t 4. Balance the blade as per instructions. lbs. (108-122 Nm) Figure 18. ...
Operater's Manual
Page 26
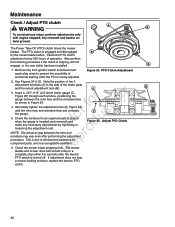
... each window, positioning the r n gauge between the rotor and r armature may vary even after the electric A C Figure 25. Check the mower blade stopping time. Remove key from ignition switch and disconnect spark plug wires to prevent the possibility of the 3 adjustment windows (A) in Figure 25... p procedure. Also perform the following procedure if the clutch is inserted and removed, and N d make any necessary adjustments by the mower blade switch. Check the windows for an equal amount of operation. Maintenance Check / Adjust PTO clutch WARNING A B To avoid serious injury...
... each window, positioning the r n gauge between the rotor and r armature may vary even after the electric A C Figure 25. Check the mower blade stopping time. Remove key from ignition switch and disconnect spark plug wires to prevent the possibility of the 3 adjustment windows (A) in Figure 25... p procedure. Also perform the following procedure if the clutch is inserted and removed, and N d make any necessary adjustments by the mower blade switch. Check the windows for an equal amount of operation. Maintenance Check / Adjust PTO clutch WARNING A B To avoid serious injury...
Operater's Manual
Page 30
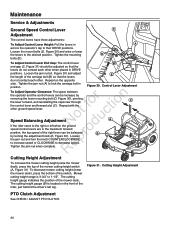
...1 1733458 Low Cut Cutting Height Adjustment To increase the mower cutting height (raise the mower deck), press the top of the mower cutting height switch (A, Figure 31) To decrease mower cutting height (lower the mower deck), press the bottom of the mower deck.. The cutting height gauge (B) is 3-3/4" to ... turn the knob COUNTERCLOCKWISE p to increase speed or CLOCKWISE to lock the carriage bolt in position. Repeat with the other . Mower cutting height range is located on the opposite side. Re Tighten the jam nut when complete. Tighten the mounting D bolts.(D). ...
...1 1733458 Low Cut Cutting Height Adjustment To increase the mower cutting height (raise the mower deck), press the top of the mower cutting height switch (A, Figure 31) To decrease mower cutting height (lower the mower deck), press the bottom of the mower deck.. The cutting height gauge (B) is 3-3/4" to ... turn the knob COUNTERCLOCKWISE p to increase speed or CLOCKWISE to lock the carriage bolt in position. Repeat with the other . Mower cutting height range is located on the opposite side. Re Tighten the jam nut when complete. Tighten the mounting D bolts.(D). ...

Operater's Manual
Page 32
...switch B OFF, and allow all moving parts to stop . 2. Check for r n all moving parts to Ground If the cut is uneven, the mower may also cause an uneven cut. See CHECK TIRE PRESSURE. N d 5. Remove ignition key, then disconnect the spark plug wire and fasten it is... more than 1/8" (3mm) difference between the tips of the mower deck. See CHECK TIRE PRESSURE. 1. e 6. Side-to mid position. Loosen the jam nuts (C) and adjust the nuts up or down to -Side B C A...
...switch B OFF, and allow all moving parts to stop . 2. Check for r n all moving parts to Ground If the cut is uneven, the mower may also cause an uneven cut. See CHECK TIRE PRESSURE. N d 5. Remove ignition key, then disconnect the spark plug wire and fasten it is... more than 1/8" (3mm) difference between the tips of the mower deck. See CHECK TIRE PRESSURE. 1. e 6. Side-to mid position. Loosen the jam nuts (C) and adjust the nuts up or down to -Side B C A...

Operater's Manual
Page 33
...Blade Tips to mid position. See r n CHECK TIRE PRESSURE. Set the cutting height to Ground 1. Side-to-side leveling is uneven, the mower may also cause an uneven cut is accomplished p using the threaded rods (A) and trunnion (B) on the right and left rear sides of the ...replace if necessary. 3. Turn the front wheels straight forward. t c 5. When complete, tighten the Figure 37. See CHECK TIRE PRESSURE. With the mower installed, place the rider on each side, proceed to -Side Adjustment (similar deck shown) 33 Measure the distance between the N d measurements on ...
...Blade Tips to mid position. See r n CHECK TIRE PRESSURE. Set the cutting height to Ground 1. Side-to-side leveling is uneven, the mower may also cause an uneven cut is accomplished p using the threaded rods (A) and trunnion (B) on the right and left rear sides of the ...replace if necessary. 3. Turn the front wheels straight forward. t c 5. When complete, tighten the Figure 37. See CHECK TIRE PRESSURE. With the mower installed, place the rider on each side, proceed to -Side Adjustment (similar deck shown) 33 Measure the distance between the N d measurements on ...


