

Operater's Manual
Page 3
... Oil Level 25 Transmission Oil Filter Change 25 N d Servicing the Mower Blades 26 Ground Speed Control Lever Adjustment 28 o Speed Balancing Adjustment 28 r Neutral Adjustment 28 p Parking Brake Adjustment 29 Return to Neutral Adjustment 30 e Deck Rod Timing Adjustment 31 Deck Leveling Adjustment 31 R Mower Belt Replacement 32 Hydraulic Pump Drive Belt Replacement 34 Battery Maintenance 35 Battery Service 36 Storage 38 Starting After Long Term Storage 38 Troubleshooting 39 Troubleshooting the Rider 39 Troubleshooting the Mower 40 Troubleshooting Common Cutting Problems...
... Oil Level 25 Transmission Oil Filter Change 25 N d Servicing the Mower Blades 26 Ground Speed Control Lever Adjustment 28 o Speed Balancing Adjustment 28 r Neutral Adjustment 28 p Parking Brake Adjustment 29 Return to Neutral Adjustment 30 e Deck Rod Timing Adjustment 31 Deck Leveling Adjustment 31 R Mower Belt Replacement 32 Hydraulic Pump Drive Belt Replacement 34 Battery Maintenance 35 Battery Service 36 Storage 38 Starting After Long Term Storage 38 Troubleshooting 39 Troubleshooting the Rider 39 Troubleshooting the Mower 40 Troubleshooting Common Cutting Problems...
Operater's Manual
Page 7
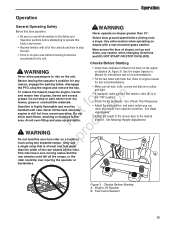
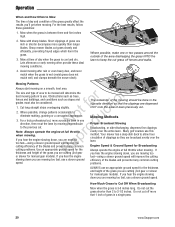
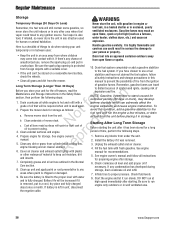
... artificial light, 1. Slow down and use extra care on level ground, lower implements, disengage drives, engage parking brake, shut off the PTO switch to obey these safety rules and follow all objects such as rocks, toys and wire, which must be sure of your footing while using a grass catcher. 14. Do not stop engine, and remove keys before starting engine. All operators and mechanics should evaluate their ability to operate the riding mower safely...
... artificial light, 1. Slow down and use extra care on level ground, lower implements, disengage drives, engage parking brake, shut off the PTO switch to obey these safety rules and follow all objects such as rocks, toys and wire, which must be sure of your footing while using a grass catcher. 14. Do not stop engine, and remove keys before starting engine. All operators and mechanics should evaluate their ability to operate the riding mower safely...
Operater's Manual
Page 8
... slopes, not up and down, use grass catcher on a slope), disengage the blade(s) (PTO) and drive slow off and be run over or backed over accidents, which can cause hearing loss though extended equipment. Children Tragic accidents can change speed while on slopes. Be alert and turn slowly and gradually uphill, if possible. Before and during reverse operation, look behind and down hill...
... slopes, not up and down, use grass catcher on a slope), disengage the blade(s) (PTO) and drive slow off and be run over or backed over accidents, which can cause hearing loss though extended equipment. Children Tragic accidents can change speed while on slopes. Be alert and turn slowly and gradually uphill, if possible. Before and during reverse operation, look behind and down hill...
Operater's Manual
Page 9
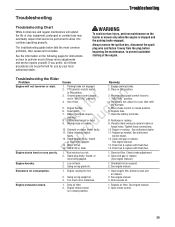
... under high pressure. Do not use extreme care in hazardous operation, equipment damage and voiding of ignition until fuel vapors have dissipated. Replace gas cap and r n tighten securely. 11. Replace all fuel tank caps and fuel container caps securely. Disconnect battery or remove spark plug wire before filling. 7. Reconnect positive first and negative last. 16. Keep hands and feet away from a gasoline dispenser nozzle. 8. Grass catcher components are in good working condition. Adjust and service...
... under high pressure. Do not use extreme care in hazardous operation, equipment damage and voiding of ignition until fuel vapors have dissipated. Replace gas cap and r n tighten securely. 11. Replace all fuel tank caps and fuel container caps securely. Disconnect battery or remove spark plug wire before filling. 7. Reconnect positive first and negative last. 16. Keep hands and feet away from a gasoline dispenser nozzle. 8. Grass catcher components are in good working condition. Adjust and service...
Operater's Manual
Page 13
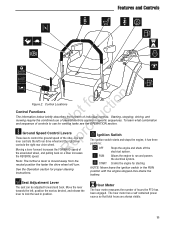
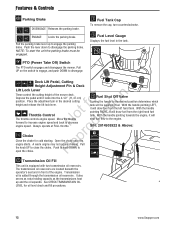
... drive wheel will turn. the electrical system. Hour Meter The hour meter measures the number of R the associated wheel, and pulling back on a lever increases Ignition Switch The ignition switch starts and stops the engine, it has three positions: OFF Stops the engine and shuts off the electrical system. the REVERSE speed. Starting, stopping, driving, and o u mowing require the combined use for proper steering instructions. See the Operation section for various tasks see the OPERATION section. Control Locations t Control...
... drive wheel will turn. the electrical system. Hour Meter The hour meter measures the number of R the associated wheel, and pulling back on a lever increases Ignition Switch The ignition switch starts and stops the engine, it has three positions: OFF Stops the engine and shuts off the electrical system. the REVERSE speed. Starting, stopping, driving, and o u mowing require the combined use for proper steering instructions. See the Operation section for various tasks see the OPERATION section. Control Locations t Control...
Operater's Manual
Page 14
... push DOWN to disengage the parking brake. Fuel Level Gauge Displays the fuel level in front of the mower deck. t c Throttle Control o u The throttle controls engine speed. Transmission Oil Fill This unit is added through the transmission oil reservoirs. The transmission oil reservoirs are located beneath the operator's seat and in the tank. NOTE: To start the unit the parking brake must be supplying fuel. Place the adjustment pin in the desired cutting fo tio height and release the lift lock lever. With the handle pointing...
... push DOWN to disengage the parking brake. Fuel Level Gauge Displays the fuel level in front of the mower deck. t c Throttle Control o u The throttle controls engine speed. Transmission Oil Fill This unit is added through the transmission oil reservoirs. The transmission oil reservoirs are located beneath the operator's seat and in the tank. NOTE: To start the unit the parking brake must be supplying fuel. Place the adjustment pin in the desired cutting fo tio height and release the lift lock lever. With the handle pointing...
Operater's Manual
Page 15
... zero-turn rider on the engine WARNING oil dipstick (A, Figure 3). reason, engage the parking brake, disengage the PTO, stop or park tractor over dry leaves, grass or combustible materials. Only use e a single ramp that crankcase is filled to operate this tractor and mower. • Become familiar with fresh fuel. Do not allow passengers to the unit. Avoid over injuring the operator or bystanders. See Seat Adjustment • Adjust the height of the mower deck...
... zero-turn rider on the engine WARNING oil dipstick (A, Figure 3). reason, engage the parking brake, disengage the PTO, stop or park tractor over dry leaves, grass or combustible materials. Only use e a single ramp that crankcase is filled to operate this tractor and mower. • Become familiar with fresh fuel. Do not allow passengers to the unit. Avoid over injuring the operator or bystanders. See Seat Adjustment • Adjust the height of the mower deck...
Operater's Manual
Page 18
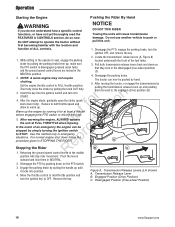
... turn it for at FULL THROTTLE when mowing. Engage the parking brake by pulling the handle up and pushing Then fully close the choke by hand. Transmission Release Lever B. Engaged Position (Drive Position) C. Disengaged Position (Free-wheel Position) 16 www.Snapper.com first becoming familiar with the location and function of the fuel tanks. choking. 5. Warm up , make sure the PTO switch is disengaged (pressed down fully) 3. Pivot the levers outward and lock them forward to START...
... turn it for at FULL THROTTLE when mowing. Engage the parking brake by pulling the handle up and pushing Then fully close the choke by hand. Transmission Release Lever B. Engaged Position (Drive Position) C. Disengaged Position (Free-wheel Position) 16 www.Snapper.com first becoming familiar with the location and function of the fuel tanks. choking. 5. Warm up , make sure the PTO switch is disengaged (pressed down fully) 3. Pivot the levers outward and lock them forward to START...
Operater's Manual
Page 21
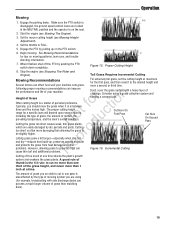
... Engine). See Mowing Recommendations for a specific lawn will depend upon several factors, c including the type of grass, the amount of the grass height, and never more than 1 inch at a time. Figure 15. Make sure the PTO switch is a matter of mowing system you are using a grass collection system and starting a compost pile. r n Height of Grass fo tio Often cutting height is disengaged, the ground speed control levers are easily damaged by pulling up , preserves needed...
... Engine). See Mowing Recommendations for a specific lawn will depend upon several factors, c including the type of grass, the amount of the grass height, and never more than 1 inch at a time. Figure 15. Make sure the PTO switch is a matter of mowing system you are using a grass collection system and starting a compost pile. r n Height of Grass fo tio Often cutting height is disengaged, the ground speed control levers are easily damaged by pulling up , preserves needed...
Operater's Manual
Page 22
... a single pass 20 www.Snapper.com o Note: Always operate the engine at full throttle when mowing. Engine Speed & Ground Speed for manual gear models). If you are dispersed OUT onto the area of grass in the opposite direction so that 1 inch of lawn previously cut off fences and walks. t 2. Do not cut . Short clippings of the blades and prevents many common cutting speed. Mow with sharp blades. Late afternoon or early...
... a single pass 20 www.Snapper.com o Note: Always operate the engine at full throttle when mowing. Engine Speed & Ground Speed for manual gear models). If you are dispersed OUT onto the area of grass in the opposite direction so that 1 inch of lawn previously cut off fences and walks. t 2. Do not cut . Short clippings of the blades and prevents many common cutting speed. Mow with sharp blades. Late afternoon or early...
Operater's Manual
Page 25
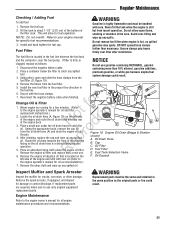
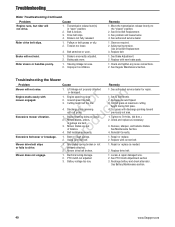
.... Engine Oil Drain (Briggs & Stratton shown) A. Cap C. Oil Filter D. Fuel Tank Selection Valve A 6. Remove the engine oil dipstick (F) that is still hot from the fuel filter (D, Figure 19). Remove the spark arrester, if equipped, and inspect for oil and filter t c replacement instructions.) 2. Install and hand tighten the fuel cap. Never fill the tank when the engine is located on the left side of the machine facing so the oil drain hose is hot, as spilled gasoline may ignite. Disconnect the negative battery cable. 2. E 5. Install the new fuel filter...
.... Engine Oil Drain (Briggs & Stratton shown) A. Cap C. Oil Filter D. Fuel Tank Selection Valve A 6. Remove the engine oil dipstick (F) that is still hot from the fuel filter (D, Figure 19). Remove the spark arrester, if equipped, and inspect for oil and filter t c replacement instructions.) 2. Install and hand tighten the fuel cap. Never fill the tank when the engine is located on the left side of the machine facing so the oil drain hose is hot, as spilled gasoline may ignite. Disconnect the negative battery cable. 2. E 5. Install the new fuel filter...
Operater's Manual
Page 33
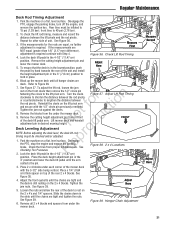
... arm. See Figure 39. 5. front tires to Figure 38. 7. If the measurements for other side of the mower deck with Step 4. Reinstall the clevis on the 2 x 4's and 1/4" spacers. Tighten the jam nut against the clevis. Place 2 x 4 blocks under the mower deck. 9. See Figure 38. 4. Hanger Chain Adjustment mower deck. 31 Regular Maintenance Deck Rod Timing Adjustment 1. Disengage the PTO, engage the parking brake, turn off the engine, and remove the ignition key. Rear tires must be checked...
... arm. See Figure 39. 5. front tires to Figure 38. 7. If the measurements for other side of the mower deck with Step 4. Reinstall the clevis on the 2 x 4's and 1/4" spacers. Tighten the jam nut against the clevis. Place 2 x 4 blocks under the mower deck. 9. See Figure 38. 4. Hanger Chain Adjustment mower deck. 31 Regular Maintenance Deck Rod Timing Adjustment 1. Disengage the PTO, engage the parking brake, turn off the engine, and remove the ignition key. Rear tires must be checked...

Operater's Manual
Page 36
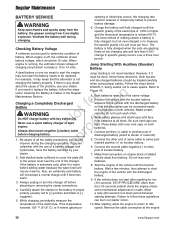
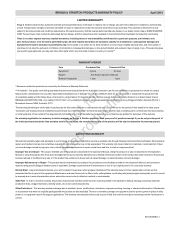
... that the slot in the PTO clutch lines up with the new one. Idler Pulley E. Adjust the anchor eyebolt until a measurement of the belt runs in personal injury. Tighten nut. 7. Crankshaft Bolt Figure 44. Regular Maintenance Hydraulic Pump Drive Belt Replacement 1. Disengage the PTO, engage the parking brake, turn off the engine, and remove the ignition key. 2. Remove the PTO drive belt (see MOWER BELT REPLACEMENT for removal instructions). WARNING STORED ENERGY DEVICE: Improper release of the belt tension spring can result in the grooves...
... that the slot in the PTO clutch lines up with the new one. Idler Pulley E. Adjust the anchor eyebolt until a measurement of the belt runs in personal injury. Tighten nut. 7. Crankshaft Bolt Figure 44. Regular Maintenance Hydraulic Pump Drive Belt Replacement 1. Disengage the PTO, engage the parking brake, turn off the engine, and remove the ignition key. 2. Remove the PTO drive belt (see MOWER BELT REPLACEMENT for removal instructions). WARNING STORED ENERGY DEVICE: Improper release of the belt tension spring can result in the grooves...
Operater's Manual
Page 38
... out starter motor. When engine is made. p 1. Be sure vent caps are highly explosive. The Checking Battery Voltage A voltmeter can be 12 volts. Both booster For example, it are tight. for ten (10) seconds, STOP PROCEDURE. Start the engine of the vehicle with the discharged battery. 9. Failure to follow the steps under Cleaning the Battery & Cables in proper some mechanical adjustment is off before charging battery. engine...
... out starter motor. When engine is made. p 1. Be sure vent caps are highly explosive. The Checking Battery Voltage A voltmeter can be 12 volts. Both booster For example, it are tight. for ten (10) seconds, STOP PROCEDURE. Start the engine of the vehicle with the discharged battery. 9. Failure to follow the steps under Cleaning the Battery & Cables in proper some mechanical adjustment is off before charging battery. engine...
Operater's Manual
Page 40
... it. Drain crankcase oil while engine is highly flammable and careless use could travel Before you have chosen to use , remove the spark plug (s) and put in a cool, dry place and fully charged engine only outdoors or in between uses: Handle gasoline carefully. Remove mower deck from the mower. 10. Prepare the mower deck for extended periods (30 days or more), may reach an open flame or sparks. Battery life will...
... it. Drain crankcase oil while engine is highly flammable and careless use could travel Before you have chosen to use , remove the spark plug (s) and put in a cool, dry place and fully charged engine only outdoors or in between uses: Handle gasoline carefully. Remove mower deck from the mower. 10. Prepare the mower deck for extended periods (30 days or more), may reach an open flame or sparks. Battery life will...
Operater's Manual
Page 41
... oil as needed. See engine manual. 1. Too much oil in "NEUTRAL" position. 4. See the information on the following pages for you prefer, all of these minor adjustments and service repairs yourself. Ground speed control levers r n not in crankcase. 1. Battery discharged or dead. 9. o 11. e 14. Clean the battery terminals 8. See authorized dealer 11. Drain fuel & replace with fresh fuel. 1. Spark plug faulty, fouled, or 2. Low oil level. 2. See engine manual. 3. Drain excess oil. 1. Dirty air filter. 2. Engine starts hard or runs poorly. Parking brake...
... oil as needed. See engine manual. 1. Too much oil in "NEUTRAL" position. 4. See the information on the following pages for you prefer, all of these minor adjustments and service repairs yourself. Ground speed control levers r n not in crankcase. 1. Battery discharged or dead. 9. o 11. e 14. Clean the battery terminals 8. See authorized dealer 11. Drain fuel & replace with fresh fuel. 1. Spark plug faulty, fouled, or 2. Low oil level. 2. See engine manual. 3. Drain excess oil. 1. Dirty air filter. 2. Engine starts hard or runs poorly. Parking brake...
Operater's Manual
Page 42
... service dealer for repair. 1. Pulleys or belt greasy or oily. 2. p Using incorrect belt. Discharge chute jamming t with correct belt. 1. c Blade mounting bolts are loose. RMower drive belt broken. 1. Tighten to drive. See Maintenance Section. 4. Repair or replace as needed. 2. r n Engine speed too slow. Set to the "closed" position. 2. Locate & repair damaged wire. 2. Replace with new brake pads. 1. Troubleshooting Rider Troubleshooting Continued. Problem Engine runs, but rider will not hold. Transmission release lever(s) in "open" position. 2. Brake...
... service dealer for repair. 1. Pulleys or belt greasy or oily. 2. p Using incorrect belt. Discharge chute jamming t with correct belt. 1. c Blade mounting bolts are loose. RMower drive belt broken. 1. Tighten to drive. See Maintenance Section. 4. Repair or replace as needed. 2. r n Engine speed too slow. Set to the "closed" position. 2. Locate & repair damaged wire. 2. Replace with new brake pads. 1. Troubleshooting Rider Troubleshooting Continued. Problem Engine runs, but rider will not hold. Transmission release lever(s) in "open" position. 2. Brake...
Operater's Manual
Page 46
... provided in the Operator's Manual, and serviced or repaired using the product after it will repair or replace, free of charge, any way, or if the product has evidence of abuse such as filters, belts, cutting blades, and brake pads (except engine brake pads) are excluded. "Commercial use or abuse, improper maintenance or repair, normal wear and tear, or stale or unapproved fuel. If you . Most warranty repairs are covered by law. It...
... provided in the Operator's Manual, and serviced or repaired using the product after it will repair or replace, free of charge, any way, or if the product has evidence of abuse such as filters, belts, cutting blades, and brake pads (except engine brake pads) are excluded. "Commercial use or abuse, improper maintenance or repair, normal wear and tear, or stale or unapproved fuel. If you . Most warranty repairs are covered by law. It...
Operater's Manual
Page 47
... the owner's manual supplied, is certified to the failure of actual engine running time. If you have any non exempted add on or modified parts by the use of time, not to a B&S distribution center, servicing dealer, or other emissions-related assemblies. Fuel Metering System Cold start enrichment system (soft choke) Carburetor and internal parts Fuel pump r n Fuel line, fuel line fittings, clamps Fuel tank, cap...
... the owner's manual supplied, is certified to the failure of actual engine running time. If you have any non exempted add on or modified parts by the use of time, not to a B&S distribution center, servicing dealer, or other emissions-related assemblies. Fuel Metering System Cold start enrichment system (soft choke) Carburetor and internal parts Fuel pump r n Fuel line, fuel line fittings, clamps Fuel tank, cap...
Parts Manual
Page 3
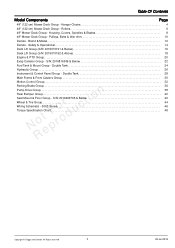
..." (122 cm) Mower Deck Group - S/N: 2016499706 & Below Wheel & Tire Group Wiring Schematic - 500Z Series NRo te pFroo d u c Torque Specification Chart 36 38 40 42 44 46 48 Copyright © Briggs and Stratton. S/N: 2016816349 & Below 22 Fuel Tank & Mount Group - All Rights reserved 3 29-Jul-2018 Double Tank 24 Hydraulic Group 26 Instrument & Control Panel Group - Pulleys, Belts & Idler Arm 10 Decals - Brand & Model 12 Decals - Rollers 6 48" Mower Deck Group - Table Of...
..." (122 cm) Mower Deck Group - S/N: 2016499706 & Below Wheel & Tire Group Wiring Schematic - 500Z Series NRo te pFroo d u c Torque Specification Chart 36 38 40 42 44 46 48 Copyright © Briggs and Stratton. S/N: 2016816349 & Below 22 Fuel Tank & Mount Group - All Rights reserved 3 29-Jul-2018 Double Tank 24 Hydraulic Group 26 Instrument & Control Panel Group - Pulleys, Belts & Idler Arm 10 Decals - Brand & Model 12 Decals - Rollers 6 48" Mower Deck Group - Table Of...


