Operater's Manual
Page 10
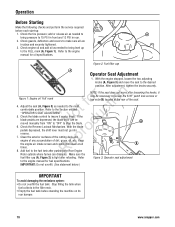
...the seat. Operation Before Starting Make the following checks and perform the service required before standing the machine on its rear bumper. 10 www.snapper.com Check the tire pressure; Figure 2: Fuel filler cap A Operator Seat Adjustment 1. If the u blade pedals are in the filler ... position. Stop filling the tank when fuel collects in place and securely tightened. 3. r n Figure 1: Engine oil 'Full' mark NOTE: If the seat does not move the seat to the engine manual for fuel specifications. fo tio 4. With the blade o pedals depressed, the shift lever must not ...
...the seat. Operation Before Starting Make the following checks and perform the service required before standing the machine on its rear bumper. 10 www.snapper.com Check the tire pressure; Figure 2: Fuel filler cap A Operator Seat Adjustment 1. If the u blade pedals are in the filler ... position. Stop filling the tank when fuel collects in place and securely tightened. 3. r n Figure 1: Engine oil 'Full' mark NOTE: If the seat does not move the seat to the engine manual for fuel specifications. fo tio 4. With the blade o pedals depressed, the shift lever must not ...
Operater's Manual
Page 17
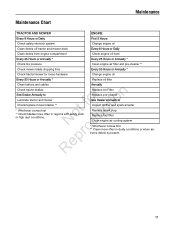
.... Maintenance Chart Maintenance TRACTOR AND MOWER ENGINE Every 8 Hours or Daily First 5 Hours Check safety interlock system Change engine oil Clean debris off tractor and mower deck Every 8 Hours or Daily Clean debris from engine compartment Check engine oil level Every 25 Hours or Annually *...Check mower blade stopping time Every 50 Hours or Annually * Check tractor/mower for loose hardware Change engine oil Every 50 Hours or Annually * Replace oil filter Clean battery and cables Annually Check tractor brakes See Dealer Annually to Inspect muffler and spark arrester...
.... Maintenance Chart Maintenance TRACTOR AND MOWER ENGINE Every 8 Hours or Daily First 5 Hours Check safety interlock system Change engine oil Clean debris off tractor and mower deck Every 8 Hours or Daily Clean debris from engine compartment Check engine oil level Every 25 Hours or Annually *...Check mower blade stopping time Every 50 Hours or Annually * Check tractor/mower for loose hardware Change engine oil Every 50 Hours or Annually * Replace oil filter Clean battery and cables Annually Check tractor brakes See Dealer Annually to Inspect muffler and spark arrester...

Operater's Manual
Page 18
.... Fuel Filler Cap must be closed securely to lower the rear of excessive Change Engine Oil r n 1. Check the torque of used oil properly. 6. Place bricks or wooden blocks under the end of oil drain plug the engine is equipped with new oil. fo tio 2. Place a 2 quart minimum capacity container under the front wheels ... (Figure 19). After all parts to cool before standing the machine on its rear bumper. 18 www.snapper.com Change the oil filter on machine. Both DO NOT attempt any new devices, which might upgrade the safety of any adjustments, maintenance, service or the ...
.... Fuel Filler Cap must be closed securely to lower the rear of excessive Change Engine Oil r n 1. Check the torque of used oil properly. 6. Place bricks or wooden blocks under the end of oil drain plug the engine is equipped with new oil. fo tio 2. Place a 2 quart minimum capacity container under the front wheels ... (Figure 19). After all parts to cool before standing the machine on its rear bumper. 18 www.snapper.com Change the oil filter on machine. Both DO NOT attempt any new devices, which might upgrade the safety of any adjustments, maintenance, service or the ...
Operater's Manual
Page 20
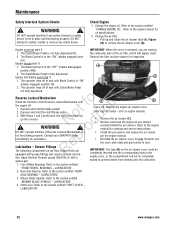
... air cleaner (C). • Remove and clean the engine air pre-cleaner (located behind the air cleaner). LUBRICATION". 20 www.snapper.com DO NOT operate machine if any safety device. DO NOT attempt to the engine manual for oil specifications. 2. tion. ep Lubrication - D B Figure 23: Opening the engine air cleaner cover (May vary by model - Rear...
... air cleaner (C). • Remove and clean the engine air pre-cleaner (located behind the air cleaner). LUBRICATION". 20 www.snapper.com DO NOT operate machine if any safety device. DO NOT attempt to the engine manual for oil specifications. 2. tion. ep Lubrication - D B Figure 23: Opening the engine air cleaner cover (May vary by model - Rear...

Operater's Manual
Page 21
... grease from plug. Lubrication bumper. (See statement below .) 3. Lubricate the spindle grease fitting (A, Figure 24) with the engine running. r n 5. DO NOT attempt any adjustments, maintenance, service or repairs with N d three shots of motor oil. LEVELNESS". A Figure 26: Shift lever grease fitting 21 STOP blade. Follow the WARNING statement found on this page...
... grease from plug. Lubrication bumper. (See statement below .) 3. Lubricate the spindle grease fitting (A, Figure 24) with the engine running. r n 5. DO NOT attempt any adjustments, maintenance, service or repairs with N d three shots of motor oil. LEVELNESS". A Figure 26: Shift lever grease fitting 21 STOP blade. Follow the WARNING statement found on this page...

Operater's Manual
Page 33
... 2. Move throttle control to side level. 6. Clean the underside of Traction Blade(s) Not Cutting Cutting Grass Improperly Poor Grass Discharge Oil Leaking PROBABLE CAUSE CORRECTIVE ACTION 1. Axle bearing seized. 5. Mower belt slipping. 3. Replace with tapered bolt & nut. 4. Move...lubrication in the "OFF" position. 2. Cutting blade is wet. 4. Mower belt slipping. Improper blade installed on drive disc. 3. Leaking engine block. 5. Adjust tension or replace mower belt. 1. Service mower blade. 5. Tapered axle bolt and nut missing. 4. Contact authorized dealer...
... 2. Move throttle control to side level. 6. Clean the underside of Traction Blade(s) Not Cutting Cutting Grass Improperly Poor Grass Discharge Oil Leaking PROBABLE CAUSE CORRECTIVE ACTION 1. Axle bearing seized. 5. Mower belt slipping. 3. Replace with tapered bolt & nut. 4. Move...lubrication in the "OFF" position. 2. Cutting blade is wet. 4. Mower belt slipping. Improper blade installed on drive disc. 3. Leaking engine block. 5. Adjust tension or replace mower belt. 1. Service mower blade. 5. Tapered axle bolt and nut missing. 4. Contact authorized dealer...


