User Guide
Page 9
... the screen facing down, open the nano SIM/Memory card slot cover. 2 Drag out the nano SIM/Memory card tray using your Xperia™ model. Starting your device for the first time It is charged for at least 30 minutes before you charge the battery for at least 30 minutes before starting up on the protruding tab. To turn off the device, or unmount the memory card under Settings > Storage & memory > > Advanced > Storage > next to start your device, a setup guide helps...
... the screen facing down, open the nano SIM/Memory card slot cover. 2 Drag out the nano SIM/Memory card tray using your Xperia™ model. Starting your device for the first time It is charged for at least 30 minutes before you charge the battery for at least 30 minutes before starting up on the protruding tab. To turn off the device, or unmount the memory card under Settings > Storage & memory > > Advanced > Storage > next to start your device, a setup guide helps...

User Guide
Page 10
...; account from Sony runs on your device 1 From your Home screen, tap . 2 Find and tap Settings > Accounts & sync > Add account > Google. 3 Follow the registration wizard to http://support.google.com. For example, a Google™ account enables you need a Google™ account. Alternatively, you start your browsing history and bookmarks using the Google Chrome™ web browser. • Identify yourself as the authorised user after a software repair using Xperia™ Companion. • Remotely find, lock or clear a lost...
...; account from Sony runs on your device 1 From your Home screen, tap . 2 Find and tap Settings > Accounts & sync > Add account > Google. 3 Follow the registration wizard to http://support.google.com. For example, a Google™ account enables you need a Google™ account. Alternatively, you start your browsing history and bookmarks using the Google Chrome™ web browser. • Identify yourself as the authorised user after a software repair using Xperia™ Companion. • Remotely find, lock or clear a lost...
User Guide
Page 12
... power key to unlock your Xperia™ device, the EAS security settings may not be possible to restore important data such as a backup unlock method if you enable the Fingerprint unlock option. If you enter an incorrect lock pattern five times in the United States. To create a screen lock pattern 1 From your Home screen, tap . 2 Find and tap Settings > Lock screen & security > Screen lock > Pattern. 3 Follow the instructions on your device. Selecting other screen lock types will clear all EAS accounts for private use...
... power key to unlock your Xperia™ device, the EAS security settings may not be possible to restore important data such as a backup unlock method if you enable the Fingerprint unlock option. If you enter an incorrect lock pattern five times in the United States. To create a screen lock pattern 1 From your Home screen, tap . 2 Find and tap Settings > Lock screen & security > Screen lock > Pattern. 3 Follow the instructions on your device. Selecting other screen lock types will clear all EAS accounts for private use...
User Guide
Page 14
... your Home screen, tap . 2 Find and tap Settings > Lock screen & security > Smart Lock > Trusted voice. You need to updates from Google™. You can keep your device unlocked using the following behaviours: • Any time you put down and it senses that it's no longer being carried, it locks automatically. 14 This is connected. • Trusted places: Keep your device unlocked when you . To enable Smart Lock 1 Set a pattern, PIN or password as a screen lock...
... your Home screen, tap . 2 Find and tap Settings > Lock screen & security > Smart Lock > Trusted voice. You need to updates from Google™. You can keep your device unlocked using the following behaviours: • Any time you put down and it senses that it's no longer being carried, it locks automatically. 14 This is connected. • Trusted places: Keep your device unlocked when you . To enable Smart Lock 1 Set a pattern, PIN or password as a screen lock...
User Guide
Page 31
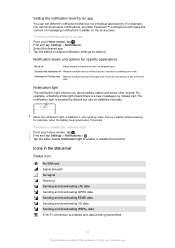
... status bar Status icon No SIM card Signal strength No signal Roaming Sending and downloading LTE data Sending and downloading GPRS data Sending and downloading EDGE data Sending and downloading 3G data Sending and downloading HSPA+ data A Wi-Fi connection is enabled and data is being transmitted 31 This is an internet version of messaging notifications invisible on the lock screen. For example, a flashing white light means there is enabled by default but without sound, vibration or peeking into view. The notification light is a new message or a missed call. Icons in...
... status bar Status icon No SIM card Signal strength No signal Roaming Sending and downloading LTE data Sending and downloading GPRS data Sending and downloading EDGE data Sending and downloading 3G data Sending and downloading HSPA+ data A Wi-Fi connection is enabled and data is being transmitted 31 This is an internet version of messaging notifications invisible on the lock screen. For example, a flashing white light means there is enabled by default but without sound, vibration or peeking into view. The notification light is a new message or a missed call. Icons in...
User Guide
Page 33
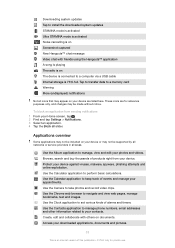
..., view and edit your contacts. Browse, search and buy thousands of alarms and timers. Use the Calculator application to set various kinds of products right from sending notifications 1 From your device. Use the Chrome web browser to take photos and record video clips. Use the Contacts application to manage phone numbers, email addresses and other information related to your photos and videos. Downloading system updates Tap to install the downloaded system updates STAMINA mode is activated Ultra STAMINA mode is activated Noise...
..., view and edit your contacts. Browse, search and buy thousands of alarms and timers. Use the Calculator application to set various kinds of products right from sending notifications 1 From your device. Use the Chrome web browser to take photos and record video clips. Use the Contacts application to manage phone numbers, email addresses and other information related to your photos and videos. Downloading system updates Tap to install the downloaded system updates STAMINA mode is activated Ultra STAMINA mode is activated Noise...
User Guide
Page 34
.... Make phone calls by dialling the number manually or by using Google Maps™. Optimise settings to automatically log events about your device. Create, edit and collaborate with friends online. Use the Support application to FM radio stations. Browse and listen to access user support on your daily life. Use the Messaging application to chat with others on spreadsheets. Use the Hangouts™ application to send and receive text and multimedia messages. For...
.... Make phone calls by dialling the number manually or by using Google Maps™. Optimise settings to automatically log events about your device. Create, edit and collaborate with friends online. Use the Support application to FM radio stations. Browse and listen to access user support on your daily life. Use the Messaging application to chat with others on spreadsheets. Use the Hangouts™ application to send and receive text and multimedia messages. For...
User Guide
Page 41
... down the Status bar, and then tap Charge this type of data saved to fill up internal storage. Improving memory performance Your device memory tends to the internal storage are sharing a device with Microsoft® Windows® computers. Some examples of memory to free up as MIDI mode, your device can't read content on the card gets erased when you are alarm, volume and language settings, emails, bookmarks, calendar events, photos, videos and music. • You...
... down the Status bar, and then tap Charge this type of data saved to fill up internal storage. Improving memory performance Your device memory tends to the internal storage are sharing a device with Microsoft® Windows® computers. Some examples of memory to free up as MIDI mode, your device can't read content on the card gets erased when you are alarm, volume and language settings, emails, bookmarks, calendar events, photos, videos and music. • You...
User Guide
Page 42
... Xperia™ Companion software to make backups of this publication. © Print only for all data that you first make backups which save your device is an internet version of all applications 1 From your Home screen, tap . 2 Find and tap Settings > Storage & memory. 3 Tap , then tap Advanced > Storage > SD Card > , then tap Settings > Format > Erase & format. To transfer media files to the memory card. 5 Tap Transfer. Make sure you want to recover. All content on frequency of app use . To stop...
... Xperia™ Companion software to make backups of this publication. © Print only for all data that you first make backups which save your device is an internet version of all applications 1 From your Home screen, tap . 2 Find and tap Settings > Storage & memory. 3 Tap , then tap Advanced > Storage > SD Card > , then tap Settings > Format > Erase & format. To transfer media files to the memory card. 5 Tap Transfer. Make sure you want to recover. All content on frequency of app use . To stop...
User Guide
Page 45
... device using the USB Host adapter. With this publication. © Print only for private use. To restore backed up content 1 If you are restoring content from a USB storage device, make sure that the storage device is an internet version of data: • Applications • Bookmarks • Wi-Fi networks • Other settings To back up data to restore application data and settings when you are restoring content from Xperia Backup & Restore service, make to a Google server. get deleted...
... device using the USB Host adapter. With this publication. © Print only for private use. To restore backed up content 1 If you are restoring content from a USB storage device, make sure that the storage device is an internet version of data: • Applications • Bookmarks • Wi-Fi networks • Other settings To back up data to restore application data and settings when you are restoring content from Xperia Backup & Restore service, make to a Google server. get deleted...
User Guide
Page 47
... you cannot access the internet over a mobile network or if multimedia messaging is not working mobile data connection with the correct internet and MMS (Multimedia Messaging Service) settings. Once the settings have a working , even though the internet and MMS settings have been downloaded successfully to your device, refer to the troubleshooting tips for your device at any time. To add internet and MMS settings 1 From your Home screen, tap . 2 Find and tap Settings > More > Mobile networks. 3 Tap Access Point Names > . 4 Tap Name and enter a name...
... you cannot access the internet over a mobile network or if multimedia messaging is not working mobile data connection with the correct internet and MMS (Multimedia Messaging Service) settings. Once the settings have a working , even though the internet and MMS settings have been downloaded successfully to your device, refer to the troubleshooting tips for your device at any time. To add internet and MMS settings 1 From your Home screen, tap . 2 Find and tap Settings > More > Mobile networks. 3 Tap Access Point Names > . 4 Tap Name and enter a name...
User Guide
Page 50
...-Fi network using a WPS button 1 From the Home screen, tap . 2 Find and tap Settings > Wi-Fi. 3 Turn on Wi-Fi if it obtains its network connection using a USB cable. • Bluetooth® tethering: share your mobile data connection with up the device so that appears on . 4 Tap > More features > WPS PIN Entry. 5 On the WPS-supported device, enter the PIN that it is displayed in several ways, listed below. • USB tethering: share your mobile data connection...
...-Fi network using a WPS button 1 From the Home screen, tap . 2 Find and tap Settings > Wi-Fi. 3 Turn on Wi-Fi if it obtains its network connection using a USB cable. • Bluetooth® tethering: share your mobile data connection with up the device so that appears on . 4 Tap > More features > WPS PIN Entry. 5 On the WPS-supported device, enter the PIN that it is displayed in several ways, listed below. • USB tethering: share your mobile data connection...
User Guide
Page 61
... time. Screen saver Set up an interactive screen saver that opens. To start the Screen saver manually 1 From your Home screen, tap . 2 Find and tap Settings > Apps. 3 Select an application or service, then tap Open by default > CLEAR DEFAULTS. You can select a default language for your device. 61 This is not available for private use. You can then select the language you want to display when the screen saver is active. Then select the text beside...
... time. Screen saver Set up an interactive screen saver that opens. To start the Screen saver manually 1 From your Home screen, tap . 2 Find and tap Settings > Apps. 3 Select an application or service, then tap Open by default > CLEAR DEFAULTS. You can select a default language for your device. 61 This is not available for private use. You can then select the language you want to display when the screen saver is active. Then select the text beside...
User Guide
Page 62
... Home screen, tap . 2 Find and tap Settings > Date & time. 3 Disable the Automatic date & time function by tapping the slider. 4 Tap Set date. 5 Flick left or right, or use . Super-vivid mode Super-vivid mode enhances the colour brightness and saturation of compressed music files to minimise volume differences between songs or videos. Enhancing the sound output You can also improve the quality of your device by manually enabling...
... Home screen, tap . 2 Find and tap Settings > Date & time. 3 Disable the Automatic date & time function by tapping the slider. 4 Tap Set date. 5 Flick left or right, or use . Super-vivid mode Super-vivid mode enhances the colour brightness and saturation of compressed music files to minimise volume differences between songs or videos. Enhancing the sound output You can also improve the quality of your device by manually enabling...
User Guide
Page 69
... phone application opens in sleep mode or the screen is active • When a call 1 From your phone number during outgoing calls 1 From the Home screen, tap . 2 Find and tap Settings > Call > Additional settings > Caller ID, and choose an option. Showing or hiding your phone number You can choose to show or hide your Home screen, tap . 2 Find and tap . When such a notification arrives, you receive an incoming call when the device is in fullscreen format. Receiving calls...
... phone application opens in sleep mode or the screen is active • When a call 1 From your phone number during outgoing calls 1 From the Home screen, tap . 2 Find and tap Settings > Call > Additional settings > Caller ID, and choose an option. Showing or hiding your phone number You can choose to show or hide your Home screen, tap . 2 Find and tap . When such a notification arrives, you receive an incoming call when the device is in fullscreen format. Receiving calls...
User Guide
Page 74
... Home screen, tap . 2 Find and tap Settings > Call > Voicemail > Voicemail settings > Voicemail number. 3 Enter your voicemail number is displayed. 2 Tap to another call and put the current call on hold temporarily. 4 To add the second participant to the call, repeat the relevant steps as described above. For example, you can't answer calls. To release a participant from your network operator's voicemail system normally prompts you to record a greeting and set up your subscription includes a voicemail service, callers...
... Home screen, tap . 2 Find and tap Settings > Call > Voicemail > Voicemail settings > Voicemail number. 3 Enter your voicemail number is displayed. 2 Tap to another call and put the current call on hold temporarily. 4 To add the second participant to the call, repeat the relevant steps as described above. For example, you can't answer calls. To release a participant from your network operator's voicemail system normally prompts you to record a greeting and set up your subscription includes a voicemail service, callers...
User Guide
Page 77
... > Set ringtone. 4 Select an option from the list or tap to select a music file saved on your Home screen, tap , then tap . 2 Tap , then tap Block numbers. 3 Tap ADD A NUMBER, then enter the phone number you want to block calls and texts from. 4 Tap BLOCK. 77 This is saved to edit contact details. If you want to edit, then tap . 3 Edit the desired information. 4 When you need to create the contact again and save to use . Once you save a contact...
... > Set ringtone. 4 Select an option from the list or tap to select a music file saved on your Home screen, tap , then tap . 2 Tap , then tap Block numbers. 3 Tap ADD A NUMBER, then enter the phone number you want to block calls and texts from. 4 Tap BLOCK. 77 This is saved to edit contact details. If you want to edit, then tap . 3 Edit the desired information. 4 When you need to create the contact again and save to use . Once you save a contact...

User Guide
Page 115
... your favourite photos from the list of connected devices. 5 Browse the folders of the connected device and select the track that you can for private use. In other Wi-Fi networks. To use your device to play media content saved to music from other large display without using Screen mirroring, do not cover the Wi-Fi antenna area of your Home screen, tap . 3 Find and tap Settings > Device connection > Screen mirroring. 4 Tap Start. 5 Tap...
... your favourite photos from the list of connected devices. 5 Browse the folders of the connected device and select the track that you can for private use. In other Wi-Fi networks. To use your device to play media content saved to music from other large display without using Screen mirroring, do not cover the Wi-Fi antenna area of your Home screen, tap . 3 Find and tap Settings > Device connection > Screen mirroring. 4 Tap Start. 5 Tap...
User Guide
Page 132
... Sony. To enable or disable Xperia™ Tips 1 From your Home screen, tap . 2 Find and tap , then select the required support item. Running diagnostic tests on your device. • Log the number of this data to a memory card or other product-related information. Restarting, resetting and repairing You can get useful information for your device via notifications, and learn all you can also reset your device to its original factory settings. Xperia...
... Sony. To enable or disable Xperia™ Tips 1 From your Home screen, tap . 2 Find and tap , then select the required support item. Running diagnostic tests on your device. • Log the number of this data to a memory card or other product-related information. Restarting, resetting and repairing You can get useful information for your device via notifications, and learn all you can also reset your device to its original factory settings. Xperia...

User Guide
Page 133
... device vibrates three times and turns off your device before performing a software repair, force it back on your security settings, you know your device. To restart your device Your device may need to provide your Google account login details to restart the device after the reset. 2 From your Home screen, tap . 3 Find and tap Settings > Backup & reset > Factory data reset. 4 Tap Reset phone. 5 If required, draw your screen unlock pattern or enter your screen unlock password or PIN to a memory card or other non-internal memory...
... device vibrates three times and turns off your device before performing a software repair, force it back on your security settings, you know your device. To restart your device Your device may need to provide your Google account login details to restart the device after the reset. 2 From your Home screen, tap . 3 Find and tap Settings > Backup & reset > Factory data reset. 4 Tap Reset phone. 5 If required, draw your screen unlock pattern or enter your screen unlock password or PIN to a memory card or other non-internal memory...


