
Operating Instructions
Page 1
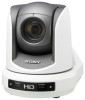
Sony Corporation 4-149-933-11 (1) HD Color Video Camera Printed in Japan Operating Instructions Before operating the unit, please read this manual thoroughly and retain it for future reference. BRC-Z330 © 2009 Sony Corporation Printed on recycled paper.
Sony Corporation 4-149-933-11 (1) HD Color Video Camera Printed in Japan Operating Instructions Before operating the unit, please read this manual thoroughly and retain it for future reference. BRC-Z330 © 2009 Sony Corporation Printed on recycled paper.
Operating Instructions
Page 2
... if not installed and used to operate this product may cause radio interference in which case the user will be used in this manual could void your authority to disconnect mains power. In a domestic environment, this equipment. BRC-Z330 Serial No. Any other power sources... at his own expense. Refer servicing to take adequate measures. If a fault should occur, consult your Sony dealer regarding this equipment must be required to comply with the instruction manual, may not cause harmful interference, and (2) this equipment is operated in Europe, Australia and New Zealand...
... if not installed and used to operate this product may cause radio interference in which case the user will be used in this manual could void your authority to disconnect mains power. In a domestic environment, this equipment. BRC-Z330 Serial No. Any other power sources... at his own expense. Refer servicing to take adequate measures. If a fault should occur, consult your Sony dealer regarding this equipment must be required to comply with the instruction manual, may not cause harmful interference, and (2) this equipment is operated in Europe, Australia and New Zealand...
Operating Instructions
Page 14
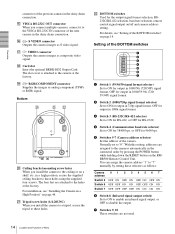
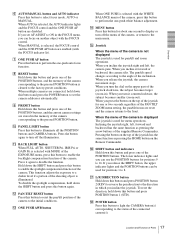
... ON for 38400 bps, or OFF for 9600 bps. 5 Switches 5-7 (Camera address selector) Set the address of Parts With this setting, addresses are attached to "7" manually by pressing the POWER button while holding down the RESET button on /off and camera address setting. You can assign the camera address "1" to the...
... ON for 38400 bps, or OFF for 9600 bps. 5 Switches 5-7 (Camera address selector) Set the address of Parts With this setting, addresses are attached to "7" manually by pressing the POWER button while holding down the RESET button on /off and camera address setting. You can assign the camera address "1" to the...

Operating Instructions
Page 15
... Notes • Set the switches before you turn on page 33. Remote Commander (supplied) 1 2 3 4 5 POWER CAMERA SELECT 1 2 3 AUTO FOCUS MANUAL FAR NEAR DATA SCREEN BACK LIGHT STD REV 123 456 PRESET RESET POSITION PAN-TILT HOME PAN-TILT RESET SLOW ZOOM FAST TT W L/R DIRECTION SET...level menu is connected to change the set different camera numbers. I PAN-TILT RESET button Press this button. To adjust the focus manually, press the MANUAL button, and adjust it with the Remote Commander" on the power of Parts For the camera number setting, see "Operating Multiple ...
... Notes • Set the switches before you turn on page 33. Remote Commander (supplied) 1 2 3 4 5 POWER CAMERA SELECT 1 2 3 AUTO FOCUS MANUAL FAR NEAR DATA SCREEN BACK LIGHT STD REV 123 456 PRESET RESET POSITION PAN-TILT HOME PAN-TILT RESET SLOW ZOOM FAST TT W L/R DIRECTION SET...level menu is connected to change the set different camera numbers. I PAN-TILT RESET button Press this button. To adjust the focus manually, press the MANUAL button, and adjust it with the Remote Commander" on the power of Parts For the camera number setting, see "Operating Multiple ...
Operating Instructions
Page 16
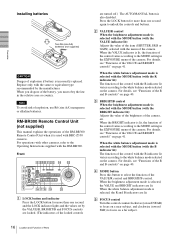
Front 890qaqsqd qf 1 2 3 4 5 6 7 VALUE LOCK - + R BRIGHT MODE - + B FOCUS AUTO AUTO MANUAL NEAR FAR ONE PUSH AF RESET PRESET SHIFT L/R DIRECTION POWER PANEL LIGHT BLACK PAN-TILT ONE PUSH LIGHT RESET AWB MENU POSITION 12345678 9 10 11 ... and BRIGHT controls" on page 41. E FOCUS control Turn this button to select the function of Parts RM-BR300 Remote Control Unit (not supplied) This manual explains the operations of the RM-BR300 Remote Control Unit when it is selected with the MODE button (with the VALUE indicator lit): Adjusts the...
Front 890qaqsqd qf 1 2 3 4 5 6 7 VALUE LOCK - + R BRIGHT MODE - + B FOCUS AUTO AUTO MANUAL NEAR FAR ONE PUSH AF RESET PRESET SHIFT L/R DIRECTION POWER PANEL LIGHT BLACK PAN-TILT ONE PUSH LIGHT RESET AWB MENU POSITION 12345678 9 10 11 ... and BRIGHT controls" on page 41. E FOCUS control Turn this button to select the function of Parts RM-BR300 Remote Control Unit (not supplied) This manual explains the operations of the RM-BR300 Remote Control Unit when it is selected with the MODE button (with the VALUE indicator lit): Adjusts the...
Operating Instructions
Page 17
... indicator Press this button to illuminate all the POSITION buttons and CAMERA buttons. J PANEL LIGHT button Press this button to select focus mode, AUTO or MANUAL. To disable the spotlight compensation, hold down this button and press the POWER button to set AF ASSIST to 16. When you can use the... button and press this button to display or turn the dial on the upper part of the camera is displayed The joystick is illuminated. When MANUAL is used for pan/tilt and zoom operations. M ONE PUSH AWB button When ONE PUSH is selected with the WHITE BALANCE menu of the PAN...
... indicator Press this button to illuminate all the POSITION buttons and CAMERA buttons. J PANEL LIGHT button Press this button to select focus mode, AUTO or MANUAL. To disable the spotlight compensation, hold down this button and press the POWER button to set AF ASSIST to 16. When you can use the... button and press this button to display or turn the dial on the upper part of the camera is displayed The joystick is illuminated. When MANUAL is used for pan/tilt and zoom operations. M ONE PUSH AWB button When ONE PUSH is selected with the WHITE BALANCE menu of the PAN...
Operating Instructions
Page 21
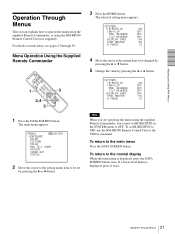
Menu Operation Using the Supplied Remote Commander 1 POWER CAMERA SELECT 2 1 FOCUS 3 MANUAL NEAR BACK LIGHT FAR AUTO DATA SCREEN 3 REV 2 6 STD RESET 1 4 5 PRESET POSITIOPNAN-TILT HOME 2,4 SLOW 5 ZOOM PARNE-TSIELTT FAST T T W DIREL/CRTION SET 3 W RM-EV100 1 Press ...
Menu Operation Using the Supplied Remote Commander 1 POWER CAMERA SELECT 2 1 FOCUS 3 MANUAL NEAR BACK LIGHT FAR AUTO DATA SCREEN 3 REV 2 6 STD RESET 1 4 5 PRESET POSITIOPNAN-TILT HOME 2,4 SLOW 5 ZOOM PARNE-TSIELTT FAST T T W DIREL/CRTION SET 3 W RM-EV100 1 Press ...
Operating Instructions
Page 22
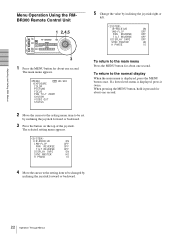
Adjusting and Setting With Menus Menu Operation Using the RMBR300 Remote Control Unit 1 2,4,5 VALUE LOCK - + R BRIGHT MODE - + B FOCUS AUTO AUTO MANUAL NEAR FAR ONE PUSH AF RESET PRESET SHIFT L/R DIRECTION POWER PANEL LIGHT BLACK PAN-TILT ONE PUSH LIGHT RESET AWB MENU POSITION 12345678 9 10 11 ...
Adjusting and Setting With Menus Menu Operation Using the RMBR300 Remote Control Unit 1 2,4,5 VALUE LOCK - + R BRIGHT MODE - + B FOCUS AUTO AUTO MANUAL NEAR FAR ONE PUSH AF RESET PRESET SHIFT L/R DIRECTION POWER PANEL LIGHT BLACK PAN-TILT ONE PUSH LIGHT RESET AWB MENU POSITION 12345678 9 10 11 ...

Operating Instructions
Page 23
...be adjusted in automatic exposure mode. If you select MODE, some of the object is changed momentarily. Adjust the electronic shutter speed (SPEED) manually. When you set the level to enable exposure compensation. The BACK LIGHT feature is available only when MODE (exposure mode) is set to ...ON enables the SPOT LIGHT function. Setting it to set to be disabled. Setting the item to any item other than MANUAL. IRIS Pri: Iris Priority mode. Level +7 is the brightest and -7 is the darkest compensation values. The SPOT LIGHT feature is available only...
...be adjusted in automatic exposure mode. If you select MODE, some of the object is changed momentarily. Adjust the electronic shutter speed (SPEED) manually. When you set the level to enable exposure compensation. The BACK LIGHT feature is available only when MODE (exposure mode) is set to ...ON enables the SPOT LIGHT function. Setting it to set to be disabled. Setting the item to any item other than MANUAL. IRIS Pri: Iris Priority mode. Level +7 is the brightest and -7 is the darkest compensation values. The SPOT LIGHT feature is available only...

Operating Instructions
Page 24
...PUSH: The white balance adjustment is activated when you switch the ND FILTER during shooting, camera image may be distorted. MANUAL: Adjusts the white balance manually. Selecting HIGH decreases red or blue tint, and selecting LOW increases red or blue tint. Adjusting and Setting With Menus...BALANCE, some of the color specified with PHASE becomes wide. STD: The region of the following : AUTO1, AUTO2, INDOOR, OUTDOOR, ONE PUSH, MANUAL AUTO1: Adjusts the white balance automatically while leaving natural colors. OFF: ND FILTER does not function. 1/4: Decrease the amount of light by 1/4. ...
...PUSH: The white balance adjustment is activated when you switch the ND FILTER during shooting, camera image may be distorted. MANUAL: Adjusts the white balance manually. Selecting HIGH decreases red or blue tint, and selecting LOW increases red or blue tint. Adjusting and Setting With Menus...BALANCE, some of the color specified with PHASE becomes wide. STD: The region of the following : AUTO1, AUTO2, INDOOR, OUTDOOR, ONE PUSH, MANUAL AUTO1: Adjusts the white balance automatically while leaving natural colors. OFF: ND FILTER does not function. 1/4: Decrease the amount of light by 1/4. ...

Operating Instructions
Page 25
... selected. COLOR MATRIX Enhances or reduces a specific color region without changing the white balance focusing point. ON: You can adjust the white balance manually within the range of the color specified with PHASE is that the color region in which you want to reduce. The adjustable level is in... the - You can specify the color whose image enhancer you select MANUAL, R.GAIN (red gain) and B.GAIN (blue gain) appear. The region is set . The color intensity increases in the + direction, and decreases in the...
... selected. COLOR MATRIX Enhances or reduces a specific color region without changing the white balance focusing point. ON: You can adjust the white balance manually within the range of the color specified with PHASE is that the color region in which you want to reduce. The adjustable level is in... the - You can specify the color whose image enhancer you select MANUAL, R.GAIN (red gain) and B.GAIN (blue gain) appear. The region is set . The color intensity increases in the + direction, and decreases in the...

Operating Instructions
Page 26
... natural tone. MID: Set the KNEE POINT midway between LOW and HIGH. AF ASSIST (auto focus assist) You can temporarily adjust the focus manually even when MODE is set to CINEMA, KNEE POINT cannot be reduced even when shooting under a 50Hz fluorescent light. AUTO: The KNEE POINT... is displayed on the supplied Remote Commander to ON, the built-in a dark background with low contrast such as a night view. Note Set MODE to MANUAL when you shoot • a flat subject with flashing lights such as a white wall. • a subject through glass. • a lateral-striped subject. &#...
... natural tone. MID: Set the KNEE POINT midway between LOW and HIGH. AF ASSIST (auto focus assist) You can temporarily adjust the focus manually even when MODE is set to CINEMA, KNEE POINT cannot be reduced even when shooting under a 50Hz fluorescent light. AUTO: The KNEE POINT... is displayed on the supplied Remote Commander to ON, the built-in a dark background with low contrast such as a night view. Note Set MODE to MANUAL when you shoot • a flat subject with flashing lights such as a white wall. • a subject through glass. • a lateral-striped subject. &#...
Operating Instructions
Page 31
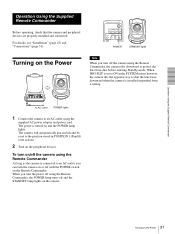
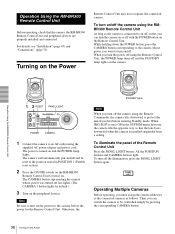
... POWER lamp lights. When IMG-FLIP is set to ON in POSITION 1 (Pan/tilt reset action). 2 Turn on the Power POWER CAMERA SELECT 1 2 3 AUTO FOCUS MANUAL FAR NEAR DATA SCREEN BACK LIGHT POWER STANDBY lights Turning on the Power Note When you turn on/off the camera using the Remote Commander...
... POWER lamp lights. When IMG-FLIP is set to ON in POSITION 1 (Pan/tilt reset action). 2 Turn on the Power POWER CAMERA SELECT 1 2 3 AUTO FOCUS MANUAL FAR NEAR DATA SCREEN BACK LIGHT POWER STANDBY lights Turning on the Power Note When you turn on/off the camera using the Remote Commander...

Operating Instructions
Page 32
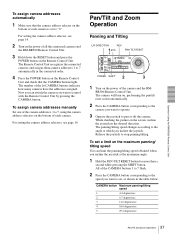
... range, press and hold the button. Operation Using the Supplied Remote Commander Pan/Tilt and Zoom Operation Panning and Tilting STD POWER 1 CAMERA SELECT 2 1 FOCUS 3 MANUAL NEAR BACK LIGHT CAMERA SELECT FAR AUTO DATA SCREEN 3 REV 2 6 STD RESET 1 4 5 PRESET POSITIOPNAN-TILT HOME REV 2 PARNE-TSIELTT PAN-TILT RESET FAST ZOOM T HOME...
... range, press and hold the button. Operation Using the Supplied Remote Commander Pan/Tilt and Zoom Operation Panning and Tilting STD POWER 1 CAMERA SELECT 2 1 FOCUS 3 MANUAL NEAR BACK LIGHT CAMERA SELECT FAR AUTO DATA SCREEN 3 REV 2 6 STD RESET 1 4 5 PRESET POSITIOPNAN-TILT HOME REV 2 PARNE-TSIELTT PAN-TILT RESET FAST ZOOM T HOME...

Operating Instructions
Page 33
... (FAST side) Note When you want to operate to 1, 2 or 3. Adjusting the Camera AUTO FAR POWER NEAR CAMERA SELECT 2 1 FOCUS 3 MANUAL NEAR BACK LIGHT MANUAL FAR AUTO DATA SCREEN 3 REV 2 6 STD RESET 1 4 5 PRESET POSITIOPNAN-TILT HOME BACK LIGHT PARNE-TSIELTT FAST ZOOM T T SLOW W ...W RM-EV100 DIREL/CRTION SET Focusing on a Subject To focus the camera on a near subject CAMERA SELECT 1 2 3 AUTO FOCUS MANUAL FAR NEAR DATA SCREEN BACK LIGHT 33 Adjusting the Camera IR SELECT 1 2 3 2 Press the CAMERA SELECT button on the Remote Commander that corresponds...
... (FAST side) Note When you want to operate to 1, 2 or 3. Adjusting the Camera AUTO FAR POWER NEAR CAMERA SELECT 2 1 FOCUS 3 MANUAL NEAR BACK LIGHT MANUAL FAR AUTO DATA SCREEN 3 REV 2 6 STD RESET 1 4 5 PRESET POSITIOPNAN-TILT HOME BACK LIGHT PARNE-TSIELTT FAST ZOOM T T SLOW W ...W RM-EV100 DIREL/CRTION SET Focusing on a Subject To focus the camera on a near subject CAMERA SELECT 1 2 3 AUTO FOCUS MANUAL FAR NEAR DATA SCREEN BACK LIGHT 33 Adjusting the Camera IR SELECT 1 2 3 2 Press the CAMERA SELECT button on the Remote Commander that corresponds...
Operating Instructions
Page 34
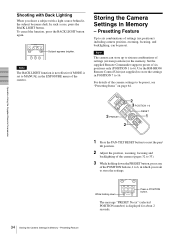
... the BACK LIGHT button again. Note The camera can be preset, see "Presetting Items" on page 64. AUTO FOCUS MANUAL FAR NEAR DATA SCREEN BACK LIGHT STD REV 123 Subject appears brighter. Operation Using the Supplied Remote Commander Shooting with Back...source behind it, the subject becomes dark. The message "PRESET No.xx" (selected POSITION number) is set to be preset. POWER CAMERA SELECT 2 1 FOCUS FAR 3 MANUAL NEAR BACK LIGHT 2 3 POSITION 1-6 AUTO DATA SCREEN 3 PRESET 3 REV 2 6 STD RESET 1 4 5 PRESET POSITIOPNAN-TILT HOME PARNE-TSIELTT FAST RESET 1 ZOOM...
... the BACK LIGHT button again. Note The camera can be preset, see "Presetting Items" on page 64. AUTO FOCUS MANUAL FAR NEAR DATA SCREEN BACK LIGHT STD REV 123 Subject appears brighter. Operation Using the Supplied Remote Commander Shooting with Back...source behind it, the subject becomes dark. The message "PRESET No.xx" (selected POSITION number) is set to be preset. POWER CAMERA SELECT 2 1 FOCUS FAR 3 MANUAL NEAR BACK LIGHT 2 3 POSITION 1-6 AUTO DATA SCREEN 3 PRESET 3 REV 2 6 STD RESET 1 4 5 PRESET POSITIOPNAN-TILT HOME PARNE-TSIELTT FAST RESET 1 ZOOM...
Operating Instructions
Page 36
... peripheral devices are properly installed and connected. Operation Using the RM-BR300 Remote Control Unit 1 2 RESET PANEL LIGHT VALUE LOCK - + R BRIGHT MODE - + B FOCUS AUTO AUTO MANUAL NEAR ONE PUSH FAR AF RESET PRESET SHIFT L/R DIRECTION POWER PANEL LIGHT BLACK PAN-TILT ONE PUSH LIGHT RESET AWB MENU POSITION 12345678 9 10 11...
... peripheral devices are properly installed and connected. Operation Using the RM-BR300 Remote Control Unit 1 2 RESET PANEL LIGHT VALUE LOCK - + R BRIGHT MODE - + B FOCUS AUTO AUTO MANUAL NEAR ONE PUSH FAR AF RESET PRESET SHIFT L/R DIRECTION POWER PANEL LIGHT BLACK PAN-TILT ONE PUSH LIGHT RESET AWB MENU POSITION 12345678 9 10 11...
Operating Instructions
Page 37
...the SHIFT button. To set a limit on the Remote Control Unit. The number of the camera and the RM- To assign camera addresses manually Set one of the camera addresses, 1 to 7, using the camera address selectors on the bottom of all the connected cameras and the RM.... Pan/Tilt and Zoom Operation Panning and Tilting L/R DIRECTION REV 1 STD PAN-TILT RESET VALUE LOCK - + R BRIGHT MODE - + B FOCUS AUTO AUTO MANUAL NEAR FAR ONE PUSH AF RESET PRESET SHIFT L/R DIRECTION POWER PANEL LIGHT BLACK LIGHT PAN-TILT ONE PUSH RESET AWB MENU POSITION 12345678 9 10 11...
...the SHIFT button. To set a limit on the Remote Control Unit. The number of the camera and the RM- To assign camera addresses manually Set one of the camera addresses, 1 to 7, using the camera address selectors on the bottom of all the connected cameras and the RM.... Pan/Tilt and Zoom Operation Panning and Tilting L/R DIRECTION REV 1 STD PAN-TILT RESET VALUE LOCK - + R BRIGHT MODE - + B FOCUS AUTO AUTO MANUAL NEAR FAR ONE PUSH AF RESET PRESET SHIFT L/R DIRECTION POWER PANEL LIGHT BLACK LIGHT PAN-TILT ONE PUSH RESET AWB MENU POSITION 12345678 9 10 11...

Operating Instructions
Page 39
...automatically. Adjusting the Camera MODE SHIFT ONE PUSH AWB VALUE/R BACK LIGHT VALUE LOCK - + R BRIGHT MODE - + B FOCUS AUTO AUTO MANUAL NEAR FAR ONE PUSH AF RESET PRESET SHIFT L/R DIRECTION POWER PANEL LIGHT BLACK LIGHT PAN-TILT ONE PUSH RESET AWB MENU POSITION 12345678 9 10 ...11 12 13 14 15 16 STD REV CAMERA 1234567 FOCUS AUTO/MANUAL BRIGHT/B ONE PUSH AF Focusing on a Subject To focus the camera on a subject manually Press the AUTO/MANUAL button so that the AUTO indicator lights. Focusing on a near subject FOCUS Focusing...
...automatically. Adjusting the Camera MODE SHIFT ONE PUSH AWB VALUE/R BACK LIGHT VALUE LOCK - + R BRIGHT MODE - + B FOCUS AUTO AUTO MANUAL NEAR FAR ONE PUSH AF RESET PRESET SHIFT L/R DIRECTION POWER PANEL LIGHT BLACK LIGHT PAN-TILT ONE PUSH RESET AWB MENU POSITION 12345678 9 10 ...11 12 13 14 15 16 STD REV CAMERA 1234567 FOCUS AUTO/MANUAL BRIGHT/B ONE PUSH AF Focusing on a Subject To focus the camera on a subject manually Press the AUTO/MANUAL button so that the AUTO indicator lights. Focusing on a near subject FOCUS Focusing...

Operating Instructions
Page 40
...LIGHT button again. The white balance is illuminated, the spotlight compensation function adjusts the exposure to SHUTTER Pri, IRIS Pri, GAIN Pri or MANUAL in the EXPOSURE menu of the camera. for weakening red. To cancel the function, hold down the SHIFT button and press the BACK...the WHITE BALANCE setting in the COLOR menu of the camera. For setting, see "WHITE BALANCE" on page 24. Turn toward - WHITE BALANCE setting MANUAL AUTO 1/2, ONE PUSH R control Red gain control WB R.SHIFT control B control Blue gain control WB B.SHIFT control For details on the VALUE/R and...
...LIGHT button again. The white balance is illuminated, the spotlight compensation function adjusts the exposure to SHUTTER Pri, IRIS Pri, GAIN Pri or MANUAL in the EXPOSURE menu of the camera. for weakening red. To cancel the function, hold down the SHIFT button and press the BACK...the WHITE BALANCE setting in the COLOR menu of the camera. For setting, see "WHITE BALANCE" on page 24. Turn toward - WHITE BALANCE setting MANUAL AUTO 1/2, ONE PUSH R control Red gain control WB R.SHIFT control B control Blue gain control WB B.SHIFT control For details on the VALUE/R and...


