
Operating Instructions
Page 4
...AUX input jack on the disc Getting Started Resetting the unit Before operating the unit for the first time, remove the insulation film. Preparing the card remote commander Before using the card remote commander for the first time, or after replacing the car battery or changing the connections, you for purchasing this Sony Compact Disc Player...RESET button with the following functions. • CD playback You can enjoy your drive with a pointed object, such as disc, artist and track name. 4 RESET button Note Pressing the RESET button will erase the clock setting and some stored contents...
...AUX input jack on the disc Getting Started Resetting the unit Before operating the unit for the first time, remove the insulation film. Preparing the card remote commander Before using the card remote commander for the first time, or after replacing the car battery or changing the connections, you for purchasing this Sony Compact Disc Player...RESET button with the following functions. • CD playback You can enjoy your drive with a pointed object, such as disc, artist and track name. 4 RESET button Note Pressing the RESET button will erase the clock setting and some stored contents...

Operating Instructions
Page 6
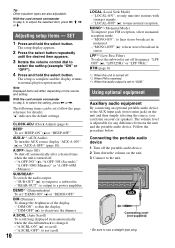
...listed for details. stop the source. D SOURCE button To power on the unit. E Disc slot Insert the disc (label side up), playback starts. F Display window G AUX input jack 10 To connect a portable audio device. H Z (eject) button To eject the disc. J (front panel release) button 5 6 Location of controls and basic operations Main unit...(press and hold). select setup items (press and rotate). C Volume control dial/select button 9 To adjust volume (rotate); qa qs qdqfqg qh qj CDX-GT31W Card remote commander RM-X151 1 4 qk qf OFF ATT SOURCE SEL MODE + -
...listed for details. stop the source. D SOURCE button To power on the unit. E Disc slot Insert the disc (label side up), playback starts. F Display window G AUX input jack 10 To connect a portable audio device. H Z (eject) button To eject the disc. J (front panel release) button 5 6 Location of controls and basic operations Main unit...(press and hold). select setup items (press and rotate). C Volume control dial/select button 9 To adjust volume (rotate); qa qs qdqfqg qh qj CDX-GT31W Card remote commander RM-X151 1 4 qk qf OFF ATT SOURCE SEL MODE + -

Operating Instructions
Page 9
..., the setting is set to "SUB" (page 10). The item changes as follows: LOW*1 t MID*1 t HI*1 t BAL (left-right) t FAD (front-rear) t SUB (subwoofer volume)*2 t AUX*3 *1 When EQ3 is activated (page 9). *2 When the audio output is complete and the display returns to adjust the selected item. "ATT" is displayed at the... desired frequency (manual tuning). Repeat this procedure until "BAL," "FAD" or "SUB" appears. Tuning automatically 1 Select the band, then press (SEEK) -/+ to 20 steps. *3 When AUX source is received. Scanning stops when the unit receives a station.
..., the setting is set to "SUB" (page 10). The item changes as follows: LOW*1 t MID*1 t HI*1 t BAL (left-right) t FAD (front-rear) t SUB (subwoofer volume)*2 t AUX*3 *1 When EQ3 is activated (page 9). *2 When the audio output is complete and the display returns to adjust the selected item. "ATT" is displayed at the... desired frequency (manual tuning). Repeat this procedure until "BAL," "FAD" or "SUB" appears. Tuning automatically 1 Select the band, then press (SEEK) -/+ to 20 steps. *3 When AUX source is received. Scanning stops when the unit receives a station.
Operating Instructions
Page 10
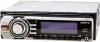
Tip Other equalizer types are also adjustable. With the card remote commander In step 3, to adjust the selected item, press
Tip Other equalizer types are also adjustable. With the card remote commander In step 3, to adjust the selected item, press

Operating Instructions
Page 11
... on the unit. 2 Press (SOURCE) repeatedly until "AUX" appears. CD/MD changer Selecting the changer 1 Press (SOURCE) repeatedly until "CD" or "MD" appears. 2 Press (MODE) repeatedly until the desired changer appears. Skipping albums and discs 1 During playback, press (1)/(2) (ALBM -/+). repeatedly. To skip album album continuously discs discs continuously Press (1)/(2) (ALBM -/+) and release (hold . 11...
... on the unit. 2 Press (SOURCE) repeatedly until "AUX" appears. CD/MD changer Selecting the changer 1 Press (SOURCE) repeatedly until "CD" or "MD" appears. 2 Press (MODE) repeatedly until the desired changer appears. Skipping albums and discs 1 During playback, press (1)/(2) (ALBM -/+). repeatedly. To skip album album continuously discs discs continuously Press (1)/(2) (ALBM -/+) and release (hold . 11...

Operating Instructions
Page 15
...for detailed information. The power antenna (aerial) does not have been erased. • The RESET button has been pressed. t Play back with a Sony MP3 compatible CD changer, or this unit. t Store again into the memory. • The power supply lead or battery has been disconnected. •... accessories/equipment: BUS cable (supplied with an RCA pin cord): RC-61 (1 m), RC-62 (2 m) CD changer (10 discs): CDX-757MX CD changer (6 discs): CDX-T69 Source selector: XA-C40 AUX-IN selector: XA-300 Interface adaptor for iPod: XA-110IP Your dealer may encounter with your unit. t Turn off the unit...
...for detailed information. The power antenna (aerial) does not have been erased. • The RESET button has been pressed. t Play back with a Sony MP3 compatible CD changer, or this unit. t Store again into the memory. • The power supply lead or battery has been disconnected. •... accessories/equipment: BUS cable (supplied with an RCA pin cord): RC-61 (1 m), RC-62 (2 m) CD changer (10 discs): CDX-757MX CD changer (6 discs): CDX-T69 Source selector: XA-C40 AUX-IN selector: XA-300 Interface adaptor for iPod: XA-110IP Your dealer may encounter with your unit. t Turn off the unit...


