
Installations/Connexions
Page 3
Table of Contents Location of controls 4 Precautions 6 Notes on discs 6 Getting Started Resetting the unit 7 Detaching the front panel 8 Setting the clock 9 CD Player Playing a disc 9 Display items 10 Playing tracks repeatedly - Best Tuning Memory (BTM 11 Receiving the stored stations 12 Storing only the desired stations 12 Other Functions Adjusting ...
Table of Contents Location of controls 4 Precautions 6 Notes on discs 6 Getting Started Resetting the unit 7 Detaching the front panel 8 Setting the clock 9 CD Player Playing a disc 9 Display items 10 Playing tracks repeatedly - Best Tuning Memory (BTM 11 Receiving the stored stations 12 Storing only the desired stations 12 Other Functions Adjusting ...

Installations/Connexions
Page 4
..., 14 Display window MBP (My Best sound Position) button 14 D (D-BASS) button 14 (eject) button 9 RELEASE (front panel release) button 8 RESET button (located on the front side of the unit, behind the front panel) 7 ATT (attenuate) button 13 SENS button 12 Number buttons CD REP 10 SHUF 10 RADIO 11, 12 Frequency... for details. CD : During Playback RADIO : During radio reception RELEASE SOURCE SRC MODE SEL ATT SENS 1 REP SHUF 2 3 4 5 MBP D-BASS D OFF 6 BTM DSPL SEEK AMS CDX-L450V Volume +/-
..., 14 Display window MBP (My Best sound Position) button 14 D (D-BASS) button 14 (eject) button 9 RELEASE (front panel release) button 8 RESET button (located on the front side of the unit, behind the front panel) 7 ATT (attenuate) button 13 SENS button 12 Number buttons CD REP 10 SHUF 10 RADIO 11, 12 Frequency... for details. CD : During Playback RADIO : During radio reception RELEASE SOURCE SRC MODE SEL ATT SENS 1 REP SHUF 2 3 4 5 MBP D-BASS D OFF 6 BTM DSPL SEEK AMS CDX-L450V Volume +/-
Installations/Connexions
Page 7
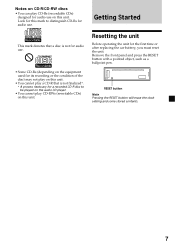
... not play on this unit. •You cannot play a CD-R that is not finalized*. * A process necessary for a recorded CD-R disc to distinguish CD-Rs for audio use. Remove the front panel and press the RESET button with a pointed object, such as a ballpoint pen. Resetting the unit Before operating the unit for audio... will erase the clock setting and some stored contents. 7 Notes on CD-R/CD-RW discs •You can play CD-RWs (rewritable CDs) on this unit. Look for this mark to be played on the audio CD player. •You cannot play CD-Rs (recordable CDs) designed for the first time or...
... not play on this unit. •You cannot play a CD-R that is not finalized*. * A process necessary for a recorded CD-R disc to distinguish CD-Rs for audio use. Remove the front panel and press the RESET button with a pointed object, such as a ballpoint pen. Resetting the unit Before operating the unit for audio... will erase the clock setting and some stored contents. 7 Notes on CD-R/CD-RW discs •You can play CD-RWs (rewritable CDs) on this unit. Look for this mark to be played on the audio CD player. •You cannot play CD-Rs (recordable CDs) designed for the first time or...

Installations/Connexions
Page 8
...until it in amplifier, the beep sound will beep for 2 seconds to avoid car battery drain. 2 Press you , use the supplied front panel case. 8 If you detach the panel while the unit is still turned on, the power will turn the unit off automatically to prevent the speakers from being damaged. •... this unit to protect the unit from being stolen. Caution alarm If you turn the ignition switch to the OFF position without removing the front panel, the caution alarm will be sure to turn off by pressing for a few seconds. Note Do not put excessive pressure on the inner surface ...
...until it in amplifier, the beep sound will beep for 2 seconds to avoid car battery drain. 2 Press you , use the supplied front panel case. 8 If you detach the panel while the unit is still turned on, the power will turn the unit off automatically to prevent the speakers from being damaged. •... this unit to protect the unit from being stolen. Caution alarm If you turn the ignition switch to the OFF position without removing the front panel, the caution alarm will be sure to turn off by pressing for a few seconds. Note Do not put excessive pressure on the inner surface ...
Installations/Connexions
Page 15
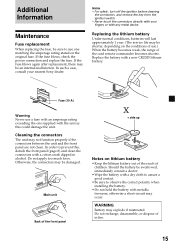
... to prevent this could damage the unit. Otherwise, the connectors may not function properly if the connectors between the unit and the front panel are not clean. Replacing the lithium battery Under normal conditions, batteries will last approximately 1 year. (The service life may explode if ... exceeding the one matching the amperage rating stated on the conditions of children. Fuse (10 A) Warning Never use a fuse with your nearest Sony dealer. WARNING Battery may be shorter, depending on the original fuse. In such a case, consult your fingers or with a new CR2025 lithium...
... to prevent this could damage the unit. Otherwise, the connectors may not function properly if the connectors between the unit and the front panel are not clean. Replacing the lithium battery Under normal conditions, batteries will last approximately 1 year. (The service life may explode if ... exceeding the one matching the amperage rating stated on the conditions of children. Fuse (10 A) Warning Never use a fuse with your nearest Sony dealer. WARNING Battery may be shorter, depending on the original fuse. In such a case, consult your fingers or with a new CR2025 lithium...
Installations/Connexions
Page 16
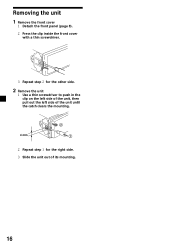
Removing the unit 1 Remove the front cover Detach the front panel (page 8). Press the clip inside the front cover with a thin screwdriver. Slide the unit out of the unit until the catch clears the mounting. 4 mm Repeat step for the other side. 2 Remove the unit Use a thin screwdriver to push in the clip on the left side of the unit, then pull out the left side of its mounting. 16 Repeat step for the right side.
Removing the unit 1 Remove the front cover Detach the front panel (page 8). Press the clip inside the front cover with a thin screwdriver. Slide the unit out of the unit until the catch clears the mounting. 4 mm Repeat step for the other side. 2 Remove the unit Use a thin screwdriver to push in the clip on the left side of the unit, then pull out the left side of its mounting. 16 Repeat step for the right side.
Installations/Connexions
Page 17
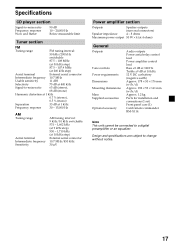
Specifications CD player section Signal-to-noise ratio Frequency response Wow and flutter 90 dB 10 - 20,000 Hz Below measurable limit Tuner section FM Tuning range FM tuning interval: 50 kHz/200 kHz switchable 87.5 - 108 MHz (at 50 kHz step) 87.5 - 107.9 MHz (at 200 ...215; 50 × 176 mm (w/h/d) Approx. 182 × 53 × 161 mm (w/h/d) Approx. 1.2 kg Parts for installation and connections (1 set) Front panel case (1) Card remote commander RM-X114 Note This unit cannot be connected to change without notice. 17 Design and specifications are subject to a digital preamplifier...
Specifications CD player section Signal-to-noise ratio Frequency response Wow and flutter 90 dB 10 - 20,000 Hz Below measurable limit Tuner section FM Tuning range FM tuning interval: 50 kHz/200 kHz switchable 87.5 - 108 MHz (at 50 kHz step) 87.5 - 107.9 MHz (at 200 ...215; 50 × 176 mm (w/h/d) Approx. 182 × 53 × 161 mm (w/h/d) Approx. 1.2 kg Parts for installation and connections (1 set) Front panel case (1) Card remote commander RM-X114 Note This unit cannot be connected to change without notice. 17 Design and specifications are subject to a digital preamplifier...

Installations/Connexions
Page 18
...a disc) to the centre position for a 2-speaker system. CD will not go up. Dirty or defective disc. The power aerial does not extend. A disc is...8226;The car does not have a relay box. 18 CD playback A disc cannot be received. Before going through the checklist below, check the connection...to "ON." Set to display the clock. •Remove the front panel and clean the connectors. Indications disappear from vibration. •The unit is...to its recording equipment or the disc condition. Playback does not begin. •Dirty or defective disc. •CD-R that is ...
...a disc) to the centre position for a 2-speaker system. CD will not go up. Dirty or defective disc. The power aerial does not extend. A disc is...8226;The car does not have a relay box. 18 CD playback A disc cannot be received. Before going through the checklist below, check the connection...to "ON." Set to display the clock. •Remove the front panel and clean the connectors. Indications disappear from vibration. •The unit is...to its recording equipment or the disc condition. Playback does not begin. •Dirty or defective disc. •CD-R that is ...


