
Limited Warranty (U.S. Only)
Page 1
...responsibility to the software. It is longer. It is invalid if the factory-applied serial number has been altered or removed from state to the Sony authorized service facility specified. Any parts or product replaced under this Labor Warranty has expired but not limited to product issues... caused by any repair, replacement part or replacement product for the remainder of one (1) year from your authorized dealer, call: 1-800-488-SONY (7669) Repair / Replacement Warranty: This Limited Warranty shall apply to replace the product after this Limited Warranty will , at its option, ...
...responsibility to the software. It is longer. It is invalid if the factory-applied serial number has been altered or removed from state to the Sony authorized service facility specified. Any parts or product replaced under this Labor Warranty has expired but not limited to product issues... caused by any repair, replacement part or replacement product for the remainder of one (1) year from your authorized dealer, call: 1-800-488-SONY (7669) Repair / Replacement Warranty: This Limited Warranty shall apply to replace the product after this Limited Warranty will , at its option, ...

Installations/Connexions
Page 3
D-bass 14 Additional Information Maintenance 15 Removing the unit 16 Specifications 17 Troubleshooting 18 Error displays 19 3 Repeat Play 10 Playing tracks in random order - My Best sound Position (MBP 14 Boosting ... sound 13 Selecting the sound position - Shuffle Play 10 Radio Display items 11 Storing stations automatically - Table of Contents Location of controls 4 Precautions 6 Notes on discs 6 Getting Started Resetting the unit 7 Detaching the front panel 8 Setting the clock 9 CD Player Playing a disc 9 Display items 10 Playing tracks repeatedly -
D-bass 14 Additional Information Maintenance 15 Removing the unit 16 Specifications 17 Troubleshooting 18 Error displays 19 3 Repeat Play 10 Playing tracks in random order - My Best sound Position (MBP 14 Boosting ... sound 13 Selecting the sound position - Shuffle Play 10 Radio Display items 11 Storing stations automatically - Table of Contents Location of controls 4 Precautions 6 Notes on discs 6 Getting Started Resetting the unit 7 Detaching the front panel 8 Setting the clock 9 CD Player Playing a disc 9 Display items 10 Playing tracks repeatedly -

Installations/Connexions
Page 6
... the discs with sticky ink/residue. Notes on discs •To keep the disc clean, do so may damage the unit. Handle the disc by its edge. •Keep your discs in their cases or disc magazines when not in this manual, please consult your nearest Sony dealer. Such discs may...commercially available cleaning cloth. Should this occur, the unit will extend automatically while the unit is operating. In such a case, remove the disc and wait for analog discs. 6 Precautions •If your car was parked in a very damp area, moisture condensation may occur inside the lenses and ...
... the discs with sticky ink/residue. Notes on discs •To keep the disc clean, do so may damage the unit. Handle the disc by its edge. •Keep your discs in their cases or disc magazines when not in this manual, please consult your nearest Sony dealer. Such discs may...commercially available cleaning cloth. Should this occur, the unit will extend automatically while the unit is operating. In such a case, remove the disc and wait for analog discs. 6 Precautions •If your car was parked in a very damp area, moisture condensation may occur inside the lenses and ...
Installations/Connexions
Page 7
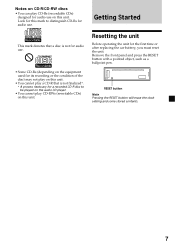
... audio use on this unit. Resetting the unit Before operating the unit for audio use . Notes on CD-R/CD-RW discs •You can play CD-RWs (rewritable CDs) on this unit. Remove the front panel and press the RESET button with a pointed object, such as a ballpoint pen. Look for this mark... to be played on the audio CD player. •You cannot play CD-Rs (recordable CDs) designed for the first time or...
... audio use on this unit. Resetting the unit Before operating the unit for audio use . Notes on CD-R/CD-RW discs •You can play CD-RWs (rewritable CDs) on this unit. Remove the front panel and press the RESET button with a pointed object, such as a ballpoint pen. Look for this mark... to be played on the audio CD player. •You cannot play CD-Rs (recordable CDs) designed for the first time or...

Installations/Connexions
Page 8
Caution alarm If you turn the ignition switch to the OFF position without removing the front panel, the caution alarm will turn the unit off towards Attaching the front panel Attach part of the front panel to protect the ...
Caution alarm If you turn the ignition switch to the OFF position without removing the front panel, the caution alarm will turn the unit off towards Attaching the front panel Attach part of the front panel to protect the ...
Installations/Connexions
Page 15
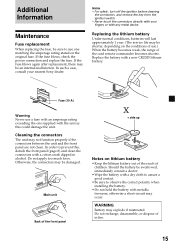
... a new CR2025 lithium battery. Notes • For safety, turn off the ignition before cleaning the connectors, and remove the key from the ignition switch. • Never touch the connectors directly with your nearest Sony dealer. Otherwise, the connectors may be an internal malfunction. Do not recharge, disassemble, or dispose of children. Main...
... a new CR2025 lithium battery. Notes • For safety, turn off the ignition before cleaning the connectors, and remove the key from the ignition switch. • Never touch the connectors directly with your nearest Sony dealer. Otherwise, the connectors may be an internal malfunction. Do not recharge, disassemble, or dispose of children. Main...
Installations/Connexions
Page 16
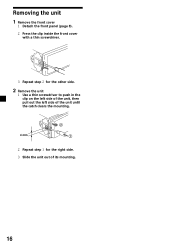
Press the clip inside the front cover with a thin screwdriver. Slide the unit out of the unit until the catch clears the mounting. 4 mm Repeat step for the right side. Removing the unit 1 Remove the front cover Detach the front panel (page 8). Repeat step for the other side. 2 Remove the unit Use a thin screwdriver to push in the clip on the left side of the unit, then pull out the left side of its mounting. 16
Press the clip inside the front cover with a thin screwdriver. Slide the unit out of the unit until the catch clears the mounting. 4 mm Repeat step for the right side. Removing the unit 1 Remove the front cover Detach the front panel (page 8). Repeat step for the other side. 2 Remove the unit Use a thin screwdriver to push in the clip on the left side of the unit, then pull out the left side of its mounting. 16

Installations/Connexions
Page 18
... control to turn on the unit. Stored stations and correct time are not matched correctly with your car has built-in FM/AM aerial in the wrong way. Press (or insert a disc) to the centre position for a 2-speaker system. The car does not have a relay box. 18 CD playback...everything is hampered by noises. •Connect a power aerial control lead (blue) or accessory power supply lead (red) to display the clock. •Remove the front panel and clean the connectors. The sound is in the memory. •The broadcast signal is being supplied to the monaural reception mode...
... control to turn on the unit. Stored stations and correct time are not matched correctly with your car has built-in FM/AM aerial in the wrong way. Press (or insert a disc) to the centre position for a 2-speaker system. The car does not have a relay box. 18 CD playback...everything is hampered by noises. •Connect a power aerial control lead (blue) or accessory power supply lead (red) to display the clock. •Remove the front panel and clean the connectors. The sound is in the memory. •The broadcast signal is being supplied to the monaural reception mode...


