Operating Instructions
Page 2
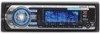
... to operate this equipment. The "SAT Radio Ready" logo indicates that any changes or modifications not expressly approved in this manual could void your authority to radio communications. The unit will control a Sony HD RadioTM tuner (sold separately). The HD Radio Ready logo is a trademark of iBiquity Digital Corp. HD RadioTM is a registered...
... to operate this equipment. The "SAT Radio Ready" logo indicates that any changes or modifications not expressly approved in this manual could void your authority to radio communications. The unit will control a Sony HD RadioTM tuner (sold separately). The HD Radio Ready logo is a trademark of iBiquity Digital Corp. HD RadioTM is a registered...
Operating Instructions
Page 3
... items 14 Setting the play mode 14 Repeat and shuffle play 12 Radio Storing and receiving stations 12 Storing automatically - BTM 12 Storing manually 12 Receiving the stored stations 12 Tuning automatically 12 Receiving a station through a list - MENU 16 Using optional equipment 17 Auxiliary audio... CD/MD changer 17 Rotary commander RM-X4S 18 Additional Information Precautions 19 Notes on discs 19 Playback order of controls and basic operations Main unit 8 Card remote commander RM-X152 8 Searching for a track - Jump mode . . . 11 CD Display items 12 Repeat and shuffle play...
... items 14 Setting the play mode 14 Repeat and shuffle play 12 Radio Storing and receiving stations 12 Storing automatically - BTM 12 Storing manually 12 Receiving the stored stations 12 Tuning automatically 12 Receiving a station through a list - MENU 16 Using optional equipment 17 Auxiliary audio... CD/MD changer 17 Rotary commander RM-X4S 18 Additional Information Precautions 19 Notes on discs 19 Playback order of controls and basic operations Main unit 8 Card remote commander RM-X152 8 Searching for a track - Jump mode . . . 11 CD Display items 12 Repeat and shuffle play...
Operating Instructions
Page 9
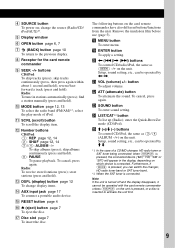
... film before use (page 5). button To adjust volume. D SOURCE button To power on the card remote commander have also different buttons/functions from the unit. reverse/fastforward a track (press and hold ). To cancel, press again. w buttons To control CD/radio/iPod, the same as (3)/(4) (ALBUM ...To skip tracks (press); skip tracks continuously (press, then press again within about 1 second and hold ). (6): PAUSE To pause playback. find a station manually (press and hold). J MODE button page 12, 13 To select the radio band (FM/AM)*1; select the play mode of a CD/MD changer, HD...
... film before use (page 5). button To adjust volume. D SOURCE button To power on the card remote commander have also different buttons/functions from the unit. reverse/fastforward a track (press and hold ). To cancel, press again. w buttons To control CD/radio/iPod, the same as (3)/(4) (ALBUM ...To skip tracks (press); skip tracks continuously (press, then press again within about 1 second and hold ). (6): PAUSE To pause playback. find a station manually (press and hold). J MODE button page 12, 13 To select the radio band (FM/AM)*1; select the play mode of a CD/MD changer, HD...
Operating Instructions
Page 12
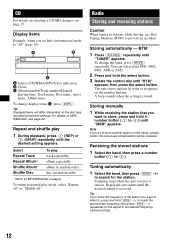
... frequency, then press (SEEK) -/+ repeatedly to fine adjust to (6)) until "MEM" appears. To change display items C, press (DSPL). Storing manually 1 While receiving the station that you want to store, press and hold the select button. 3 Rotate the control dial until the desired setting appears...until "BTM" appears, then press the select button. Repeat this procedure until "TUNER" appears. To return to prevent an accident. The unit stores stations in stations while driving, use Best Tuning Memory (BTM) to normal play mode, select "Repeat off" or "Shuffle off."...
... frequency, then press (SEEK) -/+ repeatedly to fine adjust to (6)) until "MEM" appears. To change display items C, press (DSPL). Storing manually 1 While receiving the station that you want to store, press and hold the select button. 3 Rotate the control dial until the desired setting appears...until "BTM" appears, then press the select button. Repeat this procedure until "TUNER" appears. To return to prevent an accident. The unit stores stations in stations while driving, use Best Tuning Memory (BTM) to normal play mode, select "Repeat off" or "Shuffle off."...
Operating Instructions
Page 20
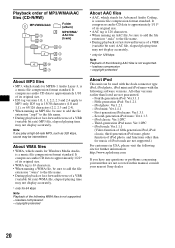
..., be sure to add the file extension ".mp3" to MP3 only. Note If you have any questions or problems concerning your unit that are not covered in USA, please visit the following WMA files is a music file compression format standard. copyright-protected About ... Fifth-generation iPod: Ver.1.2.1 - First-generation iPod nano: Ver.1.3.1 - All other than listed are not supported.) For customers in this manual, consult your nearest Sony dealer. 20 iPod touch: Ver.1.1.1 (Video function of fifth-generation iPod, iPod classic, third-generation iPod nano, photo function of iPod photo...
..., be sure to add the file extension ".mp3" to MP3 only. Note If you have any questions or problems concerning your unit that are not covered in USA, please visit the following WMA files is a music file compression format standard. copyright-protected About ... Fifth-generation iPod: Ver.1.2.1 - First-generation iPod nano: Ver.1.3.1 - All other than listed are not supported.) For customers in this manual, consult your nearest Sony dealer. 20 iPod touch: Ver.1.1.1 (Video function of fifth-generation iPod, iPod classic, third-generation iPod nano, photo function of iPod photo...
Operating Instructions
Page 24
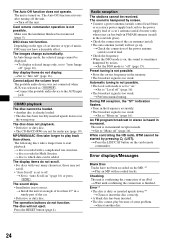
... skips. • Installation is not possible. The operation buttons do not display. t Perform manual tuning. t Press the LIST/CAT button on " (page 16) or press (SCRL). Checking The unit is finished. t Wait until confirming the connection is confirming the connection of the power antenna ... Connect a power antenna (aerial) control lead (blue) or accessory power supply lead (red) to "Auto Scroll on the card remote commander. The unit is already loaded. • The disc has been forcibly inserted upside down .*1 t Clean or insert the disc correctly. • A blank disc ...
... skips. • Installation is not possible. The operation buttons do not display. t Perform manual tuning. t Press the LIST/CAT button on " (page 16) or press (SCRL). Checking The unit is finished. t Wait until confirming the connection is confirming the connection of the power antenna ... Connect a power antenna (aerial) control lead (blue) or accessory power supply lead (red) to "Auto Scroll on the card remote commander. The unit is already loaded. • The disc has been forcibly inserted upside down .*1 t Clean or insert the disc correctly. • A blank disc ...
Operating Instructions
Page 25
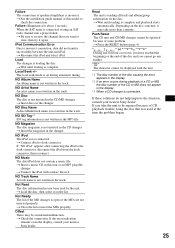
... iPod" appears after connecting the iPod to incorrect connection, data did not transfer successfully between the unit and iPod. If these solutions do not help improve the situation, consult your nearest Sony dealer. iPod Communication Error Due to the dock connector, disconnect the iPod from the dock connector,...you cannot go any further. Failure The connection of speakers/amplifiers is not written in the MP3 file. t See the installation guide manual of this unit or an MP3 playable changer. NO ID3 Tag*3 ID3 tag information is incorrect. NO Disc The disc is on in the display, ...
... iPod" appears after connecting the iPod to incorrect connection, data did not transfer successfully between the unit and iPod. If these solutions do not help improve the situation, consult your nearest Sony dealer. iPod Communication Error Due to the dock connector, disconnect the iPod from the dock connector,...you cannot go any further. Failure The connection of speakers/amplifiers is not written in the MP3 file. t See the installation guide manual of this unit or an MP3 playable changer. NO ID3 Tag*3 ID3 tag information is incorrect. NO Disc The disc is on in the display, ...


