Operating Instructions (primary manual)
Page 3
TABLE OF CONTENTS Getting Started Precautions 4 Identifying Parts and Controls 5 Setup 6 Turning on the Monitor and Computer 8 Selecting the Input Signal 8 Customizing Your Monitor Introducing the On-Screen Display System 9 Selecting the On-Screen Display Language 9 Automatically Adjusting the Picture 10 Eliminating Flickering or Blurring Manually 10 Adjusting the ...
TABLE OF CONTENTS Getting Started Precautions 4 Identifying Parts and Controls 5 Setup 6 Turning on the Monitor and Computer 8 Selecting the Input Signal 8 Customizing Your Monitor Introducing the On-Screen Display System 9 Selecting the On-Screen Display Language 9 Automatically Adjusting the Picture 10 Eliminating Flickering or Blurring Manually 10 Adjusting the ...

Operating Instructions (primary manual)
Page 4
...sharp or abrasive items such as this monitor will eventually disappear. • The screen and the cabinet become warm during operation. The residual image will not conform to normal. • If a still picture is intact. Consult your Sony dealer when replacing the fl uorescent tube.... when you use a glass cleaning liquid, do not use the original carton and packing materials. This is not a malfunction. When the monitor becomes warm, the screen returns to mandatory FCC standards. Maintenance • Clean the cabinet, panel and controls with a soft cloth lightly moistened...
...sharp or abrasive items such as this monitor will eventually disappear. • The screen and the cabinet become warm during operation. The residual image will not conform to normal. • If a still picture is intact. Consult your Sony dealer when replacing the fl uorescent tube.... when you use a glass cleaning liquid, do not use the original carton and packing materials. This is not a malfunction. When the monitor becomes warm, the screen returns to mandatory FCC standards. Maintenance • Clean the cabinet, panel and controls with a soft cloth lightly moistened...
Operating Instructions (primary manual)
Page 5
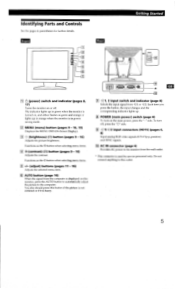
... is in parentheses for further details. Front Rear 1 2 3 4 5 6 et. 7 POWER 8 (!) (power) switch and indicator (pages 8, 17) Turns the monitor on the main power, press the "-" side. Functions as the 0 button when selecting menu items. 5 +1- (adjust) buttons (pages 11 -16) Adjusts the selected ...menu item. Do not connect anything to the monitor from EJ1 or -a2. You also should press this outlet. 5 Getting Started Identifying Parts and Controls See the pages in power saving mode. ...
... is in parentheses for further details. Front Rear 1 2 3 4 5 6 et. 7 POWER 8 (!) (power) switch and indicator (pages 8, 17) Turns the monitor on the main power, press the "-" side. Functions as the 0 button when selecting menu items. 5 +1- (adjust) buttons (pages 11 -16) Adjusts the selected ...menu item. Do not connect anything to the monitor from EJ1 or -a2. You also should press this outlet. 5 Getting Started Identifying Parts and Controls See the pages in power saving mode. ...
Operating Instructions (primary manual)
Page 6
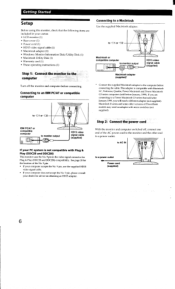
...Macintosh Use the supplied Macintosh adapter. See page 20 for advice on obtaining an HD15 adapter. to or Macintosh or compatible computer to monitor output )fi 0000 Macintosh adapter (supp ied)* HD15 video signal cable (supplied) • Connect the supplied Macintosh adapter to the ...computer before connecting. Getting Started Setup Before using this monitor, check that the following items are connecting to a Power Macintosh G3 series that sold after January 1999, you are included in ...
...Macintosh Use the supplied Macintosh adapter. See page 20 for advice on obtaining an HD15 adapter. to or Macintosh or compatible computer to monitor output )fi 0000 Macintosh adapter (supp ied)* HD15 video signal cable (supplied) • Connect the supplied Macintosh adapter to the ...computer before connecting. Getting Started Setup Before using this monitor, check that the following items are connecting to a Power Macintosh G3 series that sold after January 1999, you are included in ...
Operating Instructions (primary manual)
Page 7
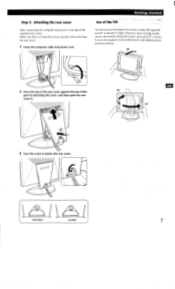
... screw to the left or right. However, best viewing results can be obtained by tilting the screen upward by 5° or more. To turn the monitor, hold at the bottom with both hands as illustrated below. ----- 30° I 2 Press the top of the rear cover against the top of the Tilt... The tilt feature will adjust the monitor within 30° upward, and 45° to fasten the rear cover. 11 Unlocked Locked 7 Step 3: Attaching the rear cover After connecting the computer and...
... screw to the left or right. However, best viewing results can be obtained by tilting the screen upward by 5° or more. To turn the monitor, hold at the bottom with both hands as illustrated below. ----- 30° I 2 Press the top of the rear cover against the top of the Tilt... The tilt feature will adjust the monitor within 30° upward, and 45° to fasten the rear cover. 11 Unlocked Locked 7 Step 3: Attaching the rear cover After connecting the computer and...
Operating Instructions (primary manual)
Page 8
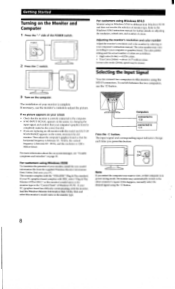
...16 bit) 65,536 colors. • True Color (24 bit) about the on-screen messages, see "Trouble symptoms and remedies" on the Monitor and Computer 1 Press the "-" side of colors. VV Computers connected to -S2 connected to this model and OUT OF SCAN RANGE appears on adjusting... to your computer or graphics board. Refer to the Windows NT4.0 instruction manual for further details on the screen, reconnect the old monitor. This monitor complies with this monitor using the -O button. 8 If this button. 1• 2• Note If you restart the computer you press this happens,...
...16 bit) 65,536 colors. • True Color (24 bit) about the on-screen messages, see "Trouble symptoms and remedies" on the Monitor and Computer 1 Press the "-" side of colors. VV Computers connected to -S2 connected to this model and OUT OF SCAN RANGE appears on adjusting... to your computer or graphics board. Refer to the Windows NT4.0 instruction manual for further details on the screen, reconnect the old monitor. This monitor complies with this monitor using the -O button. 8 If this button. 1• 2• Note If you restart the computer you press this happens,...
Operating Instructions (primary manual)
Page 9
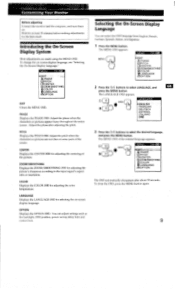
... fuzzy throughout the entire screen. Adjust the phase after about 30 seconds. CENTER Displays the CENTER OSD for the best result. Customizing Your Monitor Before adjusting Connect the monitor and the computer, and turn them on. Introducing the On-Screen Display System Most adjustments are not clear at least 30 minutes before...
... fuzzy throughout the entire screen. Adjust the phase after about 30 seconds. CENTER Displays the CENTER OSD for the best result. Customizing Your Monitor Before adjusting Connect the monitor and the computer, and turn them on. Introducing the On-Screen Display System Most adjustments are not clear at least 30 minutes before...
Operating Instructions (primary manual)
Page 10
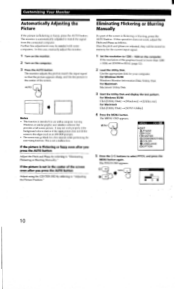
...Click [Utility Disk] -0, [SONY-Utility]. 4 Press the MENU button. The monitor is automatically adjusted to select PITCH, and press the MENU button again. Eliminating Flickering or Blurring Manually If a part of the screen is not a malfunction. For Windows 95/98 Windows Monitor Information Disk/Utility Disk For ... AUTO button. In this operation does not work properly if the background color is flickering or fuzzy, press the AUTO button. The monitor adjusts the pitch to match the input signal so that provides a full-screen picture. It may go blank for your computer. If...
...Click [Utility Disk] -0, [SONY-Utility]. 4 Press the MENU button. The monitor is automatically adjusted to select PITCH, and press the MENU button again. Eliminating Flickering or Blurring Manually If a part of the screen is not a malfunction. For Windows 95/98 Windows Monitor Information Disk/Utility Disk For ... AUTO button. In this operation does not work properly if the background color is flickering or fuzzy, press the AUTO button. The monitor adjusts the pitch to match the input signal so that provides a full-screen picture. It may go blank for your computer. If...
Operating Instructions (primary manual)
Page 11
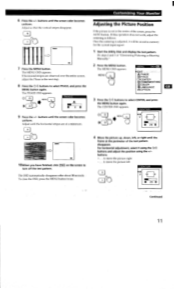
Customizing Your Monitor Adjusting the Picture Position If the picture is adjusted, it will be stored in the center of the screen, press the AUTO button. The CENTER ...
Customizing Your Monitor Adjusting the Picture Position If the picture is adjusted, it will be stored in the center of the screen, press the AUTO button. The CENTER ...
Operating Instructions (primary manual)
Page 12
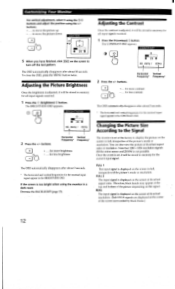
...- Once the zoom is adjusted, it will be stored in a dark room Decrease the BACKLIGHT (page 15). to the Signal The monitor is set , it will be stored in full, irrespective of the picture's mode or resolution. Adjusting the Picture Brightness Once the brightness...its actual aspect ratio. CONTRAST O 26 O 48. 4kHz / 60Hz 2 Press the +/- Customizing Your Monitor For vertical adjustment, select V using the •01,0, buttons and adjust the position using the monitor in memory for all input signals received. 1 Press the 0 (contrast) 43, button. Adjusting the ...
...- Once the zoom is adjusted, it will be stored in a dark room Decrease the BACKLIGHT (page 15). to the Signal The monitor is set , it will be stored in full, irrespective of the picture's mode or resolution. Adjusting the Picture Brightness Once the brightness...its actual aspect ratio. CONTRAST O 26 O 48. 4kHz / 60Hz 2 Press the +/- Customizing Your Monitor For vertical adjustment, select V using the •01,0, buttons and adjust the position using the monitor in memory for all input signals received. 1 Press the 0 (contrast) 43, button. Adjusting the ...

Operating Instructions (primary manual)
Page 13
... picture on the screen in full Select "FULL 1" in the order of TEXT -+ STANDARD --. The MENU OSD appears. The ZOOM/SMOOTHING OSD appears. Customizing Your Monitor STANDARD Standard smoothing effect (factory preset smoothing effect). MENU 'Or ZOOM/SMOOTHING *ZOOM •FULL1 SMOOTHING •FULL2 t • REAL 3 Press the ft/4 buttons to...
... picture on the screen in full Select "FULL 1" in the order of TEXT -+ STANDARD --. The MENU OSD appears. The ZOOM/SMOOTHING OSD appears. Customizing Your Monitor STANDARD Standard smoothing effect (factory preset smoothing effect). MENU 'Or ZOOM/SMOOTHING *ZOOM •FULL1 SMOOTHING •FULL2 t • REAL 3 Press the ft/4 buttons to...
Operating Instructions (primary manual)
Page 14
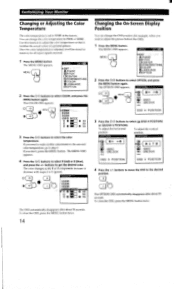
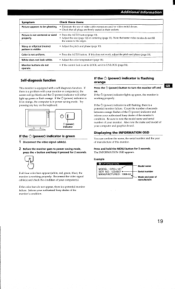
Customizing Your Monitor Changing or Adjusting the Color Temperature The color temperature is adjusted, it matches the actual colors of a printed picture. Use this function to adjust the ...
Customizing Your Monitor Changing or Adjusting the Color Temperature The color temperature is adjusted, it matches the actual colors of a printed picture. Use this function to adjust the ...
Operating Instructions (primary manual)
Page 15
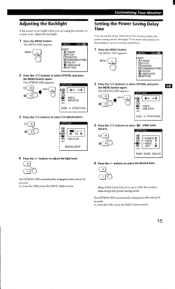
... the +/- OSD H POSITION 3 Press the Q/0 buttons to select OPTION, and press the MENU button again. See page 17 for more information on this monitor's power saving capabilities. 1 Press the MENU button. The OPTION OSD appears. The MENU OSD appears. The MENU OSD appears. buttons to OFF, the... not go into power saving mode. When PWR SAVE DELAY is too bright when you are using the monitor in a dark room, adjust the backlight. 1 Press the MENU button. OPTION O • 6 0MIN O •0. *IrcVa • 1MIN t • 5SEC 4>n OFF O 4.4- oc,oi MENU OPTION ...
... the +/- OSD H POSITION 3 Press the Q/0 buttons to select OPTION, and press the MENU button again. See page 17 for more information on this monitor's power saving capabilities. 1 Press the MENU button. The OPTION OSD appears. The MENU OSD appears. The MENU OSD appears. buttons to OFF, the... not go into power saving mode. When PWR SAVE DELAY is too bright when you are using the monitor in a dark room, adjust the backlight. 1 Press the MENU button. OPTION O • 6 0MIN O •0. *IrcVa • 1MIN t • 5SEC 4>n OFF O 4.4- oc,oi MENU OPTION ...
Operating Instructions (primary manual)
Page 16
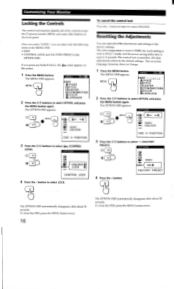
...; FACTORY PRESET 4 Press the + button. To close the OSD, press the MENU button twice. OPTION O I=.03 • UNLOCK LOCK O CONTROL LOCK 4 Press the - Customizing Your Monitor Locking the Controls The control lock function disables all of the controls except the (5 (power) switch, MENU and some other adjustments return to select UNLOCK...
...; FACTORY PRESET 4 Press the + button. To close the OSD, press the MENU button twice. OPTION O I=.03 • UNLOCK LOCK O CONTROL LOCK 4 Press the - Customizing Your Monitor Locking the Controls The control lock function disables all of the controls except the (5 (power) switch, MENU and some other adjustments return to select UNLOCK...
Operating Instructions (primary manual)
Page 17
... computer enters the power saving mode, the input signal is cut and NO INPUT SIGNAL appears on the screen. After the time set by the monitor's specifications. However, it may help you isolate the cause of a problem and as the more stringent NUTEK . Power consumption Power mode consumption (I)... in three stages as a user mode and recalled whenever the corresponding input signal is received. You can set the delay time before the monitor enters the power saving mode using the OSD. To solve the problem, see "Trouble symptoms and remedies" on page 15. The calibration is...
... computer enters the power saving mode, the input signal is cut and NO INPUT SIGNAL appears on the screen. After the time set by the monitor's specifications. However, it may help you isolate the cause of a problem and as the more stringent NUTEK . Power consumption Power mode consumption (I)... in three stages as a user mode and recalled whenever the corresponding input signal is received. You can set the delay time before the monitor enters the power saving mode using the OSD. To solve the problem, see "Trouble symptoms and remedies" on page 15. The calibration is...
Operating Instructions (primary manual)
Page 18
...21" Color, etc.) and the frequency of electric or magnetic fields such as other monitors, laser printers, electric fans, fluorescent lighting, or televisions. • Move the monitor away from among the Sony monitors in the proper bus slot. Picture is scrambled. • • Press the AUTO... button. If this monitor, reconnect the old monitor and do no message is displayed and the (!) indicator is...
...21" Color, etc.) and the frequency of electric or magnetic fields such as other monitors, laser printers, electric fans, fluorescent lighting, or televisions. • Move the monitor away from among the Sony monitors in the proper bus slot. Picture is scrambled. • • Press the AUTO... button. If this monitor, reconnect the old monitor and do no message is displayed and the (!) indicator is...
Operating Instructions (primary manual)
Page 19
... there is not uniform. • Press the AUTO button. Inform your authorized Sony dealer of your computer and graphics board. If the (power) indicator is flashing orange Press the () (power) button to turn the monitor off and on the keyboard. ( (!) (power) indicator If the (!) (power.... Picture is working properly. If there is equipped with your authorized Sony dealer of manufacture 19 Example • • MODEL : CPD-L181 SER NO: 1234567 MANUFACTURED : 1999-52 Model name Serial number Week and year of the monitor's condition. properly. • Adjust the size (page 12) or...
... there is not uniform. • Press the AUTO button. Inform your authorized Sony dealer of your computer and graphics board. If the (power) indicator is flashing orange Press the () (power) button to turn the monitor off and on the keyboard. ( (!) (power) indicator If the (!) (power.... Picture is working properly. If there is equipped with your authorized Sony dealer of manufacture 19 Example • • MODEL : CPD-L181 SER NO: 1234567 MANUFACTURED : 1999-52 Model name Serial number Week and year of the monitor's condition. properly. • Adjust the size (page 12) or...
Operating Instructions (primary manual)
Page 20
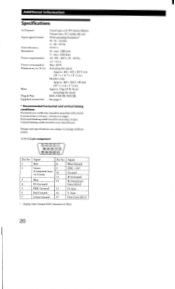
...% H: max. 1280 dots V: max. 1024 lines AC 100 - 240 V, 50 - 60 Hz, 1.0 - 0.6 A Max. 48 W Including the stand: Approx. 468 x 422 x 207.5 mm (18 1 / 2 x 16 5/ 8 x 8 1 / 4 in.) Monitor only: Approx. 468 x 354.5 x 90 mm (18 1 /2 x 14 x 3 5/s in.) Approx. 9 kg (19 lb 14 oz) including the stand DDC/DDC2B/DDC2Bi See page 6. * Recommended horizontal...
...% H: max. 1280 dots V: max. 1024 lines AC 100 - 240 V, 50 - 60 Hz, 1.0 - 0.6 A Max. 48 W Including the stand: Approx. 468 x 422 x 207.5 mm (18 1 / 2 x 16 5/ 8 x 8 1 / 4 in.) Monitor only: Approx. 468 x 354.5 x 90 mm (18 1 /2 x 14 x 3 5/s in.) Approx. 9 kg (19 lb 14 oz) including the stand DDC/DDC2B/DDC2Bi See page 6. * Recommended horizontal...
Marketing Specifications
Page 2
... viewing angle...all this unique display has to vary or waive this disclaimer. The CPD-L181 is Energy Star Compliant when used with a computer equipped with respect to connect. Sony, the Sony logo, Multiscan, Digital FlexRes, Auto ImageSet and Zero Footprint are trademarks of Intel ... or Sony authorized dealers may be removed easily for themselves the suitability and compatibility of all in this product meets the International Energy Star Program for energy efficiency. All rights reserved. D186 Printed in part without the footprint. This monitor is also easy ...
... viewing angle...all this unique display has to vary or waive this disclaimer. The CPD-L181 is Energy Star Compliant when used with a computer equipped with respect to connect. Sony, the Sony logo, Multiscan, Digital FlexRes, Auto ImageSet and Zero Footprint are trademarks of Intel ... or Sony authorized dealers may be removed easily for themselves the suitability and compatibility of all in this product meets the International Energy Star Program for energy efficiency. All rights reserved. D186 Printed in part without the footprint. This monitor is also easy ...


