
Operating Instructions
Page 5
... Virtual Surround Sound Settings (TVS 43 Enjoying Movies 45 Changing the Angles 45 Displaying the Subtitles 45 Adjusting the Picture Quality (BNR 46 Using Various Additional Functions 47 Locking Discs (Custom Parental Control, Parental Control 47 Operation Sound Effects (Sound Feedback 52 Controlling Your TV with the Supplied Remote 53 Settings and Adjustments 54 Using the Setup Display 54 Setting the Display or Sound Track Language (LANGUAGE SETUP) . . . . . 55 Settings for the Display (SCREEN SETUP 56 Custom Settings (CUSTOM SETUP 57 Settings for the Sound (AUDIO SETUP...
... Virtual Surround Sound Settings (TVS 43 Enjoying Movies 45 Changing the Angles 45 Displaying the Subtitles 45 Adjusting the Picture Quality (BNR 46 Using Various Additional Functions 47 Locking Discs (Custom Parental Control, Parental Control 47 Operation Sound Effects (Sound Feedback 52 Controlling Your TV with the Supplied Remote 53 Settings and Adjustments 54 Using the Setup Display 54 Setting the Display or Sound Track Language (LANGUAGE SETUP) . . . . . 55 Settings for the Display (SCREEN SETUP 56 Custom Settings (CUSTOM SETUP 57 Settings for the Sound (AUDIO SETUP...

Operating Instructions
Page 22
... 1-L VIDEO 1 R-AUDIO 2-L VIDEO 2 Optical digital cord (not supplied) Remove jack cap before connecting (white) (red) to coaxial or optical digital input to audio input [Speakers] Dolby Surround amplifier (receiver) Rear (L) Rear (R) [Speakers] Front (L) Front (R) Subwoofer center Rear* (mono) l: Signal flow ∗When connecting 6 speakers, replace the monaural rear speaker with a Dolby Digital, or DTS decoder, refer to the operating instructions of 3 speakers (front L and R, and rear (monaural)). If your amplifier (receiver) has R and L audio input jacks only, use...
... 1-L VIDEO 1 R-AUDIO 2-L VIDEO 2 Optical digital cord (not supplied) Remove jack cap before connecting (white) (red) to coaxial or optical digital input to audio input [Speakers] Dolby Surround amplifier (receiver) Rear (L) Rear (R) [Speakers] Front (L) Front (R) Subwoofer center Rear* (mono) l: Signal flow ∗When connecting 6 speakers, replace the monaural rear speaker with a Dolby Digital, or DTS decoder, refer to the operating instructions of 3 speakers (front L and R, and rear (monaural)). If your amplifier (receiver) has R and L audio input jacks only, use...

Operating Instructions
Page 29
... heard from the speakers, affecting your speakers to "STEREO" using the AUDIO button when you missed. To avoid possible damage to the audio system, the consumer should take proper precautions when the analog stereo jacks of the player. • Set the sound to be connected to "ON" in continuous play a DVD with some scenes. 29 To enjoy DTS Digital Surround™ playback, an external 5.1-channel decoder system must be damaged...
... heard from the speakers, affecting your speakers to "STEREO" using the AUDIO button when you missed. To avoid possible damage to the audio system, the consumer should take proper precautions when the analog stereo jacks of the player. • Set the sound to be connected to "ON" in continuous play a DVD with some scenes. 29 To enjoy DTS Digital Surround™ playback, an external 5.1-channel decoder system must be damaged...

Operating Instructions
Page 36
... select "OFF" in stop mode as well. "A-B" appears on • ON: Repeats Program Play or Shuffle Play. xWhen playing a DVD (Program Play and Shuffle Play are set . xWhen Program Play or Shuffle Play is on the front panel display during A-B Repeat Play. A-B CLEAR 36 Notes • You can play a specific portion of the tracks on a disc. • CHAPTER: Repeats the current chapter. xWhen playing a VIDEO CD or CD (Program Play and Shuffle Play are set A-B Repeat Play...
... select "OFF" in stop mode as well. "A-B" appears on • ON: Repeats Program Play or Shuffle Play. xWhen playing a DVD (Program Play and Shuffle Play are set . xWhen Program Play or Shuffle Play is on the front panel display during A-B Repeat Play. A-B CLEAR 36 Notes • You can play a specific portion of the tracks on a disc. • CHAPTER: Repeats the current chapter. xWhen playing a VIDEO CD or CD (Program Play and Shuffle Play are set A-B Repeat Play...

Operating Instructions
Page 43
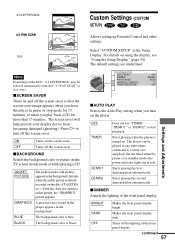
... playing a DVD, the player does not output Dolby Digital signals from the DIGITAL OUT (COAXIAL and OPTICAL) jacks (when you enjoy surround sound effects by using actual rear speakers. TVS DYNAMIC Sound Adjustments 2 Press SURROUND repeatedly to "D-PCM") (page 59). Refer to work with the LINE OUT L/R (AUDIO) 1/2 jacks. TV Virtual Surround Sound Settings (TVS) When you connect a stereo TV or 2 front speakers, TV Virtual Surround lets you set to "OFF" in "AUDIO SETUP" to select one of the TVS (TV Virtual Surround) sounds. The Control...
... playing a DVD, the player does not output Dolby Digital signals from the DIGITAL OUT (COAXIAL and OPTICAL) jacks (when you enjoy surround sound effects by using actual rear speakers. TVS DYNAMIC Sound Adjustments 2 Press SURROUND repeatedly to "D-PCM") (page 59). Refer to work with the LINE OUT L/R (AUDIO) 1/2 jacks. TV Virtual Surround Sound Settings (TVS) When you connect a stereo TV or 2 front speakers, TV Virtual Surround lets you set to "OFF" in "AUDIO SETUP" to select one of the TVS (TV Virtual Surround) sounds. The Control...

Operating Instructions
Page 48
... disc for entering the password appears. 2 Enter your 4-digit password using X/x to select the digit, followed by c to move the cursor. "Custom parental control is turned off the Custom Parental Control function 1 In Step 4, select "OFF t," then press ENTER. 2 Enter your 4-digit password using X/x to select the digit, followed by c to move the cursor. To turn off the Control Menu Press O RETURN and then DISPLAY repeatedly until the Control Menu is set a playback limitation level...
... disc for entering the password appears. 2 Enter your 4-digit password using X/x to select the digit, followed by c to move the cursor. "Custom parental control is turned off the Custom Parental Control function 1 In Step 4, select "OFF t," then press ENTER. 2 Enter your 4-digit password using X/x to select the digit, followed by c to move the cursor. To turn off the Control Menu Press O RETURN and then DISPLAY repeatedly until the Control Menu is set a playback limitation level...

Operating Instructions
Page 50
... the Control Menu is turned off the Parental Control function and play the DVD after entering your password Set, "LEVEL" to the previous screen. The selection items for entering the password appears. 2 Follow Step 6 to select a geographic area as the playback limitation level, then press ENTER. To change the password 1 In Step 7, select "CHANGE PASSWORD t" using X/x, then press ENTER. To turn off . CUSTOM SETUP PARENTAL CONTROL LEVEL: STANDARD: CHANGE PASSWORD OFF OFF 8: 7: NC17 6: R 5: 10 Select the level you make a mistake...
... the Control Menu is turned off the Parental Control function and play the DVD after entering your password Set, "LEVEL" to the previous screen. The selection items for entering the password appears. 2 Follow Step 6 to select a geographic area as the playback limitation level, then press ENTER. To change the password 1 In Step 7, select "CHANGE PASSWORD t" using X/x, then press ENTER. To turn off . CUSTOM SETUP PARENTAL CONTROL LEVEL: STANDARD: CHANGE PASSWORD OFF OFF 8: 7: NC17 6: R 5: 10 Select the level you make a mistake...

Operating Instructions
Page 55
... you select "RESET" in the disc is turned off. z If you select "QUICK" in the Setup Display. "LANGUAGE SETUP" allows you will enter Quick Setup mode (page 24). Select "LANGUAGE SETUP" in Step 3, you to the default settings. Selects the language from the displayed list. Select the language from the displayed list. Settings and Adjustments continued 55 LANGUAGE SETUP OSD: DVD MENU: AUDIO: SUBTITLE: ENGLISH ENGLISH ORIGINAL AUDIO FOLLOW xOSD (On-Screen Display) Switches the display language on using the display, see "Using the Setup Display...
... you select "RESET" in the disc is turned off. z If you select "QUICK" in the Setup Display. "LANGUAGE SETUP" allows you will enter Quick Setup mode (page 24). Select "LANGUAGE SETUP" in Step 3, you to the default settings. Selects the language from the displayed list. Select the language from the displayed list. Settings and Adjustments continued 55 LANGUAGE SETUP OSD: DVD MENU: AUDIO: SUBTITLE: ENGLISH ENGLISH ORIGINAL AUDIO FOLLOW xOSD (On-Screen Display) Switches the display language on using the display, see "Using the Setup Display...
Operating Instructions
Page 57
... the player in standby mode (the power indicator lights up Parental Control and other settings. Set the timer when the player is already recorded on the TV screen in red). Turns off the screen saver. xSCREEN SAVER Turns on the player. Makes the front panel display dark. xDIMMER Adjusts the lighting of the front panel display. A preset picture stored in the player appears in the Setup Display. Starts playing the second demonstration automatically. BRIGHT DARK OFF Makes the front panel display...
... the player in standby mode (the power indicator lights up Parental Control and other settings. Set the timer when the player is already recorded on the TV screen in red). Turns off the screen saver. xSCREEN SAVER Turns on the player. Makes the front panel display dark. xDIMMER Adjusts the lighting of the front panel display. A preset picture stored in the player appears in the Setup Display. Starts playing the second demonstration automatically. BRIGHT DARK OFF Makes the front panel display...
Operating Instructions
Page 60
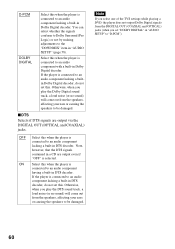
... DIGITAL OUT (COAXIAL and OPTICAL) jacks (when you play the Dolby Digital sound track, a loud noise (or no sound) will come out from the speakers, affecting your ears or causing the speakers to the "DOWNMIX" item in "AUDIO SETUP" (page 58). D-PCM Select this when the player is connected to "D-PCM"). 60 Otherwise, when you set this. You can select whether the signals conform to Dolby Surround (Pro Logic) or not by making adjustments...
... DIGITAL OUT (COAXIAL and OPTICAL) jacks (when you play the Dolby Digital sound track, a loud noise (or no sound) will come out from the speakers, affecting your ears or causing the speakers to the "DOWNMIX" item in "AUDIO SETUP" (page 58). D-PCM Select this when the player is connected to "D-PCM"). 60 Otherwise, when you set this. You can select whether the signals conform to Dolby Surround (Pro Logic) or not by making adjustments...
Limited Warranty (US Only)
Page 1
... not apply to any authorized Sony service facility. Proof of purchase in Japan This warranty does not cover damage due to improper operation or maintenance, connection to improper voltage supply, or attempted repair by Sony to state. 4-557-172-02 General Stereo/Hifi Components/Tape Decks ® CD Players/Mini Disc Players/Audio Systems Hifi Audio LIMITED WARRANTY Sony Electronics Inc. ("Sony") warrants this Product is...
... not apply to any authorized Sony service facility. Proof of purchase in Japan This warranty does not cover damage due to improper operation or maintenance, connection to improper voltage supply, or attempted repair by Sony to state. 4-557-172-02 General Stereo/Hifi Components/Tape Decks ® CD Players/Mini Disc Players/Audio Systems Hifi Audio LIMITED WARRANTY Sony Electronics Inc. ("Sony") warrants this Product is...
Operating Instructions
Page 3
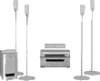
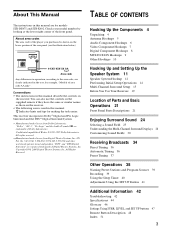
... under license from Digital Theater Systems, Inc. Conventions • The instructions in this manual are for models STR-DE475 and STR-K402. TABLE OF CONTENTS Hooking Up the Components 4 Unpacking 4 Antenna Hookups 5 Audio Component Hookups 6 Video Component Hookups 7 Digital Component Hookups 8 MULTI CH IN Hookups 9 Other Hookups 10 Hooking Up and Setting Up the Speaker System 11 Speaker System Hookup 12 Performing Initial Setup Operations 14 Multi Channel Surround Setup 15 Before You Use Your Receiver 19 Location of area code AA only". RS IMPEDANCE USE 8 - 16Ω CENTER FRONT...
... under license from Digital Theater Systems, Inc. Conventions • The instructions in this manual are for models STR-DE475 and STR-K402. TABLE OF CONTENTS Hooking Up the Components 4 Unpacking 4 Antenna Hookups 5 Audio Component Hookups 6 Video Component Hookups 7 Digital Component Hookups 8 MULTI CH IN Hookups 9 Other Hookups 10 Hooking Up and Setting Up the Speaker System 11 Speaker System Hookup 12 Performing Initial Setup Operations 14 Multi Channel Surround Setup 15 Before You Use Your Receiver 19 Location of area code AA only". RS IMPEDANCE USE 8 - 16Ω CENTER FRONT...

Operating Instructions
Page 8
... player's AC-3 RF OUT jack directly to the instruction manual supplied with sampling frequencies of a movie theater into your RF Demodulator for details on the receiver are required. BASS + VIDEO DVD/LD TV/SAT MD/TAPE CD TUNER MASTER VOLUME + - MUTING Note When making connections as the Sony MOD-RF1 (not supplied). MODE 2CH - To enjoy full effect of multi channel surround sound, five speakers (two front speakers, two surround speakers, and a center speaker) and a sub woofer are compatible with your home...
... player's AC-3 RF OUT jack directly to the instruction manual supplied with sampling frequencies of a movie theater into your RF Demodulator for details on the receiver are required. BASS + VIDEO DVD/LD TV/SAT MD/TAPE CD TUNER MASTER VOLUME + - MUTING Note When making connections as the Sony MOD-RF1 (not supplied). MODE 2CH - To enjoy full effect of multi channel surround sound, five speakers (two front speakers, two surround speakers, and a center speaker) and a sub woofer are compatible with your home...
Operating Instructions
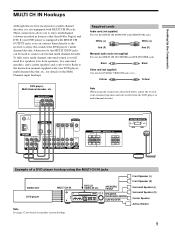
Page 9
... player MULTI CH IN DVD/LD VIDEO IN etc. TUNING + SET UP - BASS + VIDEO DVD/LD TV/SAT MD/TAPE CD TUNER MASTER VOLUME + - Front Speaker (L) Front Speaker (R) Surround Speaker (L) Surround Speaker (R) Center Speaker Active Woofer 9 SPEAKERS FRONT ? / 1 PHONES DISPLAY DIMMER MULTI CHANNEL DECODING MULTI CH IN INPUT MODE PRESET - TREBLE + - Hooking Up the Components MULTI CH IN Hookups Although this receiver incorporates a multi channel decoder, it is equipped with MULTI CH OUTPUT jacks, you can be used to enjoy multichannel software encoded in formats other than Dolby...
... player MULTI CH IN DVD/LD VIDEO IN etc. TUNING + SET UP - BASS + VIDEO DVD/LD TV/SAT MD/TAPE CD TUNER MASTER VOLUME + - Front Speaker (L) Front Speaker (R) Surround Speaker (L) Surround Speaker (R) Center Speaker Active Woofer 9 SPEAKERS FRONT ? / 1 PHONES DISPLAY DIMMER MULTI CHANNEL DECODING MULTI CH IN INPUT MODE PRESET - TREBLE + - Hooking Up the Components MULTI CH IN Hookups Although this receiver incorporates a multi channel decoder, it is equipped with MULTI CH OUTPUT jacks, you can be used to enjoy multichannel software encoded in formats other than Dolby...

Operating Instructions
Page 12
... you use speakers with low maximum input rating, adjust the volume carefully to + and - Hooking Up and Setting Up the Speaker System ] Speaker System Hookup Required cords Speaker cords (not supplied) One for each front, surround, and center speaker (+) (+) (-) (-) Monaural audio cord (not supplied) One for an active woofer Black Black } }] Front speaker (R) Front speaker (L) FM 75Ω COAXIAL AM ANTENNA ANTENNA L DIGITAL TV/SAT IN DVD/LD IN OPTICAL CENTER L COAXIAL MONITOR VIDEO IN VIDEO IN VIDEO OUT VIDEO IN VIDEO OUT AUDIO OUT R SUB FRONT SURROUND WOOFER MULTI...
... you use speakers with low maximum input rating, adjust the volume carefully to + and - Hooking Up and Setting Up the Speaker System ] Speaker System Hookup Required cords Speaker cords (not supplied) One for each front, surround, and center speaker (+) (+) (-) (-) Monaural audio cord (not supplied) One for an active woofer Black Black } }] Front speaker (R) Front speaker (L) FM 75Ω COAXIAL AM ANTENNA ANTENNA L DIGITAL TV/SAT IN DVD/LD IN OPTICAL CENTER L COAXIAL MONITOR VIDEO IN VIDEO IN VIDEO OUT VIDEO IN VIDEO OUT AUDIO OUT R SUB FRONT SURROUND WOOFER MULTI...
Operating Instructions
Page 19
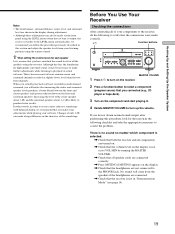
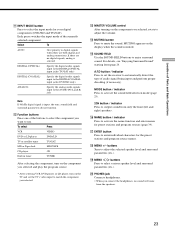
.... ?/1 Function buttons ? / 1 PHONES DISPLAY DIMMER MULTI CHANNEL DECODING MULTI CH IN INPUT MODE PRESET - Changes of only 1 dB can also be necessary to make further adjustments while listening to the LEVEL menu automatically), we recommend that you make some adjustments while playing your listening position using the LEVEL menu (when the test tone is output, the receiver switches to playback of all the speakers using the test tone. TUNING + SET UP - No sound will notice that the connections were made via the front panel using...
.... ?/1 Function buttons ? / 1 PHONES DISPLAY DIMMER MULTI CHANNEL DECODING MULTI CH IN INPUT MODE PRESET - Changes of only 1 dB can also be necessary to make further adjustments while listening to the LEVEL menu automatically), we recommend that you make some adjustments while playing your listening position using the LEVEL menu (when the test tone is output, the receiver switches to playback of all the speakers using the test tone. TUNING + SET UP - No sound will notice that the connections were made via the front panel using...
Operating Instructions
Page 22
... Specify the front, center, and surround speaker distances. (page 17) Dimmer range Specify the display to turn off when you can then make various settings using the MENU +/- TUNING + MEMORY SHIFT FM MODE FM AM MENU NAME LEVEL SOUND CONTROL SURR SOUND FIELD ENTER A.F.D. buttons (qk). When you select You can Speaker type Specify the type of Parts and Basic Operations w; FM button Selects the FM band. BASS + VIDEO DVD/LD TV/SAT MD/TAPE CD TUNER MASTER VOLUME + -
... Specify the front, center, and surround speaker distances. (page 17) Dimmer range Specify the display to turn off when you can then make various settings using the MENU +/- TUNING + MEMORY SHIFT FM MODE FM AM MENU NAME LEVEL SOUND CONTROL SURR SOUND FIELD ENTER A.F.D. buttons (qk). When you select You can Speaker type Specify the type of Parts and Basic Operations w; FM button Selects the FM band. BASS + VIDEO DVD/LD TV/SAT MD/TAPE CD TUNER MASTER VOLUME + -
Operating Instructions
Page 23
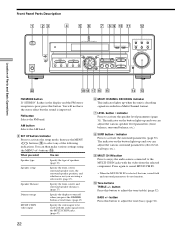
... MASTER VOLUME control After turning on the display when the sound is input, the tone, sound field and surround parameters do not function. qf MUTING button Press to enjoy surround sound. A.F.D button / indicator Press to set the TV's video input to match the component you want to adjust the volume. qk MENU +/- w; PHONES jack Connects headphones. • When you selected, rotate to use. If there are both digital and analog connections. Location of the currently selected component. Each press switches the input mode...
... MASTER VOLUME control After turning on the display when the sound is input, the tone, sound field and surround parameters do not function. qf MUTING button Press to enjoy surround sound. A.F.D button / indicator Press to set the TV's video input to match the component you want to adjust the volume. qk MENU +/- w; PHONES jack Connects headphones. • When you selected, rotate to use. If there are both digital and analog connections. Location of the currently selected component. Each press switches the input mode...

Operating Instructions
Page 28
... to indicate the speakers used to output the center and surround channel signals.* * However, this indicator does not light if the center and surround speakers are input. DIGITAL This indicator lights up when the receiver is decoding signals recorded in the Dolby Digital format. 7 OPT Lights up when the disc being played contains the LFE (Low Frequency Effect) channel and when the sound of the LFE channel signal is actually being input through the COAX terminal. 28 SP. L: Front...
... to indicate the speakers used to output the center and surround channel signals.* * However, this indicator does not light if the center and surround speakers are input. DIGITAL This indicator lights up when the receiver is decoding signals recorded in the Dolby Digital format. 7 OPT Lights up when the disc being played contains the LFE (Low Frequency Effect) channel and when the sound of the LFE channel signal is actually being input through the COAX terminal. 28 SP. L: Front...

Operating Instructions
Page 51
...on a video tape 40 S Scanning preset stations. See Automatic tuning Selecting component 21 sound field 25 Sleep timer 40 Sound field adjustable parameters 31 customizing 30 pre-programmed 25-27 resetting 32 selecting 25 Speakers adjusting speaker volume 18 connection 12 placement 16 Supplied accessories 4 Surround sound 24-33 T Test tone 18 Troubleshooting 42 Tuning automatically 36 directly 36 preset stations 37 U, V, W, X, Y, Z Unpacking 4 51 See Recording Effect level 30 H Hookups MULTI CH IN 9 AC power cord 10 antennas 5 audio components 6 digital components 8 speaker system 12 video...
...on a video tape 40 S Scanning preset stations. See Automatic tuning Selecting component 21 sound field 25 Sleep timer 40 Sound field adjustable parameters 31 customizing 30 pre-programmed 25-27 resetting 32 selecting 25 Speakers adjusting speaker volume 18 connection 12 placement 16 Supplied accessories 4 Surround sound 24-33 T Test tone 18 Troubleshooting 42 Tuning automatically 36 directly 36 preset stations 37 U, V, W, X, Y, Z Unpacking 4 51 See Recording Effect level 30 H Hookups MULTI CH IN 9 AC power cord 10 antennas 5 audio components 6 digital components 8 speaker system 12 video...


