
Operating Instructions
Page 2
... television reception, which the receiver is no guarantee that any changes or modifications not expressly approved in this manual could void your Sony dealer regarding this product. DAV-HDX277WC/DAV-HDX279W/ DAV-HDX576WF Serial No Date of Manufacture Marking is encouraged to try to operate this equipment. These limits are located at the rear exterior...
... television reception, which the receiver is no guarantee that any changes or modifications not expressly approved in this manual could void your Sony dealer regarding this product. DAV-HDX277WC/DAV-HDX279W/ DAV-HDX576WF Serial No Date of Manufacture Marking is encouraged to try to operate this equipment. These limits are located at the rear exterior...

Operating Instructions
Page 4
...products is as a general term for a DVD VIDEO, DVD+RW/DVD+R, and DVDRW/DVD-R. • Measurements are for DAVHDX277WC, DAV-HDX279W, and DAVHDX576WF. For details on the remote. • The instructions in this manual are expressed in feet (ft) for ... setting is underlined. The following S-AIR products can be used as follows: • DAV-HDX277WC: Surround amplifier (optional) S-AIR receiver (supplied) • DAV-HDX279W: Surround amplifier (supplied) S-AIR receiver (optional) • DAV-HDX576WF: Surround amplifier (supplied) S-AIR receiver (supplied) The S-AIR product can be used ...
...products is as a general term for a DVD VIDEO, DVD+RW/DVD+R, and DVDRW/DVD-R. • Measurements are for DAVHDX277WC, DAV-HDX279W, and DAVHDX576WF. For details on the remote. • The instructions in this manual are expressed in feet (ft) for ... setting is underlined. The following S-AIR products can be used as follows: • DAV-HDX277WC: Surround amplifier (optional) S-AIR receiver (supplied) • DAV-HDX279W: Surround amplifier (supplied) S-AIR receiver (optional) • DAV-HDX576WF: Surround amplifier (supplied) S-AIR receiver (supplied) The S-AIR product can be used ...

Operating Instructions
Page 11
Getting Started DAV-HDX576WF • Front speakers (2) • Remote commander (remote) (1) • Surround amplifier (1) • Center speaker (1) • R6 (size AA) batteries (2) • Calibration mic (1) • Speaker cord cover (1) &#...
Getting Started DAV-HDX576WF • Front speakers (2) • Remote commander (remote) (1) • Surround amplifier (1) • Center speaker (1) • R6 (size AA) batteries (2) • Calibration mic (1) • Speaker cord cover (1) &#...

Operating Instructions
Page 13
... base 13US Post Bottom of the base Speaker cord , Two holes Top of the post that has two holes. Getting Started Step 1: Assembling the Speakers (DAV-HDX576WF only) Before connecting the speakers, attach the speaker stand to the speaker. (For the front speakers) Use the parts as follows: • Front speakers (2) •...
... base 13US Post Bottom of the base Speaker cord , Two holes Top of the post that has two holes. Getting Started Step 1: Assembling the Speakers (DAV-HDX576WF only) Before connecting the speakers, attach the speaker stand to the speaker. (For the front speakers) Use the parts as follows: • Front speakers (2) •...

Operating Instructions
Page 19
Dusty or dirty - Very humid D E 19US D E DAV-HDX576WF A A Front speaker (L (left)) B Front speaker (R (right)) B C Center speaker D Surround speaker (L (left )) E Surround speaker (R (right)) F Subwoofer G Unit H Surround amplifier CF G...; Do not set the speakers in an inclined position. • Do not place the speakers in locations that are: - Extremely hot or cold - Getting Started DAV-HDX279W A A Front speaker (L (left)) B Front speaker (R (right)) B C Center speaker D Surround speaker (L (left )) E Surround speaker (R (right)) F Subwoofer G Unit H Surround ...
Dusty or dirty - Very humid D E 19US D E DAV-HDX576WF A A Front speaker (L (left)) B Front speaker (R (right)) B C Center speaker D Surround speaker (L (left )) E Surround speaker (R (right)) F Subwoofer G Unit H Surround amplifier CF G...; Do not set the speakers in an inclined position. • Do not place the speakers in locations that are: - Extremely hot or cold - Getting Started DAV-HDX279W A A Front speaker (L (left)) B Front speaker (R (right)) B C Center speaker D Surround speaker (L (left )) E Surround speaker (R (right)) F Subwoofer G Unit H Surround ...

Operating Instructions
Page 21
... where reinforcement is applied. • Contact a screw shop or installer regarding the wall material or screws to be used. • Sony is not responsible for the wall material and strength. Getting Started DAV-HDX576WF For the center speaker 145 mm (5 3/4 inches) For the front speakers 8 to 10 mm (11/32 to 13/32...
... where reinforcement is applied. • Contact a screw shop or installer regarding the wall material or screws to be used. • Sony is not responsible for the wall material and strength. Getting Started DAV-HDX576WF For the center speaker 145 mm (5 3/4 inches) For the front speakers 8 to 10 mm (11/32 to 13/32...

Operating Instructions
Page 27
Getting Started DAV-HDX576WF Rear panel of the unit SPEAKER CENTER SUBWOOFER SPEAKER TV DIGITAL IN COAXIAL OPTICAL FRONT R FRONT L HDMI OUT DMPORT DC5V 0.7A MAX SPEAKER CENTER SUBWOOFER ...
Getting Started DAV-HDX576WF Rear panel of the unit SPEAKER CENTER SUBWOOFER SPEAKER TV DIGITAL IN COAXIAL OPTICAL FRONT R FRONT L HDMI OUT DMPORT DC5V 0.7A MAX SPEAKER CENTER SUBWOOFER ...

Operating Instructions
Page 30
Tip • You can accept both digital and analog signals. Getting Started DAV-HDX576WF Digital optical cord (not supplied) Digital coaxial cord (not supplied) TV DIGITAL IN COAXIAL OPTICAL or Audio cord (not supplied) TV R AUDIO IN L White Red ... the COMPONENT VIDEO IN jacks of the TV * If your TV accepts progressive format signals, use this connection and select the type of the TV (DAV-HDX277WC/DAV-HDX279W only). 30US Digital signals have priority over analog signals. (COAXIAL has priority over OPTICAL.) If the digital signal ceases, the analog signal will...
Tip • You can accept both digital and analog signals. Getting Started DAV-HDX576WF Digital optical cord (not supplied) Digital coaxial cord (not supplied) TV DIGITAL IN COAXIAL OPTICAL or Audio cord (not supplied) TV R AUDIO IN L White Red ... the COMPONENT VIDEO IN jacks of the TV * If your TV accepts progressive format signals, use this connection and select the type of the TV (DAV-HDX277WC/DAV-HDX279W only). 30US Digital signals have priority over analog signals. (COAXIAL has priority over OPTICAL.) If the digital signal ceases, the analog signal will...

Operating Instructions
Page 33
Getting Started DAV-HDX576WF Stereo mini-plug cord (not supplied) To the portable audio source Front panel SPEAKER CENTER SUBWOOFER SPEAKER TV DIGITAL IN COAXIAL OPTICAL FRONT R FRONT L HDMI ...
Getting Started DAV-HDX576WF Stereo mini-plug cord (not supplied) To the portable audio source Front panel SPEAKER CENTER SUBWOOFER SPEAKER TV DIGITAL IN COAXIAL OPTICAL FRONT R FRONT L HDMI ...

Operating Instructions
Page 37
...-ohm coaxial cable (not supplied) to connect the unit to either terminal. Outdoor FM antenna (aerial) Unit ANTENNA FM AM COAXIAL 75 37US Getting Started DAV-HDX576WF AM loop antenna (aerial) (supplied) A B Note • Cord (A) or cord (B) can be connected to an outdoor FM antenna (aerial) as possible. SPEAKER CENTER SUBWOOFER SPEAKER...
...-ohm coaxial cable (not supplied) to connect the unit to either terminal. Outdoor FM antenna (aerial) Unit ANTENNA FM AM COAXIAL 75 37US Getting Started DAV-HDX576WF AM loop antenna (aerial) (supplied) A B Note • Cord (A) or cord (B) can be connected to an outdoor FM antenna (aerial) as possible. SPEAKER CENTER SUBWOOFER SPEAKER...

Operating Instructions
Page 39
For details, refer to a wall outlet (mains). • Do not touch the terminals of the S-AIR receiver. Getting Started DAV-HDX576WF Rear panel of the unit SPEAKER CENTER SUBWOOFER SPEAKER TV DIGITAL IN COAXIAL OPTICAL FRONT R FRONT L HDMI OUT DMPORT DC5V 0.7A MAX EZW-RT10 COMPONENT ...
For details, refer to a wall outlet (mains). • Do not touch the terminals of the S-AIR receiver. Getting Started DAV-HDX576WF Rear panel of the unit SPEAKER CENTER SUBWOOFER SPEAKER TV DIGITAL IN COAXIAL OPTICAL FRONT R FRONT L HDMI OUT DMPORT DC5V 0.7A MAX EZW-RT10 COMPONENT ...

Operating Instructions
Page 40
...panel of the surround amplifier EZW-RT10 S-AIR ID A B C PAIRING SPEAKER L SURROUND SELECTOR R SURROUND SURROUND BACK To the wall outlet (mains) DAV-HDX576WF Before connecting the AC power cords (mains leads) of the unit and the surround amplifier to a wall outlet (mains), connect the front, center ... the unit to a wall outlet (mains), connect all the speakers to the unit. Getting Started 6 Connecting the AC power cords (mains leads) DAV-HDX277WC Before connecting the AC power cord (mains lead) of the surround amplifier EZW-RT10 S-AIR ID A B C PAIRING SPEAKER L SURROUND SELECTOR ...
...panel of the surround amplifier EZW-RT10 S-AIR ID A B C PAIRING SPEAKER L SURROUND SELECTOR R SURROUND SURROUND BACK To the wall outlet (mains) DAV-HDX576WF Before connecting the AC power cords (mains leads) of the unit and the surround amplifier to a wall outlet (mains), connect the front, center ... the unit to a wall outlet (mains), connect all the speakers to the unit. Getting Started 6 Connecting the AC power cords (mains leads) DAV-HDX277WC Before connecting the AC power cord (mains lead) of the surround amplifier EZW-RT10 S-AIR ID A B C PAIRING SPEAKER L SURROUND SELECTOR ...

Operating Instructions
Page 42
... by setting a different ID for each S-AIR product. Before setting, make sure that is established. Check radio reception, and set up the Wireless System (DAV-HDX279W/DAV-HDX576WF only) To use the wireless system, you use the multiple S-AIR product You can check the status of sound transmission between the unit and S-AIR...
... by setting a different ID for each S-AIR product. Before setting, make sure that is established. Check radio reception, and set up the Wireless System (DAV-HDX279W/DAV-HDX576WF only) To use the wireless system, you use the multiple S-AIR product You can check the status of sound transmission between the unit and S-AIR...
Operating Instructions
Page 44
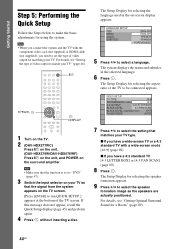
... details, see "Setting the type of the TV screen. The Setup Display for a Room" (page 89). 44US "/1 C/X/x/c, DISPLAY 1 Turn on the TV. 2 (DAV-HDX277WC) Press [/1 on the unit. (DAV-HDX279W/DAV-HDX576WF) Press [/1 on the unit, and POWER on the TV screen. [Press [ENTER] to run QUICK SETUP.] appears at the bottom of video...
... details, see "Setting the type of the TV screen. The Setup Display for a Room" (page 89). 44US "/1 C/X/x/c, DISPLAY 1 Turn on the TV. 2 (DAV-HDX277WC) Press [/1 on the unit. (DAV-HDX279W/DAV-HDX576WF) Press [/1 on the unit, and POWER on the TV screen. [Press [ENTER] to run QUICK SETUP.] appears at the bottom of video...

Operating Instructions
Page 45
... the calibration mic to children and neighbors. • Before [AUTO CALIBRATION], install the surround amplifier in the appropriate location. AUDIO IN / A.CAL MIC Calibration mic E.g., DAV-HDX576WF 12 Press C/c to select [YES]. You cannot operate following Steps with measurement. 14 Unplug the calibration mic and press C/ c to select [YES]. If you change...
... the calibration mic to children and neighbors. • Before [AUTO CALIBRATION], install the surround amplifier in the appropriate location. AUDIO IN / A.CAL MIC Calibration mic E.g., DAV-HDX576WF 12 Press C/c to select [YES]. You cannot operate following Steps with measurement. 14 Unplug the calibration mic and press C/ c to select [YES]. If you change...

Operating Instructions
Page 48
to audio files using a portable audio source, you can attenuate the input level. x DAV-HDX576WF "DVD" t "TUNER FM" t "TUNER AM" t "TV" t "SAT/CABLE" t "DMPORT" t "AUDIO" t ... Press FUNCTION +/- Select "A.F.D. To cancel, select other than "A.F.D. Changing... (COAXIAL or OPTICAL DIGITAL IN) jack (digital connection) at the same time, the digital connection takes priority. The system menu turns off . * DAV-HDX576WF only. ** DAV-HDX277WC/DAV-HDX279W only. 48US The setting is made . 6 Press SYSTEM MENU. STD." MODE" appears in the front panel display, then press or c. ...
to audio files using a portable audio source, you can attenuate the input level. x DAV-HDX576WF "DVD" t "TUNER FM" t "TUNER AM" t "TV" t "SAT/CABLE" t "DMPORT" t "AUDIO" t ... Press FUNCTION +/- Select "A.F.D. To cancel, select other than "A.F.D. Changing... (COAXIAL or OPTICAL DIGITAL IN) jack (digital connection) at the same time, the digital connection takes priority. The system menu turns off . * DAV-HDX576WF only. ** DAV-HDX277WC/DAV-HDX279W only. 48US The setting is made . 6 Press SYSTEM MENU. STD." MODE" appears in the front panel display, then press or c. ...

Operating Instructions
Page 81
... function as follows: • While you are watching the TV and the function of the system is switched to output TV sound. * DAV-HDX576WF only ** DAV-HDX277WC/DAV-HDX279W only • When you change the output method of the TV to the system speaker on the TV menu or by pressing THEATER..., loud sound may not turn the system off automatically. * DAV-HDX576WF only ** DAV-HDX277WC/DAV-HDX279W only Enjoying TV sound from the speakers in this by easy operation. For details, refer to the operating instructions of the system ...
... function as follows: • While you are watching the TV and the function of the system is switched to output TV sound. * DAV-HDX576WF only ** DAV-HDX277WC/DAV-HDX279W only • When you change the output method of the TV to the system speaker on the TV menu or by pressing THEATER..., loud sound may not turn the system off automatically. * DAV-HDX576WF only ** DAV-HDX277WC/DAV-HDX279W only Enjoying TV sound from the speakers in this by easy operation. For details, refer to the operating instructions of the system ...

Operating Instructions
Page 90
... options for [SETUP] appear. 4 Press X/x to the A.CAL MIC jack on the TV screen. 3 Press X/x to avoid measurement failure. AUDIO IN / A.CAL MIC Calibration mic E.g., DAV-HDX576WF 8 Press C/c to select [AUDIO SETUP], then press . You cannot turn the volume down. If you install the surround amplifier in stop mode. The front of...
... options for [SETUP] appear. 4 Press X/x to the A.CAL MIC jack on the TV screen. 3 Press X/x to avoid measurement failure. AUDIO IN / A.CAL MIC Calibration mic E.g., DAV-HDX576WF 8 Press C/c to select [AUDIO SETUP], then press . You cannot turn the volume down. If you install the surround amplifier in stop mode. The front of...
Operating Instructions
Page 98
... install the system near other wireless systems at the same time. • The transmission distance differs depending on the usage environment. About the surround amplifier (DAV-HDX279W/DAV-HDX576WF only) • The nameplate is located on the side exterior. • Date of radio waves and is most effective, and install the S-AIR main...
... install the system near other wireless systems at the same time. • The transmission distance differs depending on the usage environment. About the surround amplifier (DAV-HDX279W/DAV-HDX576WF only) • The nameplate is located on the side exterior. • Date of radio waves and is most effective, and install the S-AIR main...

Operating Instructions
Page 105
... not inserted correctly. • turns red - Confirm the IDs of the problem cannot be less noticeable. - Surround amplifier operation (DAV-HDX279W/DAV-HDX576WF only) If no sound. • turns green Check the status of the speakers may be found even after checking all the above...short-circuited? • Is anything blocking the ventilation holes of the surround amplifier? • After checking the above items, consult your nearest Sony dealer. Additional Information Symptom Remedy There is noise or the sound skips. • If you use another S-AIR main unit, place it more...
... not inserted correctly. • turns red - Confirm the IDs of the problem cannot be less noticeable. - Surround amplifier operation (DAV-HDX279W/DAV-HDX576WF only) If no sound. • turns green Check the status of the speakers may be found even after checking all the above...short-circuited? • Is anything blocking the ventilation holes of the surround amplifier? • After checking the above items, consult your nearest Sony dealer. Additional Information Symptom Remedy There is noise or the sound skips. • If you use another S-AIR main unit, place it more...


