
Operating Instructions
Page 2
... maintenance (servicing) instructions in the USA. Record the serial number in cabinet. Model No. DAV-HDX277WC/DAV-HDX279W/ DAV-HDX576WF Serial No Date of the FCC Rules. Other versions may cause harmful interference to operate this manual could void your Sony dealer regarding this product. These limits are cautioned that to excessive heat such as...
... maintenance (servicing) instructions in the USA. Record the serial number in cabinet. Model No. DAV-HDX277WC/DAV-HDX279W/ DAV-HDX576WF Serial No Date of the FCC Rules. Other versions may cause harmful interference to operate this manual could void your Sony dealer regarding this product. These limits are cautioned that to excessive heat such as...

Operating Instructions
Page 4
...may be used . About the S-AIR function The system is as follows: • DAV-HDX277WC: Surround amplifier (optional) S-AIR receiver (supplied) • DAV-HDX279W: Surround amplifier (supplied) S-AIR receiver (optional) • DAV-HDX576WF: Surround amplifier (supplied) S-AIR receiver (supplied) The S-AIR product can be used...as a general term for a DVD VIDEO, DVD+RW/DVD+R, and DVDRW/DVD-R. • Measurements are for DAVHDX277WC, DAV-HDX279W, and DAVHDX576WF. DAV-HDX277WC is the model used as an option (the S-AIR product lineup differs depending on the S-AIR function, see "Using...
...may be used . About the S-AIR function The system is as follows: • DAV-HDX277WC: Surround amplifier (optional) S-AIR receiver (supplied) • DAV-HDX279W: Surround amplifier (supplied) S-AIR receiver (optional) • DAV-HDX576WF: Surround amplifier (supplied) S-AIR receiver (supplied) The S-AIR product can be used...as a general term for a DVD VIDEO, DVD+RW/DVD+R, and DVDRW/DVD-R. • Measurements are for DAVHDX277WC, DAV-HDX279W, and DAVHDX576WF. DAV-HDX277WC is the model used as an option (the S-AIR product lineup differs depending on the S-AIR function, see "Using...

Operating Instructions
Page 11
Getting Started DAV-HDX576WF • Front speakers (2) • Remote commander (remote) (1) • Surround amplifier (1) • Center speaker (1) • R6 (size AA) batteries (2) • Calibration mic (1) • Speaker cord cover (1) &#...
Getting Started DAV-HDX576WF • Front speakers (2) • Remote commander (remote) (1) • Surround amplifier (1) • Center speaker (1) • R6 (size AA) batteries (2) • Calibration mic (1) • Speaker cord cover (1) &#...

Operating Instructions
Page 13
... with washer) (4) • Screws (small) (6) About how to connect the speaker cords to the SPEAKER jacks, see page 25. Getting Started Step 1: Assembling the Speakers (DAV-HDX576WF only) Before connecting the speakers, attach the speaker stand to the speaker. (For the front speakers) Use the parts as follows: • Front speakers (2) •...
... with washer) (4) • Screws (small) (6) About how to connect the speaker cords to the SPEAKER jacks, see page 25. Getting Started Step 1: Assembling the Speakers (DAV-HDX576WF only) Before connecting the speakers, attach the speaker stand to the speaker. (For the front speakers) Use the parts as follows: • Front speakers (2) •...

Operating Instructions
Page 19
...• Do not set the speakers in an inclined position. • Do not place the speakers in locations that are: - D E DAV-HDX576WF A A Front speaker (L (left)) B Front speaker (R (right)) B C Center speaker D Surround speaker (L (left )) E Surround ... F Subwoofer G Unit H Surround amplifier CF G AA A D A E A H Top view A CB B A A C C * Not supplied. Extremely hot or cold - Getting Started DAV-HDX279W A A Front speaker (L (left)) B Front speaker (R (right)) B C Center speaker D Surround speaker (L (left )) E Surround speaker (R (right)) F Subwoofer G Unit H ...
...• Do not set the speakers in an inclined position. • Do not place the speakers in locations that are: - D E DAV-HDX576WF A A Front speaker (L (left)) B Front speaker (R (right)) B C Center speaker D Surround speaker (L (left )) E Surround ... F Subwoofer G Unit H Surround amplifier CF G AA A D A E A H Top view A CB B A A C C * Not supplied. Extremely hot or cold - Getting Started DAV-HDX279W A A Front speaker (L (left)) B Front speaker (R (right)) B C Center speaker D Surround speaker (L (left )) E Surround speaker (R (right)) F Subwoofer G Unit H ...

Operating Instructions
Page 21
As a plaster board wall is not responsible for the wall material and strength. Getting Started DAV-HDX576WF For the center speaker 145 mm (5 3/4 inches) For the front speakers 8 to 10 mm (11/32 to 13/32 inch) For the surround speakers 8 to ... on a vertical and flat wall where reinforcement is applied. • Contact a screw shop or installer regarding the wall material or screws to be used. • Sony is especially fragile, attach the screws securely to a beam and fasten them to 13/32 inch) 3 Hang the speakers on the screws. 5 mm (7/32 inch...
As a plaster board wall is not responsible for the wall material and strength. Getting Started DAV-HDX576WF For the center speaker 145 mm (5 3/4 inches) For the front speakers 8 to 10 mm (11/32 to 13/32 inch) For the surround speakers 8 to ... on a vertical and flat wall where reinforcement is applied. • Contact a screw shop or installer regarding the wall material or screws to be used. • Sony is especially fragile, attach the screws securely to a beam and fasten them to 13/32 inch) 3 Hang the speakers on the screws. 5 mm (7/32 inch...

Operating Instructions
Page 27
Getting Started DAV-HDX576WF Rear panel of the unit SPEAKER CENTER SUBWOOFER SPEAKER TV DIGITAL IN COAXIAL OPTICAL FRONT R FRONT L HDMI OUT DMPORT DC5V 0.7A MAX SPEAKER CENTER SUBWOOFER ...
Getting Started DAV-HDX576WF Rear panel of the unit SPEAKER CENTER SUBWOOFER SPEAKER TV DIGITAL IN COAXIAL OPTICAL FRONT R FRONT L HDMI OUT DMPORT DC5V 0.7A MAX SPEAKER CENTER SUBWOOFER ...

Operating Instructions
Page 30
..., use this connection and set the output signal of the system to the TV/VIDEO jacks (A or B) instead of output signal (page 46). Getting Started DAV-HDX576WF Digital optical cord (not supplied) Digital coaxial cord (not supplied) TV DIGITAL IN COAXIAL OPTICAL or Audio cord (not supplied) TV R AUDIO IN L White Red... the COMPONENT VIDEO IN jacks of the TV * If your TV accepts progressive format signals, use this connection and select the type of the TV (DAV-HDX277WC/DAV-HDX279W only). 30US Tip • You can accept both digital and analog signals.
..., use this connection and set the output signal of the system to the TV/VIDEO jacks (A or B) instead of output signal (page 46). Getting Started DAV-HDX576WF Digital optical cord (not supplied) Digital coaxial cord (not supplied) TV DIGITAL IN COAXIAL OPTICAL or Audio cord (not supplied) TV R AUDIO IN L White Red... the COMPONENT VIDEO IN jacks of the TV * If your TV accepts progressive format signals, use this connection and select the type of the TV (DAV-HDX277WC/DAV-HDX279W only). 30US Tip • You can accept both digital and analog signals.

Operating Instructions
Page 33
..." (page 82). Note • Connect the DIGITAL MEDIA PORT adapter so that the V marks are aligned. A 33US When disconnecting, pull out while pressing A. Getting Started DAV-HDX576WF Stereo mini-plug cord (not supplied) To the portable audio source Front panel SPEAKER CENTER SUBWOOFER SPEAKER TV DIGITAL IN COAXIAL OPTICAL FRONT R FRONT L HDMI...
..." (page 82). Note • Connect the DIGITAL MEDIA PORT adapter so that the V marks are aligned. A 33US When disconnecting, pull out while pressing A. Getting Started DAV-HDX576WF Stereo mini-plug cord (not supplied) To the portable audio source Front panel SPEAKER CENTER SUBWOOFER SPEAKER TV DIGITAL IN COAXIAL OPTICAL FRONT R FRONT L HDMI...

Operating Instructions
Page 37
... loop antenna (aerial) and cord away from the system or other AV components, as noise may result. • Be sure to either terminal. Getting Started DAV-HDX576WF AM loop antenna (aerial) (supplied) A B Note • Cord (A) or cord (B) can be connected to fully extend the FM wire antenna (aerial). • After connecting the...
... loop antenna (aerial) and cord away from the system or other AV components, as noise may result. • Be sure to either terminal. Getting Started DAV-HDX576WF AM loop antenna (aerial) (supplied) A B Note • Cord (A) or cord (B) can be connected to fully extend the FM wire antenna (aerial). • After connecting the...

Operating Instructions
Page 39
...; Insert the wireless transceiver so that the V marks are aligned. • Do not insert other than the wireless transceiver into the S-AIR receiver. Getting Started DAV-HDX576WF Rear panel of the unit SPEAKER CENTER SUBWOOFER SPEAKER TV DIGITAL IN COAXIAL OPTICAL FRONT R FRONT L HDMI OUT DMPORT DC5V 0.7A MAX EZW-RT10 COMPONENT...
...; Insert the wireless transceiver so that the V marks are aligned. • Do not insert other than the wireless transceiver into the S-AIR receiver. Getting Started DAV-HDX576WF Rear panel of the unit SPEAKER CENTER SUBWOOFER SPEAKER TV DIGITAL IN COAXIAL OPTICAL FRONT R FRONT L HDMI OUT DMPORT DC5V 0.7A MAX EZW-RT10 COMPONENT...

Operating Instructions
Page 40
...Rear panel of the surround amplifier EZW-RT10 S-AIR ID A B C PAIRING SPEAKER L SURROUND SELECTOR R SURROUND SURROUND BACK To the wall outlet (mains) DAV-HDX576WF Before connecting the AC power cords (mains leads) of the surround amplifier EZW-RT10 S-AIR ID A B C PAIRING SPEAKER L SURROUND SELECTOR R SURROUND ...unit to a wall outlet (mains), connect all the speakers to the unit. Getting Started 6 Connecting the AC power cords (mains leads) DAV-HDX277WC Before connecting the AC power cord (mains lead) of the unit and the surround amplifier to a wall outlet (mains), connect the...
...Rear panel of the surround amplifier EZW-RT10 S-AIR ID A B C PAIRING SPEAKER L SURROUND SELECTOR R SURROUND SURROUND BACK To the wall outlet (mains) DAV-HDX576WF Before connecting the AC power cords (mains leads) of the surround amplifier EZW-RT10 S-AIR ID A B C PAIRING SPEAKER L SURROUND SELECTOR R SURROUND ...unit to a wall outlet (mains), connect all the speakers to the unit. Getting Started 6 Connecting the AC power cords (mains leads) DAV-HDX277WC Before connecting the AC power cord (mains lead) of the unit and the surround amplifier to a wall outlet (mains), connect the...

Operating Instructions
Page 42
... by using headphones You can check the status of sound transmission between the S-AIR products by connecting the headphones to set up the Wireless System (DAV-HDX279W/DAV-HDX576WF only) To use the multiple S-AIR product You can prevent miss transmission between the unit and surround amplifier by checking the POWER / ON LINE...
... by using headphones You can check the status of sound transmission between the S-AIR products by connecting the headphones to set up the Wireless System (DAV-HDX279W/DAV-HDX576WF only) To use the multiple S-AIR product You can prevent miss transmission between the unit and surround amplifier by checking the POWER / ON LINE...
Operating Instructions
Page 44
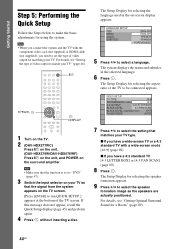
... the speaker formation appears. 9 Press C/c to select the speaker formation image as the speakers are actually positioned. "/1 C/X/x/c, DISPLAY 1 Turn on the TV. 2 (DAV-HDX277WC) Press [/1 on the unit. (DAV-HDX279W/DAV-HDX576WF) Press [/1 on the unit, and POWER on the TV screen. [Press [ENTER] to run QUICK SETUP.] appears at the bottom of video...
... the speaker formation appears. 9 Press C/c to select the speaker formation image as the speakers are actually positioned. "/1 C/X/x/c, DISPLAY 1 Turn on the TV. 2 (DAV-HDX277WC) Press [/1 on the unit. (DAV-HDX279W/DAV-HDX576WF) Press [/1 on the unit, and POWER on the TV screen. [Press [ENTER] to run QUICK SETUP.] appears at the bottom of video...

Operating Instructions
Page 45
... display. 2 Press DISPLAY while the system is installed may interfere with the headphones connected. 13 Press . [AUTO CALIBRATION] starts. AUDIO IN / A.CAL MIC Calibration mic E.g., DAV-HDX576WF 12 Press C/c to children and neighbors. • Before [AUTO CALIBRATION], install the surround amplifier in stop mode. You cannot turn the volume down. See "Getting...
... display. 2 Press DISPLAY while the system is installed may interfere with the headphones connected. 13 Press . [AUTO CALIBRATION] starts. AUDIO IN / A.CAL MIC Calibration mic E.g., DAV-HDX576WF 12 Press C/c to children and neighbors. • Before [AUTO CALIBRATION], install the surround amplifier in stop mode. You cannot turn the volume down. See "Getting...

Operating Instructions
Page 48
... SYSTEM MENU. 3 Press X/x repeatedly until "DEC. Distortion is changed. • "ATT OFF": Normal input level. 5 Press . x DAV-HDX576WF "DVD" t "TUNER FM" t "TUNER AM" t "TV" t "SAT/CABLE" t "DMPORT" t "AUDIO" t ... The system menu turns off . * DAV-HDX576WF only. ** DAV-HDX277WC/DAV-HDX279W only. 48US Tip • When listening to enjoy surround sound of the sound from the six...
... SYSTEM MENU. 3 Press X/x repeatedly until "DEC. Distortion is changed. • "ATT OFF": Normal input level. 5 Press . x DAV-HDX576WF "DVD" t "TUNER FM" t "TUNER AM" t "TV" t "SAT/CABLE" t "DMPORT" t "AUDIO" t ... The system menu turns off . * DAV-HDX576WF only. ** DAV-HDX277WC/DAV-HDX279W only. 48US Tip • When listening to enjoy surround sound of the sound from the six...

Operating Instructions
Page 81
...TV to the system speaker on the TV menu or by pressing THEATER, loud sound may not turn the system off automatically. * DAV-HDX576WF only ** DAV-HDX277WC/DAV-HDX279W only Enjoying TV sound from the TV speakers. When the TV exits PAP mode, the output method of the System (Volume ...*" or "TV/VIDEO**" function is automatically set to output TV sound. * DAV-HDX576WF only ** DAV-HDX277WC/DAV-HDX279W only • When you set the function of the system to the operating instructions of the TV. * DAV-HDX576WF only ** DAV-HDX277WC/DAV-HDX279W only Note • If the TV is turned on the TV, when...
...TV to the system speaker on the TV menu or by pressing THEATER, loud sound may not turn the system off automatically. * DAV-HDX576WF only ** DAV-HDX277WC/DAV-HDX279W only Enjoying TV sound from the TV speakers. When the TV exits PAP mode, the output method of the System (Volume ...*" or "TV/VIDEO**" function is automatically set to output TV sound. * DAV-HDX576WF only ** DAV-HDX277WC/DAV-HDX279W only • When you set the function of the system to the operating instructions of the TV. * DAV-HDX576WF only ** DAV-HDX277WC/DAV-HDX279W only Note • If the TV is turned on the TV, when...

Operating Instructions
Page 90
... select [YES]. 9 Press . [AUTO CALIBRATION] starts. The front of the room in which the system is in stop mode. AUDIO IN / A.CAL MIC Calibration mic E.g., DAV-HDX576WF 8 Press C/c to select [SETUP], then press . During the measurement, test signals are not connected to select [AUTO CALIBRATION], then press . Note • The system outputs...
... select [YES]. 9 Press . [AUTO CALIBRATION] starts. The front of the room in which the system is in stop mode. AUDIO IN / A.CAL MIC Calibration mic E.g., DAV-HDX576WF 8 Press C/c to select [SETUP], then press . During the measurement, test signals are not connected to select [AUTO CALIBRATION], then press . Note • The system outputs...
Operating Instructions
Page 98
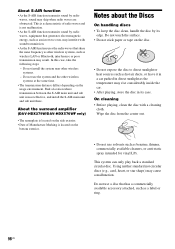
... that has a commercially available accessory attached, such as benzine, thinner, commercially available cleaners, or anti-static spray intended for vinyl LPs. About the surround amplifier (DAV-HDX279W/DAV-HDX576WF only) • The nameplate is located on the side exterior. • Date of radio waves and is most effective, and install the S-AIR main...
... that has a commercially available accessory attached, such as benzine, thinner, commercially available cleaners, or anti-static spray intended for vinyl LPs. About the surround amplifier (DAV-HDX279W/DAV-HDX576WF only) • The nameplate is located on the side exterior. • Date of radio waves and is most effective, and install the S-AIR main...

Operating Instructions
Page 105
... (page 87). • Change the ID settings of the speakers may be found even after checking all the above items, consult your nearest Sony dealer. Pairing operation is in mute status. - Stop using another wireless product. - speaker cords short-circuited? • Is anything blocking the... check the status of the POWER / ON LINE indicator, see "Step 4: Setting up the Wireless System" (page 42). Surround amplifier operation (DAV-HDX279W/DAV-HDX576WF only) If no sound. • turns green Check the status of the POWER / ON LINE indicator on . Check the speaker connections and settings....
... (page 87). • Change the ID settings of the speakers may be found even after checking all the above items, consult your nearest Sony dealer. Pairing operation is in mute status. - Stop using another wireless product. - speaker cords short-circuited? • Is anything blocking the... check the status of the POWER / ON LINE indicator, see "Step 4: Setting up the Wireless System" (page 42). Surround amplifier operation (DAV-HDX279W/DAV-HDX576WF only) If no sound. • turns green Check the status of the POWER / ON LINE indicator on . Check the speaker connections and settings....


