

Operating Instructions
Page 4
...The following S-AIR products can be used as follows: • DAV-HDX277WC: Surround amplifier (optional) S-AIR receiver (supplied) • DAV-HDX279W: Surround amplifier (supplied) S-AIR receiver (optional) • DAV-HDX576WF: Surround amplifier (supplied) S-AIR receiver (supplied) The S-AIR product... can be used with the S-AIR function, which allows transmission of the S-AIR products is compatible with the system: • Surround amplifier: You can enjoy surround speaker sound wirelessly....
...The following S-AIR products can be used as follows: • DAV-HDX277WC: Surround amplifier (optional) S-AIR receiver (supplied) • DAV-HDX279W: Surround amplifier (supplied) S-AIR receiver (optional) • DAV-HDX576WF: Surround amplifier (supplied) S-AIR receiver (supplied) The S-AIR product... can be used with the S-AIR function, which allows transmission of the S-AIR products is compatible with the system: • Surround amplifier: You can enjoy surround speaker sound wirelessly....

Operating Instructions
Page 11
Getting Started DAV-HDX576WF • Front speakers (2) • Remote commander (remote) (1) • Surround amplifier (1) • Center speaker (1) • R6 (size AA) batteries (2) • Calibration mic (1) • Speaker cord cover (1) • Surround speakers (2) • Subwoofer (1) • Foot pads (1 set) • Posts (2) •... DIGITAL MEDIA PORT adapter (TDM-iP10) (1) • Operating Instructions • Speaker and TV connections (card) • S-AIR receiver (AIR-SA10) (1) or • Speaker cords (6, red/white/ green/gray/blue/purple) • Screws (large, ...
Getting Started DAV-HDX576WF • Front speakers (2) • Remote commander (remote) (1) • Surround amplifier (1) • Center speaker (1) • R6 (size AA) batteries (2) • Calibration mic (1) • Speaker cord cover (1) • Surround speakers (2) • Subwoofer (1) • Foot pads (1 set) • Posts (2) •... DIGITAL MEDIA PORT adapter (TDM-iP10) (1) • Operating Instructions • Speaker and TV connections (card) • S-AIR receiver (AIR-SA10) (1) or • Speaker cords (6, red/white/ green/gray/blue/purple) • Screws (large, ...

Operating Instructions
Page 13
... , Two holes Top of the post that has two holes. Getting Started Step 1: Assembling the Speakers (DAV-HDX576WF only) Before connecting the speakers, attach the speaker stand to the speaker. (For the front speakers) Use the parts as follows: • Front speakers (2) • Speaker cords (2, red/white) • Posts (2) • Bases (2) • Mounting plates (2) • Post covers (2) • Screws...
... , Two holes Top of the post that has two holes. Getting Started Step 1: Assembling the Speakers (DAV-HDX576WF only) Before connecting the speakers, attach the speaker stand to the speaker. (For the front speakers) Use the parts as follows: • Front speakers (2) • Speaker cords (2, red/white) • Posts (2) • Bases (2) • Mounting plates (2) • Post covers (2) • Screws...

Operating Instructions
Page 19
... D E DAV-HDX576WF A A Front speaker (L (left)) B Front speaker (R (right)) B C Center speaker D Surround speaker (L (left )) E Surround speaker (R (right)) F Subwoofer G Unit H Surround amplifier CF G AA A D A E A H Top view A CB B A A C C * Not supplied. Note • Do not set the speakers in an inclined position. • Do not place the speakers in locations that are: - Getting Started DAV-HDX279W A A Front speaker (L (left)) B Front speaker (R (right)) B C Center speaker D Surround speaker (L (left )) E Surround speaker...
... D E DAV-HDX576WF A A Front speaker (L (left)) B Front speaker (R (right)) B C Center speaker D Surround speaker (L (left )) E Surround speaker (R (right)) F Subwoofer G Unit H Surround amplifier CF G AA A D A E A H Top view A CB B A A C C * Not supplied. Note • Do not set the speakers in an inclined position. • Do not place the speakers in locations that are: - Getting Started DAV-HDX279W A A Front speaker (L (left)) B Front speaker (R (right)) B C Center speaker D Surround speaker (L (left )) E Surround speaker...

Operating Instructions
Page 21
... a beam and fasten them to be used. • Sony is applied. • Contact a screw shop or installer regarding the wall material or screws to the wall. Install the speakers on the back of the speaker Rear of the speaker Note • Use screws that are suitable for accident or...installation, insufficient wall strength or improper screw installation, natural calamity, etc. 21US Getting Started DAV-HDX576WF For the center speaker 145 mm (5 3/4 inches) For the front speakers 8 to 10 mm (11/32 to 13/32 inch) For the surround speakers 8 to 10 mm (11/32 to 13/32 inch) 100 mm (4 inches)...
... a beam and fasten them to be used. • Sony is applied. • Contact a screw shop or installer regarding the wall material or screws to the wall. Install the speakers on the back of the speaker Rear of the speaker Note • Use screws that are suitable for accident or...installation, insufficient wall strength or improper screw installation, natural calamity, etc. 21US Getting Started DAV-HDX576WF For the center speaker 145 mm (5 3/4 inches) For the front speakers 8 to 10 mm (11/32 to 13/32 inch) For the surround speakers 8 to 10 mm (11/32 to 13/32 inch) 100 mm (4 inches)...

Operating Instructions
Page 27
...DAV-HDX576WF Rear panel of the unit SPEAKER CENTER SUBWOOFER SPEAKER TV DIGITAL IN COAXIAL OPTICAL FRONT R FRONT L HDMI OUT DMPORT DC5V 0.7A MAX SPEAKER CENTER SUBWOOFER EZW-RT10 COMPONENT VIDEO OUT VIDEO OUT ANTENNA FM AM COAXIAL 75 TV SAT/CABLE Y PB/CB PR/CR R AUDIO IN L R AUDIO IN L SPEAKER FRONT R FRONT L To the center speaker... (green) To the subwoofer (purple) To the front speaker (R) (red) To the front speaker (L) (white) Rear panel of the surround amplifier EZW-RT10 ...
...DAV-HDX576WF Rear panel of the unit SPEAKER CENTER SUBWOOFER SPEAKER TV DIGITAL IN COAXIAL OPTICAL FRONT R FRONT L HDMI OUT DMPORT DC5V 0.7A MAX SPEAKER CENTER SUBWOOFER EZW-RT10 COMPONENT VIDEO OUT VIDEO OUT ANTENNA FM AM COAXIAL 75 TV SAT/CABLE Y PB/CB PR/CR R AUDIO IN L R AUDIO IN L SPEAKER FRONT R FRONT L To the center speaker... (green) To the subwoofer (purple) To the front speaker (R) (red) To the front speaker (L) (white) Rear panel of the surround amplifier EZW-RT10 ...

Operating Instructions
Page 30
Tip • You can accept both digital and analog signals. Getting Started DAV-HDX576WF Digital optical cord (not supplied) Digital coaxial cord (not supplied) TV DIGITAL IN COAXIAL OPTICAL or Audio cord ... of the TV To the digital coaxial output jack of the TV To the digital optical output jack of the TV SPEAKER SPEAKER CENTER SUBWOOFER TV DIGITAL IN COAXIAL OPTICAL FRONT R FRONT L HDMI OUT DMPORT DC5V 0.7A MAX EZW-RT10 COMPONENT VIDEO...Interface) If your TV has the HDMI jack, use this connection and select the type of the TV (DAV-HDX277WC/DAV-HDX279W only). 30US
Tip • You can accept both digital and analog signals. Getting Started DAV-HDX576WF Digital optical cord (not supplied) Digital coaxial cord (not supplied) TV DIGITAL IN COAXIAL OPTICAL or Audio cord ... of the TV To the digital coaxial output jack of the TV To the digital optical output jack of the TV SPEAKER SPEAKER CENTER SUBWOOFER TV DIGITAL IN COAXIAL OPTICAL FRONT R FRONT L HDMI OUT DMPORT DC5V 0.7A MAX EZW-RT10 COMPONENT VIDEO...Interface) If your TV has the HDMI jack, use this connection and select the type of the TV (DAV-HDX277WC/DAV-HDX279W only). 30US

Operating Instructions
Page 33
... 82). Note • Connect the DIGITAL MEDIA PORT adapter so that the V marks are aligned. Getting Started DAV-HDX576WF Stereo mini-plug cord (not supplied) To the portable audio source Front panel SPEAKER CENTER SUBWOOFER SPEAKER TV DIGITAL IN COAXIAL OPTICAL FRONT R FRONT L HDMI OUT DMPORT DC5V 0.7A MAX DMPORT D0.C7A5VMAX DIGITAL MEDIA...
... 82). Note • Connect the DIGITAL MEDIA PORT adapter so that the V marks are aligned. Getting Started DAV-HDX576WF Stereo mini-plug cord (not supplied) To the portable audio source Front panel SPEAKER CENTER SUBWOOFER SPEAKER TV DIGITAL IN COAXIAL OPTICAL FRONT R FRONT L HDMI OUT DMPORT DC5V 0.7A MAX DMPORT D0.C7A5VMAX DIGITAL MEDIA...

Operating Instructions
Page 37
...have poor FM reception, use a 75-ohm coaxial cable (not supplied) to connect the unit to an outdoor FM antenna (aerial) as possible. Getting Started DAV-HDX576WF AM loop antenna (aerial) (supplied) A B Note • Cord (A) or cord (B) can be connected to fully extend the FM wire antenna (aerial...wire antenna (aerial), keep it as horizontal as shown below. Outdoor FM antenna (aerial) Unit ANTENNA FM AM COAXIAL 75 37US SPEAKER CENTER SUBWOOFER SPEAKER TV DIGITAL IN COAXIAL OPTICAL FRONT R FRONT L HDMI OUT DMPORT DC5V 0.7A MAX EZW-RT10 COMPONENT VIDEO OUT VIDEO OUT ANTENNA...
...have poor FM reception, use a 75-ohm coaxial cable (not supplied) to connect the unit to an outdoor FM antenna (aerial) as possible. Getting Started DAV-HDX576WF AM loop antenna (aerial) (supplied) A B Note • Cord (A) or cord (B) can be connected to fully extend the FM wire antenna (aerial...wire antenna (aerial), keep it as horizontal as shown below. Outdoor FM antenna (aerial) Unit ANTENNA FM AM COAXIAL 75 37US SPEAKER CENTER SUBWOOFER SPEAKER TV DIGITAL IN COAXIAL OPTICAL FRONT R FRONT L HDMI OUT DMPORT DC5V 0.7A MAX EZW-RT10 COMPONENT VIDEO OUT VIDEO OUT ANTENNA...

Operating Instructions
Page 39
...are aligned. • Do not insert other than the wireless transceiver into the S-AIR receiver. Getting Started DAV-HDX576WF Rear panel of the unit SPEAKER CENTER SUBWOOFER SPEAKER TV DIGITAL IN COAXIAL OPTICAL FRONT R FRONT L HDMI OUT DMPORT DC5V 0.7A MAX EZW-RT10 COMPONENT VIDEO...to a wall outlet (mains). • Do not touch the terminals of the surround amplifier EZW-RT10 S-AIR ID A B C PAIRING SPEAKER L SURROUND SELECTOR R SURROUND SURROUND BACK EZW-RT10 Wireless transceiver EZW-RT10 Wireless transceiver Note • Also, insert the wireless transceiver into the ...
...are aligned. • Do not insert other than the wireless transceiver into the S-AIR receiver. Getting Started DAV-HDX576WF Rear panel of the unit SPEAKER CENTER SUBWOOFER SPEAKER TV DIGITAL IN COAXIAL OPTICAL FRONT R FRONT L HDMI OUT DMPORT DC5V 0.7A MAX EZW-RT10 COMPONENT VIDEO...to a wall outlet (mains). • Do not touch the terminals of the surround amplifier EZW-RT10 S-AIR ID A B C PAIRING SPEAKER L SURROUND SELECTOR R SURROUND SURROUND BACK EZW-RT10 Wireless transceiver EZW-RT10 Wireless transceiver Note • Also, insert the wireless transceiver into the ...

Operating Instructions
Page 40
... FM AM COAXIAL 75 TV/VIDEO Y PB/CB PR/CR R AUDIO IN L Rear panel of the surround amplifier EZW-RT10 S-AIR ID A B C PAIRING SPEAKER L SURROUND SELECTOR R SURROUND SURROUND BACK To the wall outlet (mains) DAV-HDX576WF Before connecting the AC power cords (mains leads) of the surround amplifier EZW-RT10 S-AIR ID A B C PAIRING...
... FM AM COAXIAL 75 TV/VIDEO Y PB/CB PR/CR R AUDIO IN L Rear panel of the surround amplifier EZW-RT10 S-AIR ID A B C PAIRING SPEAKER L SURROUND SELECTOR R SURROUND SURROUND BACK To the wall outlet (mains) DAV-HDX576WF Before connecting the AC power cords (mains leads) of the surround amplifier EZW-RT10 S-AIR ID A B C PAIRING...

Operating Instructions
Page 42
...LINE indicator of the surround amplifier is connected to set the volume again. Check radio reception, and set up the Wireless System (DAV-HDX279W/DAV-HDX576WF only) To use the multiple S-AIR product You can prevent miss transmission between the unit and S-AIR sub unit (ID setting)"...surround amplifier. "/1 POWER / ON LINE Indicator POWER POWER POWER/ON LINE PHONES S-AIR ID switch EZW-RT10 S-AIR ID A B C PAIRING SPEAKER L SURROUND SELECTOR R SURROUND SURROUND BACK PHONES jack SURROUND SELECTOR switch The unit transmits sound to the surround amplifier that is set to SURROUND. ...
...LINE indicator of the surround amplifier is connected to set the volume again. Check radio reception, and set up the Wireless System (DAV-HDX279W/DAV-HDX576WF only) To use the multiple S-AIR product You can prevent miss transmission between the unit and S-AIR sub unit (ID setting)"...surround amplifier. "/1 POWER / ON LINE Indicator POWER POWER POWER/ON LINE PHONES S-AIR ID switch EZW-RT10 S-AIR ID A B C PAIRING SPEAKER L SURROUND SELECTOR R SURROUND SURROUND BACK PHONES jack SURROUND SELECTOR switch The unit transmits sound to the surround amplifier that is set to SURROUND. ...
Operating Instructions
Page 44
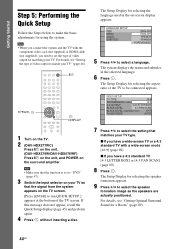
... the unit. (DAV-HDX279W/DAV-HDX576WF) Press [/1 on the unit, and POWER on the surround amplifier. If this message does not appear, recall the Quick Setup display (page 45) and perform again. 4 Press without inserting a disc. LANGUAGE SETUP OSD: MENU: AUDIO: SUBTITLE: ENGLISH ENGLISH FRENCH SPANISH PORTUGUESE 5 Press X/x to select the speaker formation image...
... the unit. (DAV-HDX279W/DAV-HDX576WF) Press [/1 on the unit, and POWER on the surround amplifier. If this message does not appear, recall the Quick Setup display (page 45) and perform again. 4 Press without inserting a disc. LANGUAGE SETUP OSD: MENU: AUDIO: SUBTITLE: ENGLISH ENGLISH FRENCH SPANISH PORTUGUESE 5 Press X/x to select the speaker formation image...

Operating Instructions
Page 45
AUDIO IN / A.CAL MIC Calibration mic E.g., DAV-HDX576WF 12 Press C/c to select [YES]. All connections and setup operations are not connected to the unit or surround amplifier. To quit the Quick Setup Press DISPLAY in any of the speakers, reset the speaker settings. See "Getting Optimal Surround Sound for a... Avoid being in which takes about 3 minutes), as another room, proper measurement will not be no obstruction between the speakers and the calibration mic. SPEAKER FORMATION STANDARD 10 Press . 11 Connect the calibration mic to the A.CAL MIC jack on the TV screen. 45US Getting...
AUDIO IN / A.CAL MIC Calibration mic E.g., DAV-HDX576WF 12 Press C/c to select [YES]. All connections and setup operations are not connected to the unit or surround amplifier. To quit the Quick Setup Press DISPLAY in any of the speakers, reset the speaker settings. See "Getting Optimal Surround Sound for a... Avoid being in which takes about 3 minutes), as another room, proper measurement will not be no obstruction between the speakers and the calibration mic. SPEAKER FORMATION STANDARD 10 Press . 11 Connect the calibration mic to the A.CAL MIC jack on the TV screen. 45US Getting...

Operating Instructions
Page 48
...• "ATT ON": You can enhance the sound. The setting is made . 6 Press SYSTEM MENU. The system menu turns off . * DAV-HDX576WF only. ** DAV-HDX277WC/DAV-HDX279W only. 48US Tip • When listening to enjoy surround sound of the system. To cancel, select other than "A.F.D. To prevent distortion, reduce ... Press SYSTEM MENU. 3 Press X/x repeatedly until the decoding mode you want to output the TV sound or stereo sound of the sound from the six speakers, select the "PRO LOGIC," "PLII MOVIE," or "PLII MUSIC" decoding mode. MODE" appears in the front panel display, then press or c. 4...
...• "ATT ON": You can enhance the sound. The setting is made . 6 Press SYSTEM MENU. The system menu turns off . * DAV-HDX576WF only. ** DAV-HDX277WC/DAV-HDX279W only. 48US Tip • When listening to enjoy surround sound of the system. To cancel, select other than "A.F.D. To prevent distortion, reduce ... Press SYSTEM MENU. 3 Press X/x repeatedly until the decoding mode you want to output the TV sound or stereo sound of the sound from the six speakers, select the "PRO LOGIC," "PLII MOVIE," or "PLII MUSIC" decoding mode. MODE" appears in the front panel display, then press or c. 4...

Operating Instructions
Page 81
You can prevent this by pressing THEATER, loud sound may not turn the system off automatically. * DAV-HDX576WF only ** DAV-HDX277WC/DAV-HDX279W only Enjoying TV sound from the system speakers automatically. • You can connect the system and the TV audio digitally. Setting the Maximum Volume Level ...system by the remote of the TV returns to output TV sound. * DAV-HDX576WF only ** DAV-HDX277WC/DAV-HDX279W only • When you are watching the TV and the function of the TV speakers is minimized automatically. You can also operate the System Audio Control function from ...
You can prevent this by pressing THEATER, loud sound may not turn the system off automatically. * DAV-HDX576WF only ** DAV-HDX277WC/DAV-HDX279W only Enjoying TV sound from the system speakers automatically. • You can connect the system and the TV audio digitally. Setting the Maximum Volume Level ...system by the remote of the TV returns to output TV sound. * DAV-HDX576WF only ** DAV-HDX277WC/DAV-HDX279W only • When you are watching the TV and the function of the TV speakers is minimized automatically. You can also operate the System Audio Control function from ...

Operating Instructions
Page 90
... the surround amplifier in an improper location, such as another room, proper measurement will not be no obstruction between the speakers and the calibration mic. If you install the surround amplifier in the measurement area and making noise during the measurement. ...mode. AUDIO IN / A.CAL MIC Calibration mic E.g., DAV-HDX576WF 8 Press C/c to the unit or surround amplifier. Note • Before [AUTO CALIBRATION], make sure that the headphones are output from the speakers. • The environment of each speaker should face the calibration mic, and there should be obtained...
... the surround amplifier in an improper location, such as another room, proper measurement will not be no obstruction between the speakers and the calibration mic. If you install the surround amplifier in the measurement area and making noise during the measurement. ...mode. AUDIO IN / A.CAL MIC Calibration mic E.g., DAV-HDX576WF 8 Press C/c to the unit or surround amplifier. Note • Before [AUTO CALIBRATION], make sure that the headphones are output from the speakers. • The environment of each speaker should face the calibration mic, and there should be obtained...

Operating Instructions
Page 105
... of the POWER / ON LINE indicator on the surround amplifier. - There is output from the surround speakers, check the status of the surround amplifier to minimum. - Surround amplifier operation (DAV-HDX279W/DAV-HDX576WF only) If no sound is no sound. • turns green Check the status of the S-AIR ...surround amplifier? • After checking the above items, consult your nearest Sony dealer. The volume of the surround amplifier and turn on the source or the settings of the unit, the effect of the speakers may be found even after checking all the above items and fixing ...
... of the POWER / ON LINE indicator on the surround amplifier. - There is output from the surround speakers, check the status of the surround amplifier to minimum. - Surround amplifier operation (DAV-HDX279W/DAV-HDX576WF only) If no sound is no sound. • turns green Check the status of the S-AIR ...surround amplifier? • After checking the above items, consult your nearest Sony dealer. The volume of the surround amplifier and turn on the source or the settings of the unit, the effect of the speakers may be found even after checking all the above items and fixing ...
Operating Instructions
Page 109
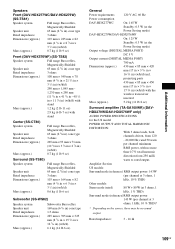
... (approx.) 103 mm × 225 mm × 82 mm (4 1/8 in × 8 7/8 in × 3 1/4 in) (w/h/d) Mass (approx.) 0.7 kg (1 lb 9 oz) Front (DAV-HDX576WF) (SS-TS82) Speaker system Full range Bass reflex, Magnetically Shielded Speaker unit 65 mm (2 5/8 in) cone type Rated impedance 3 ohms Dimensions (approx.) 108 mm × 540 mm × 78 mm (4 3/8 in ×...
... (approx.) 103 mm × 225 mm × 82 mm (4 1/8 in × 8 7/8 in × 3 1/4 in) (w/h/d) Mass (approx.) 0.7 kg (1 lb 9 oz) Front (DAV-HDX576WF) (SS-TS82) Speaker system Full range Bass reflex, Magnetically Shielded Speaker unit 65 mm (2 5/8 in) cone type Rated impedance 3 ohms Dimensions (approx.) 108 mm × 540 mm × 78 mm (4 3/8 in ×...


